
💡 For example, you’re an admin at a tutoring centre and you’re running: SNBT 2027 Mathematics Prep Tryout For this exam, you create one question package called: Penalaran Matematika (Mathematical Reasoning) You then fill the package with 40 multiple-choice questions and their correct answers.
- Create or add a question package
- Create the questions and answers inside that package
1. The Question Package Page
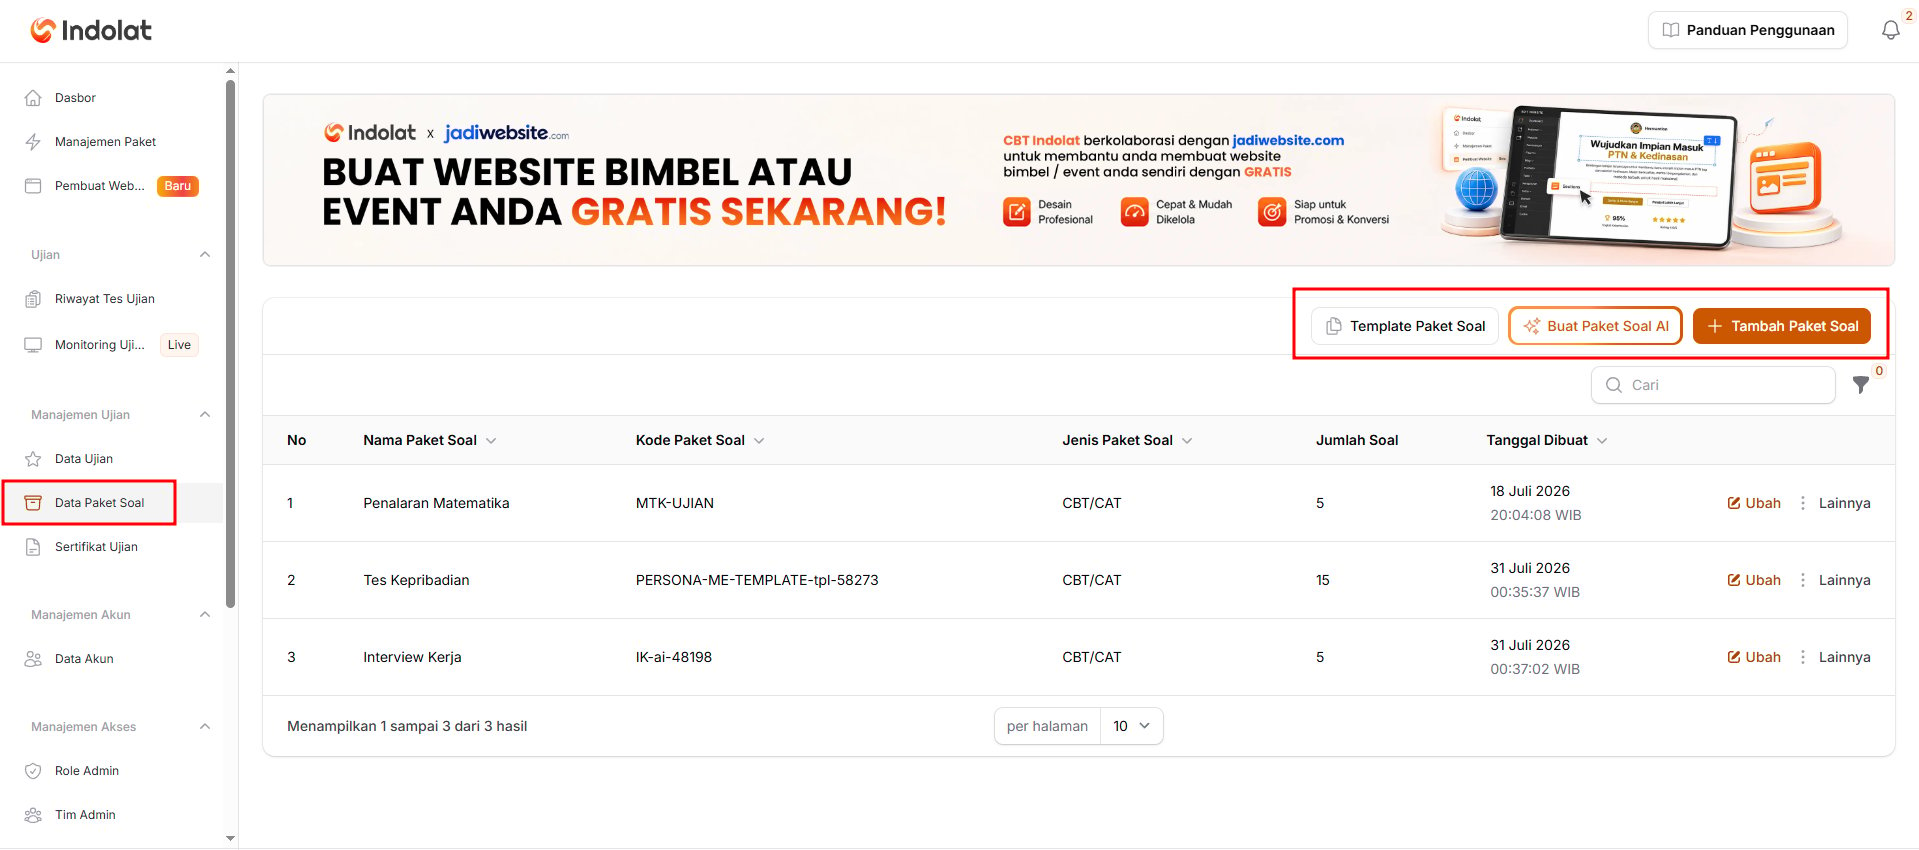
- manually: click Add Question Package
- from a question template: click Question Package Template
- with Jasper AI: click Create a Question Package with Jasper AI
Adding a Question Package Manually
Use this method if you want to build a question package from scratch and set up all of its content yourself. With the manual method, you first create the question package’s name and details. Once the package is created, you add its questions and answers one by one.💡 Example: You’re creating the Penalaran Matematika package for the SNBT (Indonesia’s national university entrance test) 2027 tryout (practice exam). The teaching team has already written the questions, and there are only 10 of them. Because there aren’t many questions and each one needs to be checked carefully, you can create the package manually and then enter the questions and answers one by one.This method suits you if:
- there aren’t many questions
- the questions are already written
- or you want to set up each question in more detail.
Using a Question Template
Use a template if you want to create a question package faster, starting from a structure the system already provides. A template gets you started without setting everything up from scratch. After using a template, you can still change the package name, the questions and the settings.💡 Example: You’re creating an SNBT tryout package with the same general structure as your previous tryout packages. Instead of setting everything up from scratch, you choose the template that fits best. Once the package is created, you only need to rename it, adjust the questions and check the answers again.This method suits you if:
- your exam is similar to one of the available examples
- you want to create the package faster.
Using Jasper AI
Use Jasper AI if you want the system to help you create a question package and generate its questions and answers. You only need to describe the subject, the number of questions, the question format and the difficulty level you want.💡 Example: You need 20 multiple-choice Basic Mathematics questions for extra practice, but you don’t have a question bank yet. Give an instruction such as: Create 20 multiple-choice Basic Mathematics questions for SNBT preparation. Each question has five answer options and one correct answer. The system creates the question package, the questions, the answer options and the correct answers automatically.This method suits you if:
- you don’t have any questions yet
- you need many questions in a short time.
2. How to Create or Add a Question Package
Create a Question Package Manually
Create a Question Package Manually
- Question Package 1: Mathematics Multiple Choice — CBT/CAT type
- Question Package 2: Mathematics Essay — Essay/File Upload type
CBT / CAT
CBT / CAT
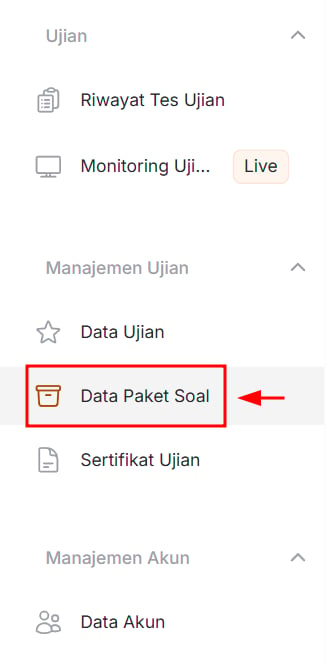
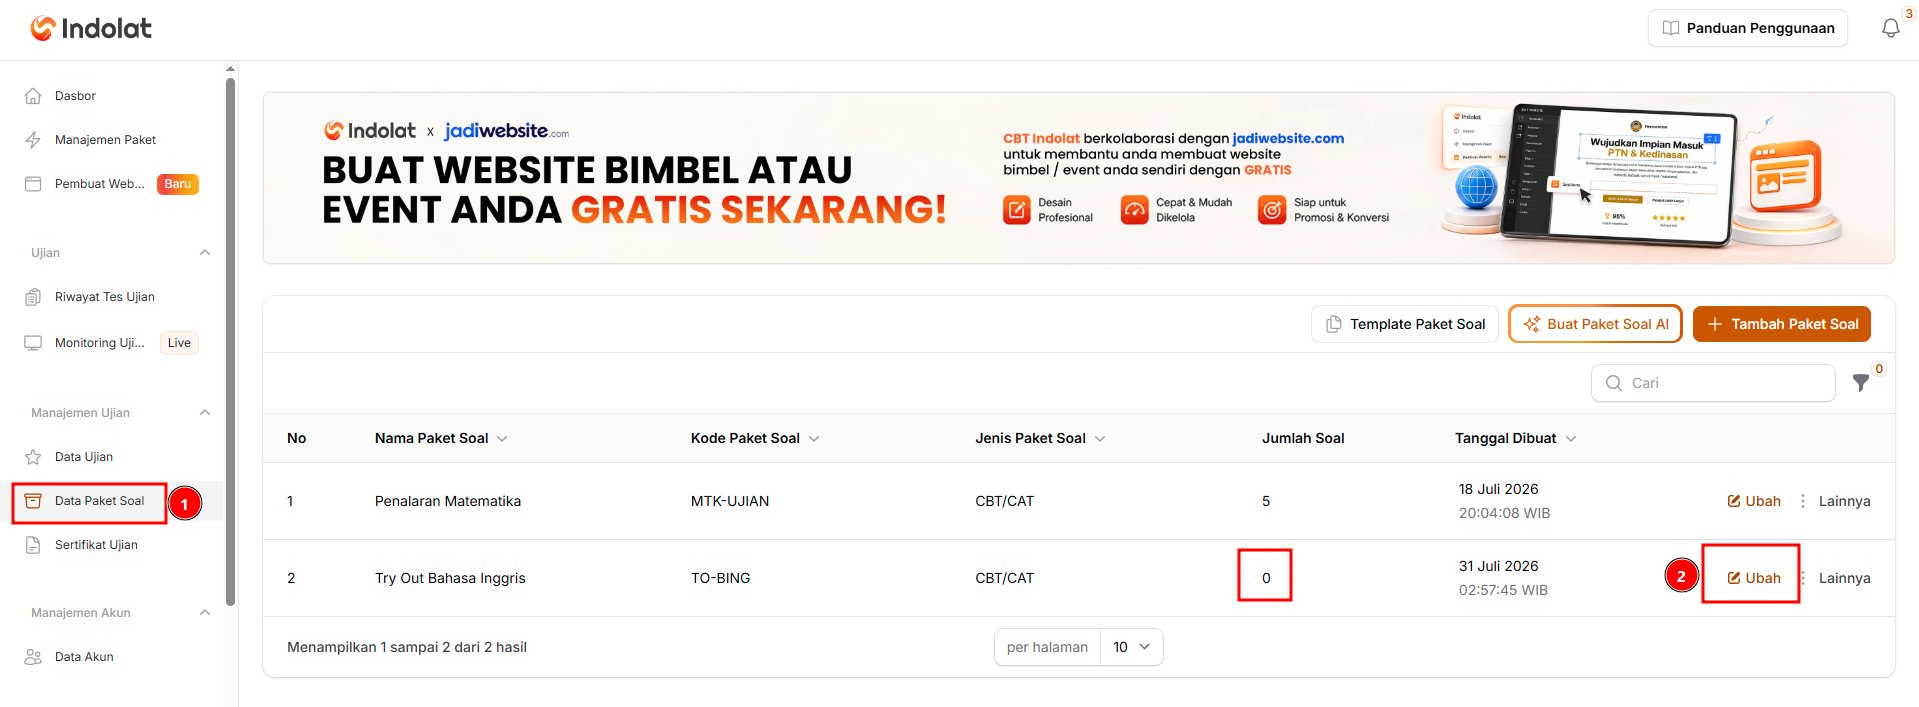
Open the Question Package Data menu
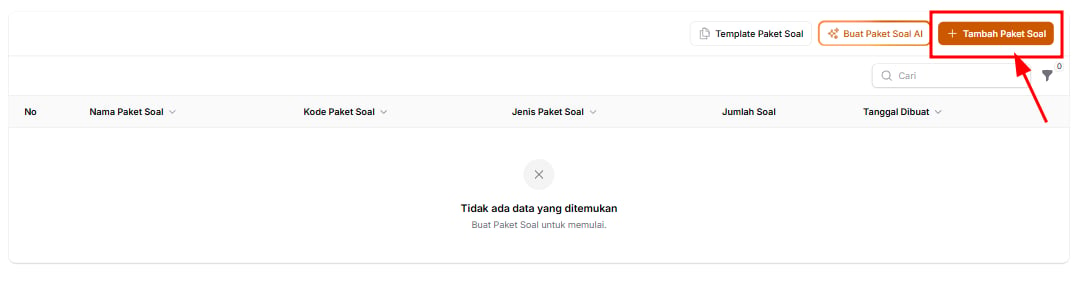
Click Add Question Package
Fill in the question package details
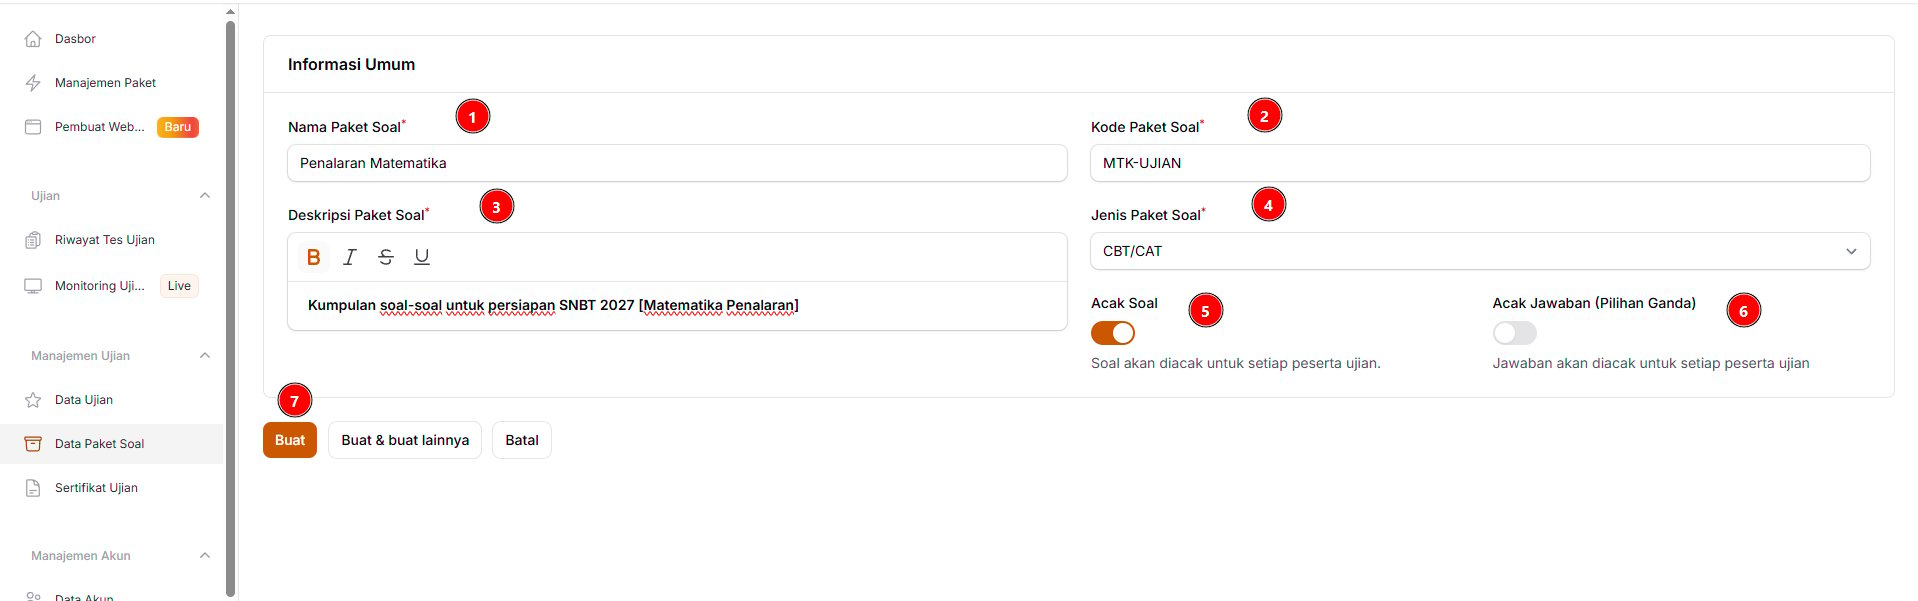
- Question Package Name
Enter a name that’s easy to recognise, for example Penalaran Matematika. - Question Package Code
Enter a unique code that tells the question packages apart, for example MTK-UJIAN. - Question Package Description
Add a short description of the package’s content or purpose. - Question Package Type
Choose CBT/CAT if participants will answer the questions directly in the system. - Shuffle Questions
Turn this on if you want the question order to be different for each participant. - Shuffle Answers (Multiple Choice)
Turn this on if you want the order of the answer options to be different for each participant. This setting applies to multiple-choice questions. - Save the question package
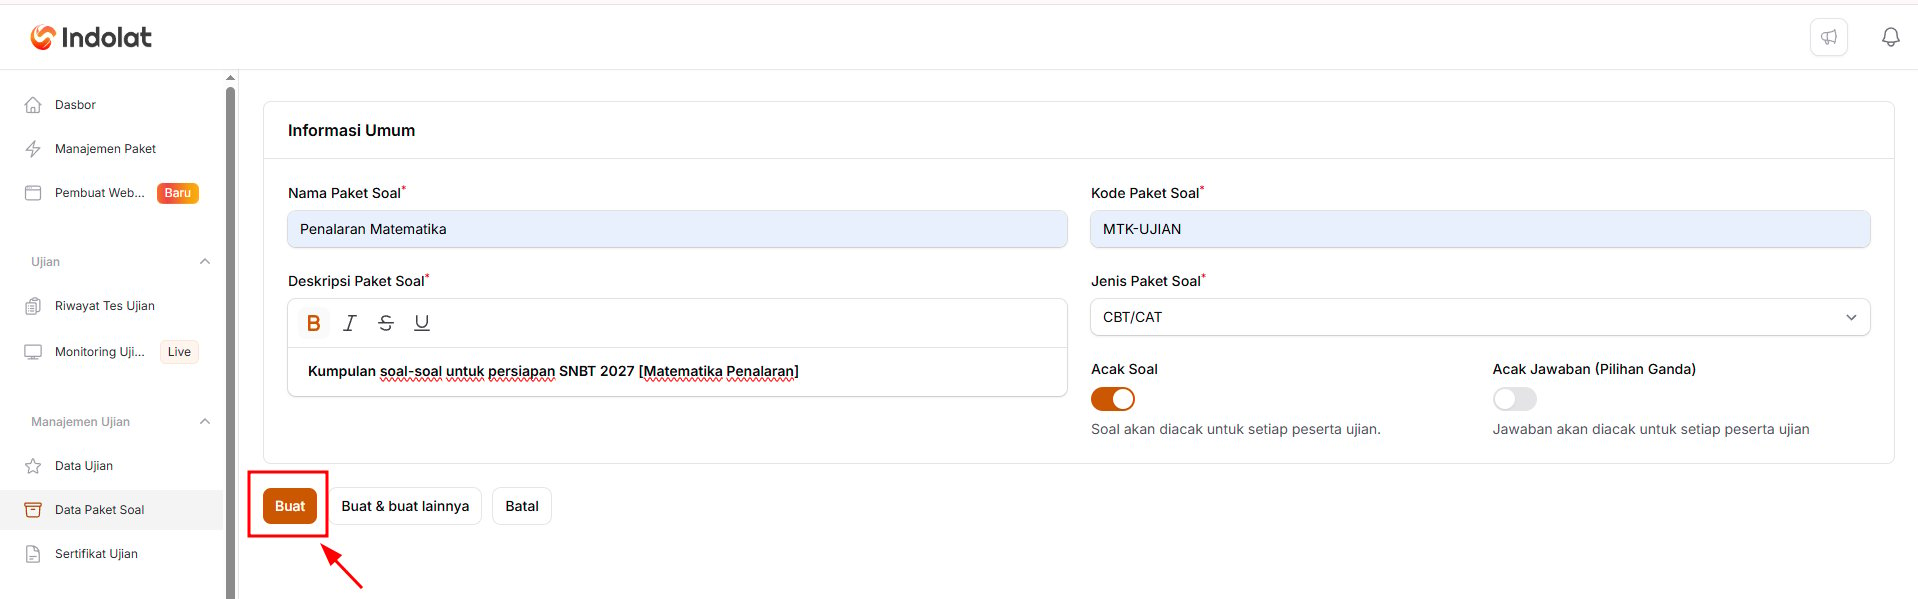
Click Create to save the question package and move on to adding questions.
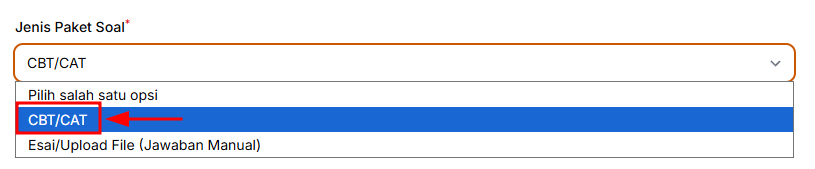
- Choose CBT/CAT if participants will see the questions on screen and enter their answers directly on the exam platform. This type suits UTBK-SNBT tryouts, olympiads and other computer-based exams.
- Choose Essay/File Upload (Manual Grading) if the questions are already in a single file, such as a PDF. Participants open the file to read the questions, then submit their answers as the exam instructions say.
Save the question package
Essay / File Upload
Essay / File Upload
Open the Question Package Data menu
Click Add Question Package
Fill in the question package details
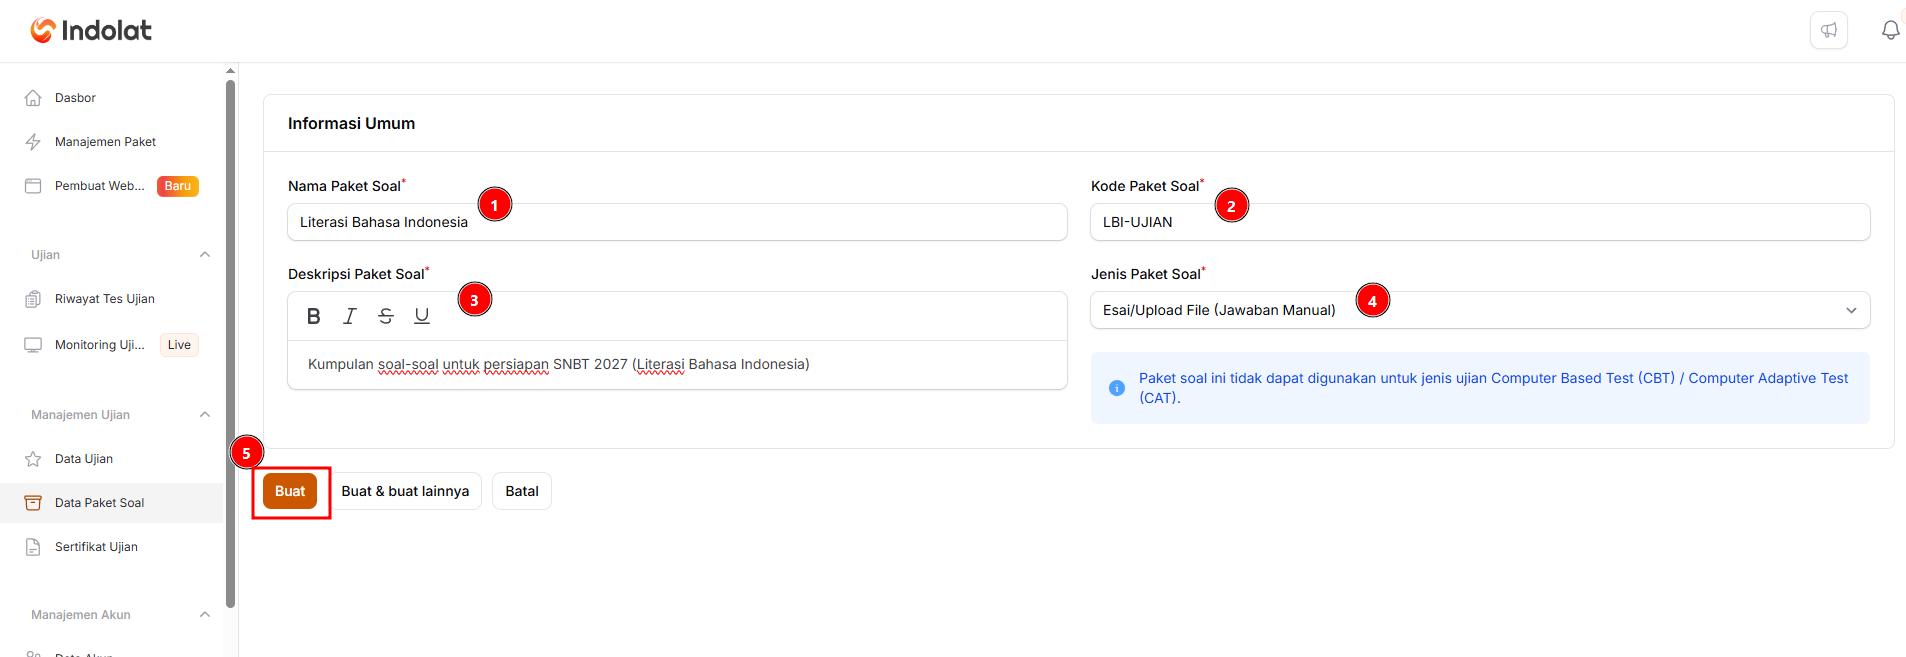
-
Question Package Name: Enter a name that makes the question package easy to recognise.
Example: Literasi Bahasa Indonesia (Indonesian Language Literacy). -
Question Package Code: Enter a short, unique code.
Example: LBI-UJIAN. -
Question Package Description: Write a short description of the package’s content.
Example: A collection of Indonesian Language Literacy questions for SNBT 2027 preparation. -
Question Package Type: Choose Essay/File Upload (Manual Grading). Use this option if participants:
- write long answers directly in the system, or
- upload an answer file, such as a PDF, a Word document or a photo of their answer sheet.
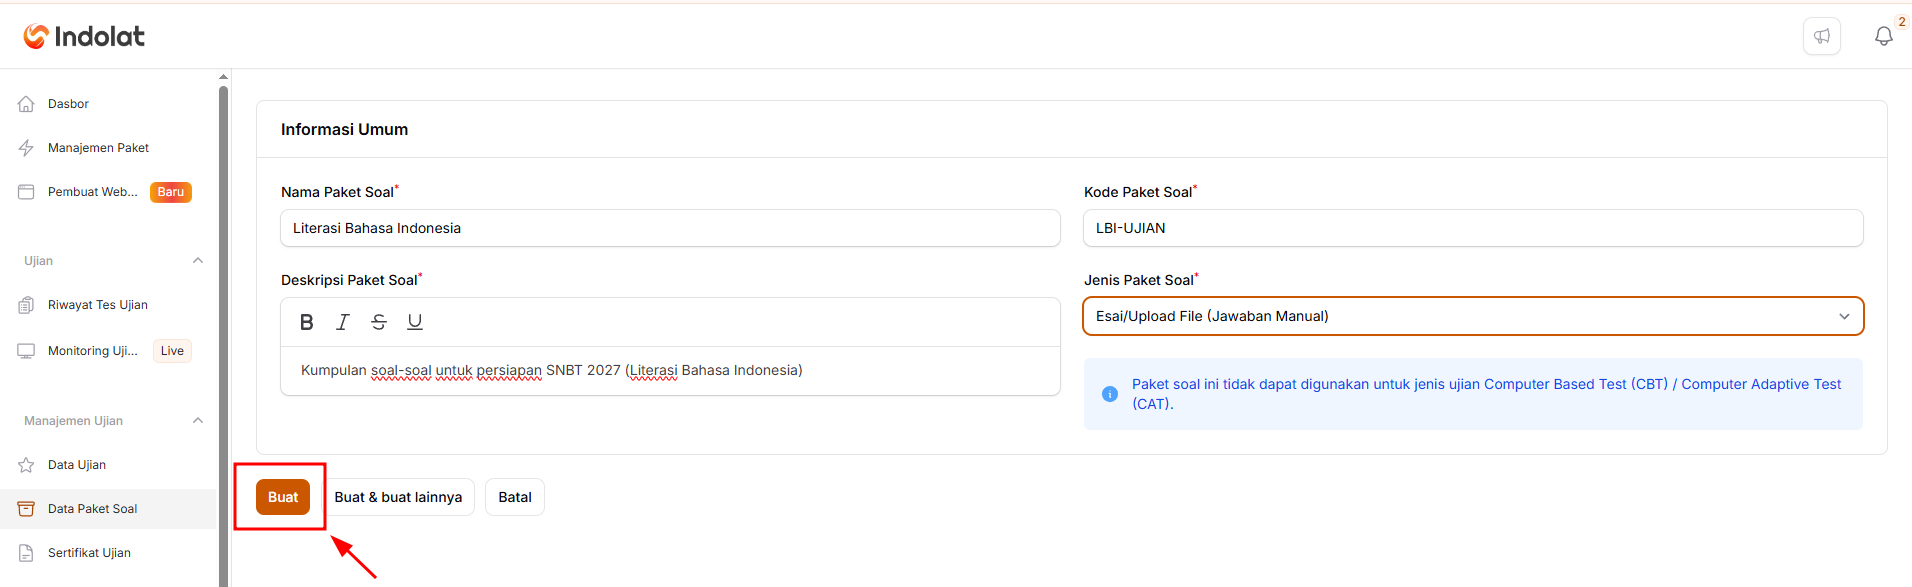
- Create: Once all the fields are filled in, click Create to save the question package.
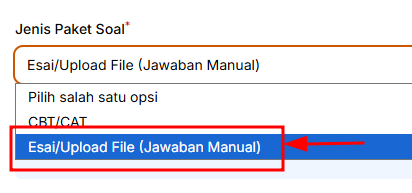
- Choose CBT/CAT if participants will see the questions on screen and enter their answers directly on the exam platform. This type suits UTBK-SNBT tryouts, olympiads and other computer-based exams.
- Choose Essay/File Upload (Manual Grading) if the questions are already in a single file, such as a PDF. Participants open the file to read the questions, then submit their answers as the exam instructions say.
Save the question package
Create a Question Package with Questions and Answers from a Template
Create a Question Package with Questions and Answers from a Template
Click Question Package Template
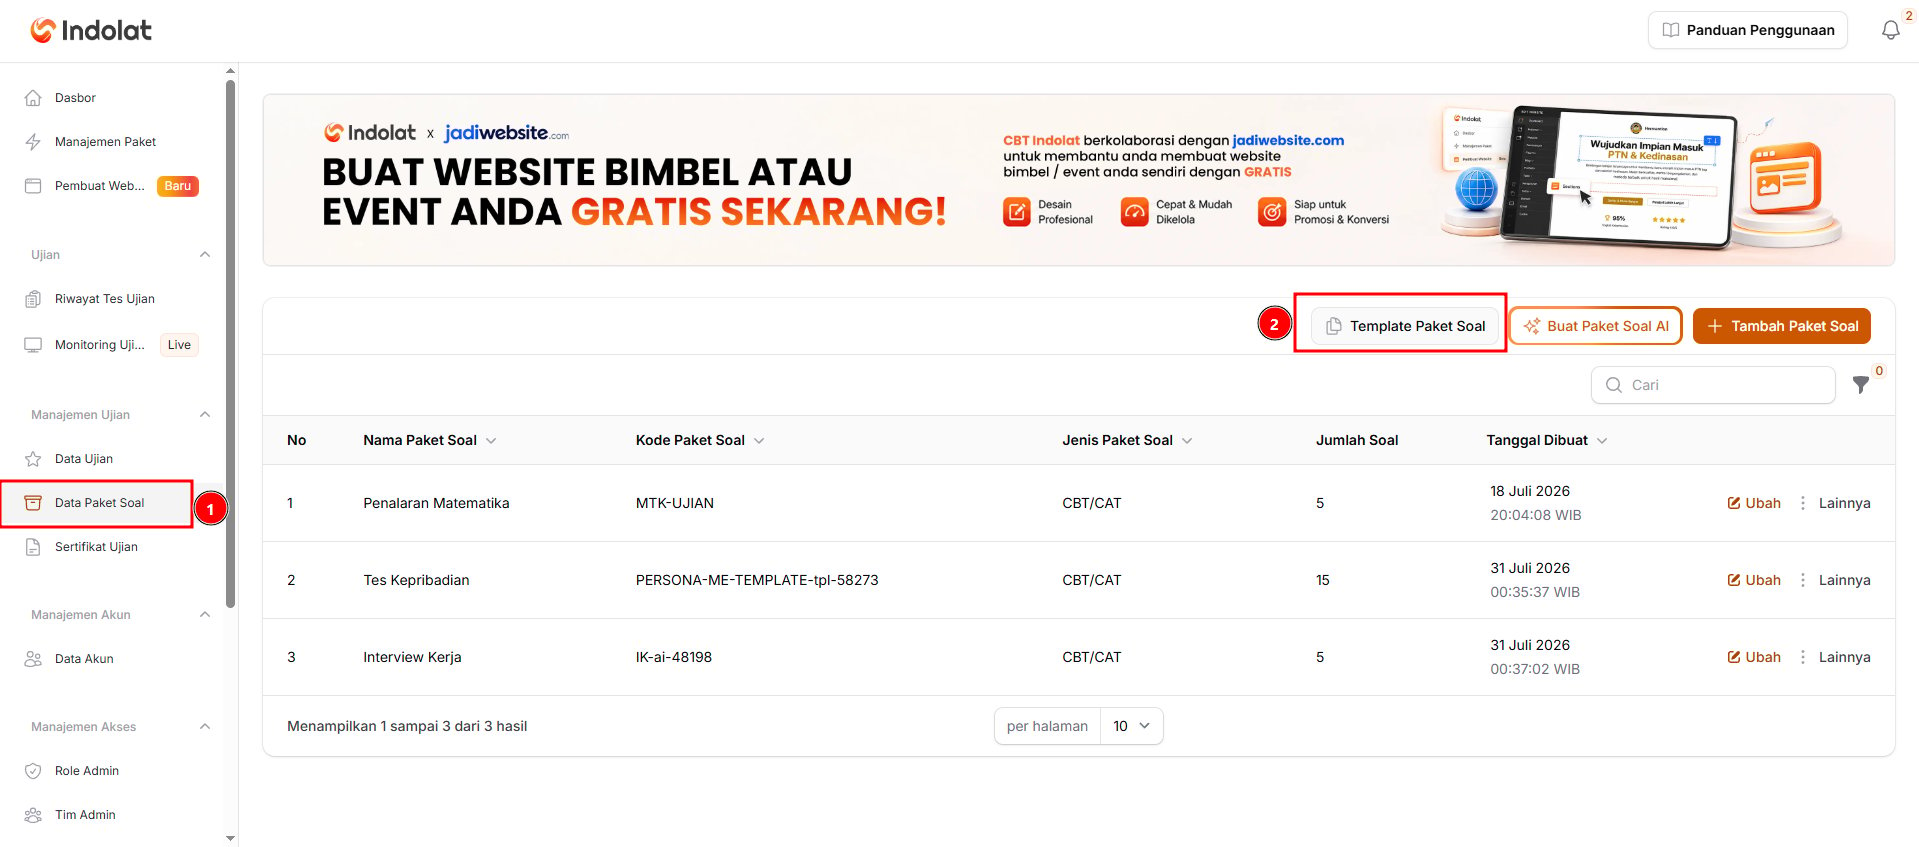
Choose a template and click Use Template
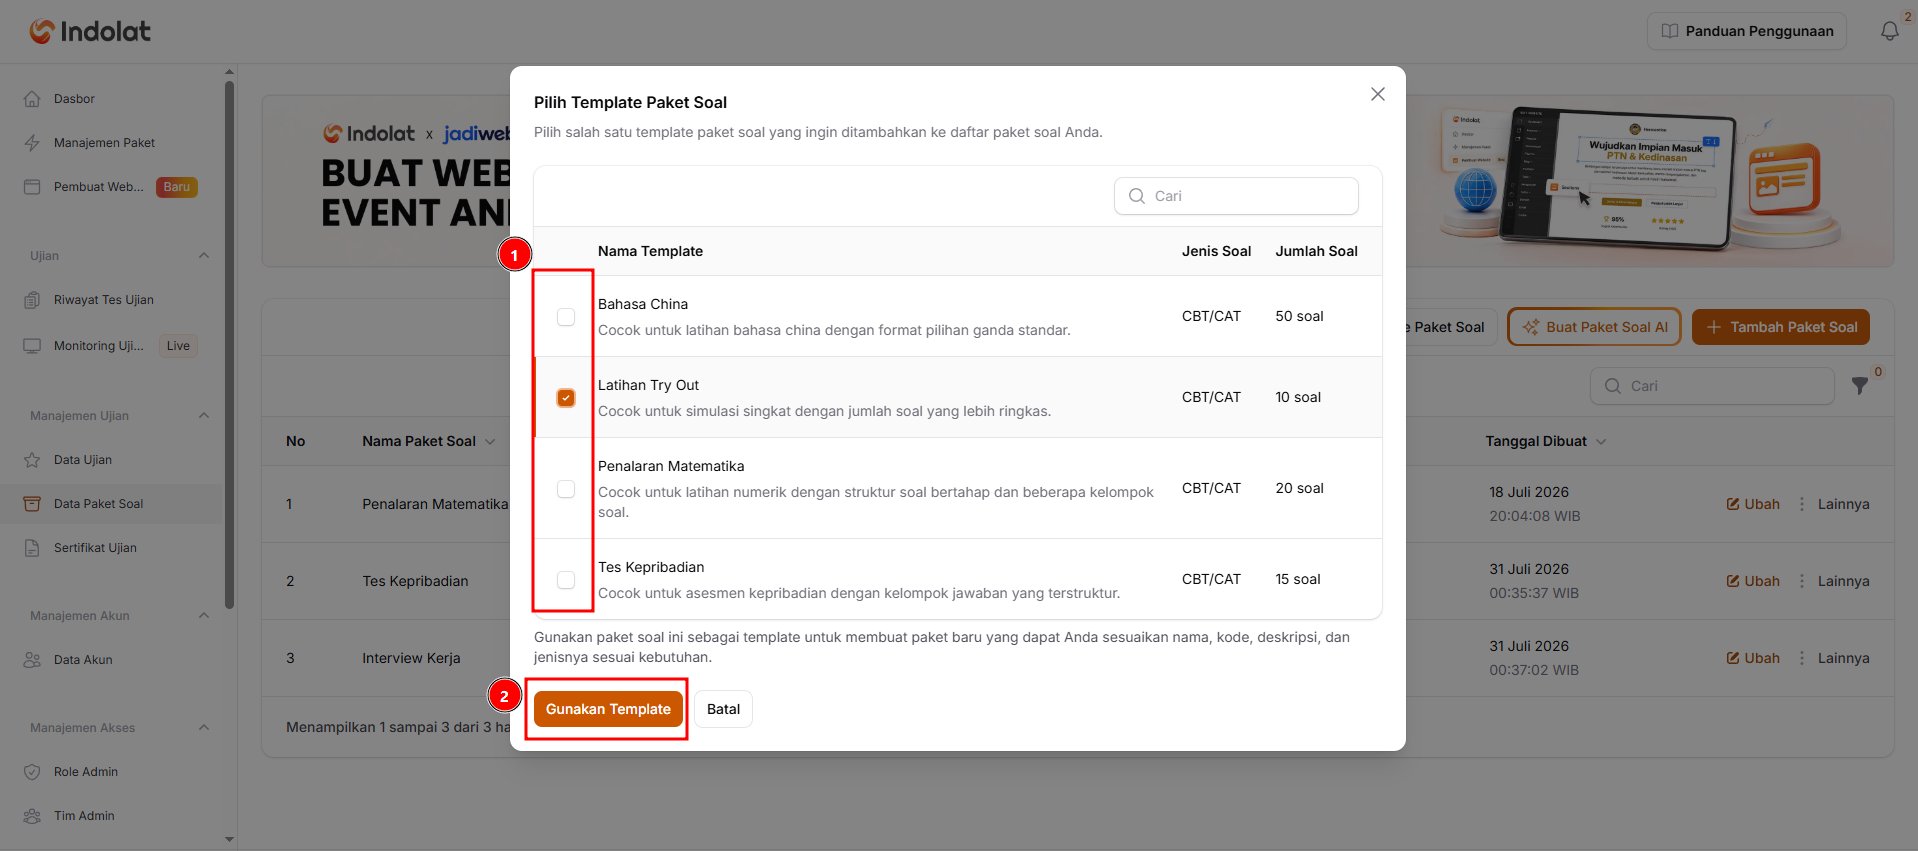
- Template Name, the name of the available package
- Question Type, the kind of question package it uses
- Number of Questions, how many questions will be copied into the new package
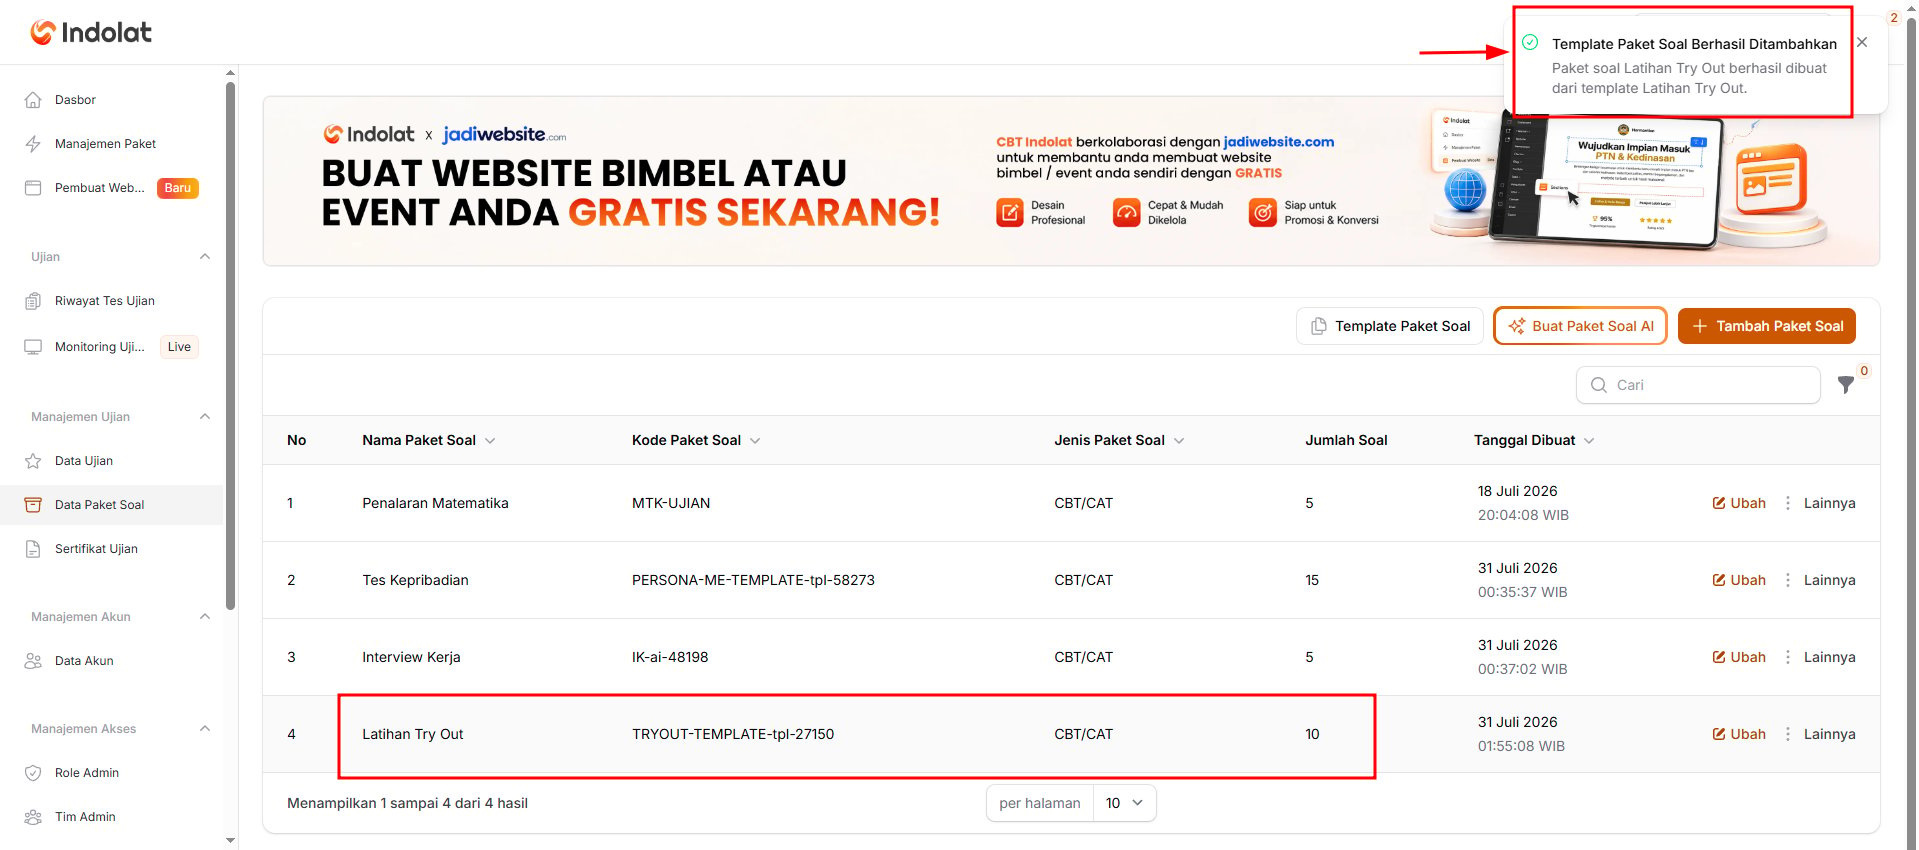
Click Edit to check the question package
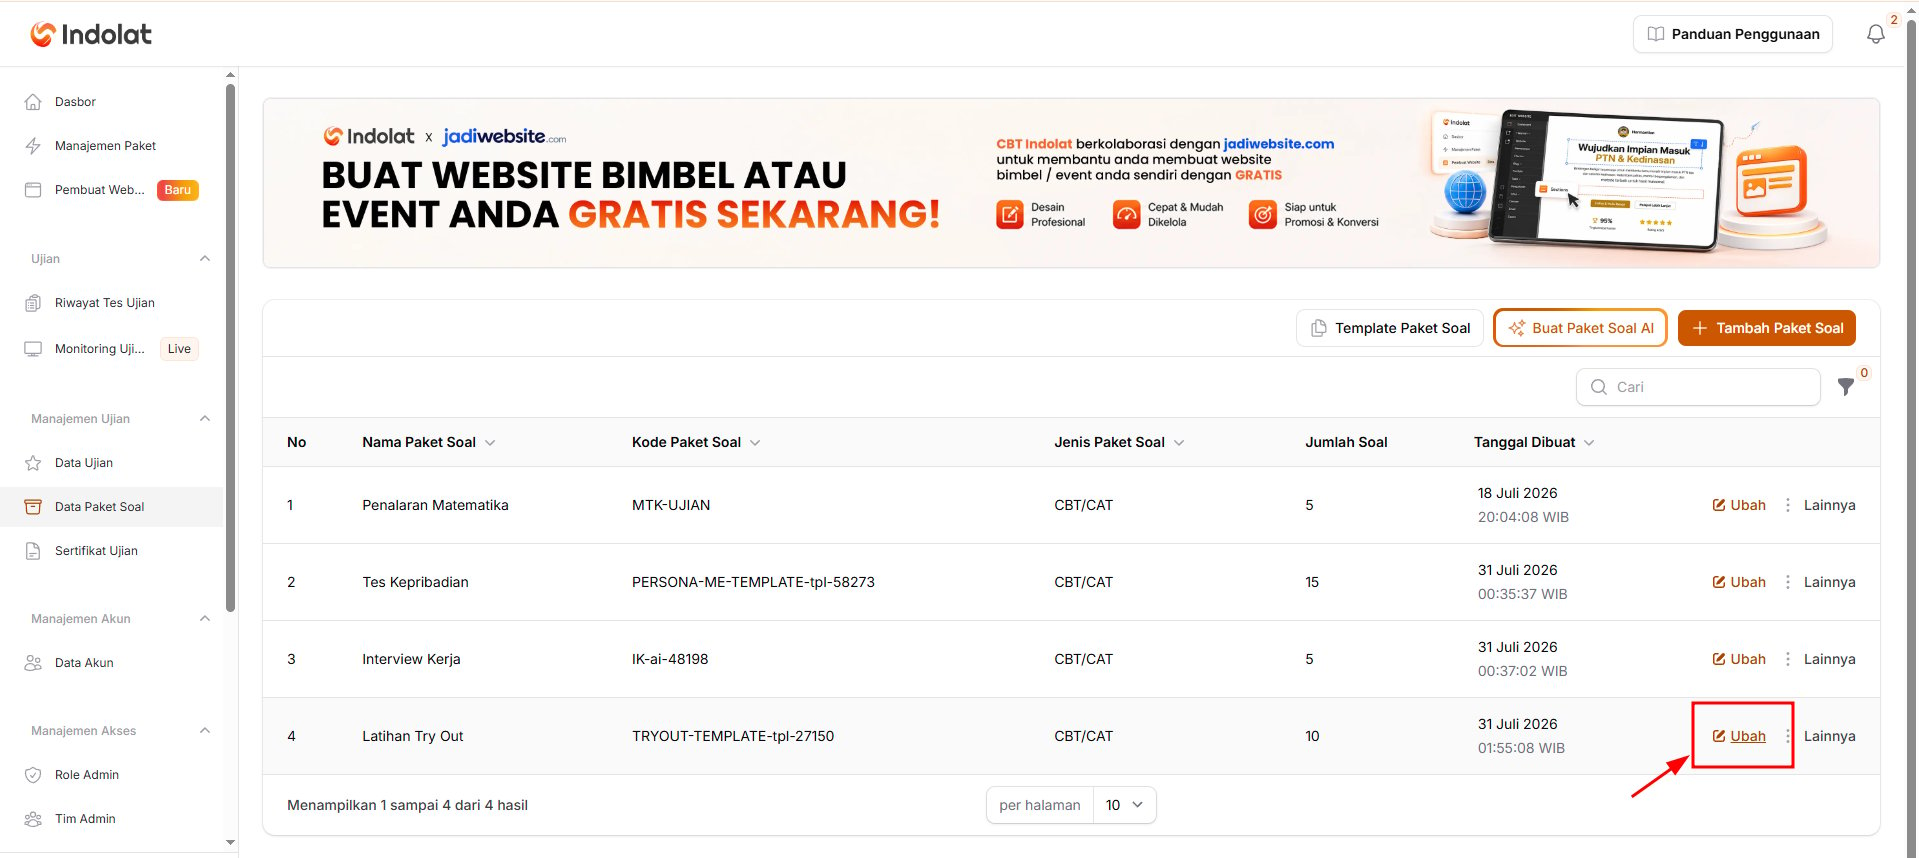
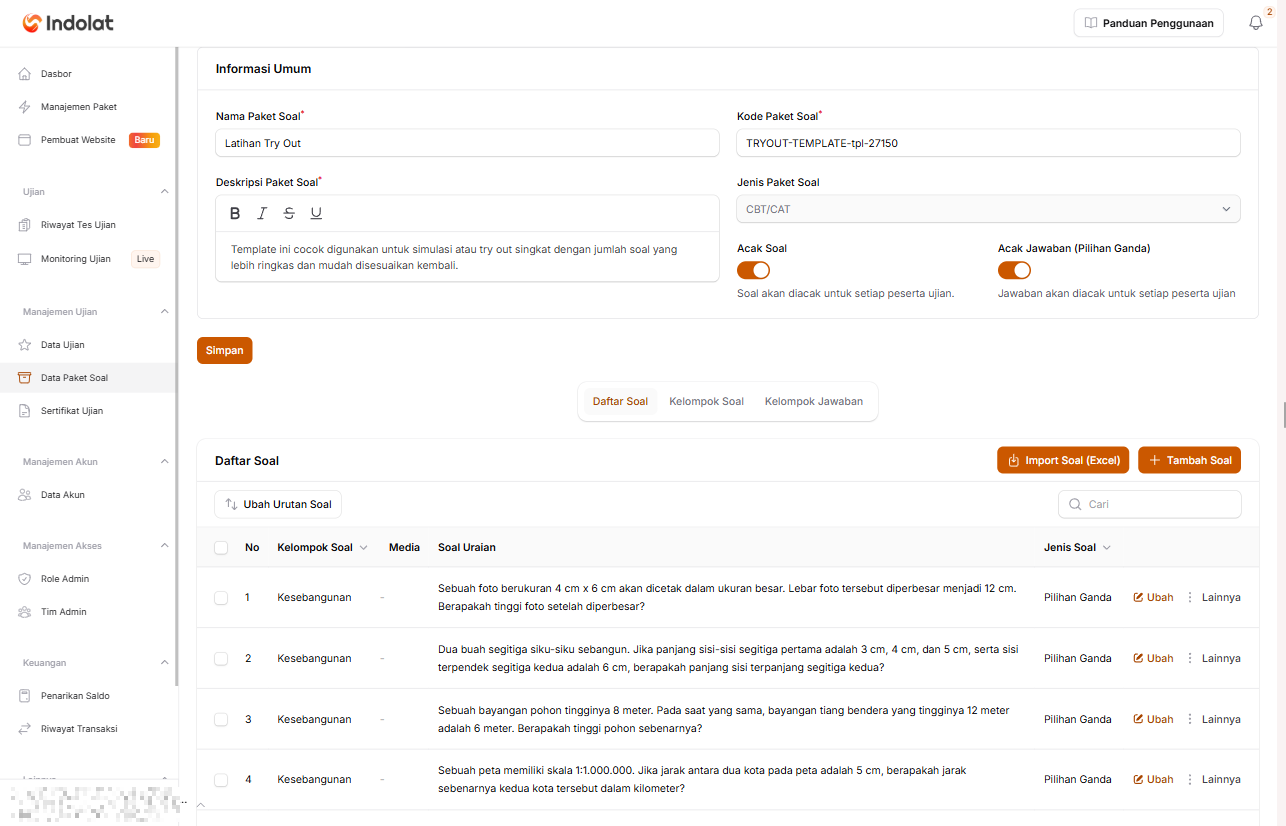
- change the package name or description
- correct the questions
- replace answer options
- change the correct answer
- and add or delete questions.
Create a Question Package with Questions and Answers Using Jasper AI
Create a Question Package with Questions and Answers Using Jasper AI
Click Create a Question Package with Jasper AI
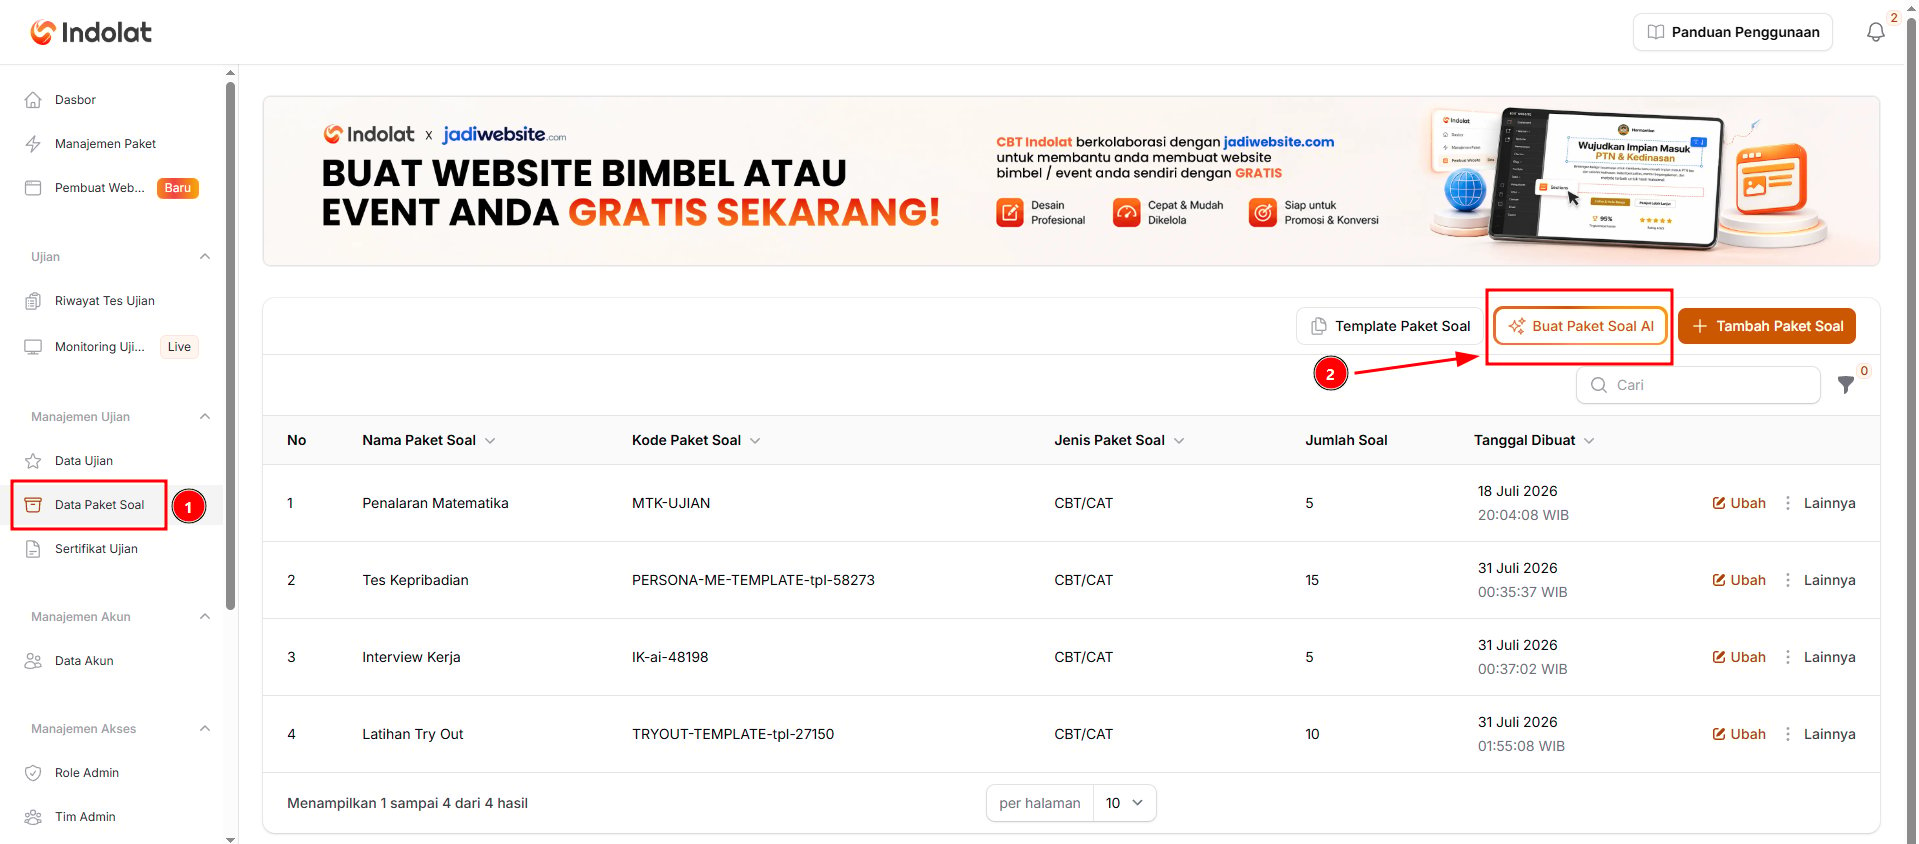
Fill in the question package details
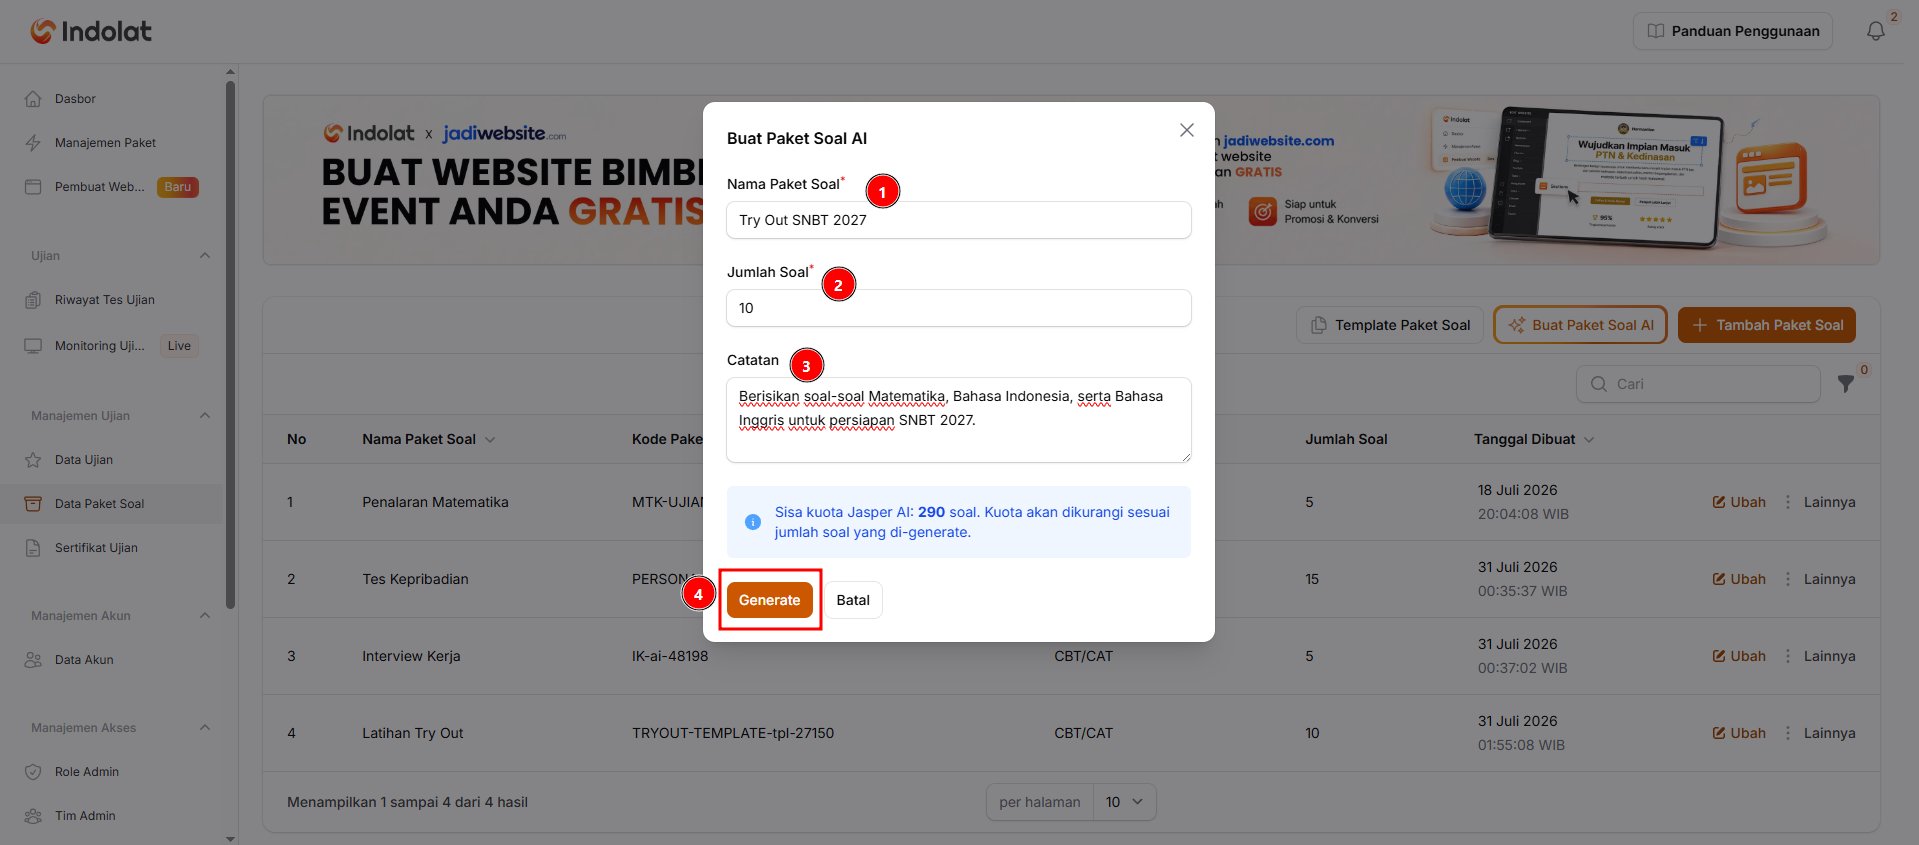
- Fill in Question Package Name. Example: Try Out SNBT 2027
- Fill in Number of Questions with the number of questions you want to generate. Example: 10 questions
- In Notes, describe the questions you need. You can mention the subject, school level, question format or difficulty level. Example: Create Mathematics, Indonesian and English questions for SNBT 2027 preparation.
- Click Generate. The system starts creating the question package; while it runs, the button shows the generation progress. Wait until a notification says the questions were created.
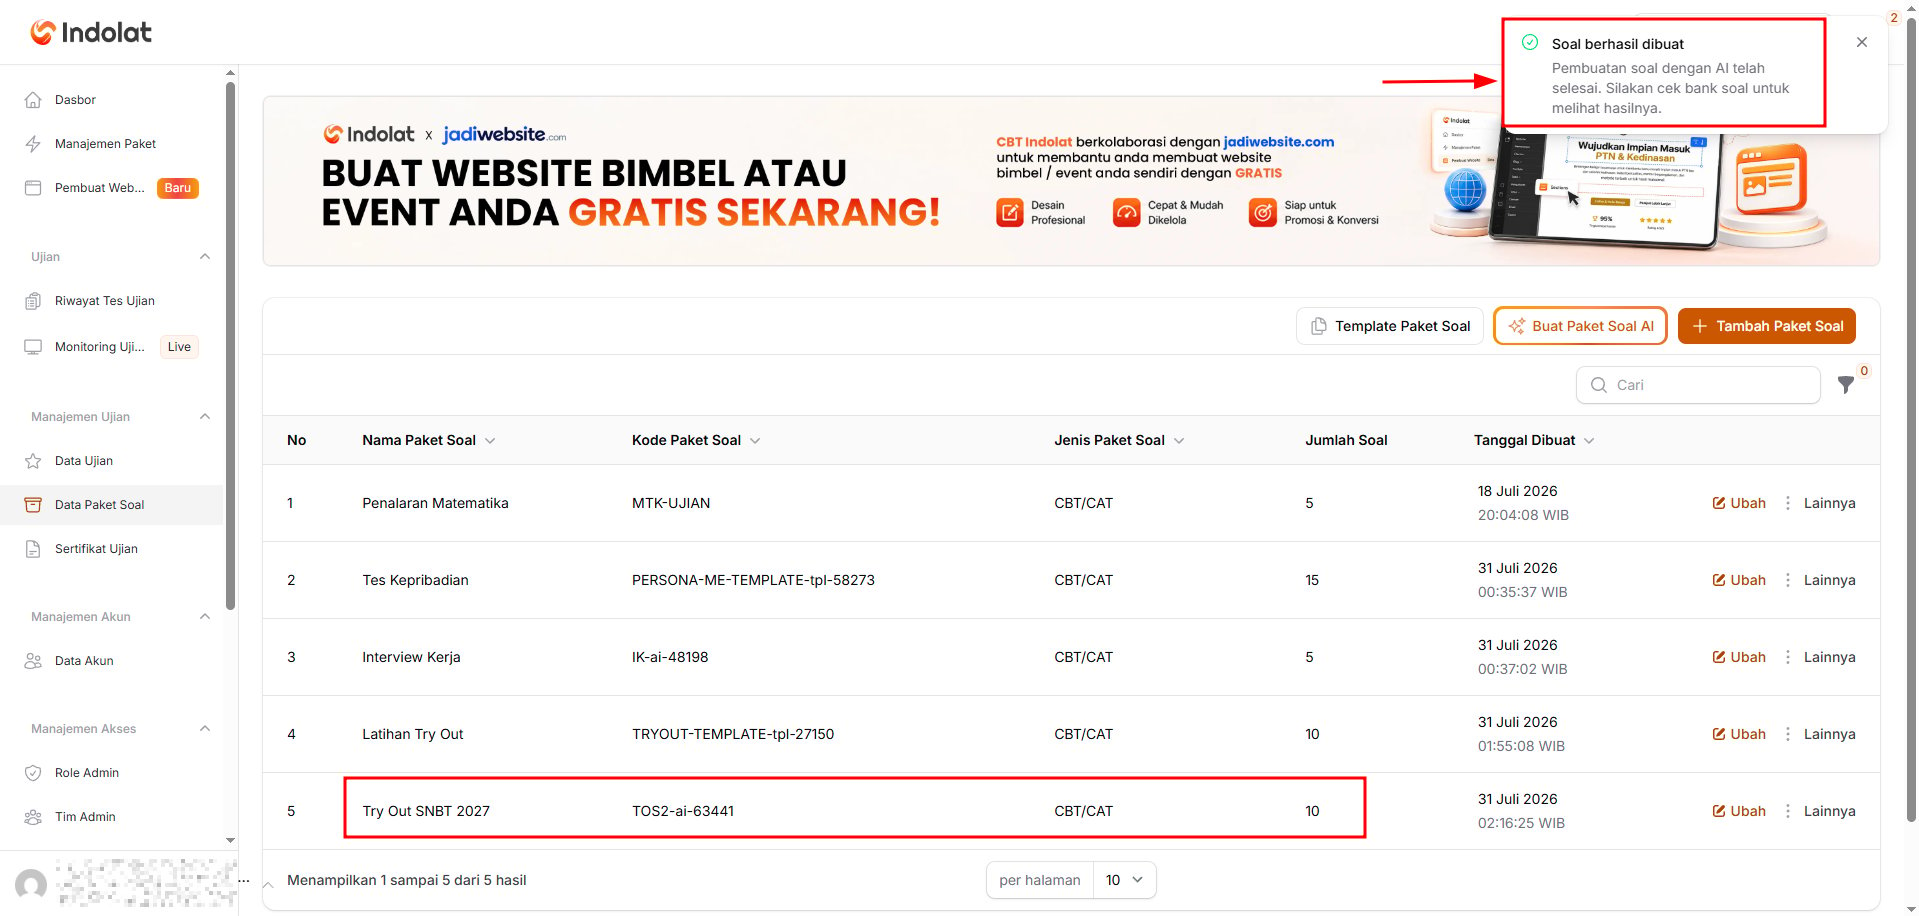
Click Edit to check the question package
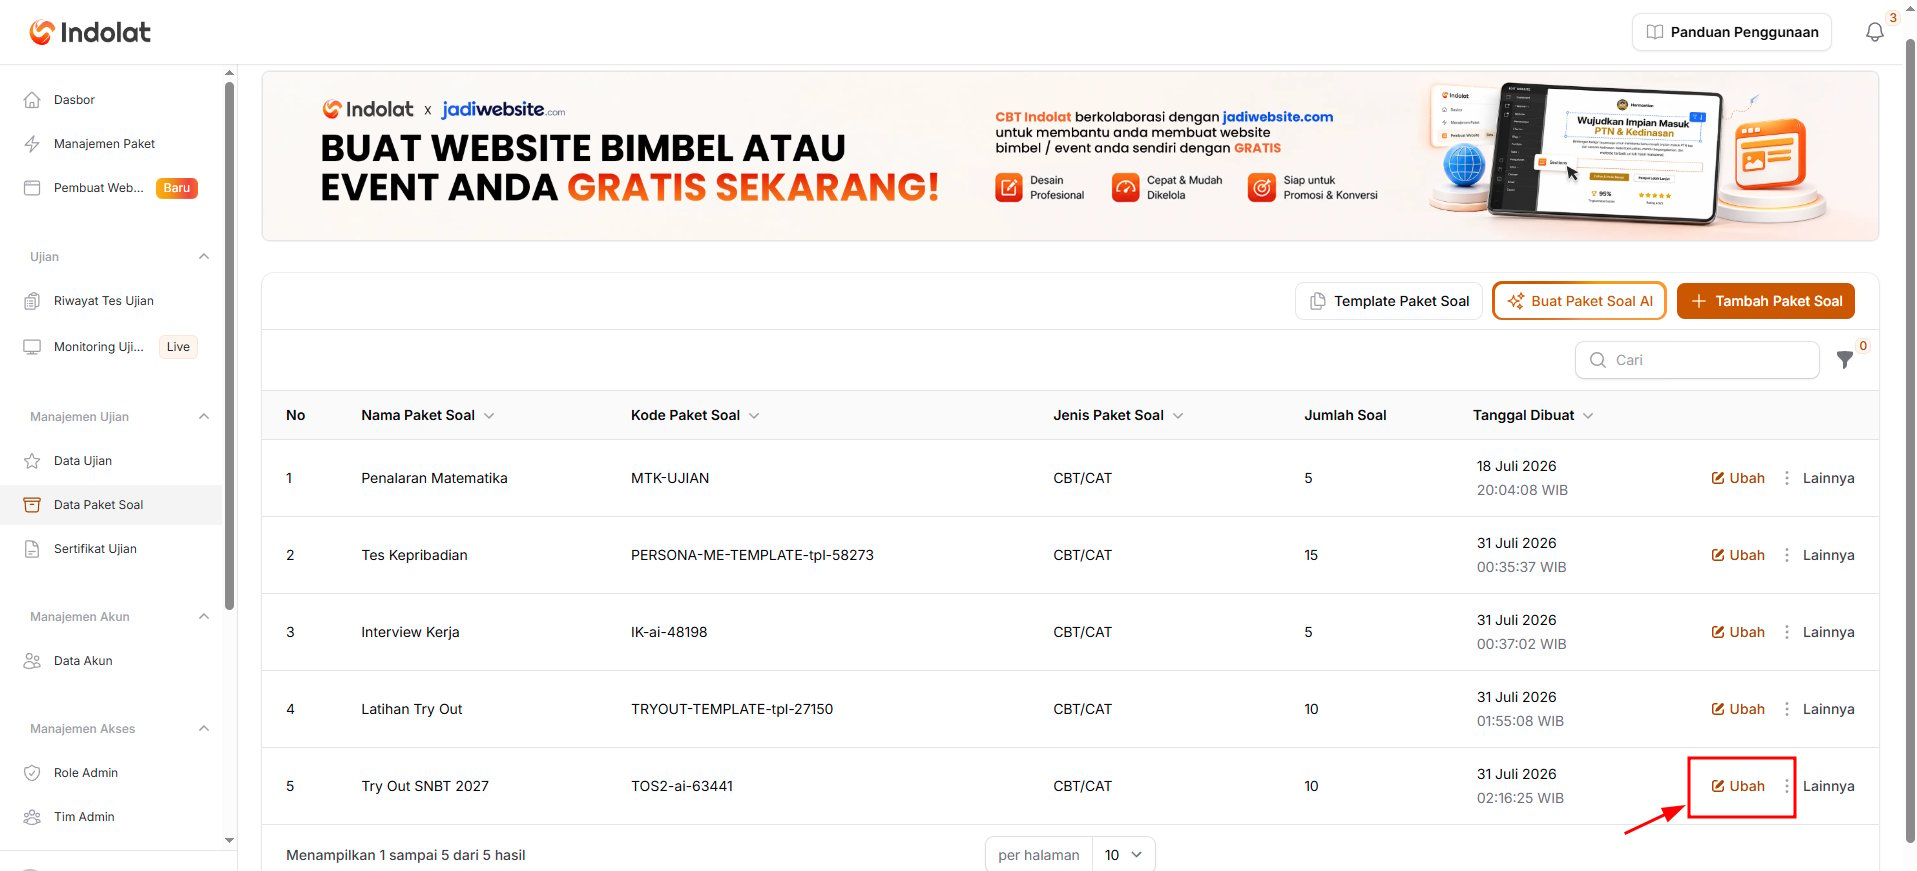
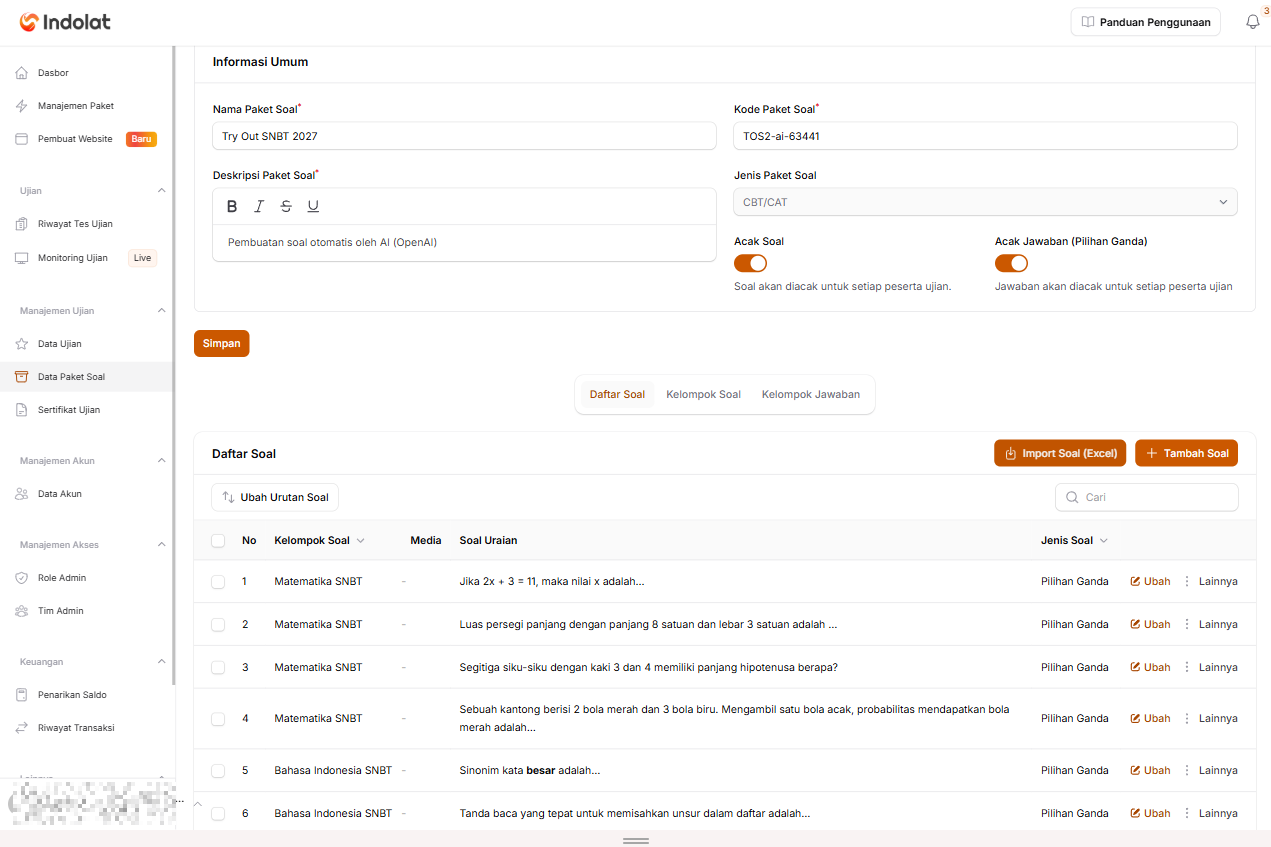
- change the package name or description
- correct the questions
- replace answer options
- change the correct answer
- and add or delete questions.
3. The Question List Page
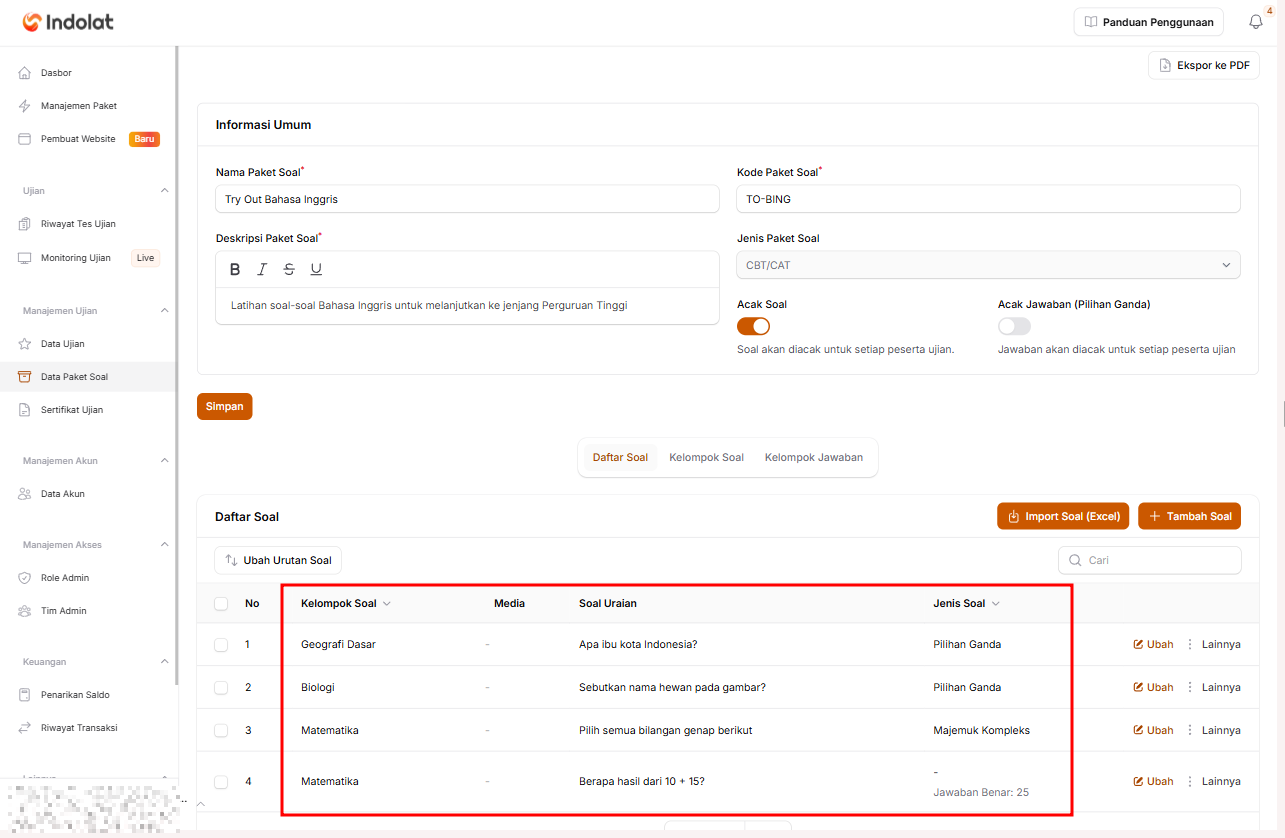
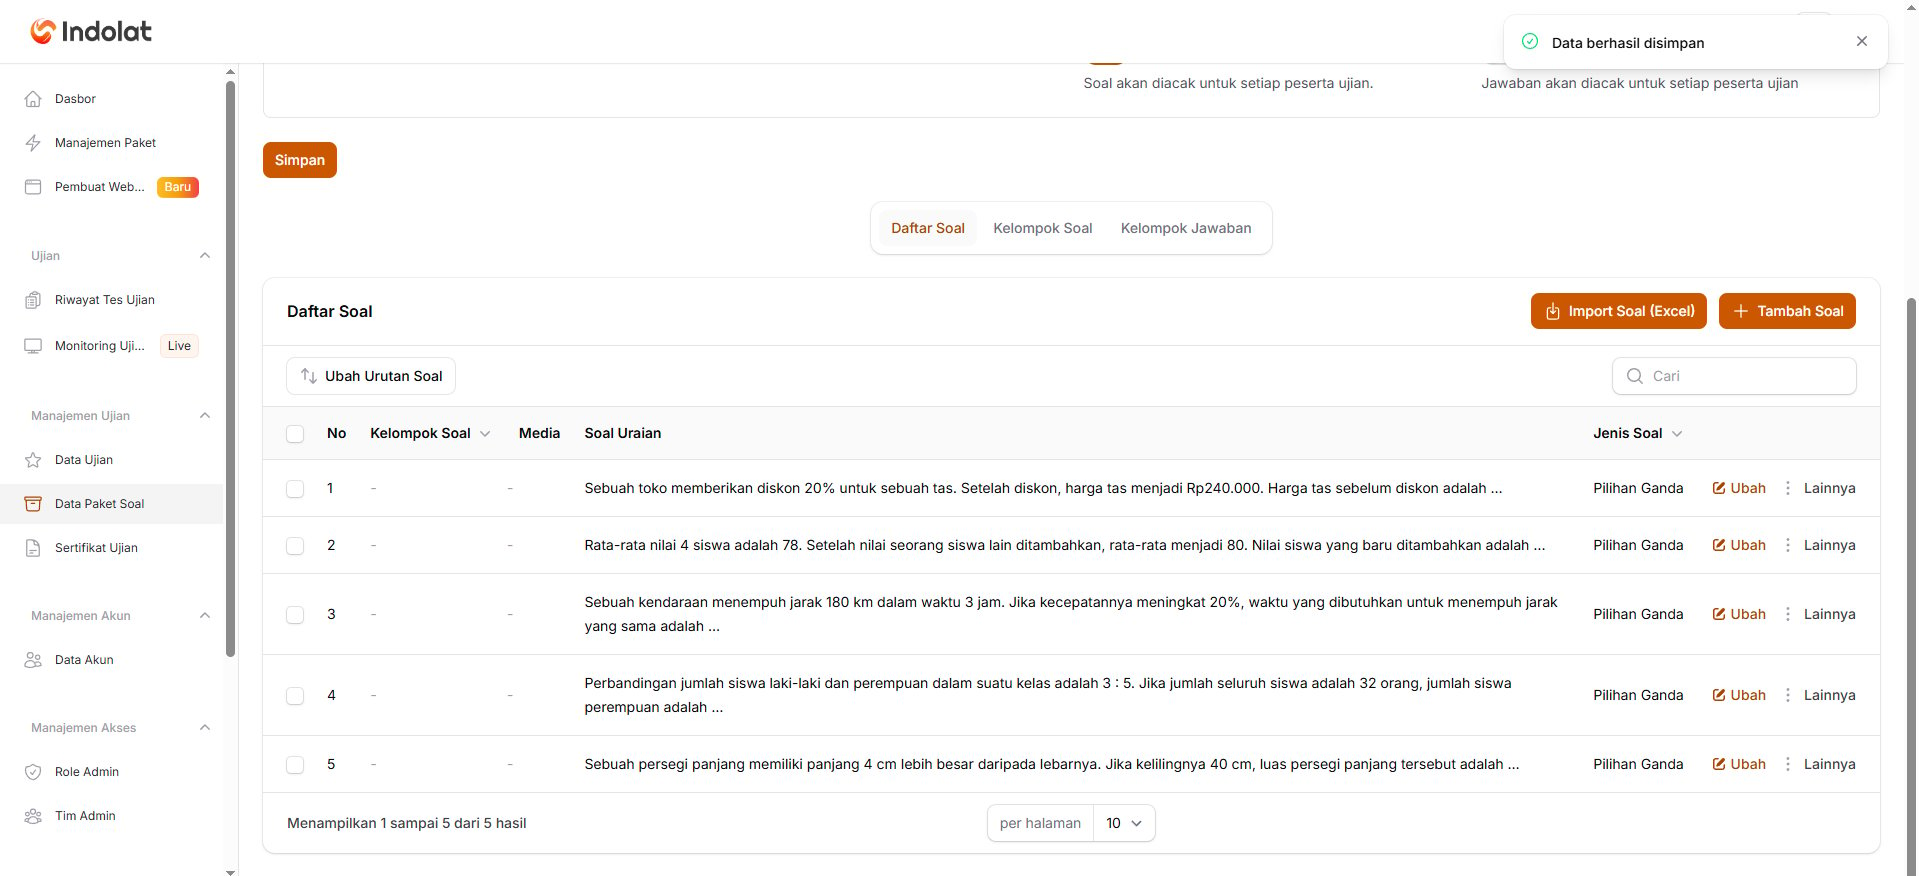
Once the question package is created, click Edit on the package you want to manage.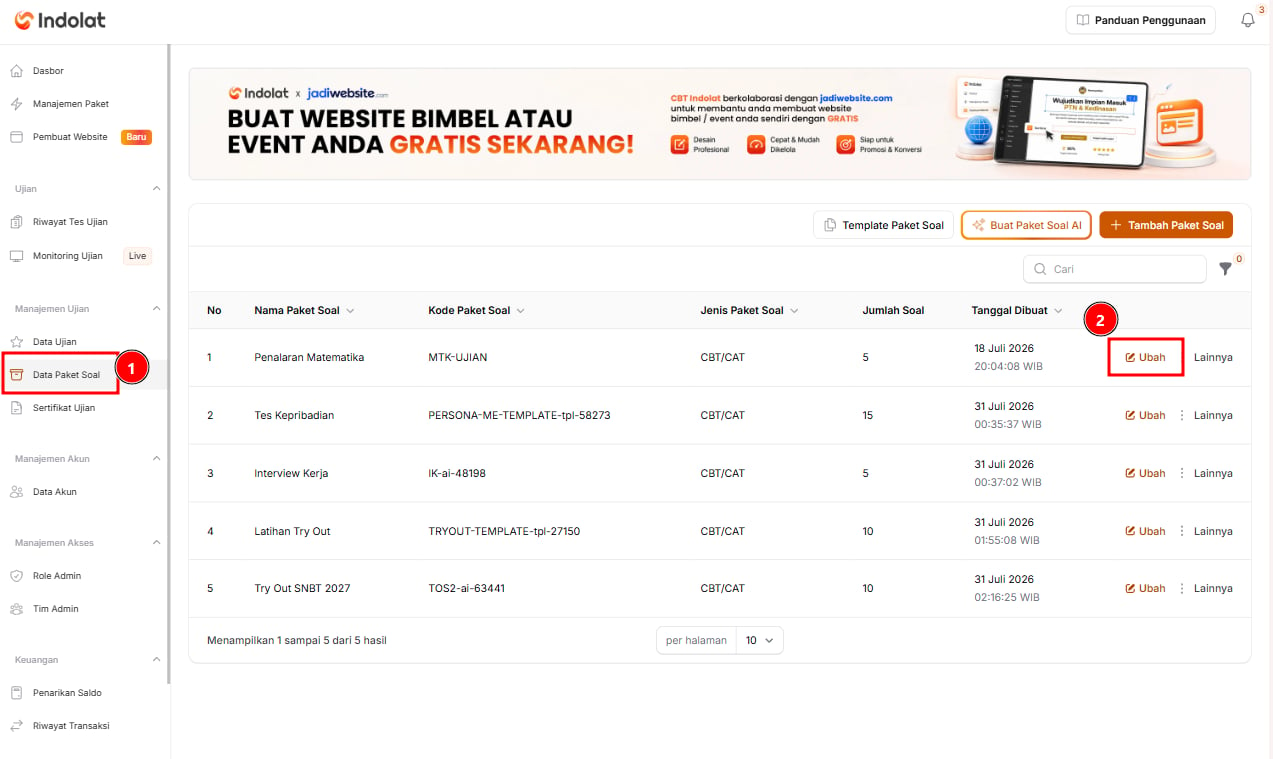
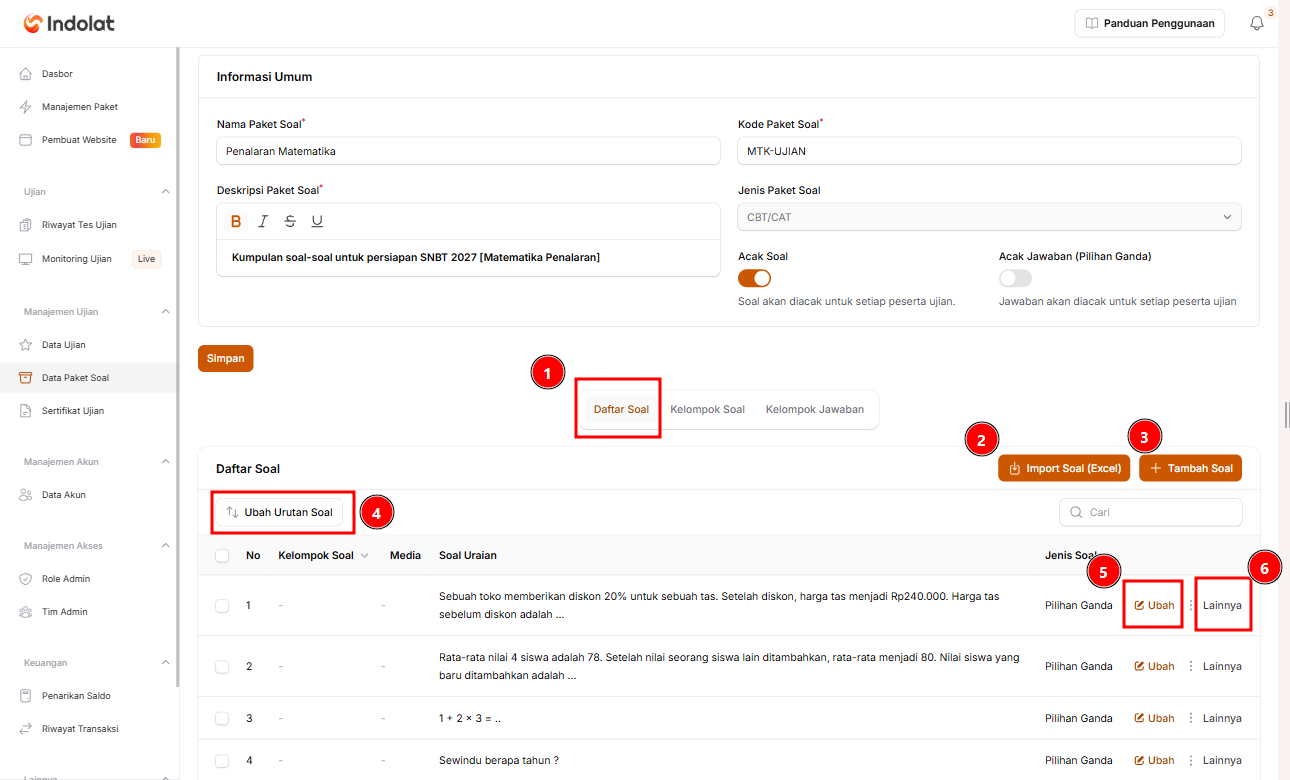
💡 For example, you open the Penalaran Matematika package used for SNBT 2027 preparation. In the Question List section, you can check the existing questions, add new ones, import questions from Excel and fix questions that still need adjusting.
Question List
This section shows every question in the package. You can see, among other things:- the question number
- the question group
- the passage, if the question uses a shared reading text
- supporting media, if any
- the question text
- and the question type.
Add Questions with Jasper AI
Use the Add Questions with Jasper AI button to add questions generated by Jasper AI to the package you have open. Fill in Number of Additional Questions and, if needed, Additional Notes, then click Generate. This button is only available for CBT/CAT question packages, and the number of questions generated is deducted from your Jasper AI quota.Import Questions (Excel)
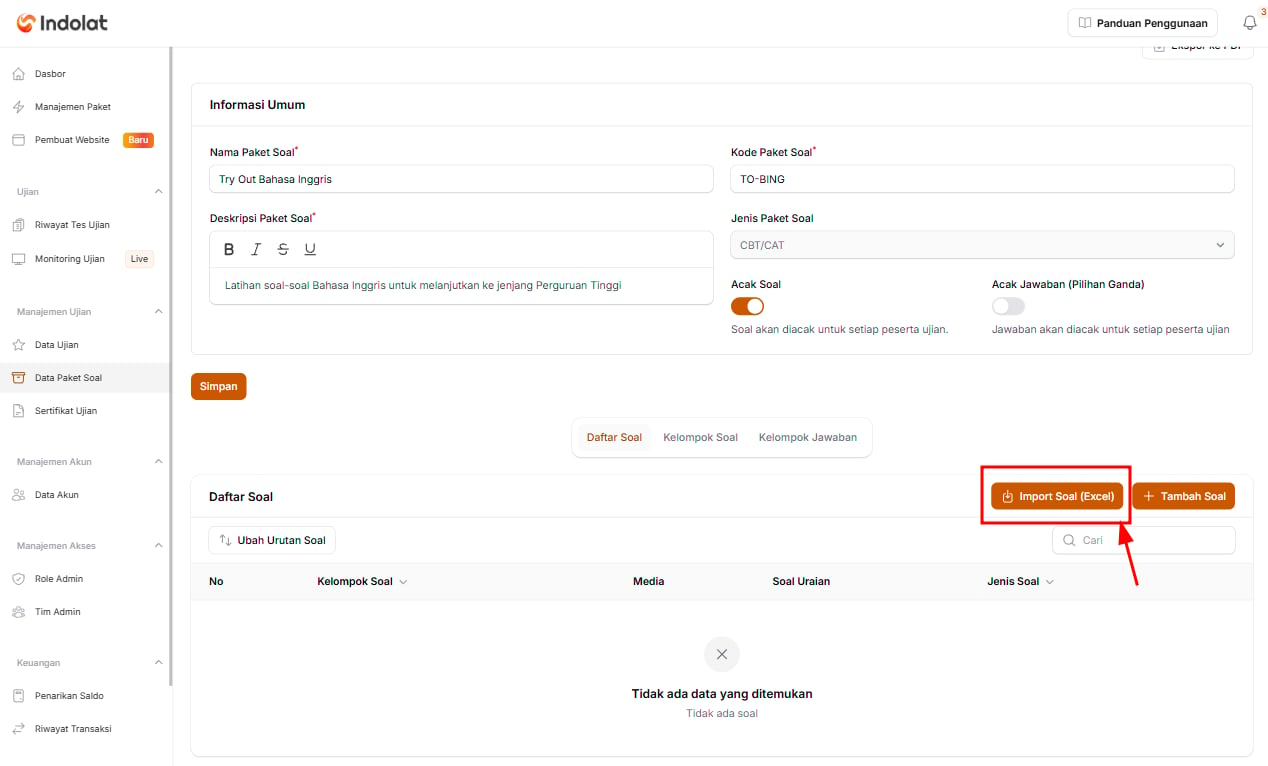
Use the Import Questions (Excel) button if you already have many questions and want to add them in one go.Add Question
Use the Add Question button to add questions manually. After clicking the button, you can fill in the question, question type, answer options, correct answer and other settings.Reorder Questions
Use the Reorder Questions button if you want to rearrange the questions. Drag the questions into place, then click Finished Reordering. 💡 Example: you want the easier questions at the start, followed by the harder ones. Use this feature to put the questions in the order you want.Edit
Click Edit on a question to correct or adjust it. You can change:- the question
- the answer options
- the correct answer
- the supporting media
- the question group
- and other settings.
Other
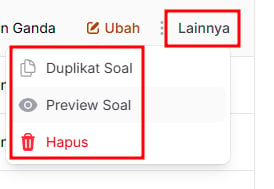
- Duplicate Question
Copies an existing question. This is useful when you want to create a new question with almost the same format or structure, so you don’t have to write it again from scratch. - Question Preview
Shows the question as participants will see it (CBT/CAT question packages only). Use it to make sure the question, answer options and layout are right before the exam takes place.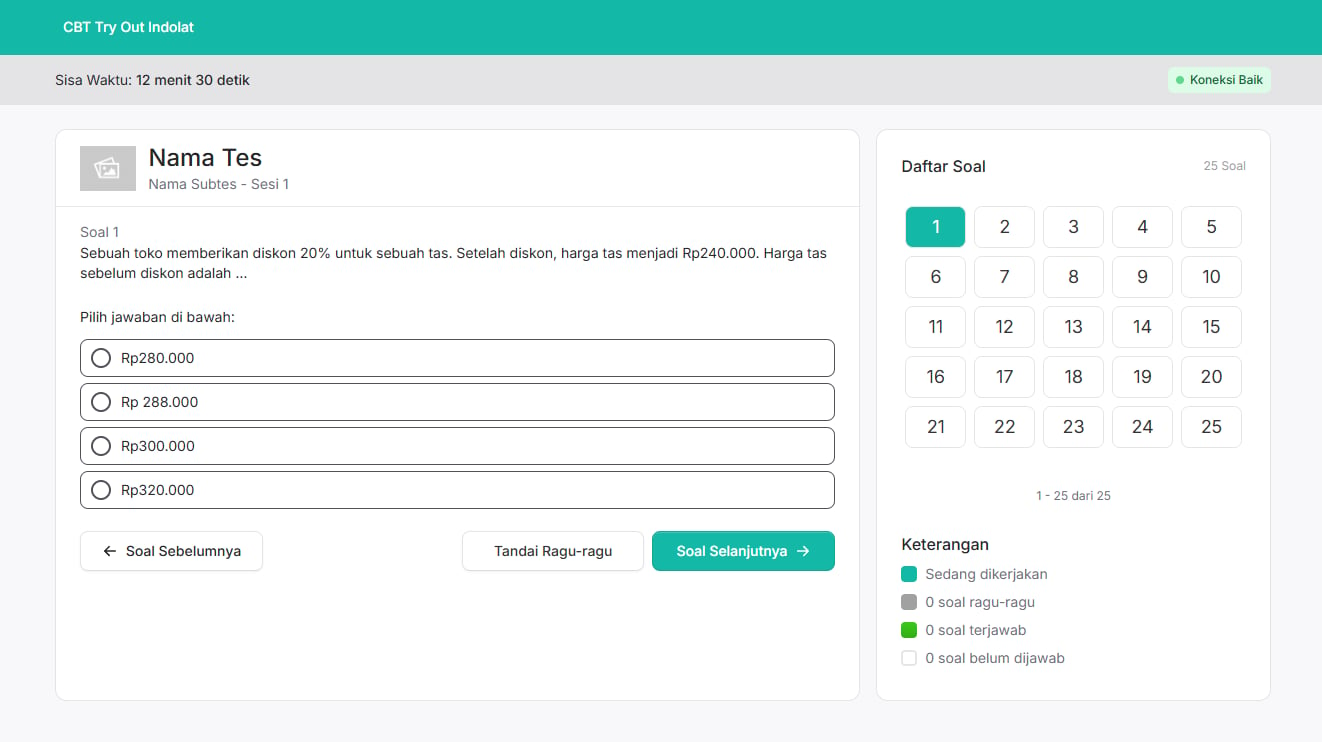
- Delete
Deletes a question you no longer need. Make sure you’ve selected the right question before deleting it.
4. How to Create Questions and Answers
Once the question package is created, the next step is to add questions to it.Create Questions and Answers Manually
Create Questions and Answers Manually
Click Add Question
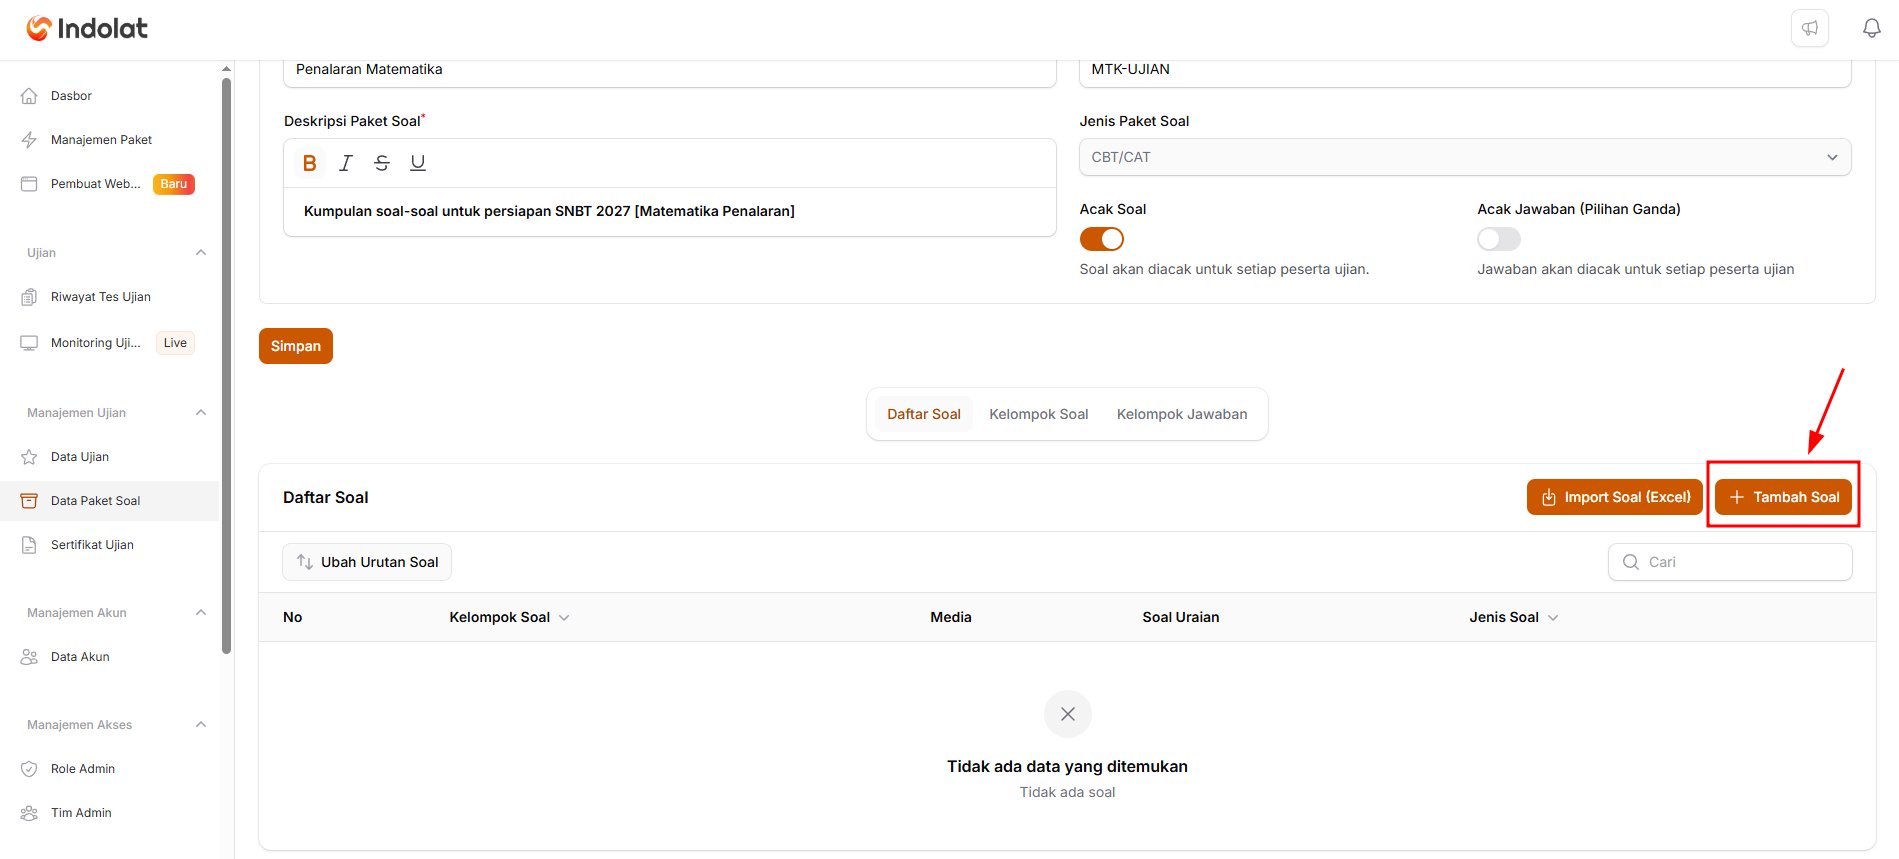
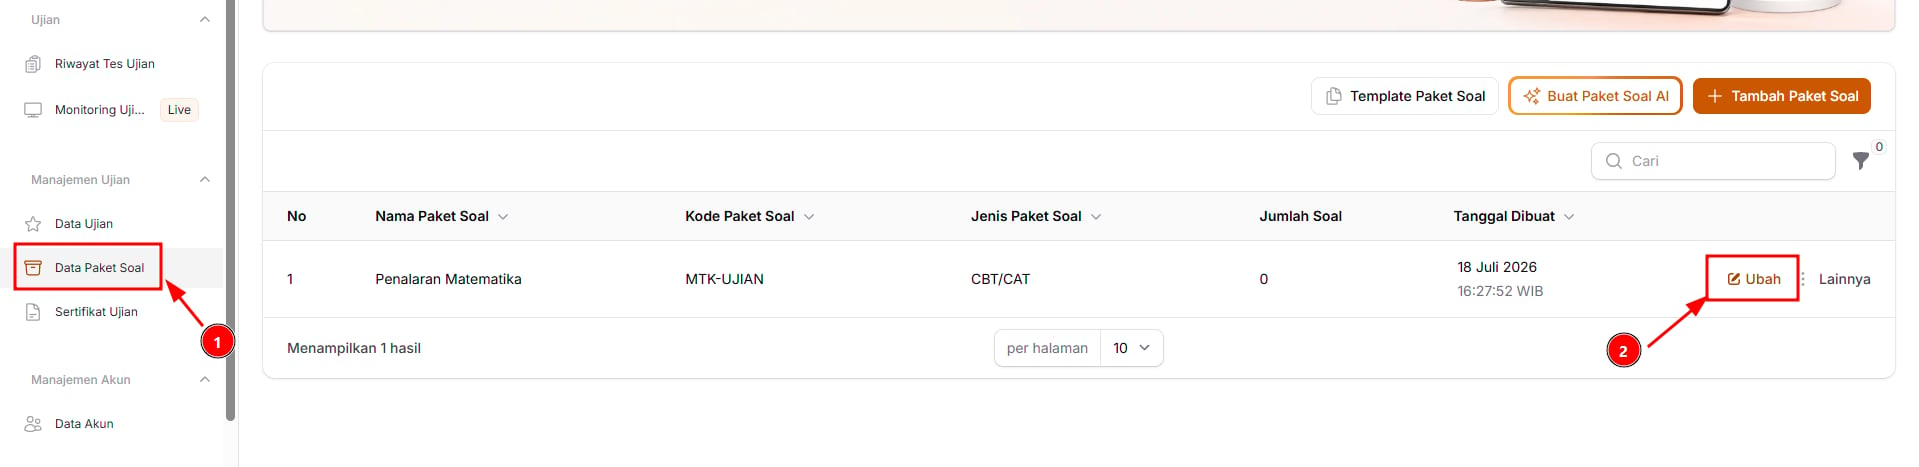
- Open the Question Package Data menu.
- Find the question package that is missing questions.
- Click Edit on that question package.
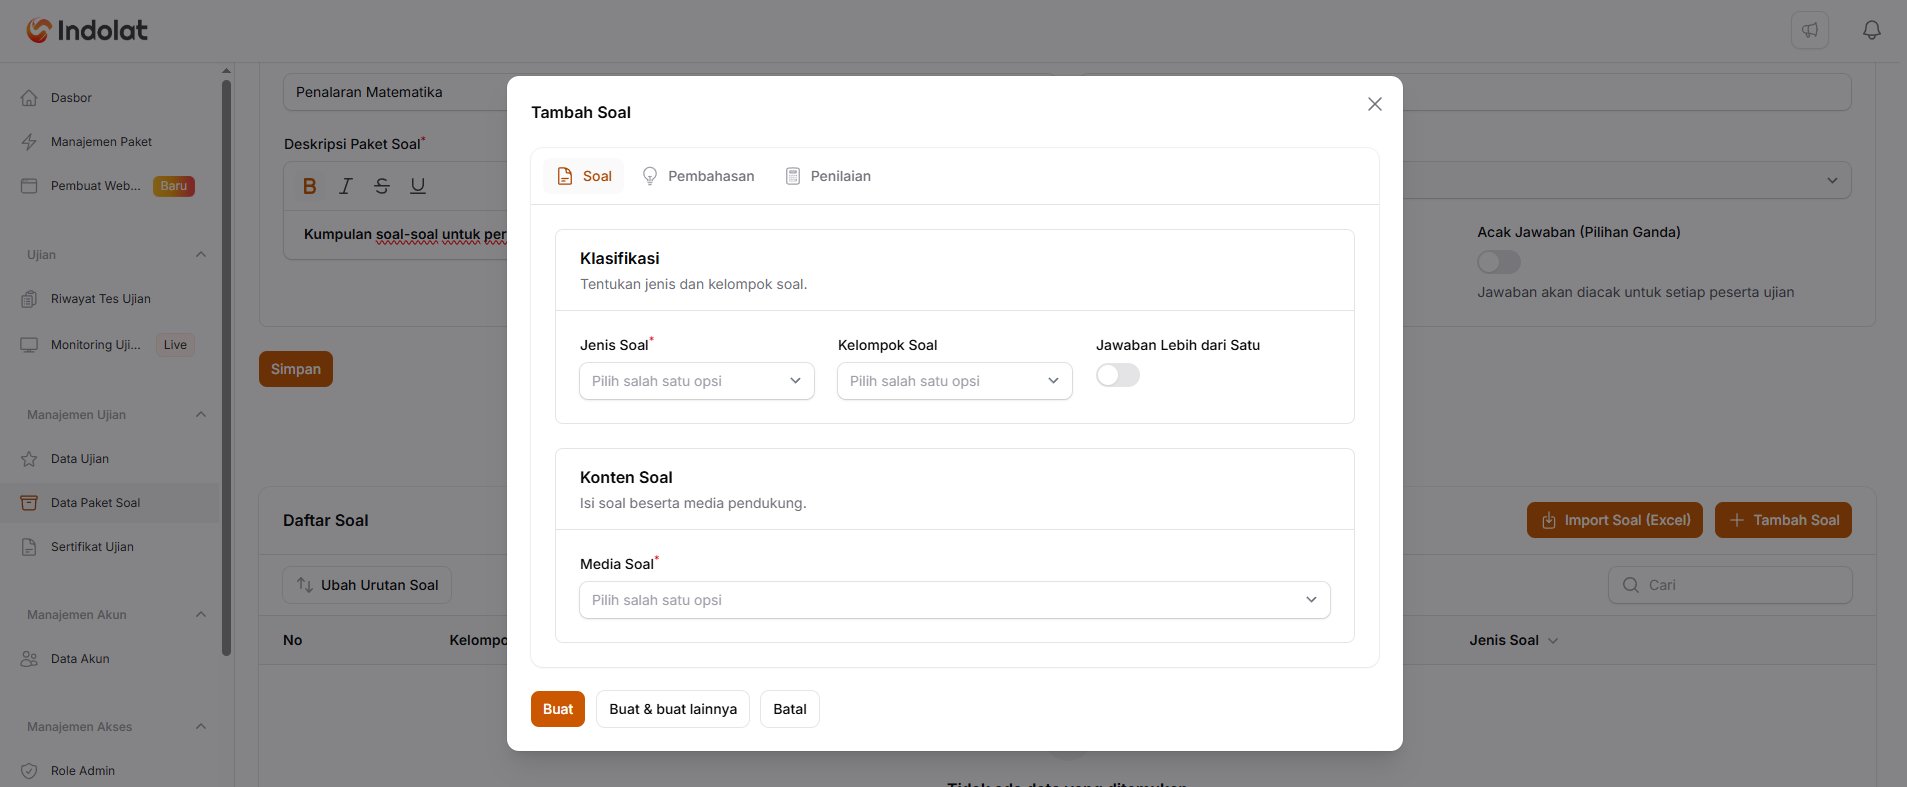
- Add the questions in the Question List section using the Add Question button.
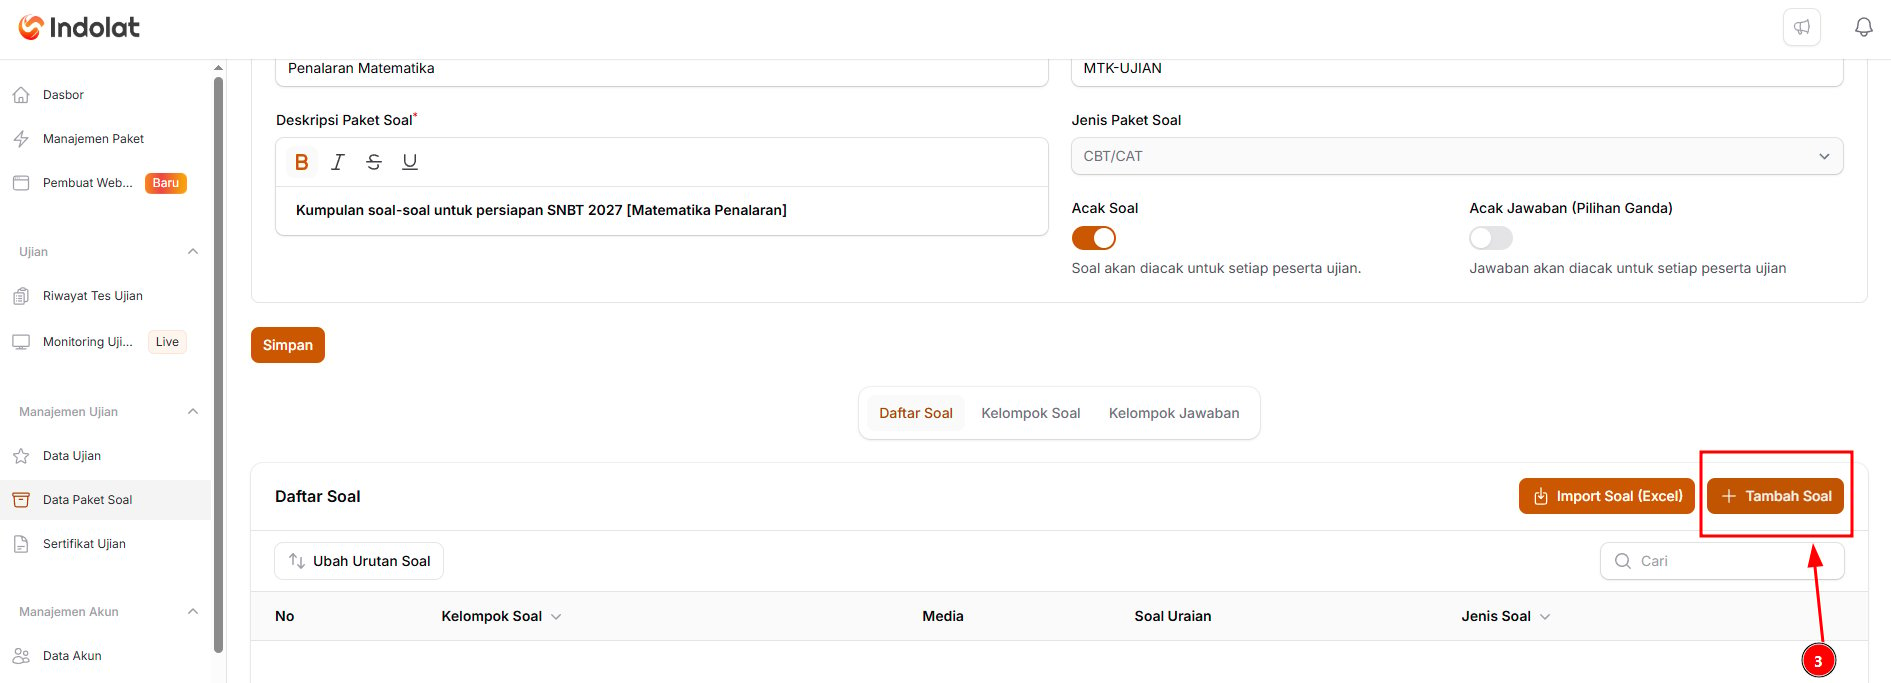
Fill in the question details
-
Question Type: sets the kind of question participants will answer:
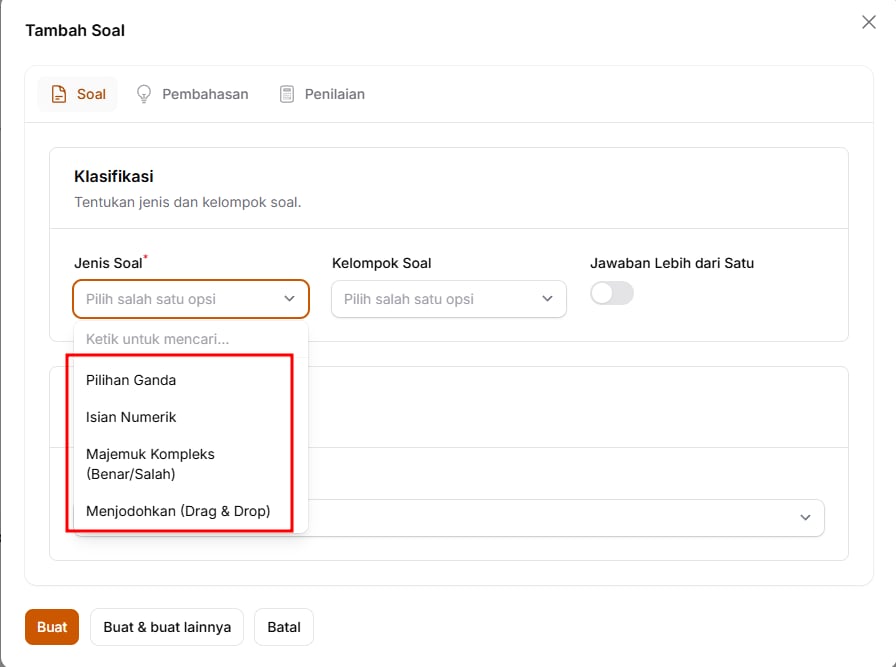
- Multiple Choice
Participants choose one correct answer.
Example: The capital of Indonesia is …
A. Bandung
B. Jakarta
C. Surabaya - Short Answer
Participants type a short answer as a number or text. You can set more than one answer that counts as correct. Set the key in the Answer Key section that appears when you choose this type: Answer Format (Text or Number), Main Answer Key and Other Accepted Answers.
Example: The capital of Indonesia is …
Correct answers: DKI Jakarta or Jakarta - Complex Multiple Response (True/False, Fact/Opinion, etc.)
Participants choose one of two labels for each statement. The labels can be True/False, Fact/Opinion, Matches/Does Not Match, Agree/Disagree, Yes/No or any other labels you set. Choose them in Label Pair under Statement Column Labels; choose Other labels (type your own) to write your own.
Example:- The sun rises in the east — True
- Water freezes at 100°C — False
- Matching (Drag & Drop)
Participants pair up items that belong together. Fill in the pairs in the Matching Pairs section (Statement (Left) and Answer (Right)); the right-hand side is shuffled during the exam.
Example:- Indonesia → Jakarta
- Japan → Tokyo
- Multiple Choice
-
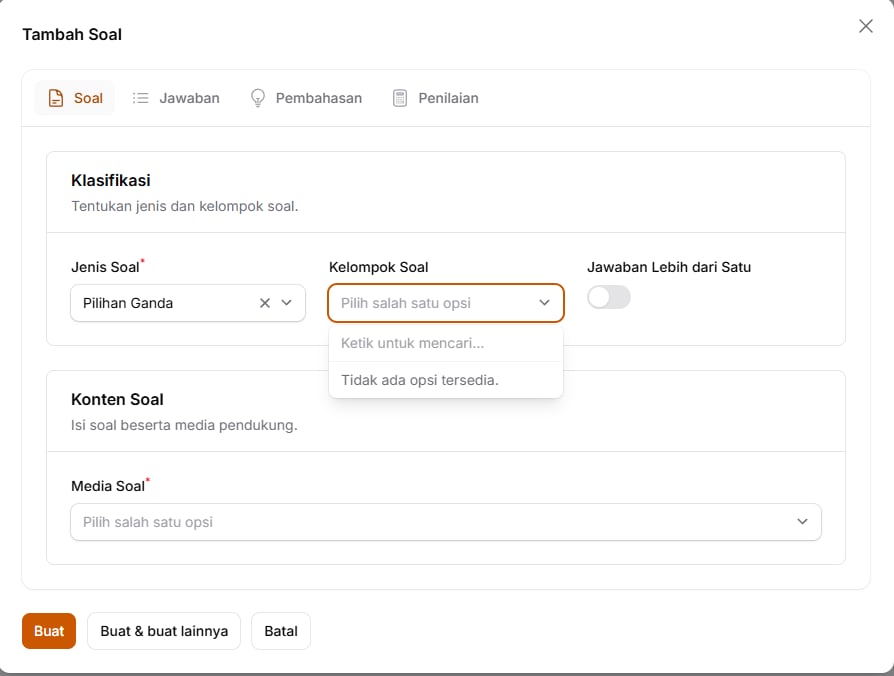
Question Group: groups several questions that share the same material or topic.
Example: there is one reading text called “School Environment”, and 3 questions are based on it. All three questions can go into the School Environment question group, so participants read the same material and then answer several related questions. Another example:
- Question Group: Reading Text 1
- Question 1: What is the main idea of the text?
- Question 2: Who is the character in the text?
- Question 3: What is the conclusion of the text?
- Passages: choose a shared reading text to show above the question text. The list of passages comes from the Passages tab of the question package (see the Create Passages (Shared Reading Texts) section). Leave it empty if the question doesn’t use a reading text.
-
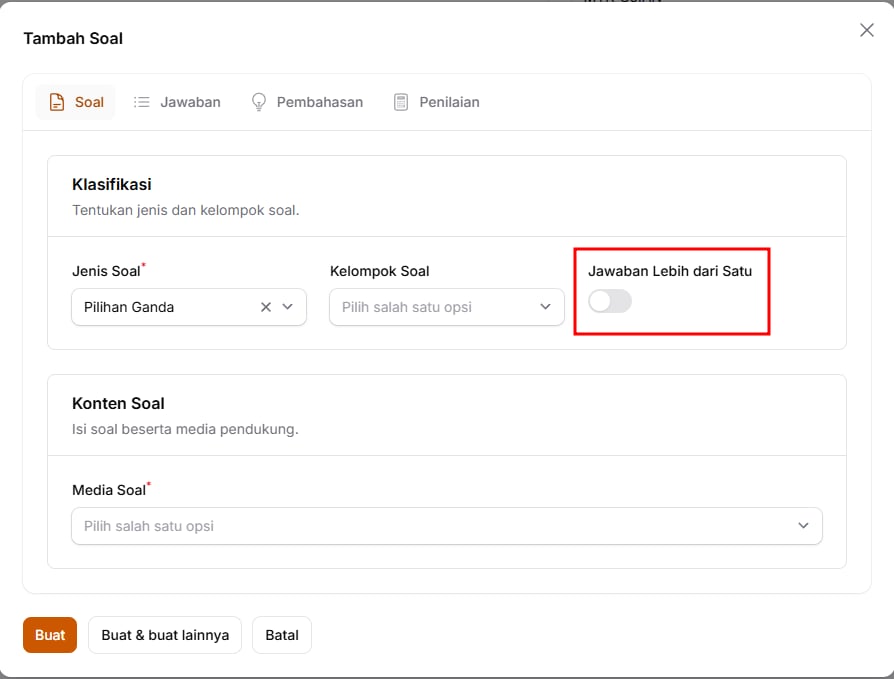
More Than One Answer: use this if a question has more than one correct answer.
Example: Choose the animals that are mammals:
- Cat ✅
- Cow ✅
- Chicken
- Fish
-
Question Media: sets how participants will see or hear the question.
You can choose more than one Question Media type for a single question.
 This means one question can combine text, images and audio. For example:

- Text for writing the question.
- Image for showing a chart or an illustration.
- Audio for listening questions.
Write the question text
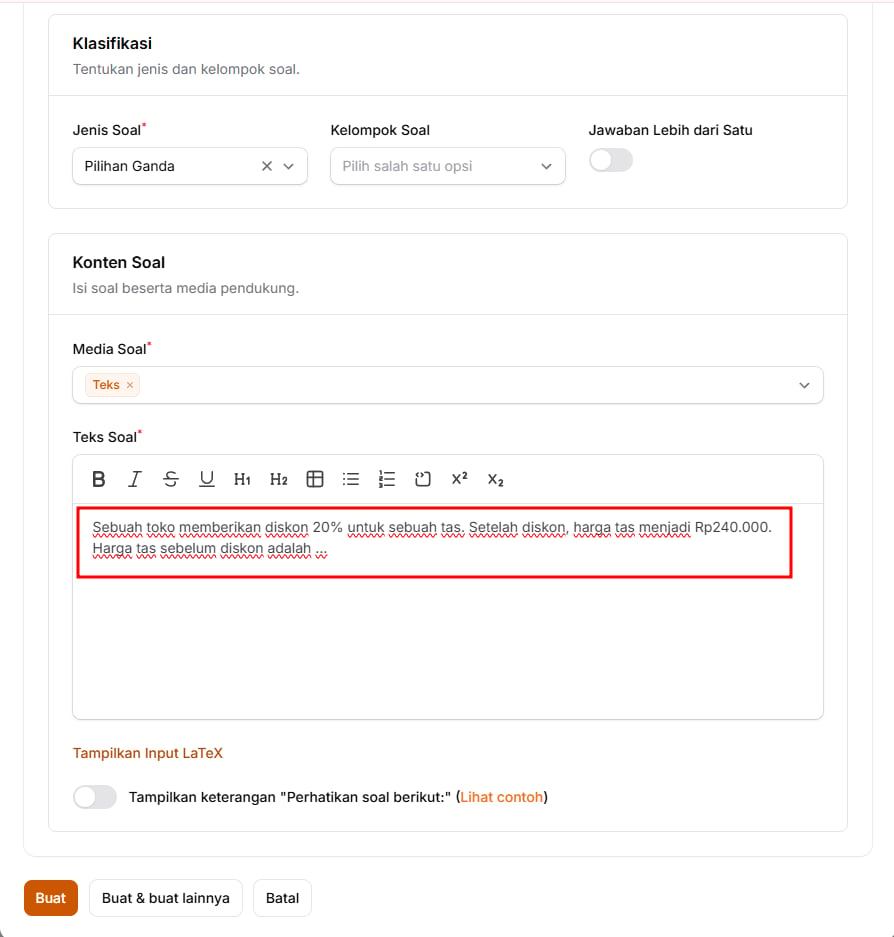
A shop gives a 20% discount on a bag. After the discount, the bag costs Rp240,000. What was the price of the bag before the discount?Use the buttons at the top of the field to format text, create lists, add tables or write mathematical formulas. The question text can be up to 5,000 characters.
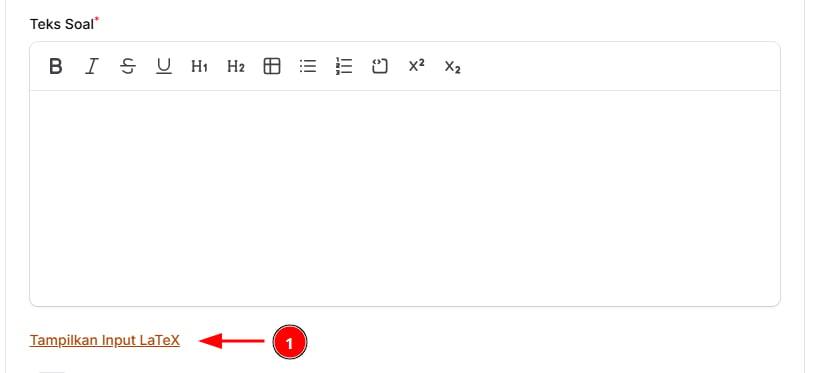
- Click Show LaTeX Input.
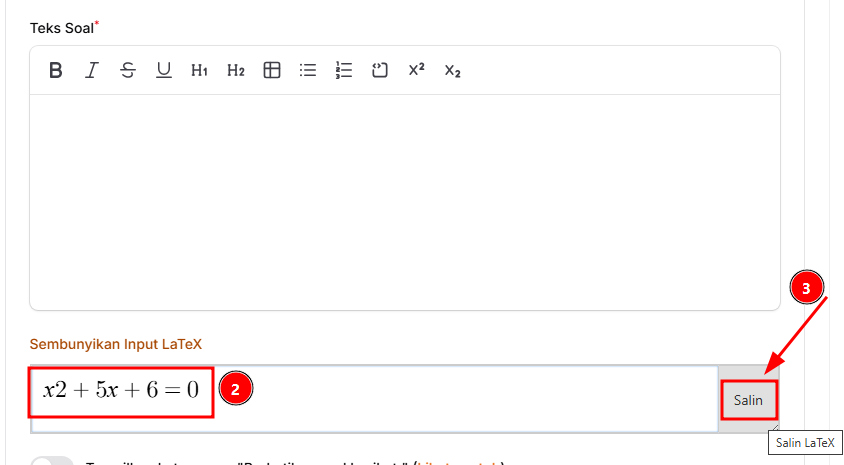
- Type the formula in the field that appears.
- Click Copy.
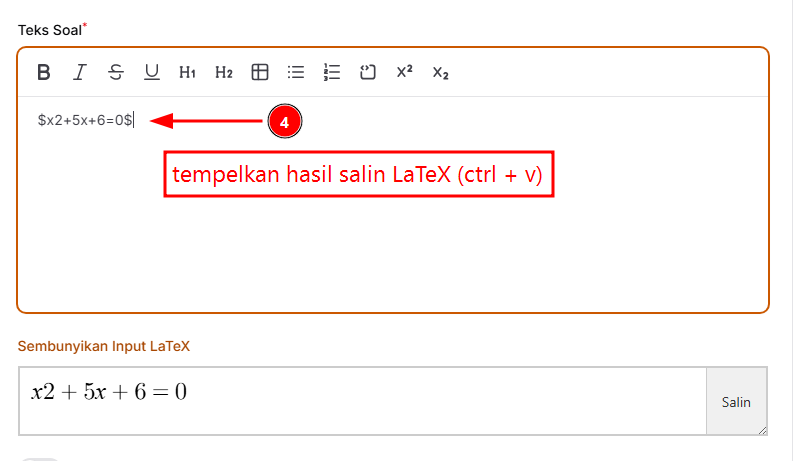
- Paste the formula into Question Text.
Add the answer options
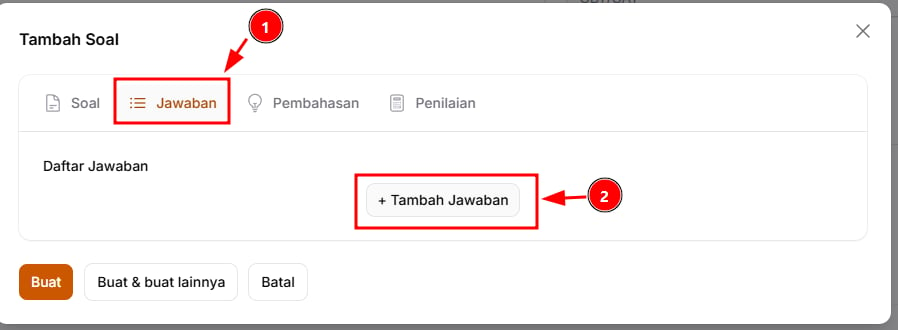
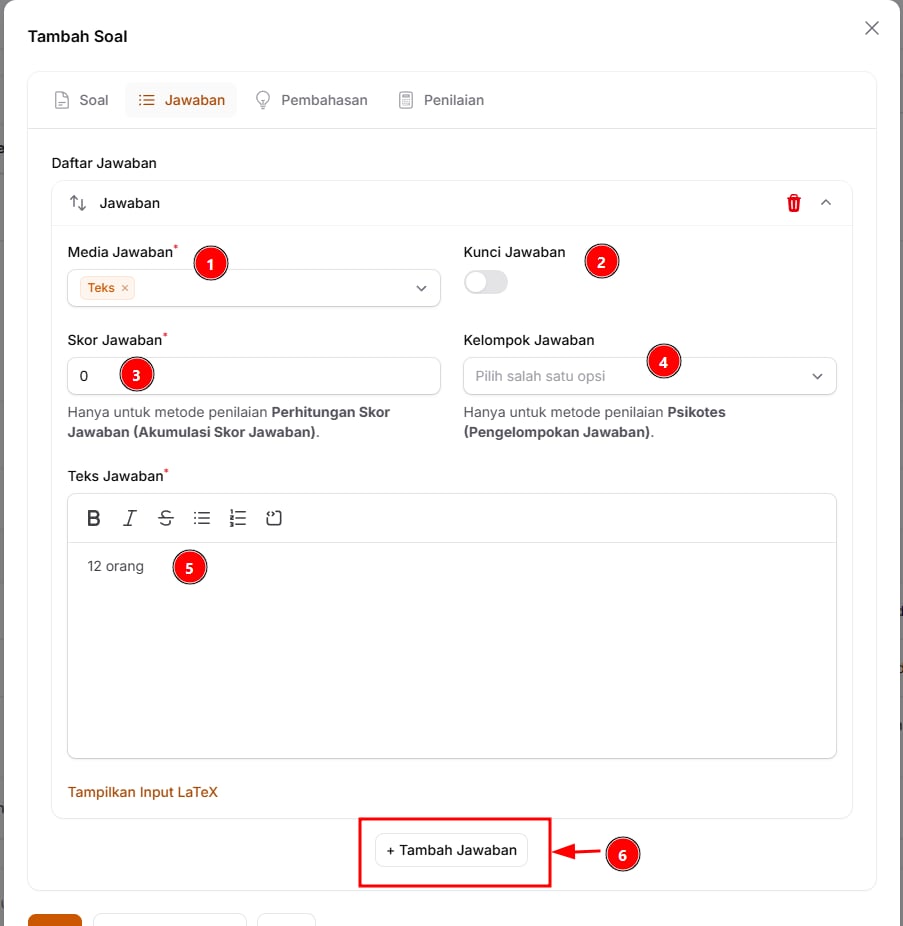
- Answer Media: Choose the answer format, for example text, image or audio.
- Answer Key: Turn this on only for the correct option. If More Than One Answer is on, turn it on for every correct option.
For example, if the correct answer is Rp300,000, turn on Answer Key only for that option. Leave it off for the other answer options.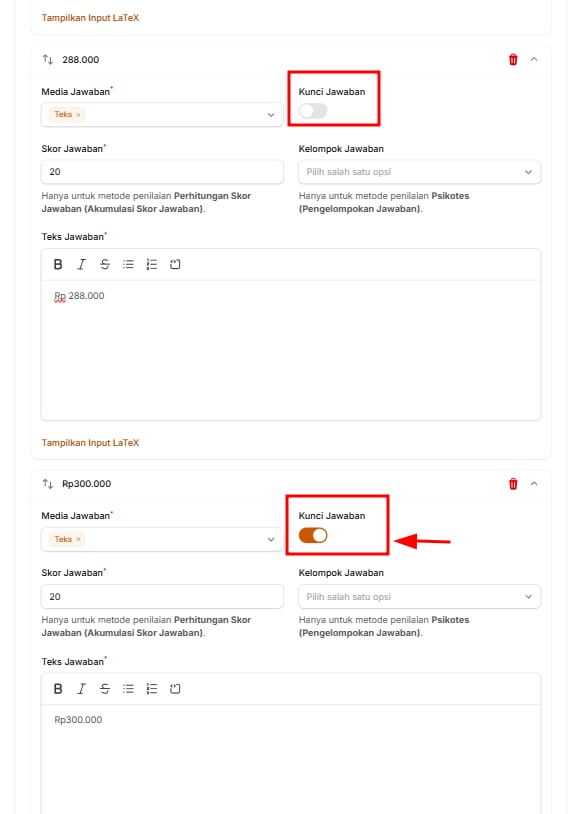
- Answer Score: Enter the score for this option.
For ordinary multiple-choice questions, wrong answers can be given a score of 0. This score is only used with the Answer Score Calculation (Sum of Answer Scores) scoring method. - Answer Group: Only used with the Psychometric (Answer Grouping) scoring method. If you don’t use it, leave it empty.
- Answer Text: Write the answer option participants will see.
- Add Answer: Click Add Answer to create the next answer option.
Create Questions and Answers by Import
Create Questions and Answers by Import
Click Edit on the question package
Click Import Questions (Excel)
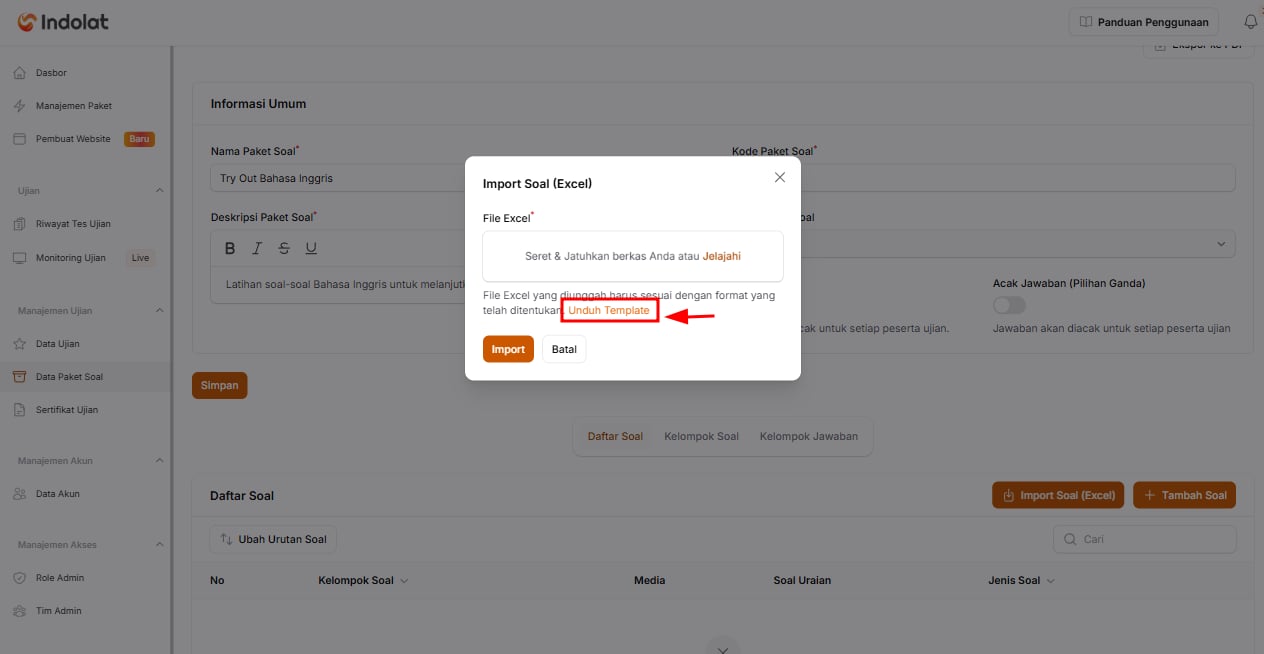
Click Download Template
Open the downloaded template
- Panduan (the instructions sheet; its name is not translated)
- Question Data
- Answer Data
- Passage Data (optional)
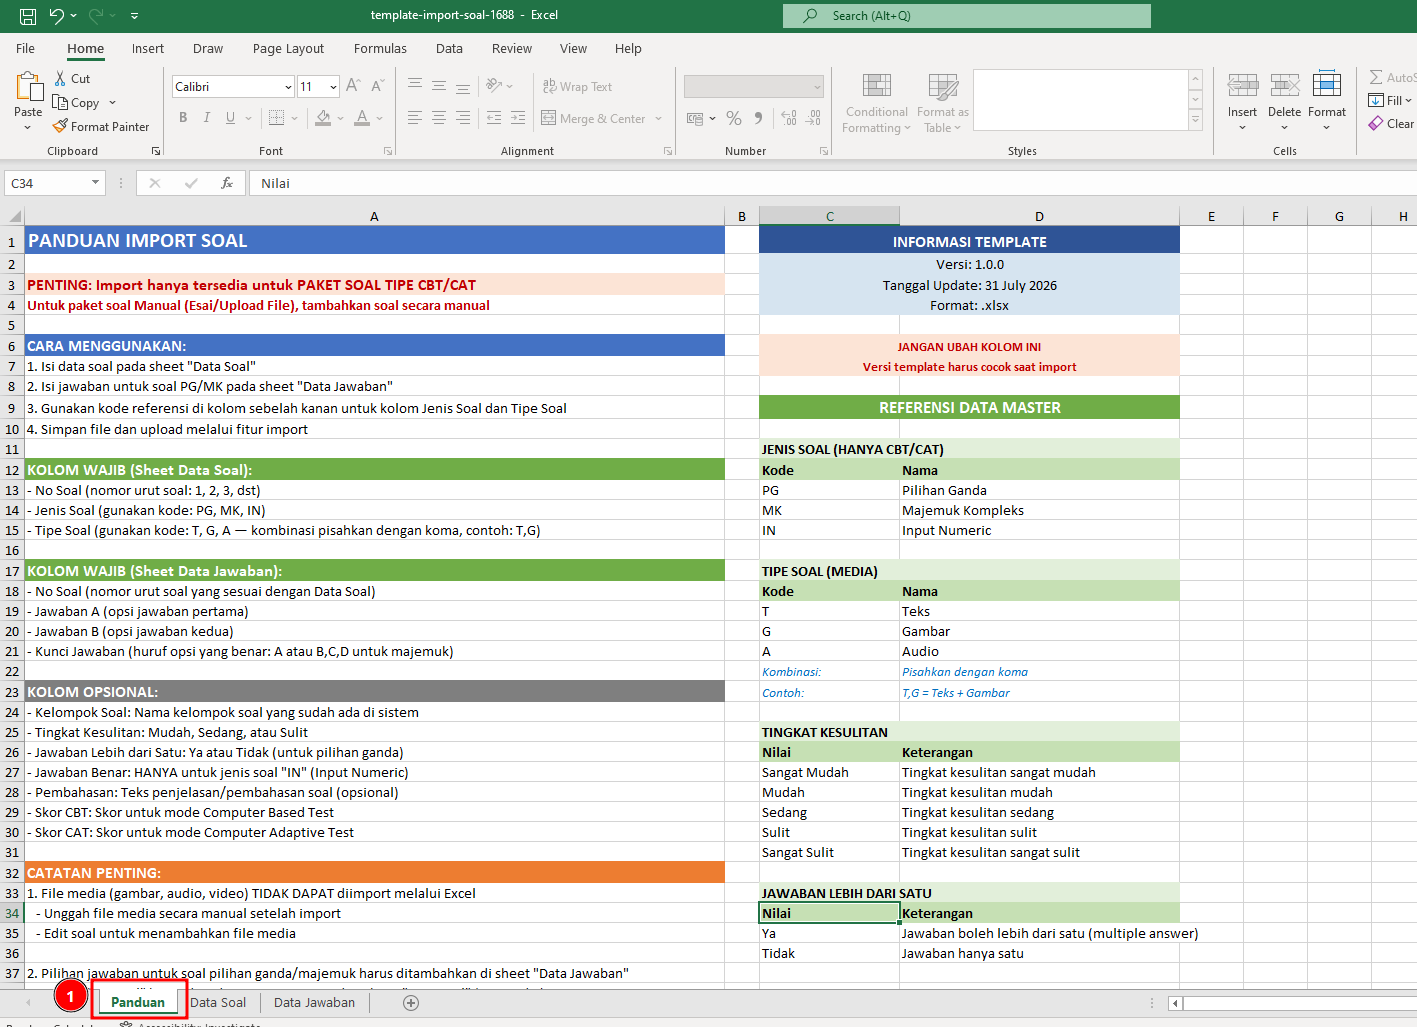
- Import is only available for CBT/CAT question packages.
- Don’t change the column names or the layout of the template.
- Question images and answer images can be added through image links (see Image link rules below). Audio and video are still added after the import.
- Use the codes listed in the instructions to fill in the question type and content type.
- Use the latest template (version 1.2.0) so that the image link columns and the passage sheet are available. Files made from earlier template versions can still be imported.
Fill in the Question Data sheet
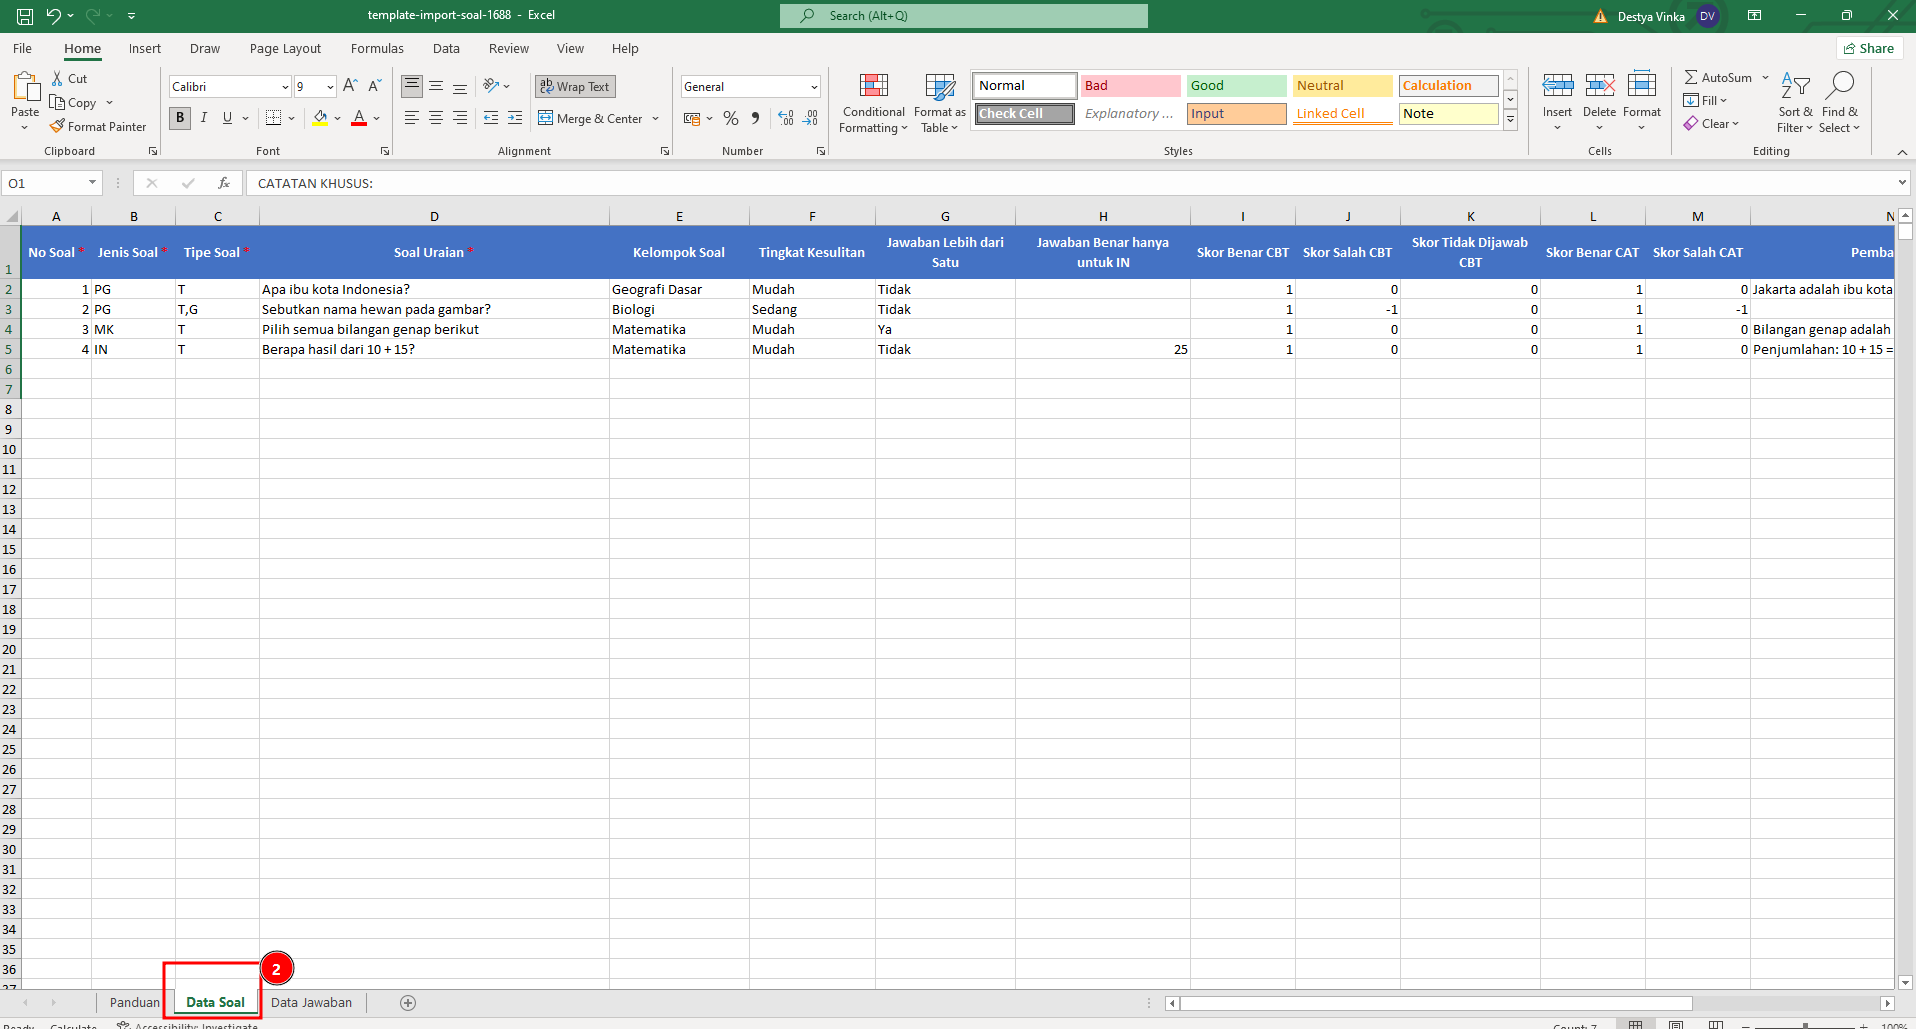
- Question No
Enter the question’s sequence number, for example 1, 2, 3 and so on. - Question Type
Enter the question type using a code:- PG for Multiple Choice
- MK for Complex Multiple Response
- IN for Short Answer
- Content Type
Enter how the question is presented using the codes below. To use more than one type, separate them with commas, for example T,G.- T for Text
- G for Image
- A for Audio
- Essay Question
Enter the question participants will answer, up to 5,000 characters. You can leave it empty if the question is only an image from Question Image Links. - Question Group
Enter the name of the question group. If no question group with that name exists yet, it is created automatically. Leave it empty if the question doesn’t need to be grouped. Examples:- Basic Geography
- Biology
- Mathematics
- Difficulty Level
Enter the question’s difficulty level (the Indonesian values, such as Mudah or Sulit, are also accepted), for example:- Very Easy
- Easy
- Medium
- Hard
- Very Hard
- More Than One Answer
Enter Yes if the question has more than one correct answer, or No if it has only one correct answer. Ya and Tidak are also accepted. - Correct Answer applies to IN only
For IN (Short Answer) questions only, enter the correct answer as a number or text. If several answers count as correct, separate them with |, for exampleDKI Jakarta | Jakartaor0.5 | 1/2. If all the answers are numbers, participants can only type numbers during the exam. Leave this column empty for other question types. - CBT and CAT scores
Enter the score for a correct, wrong or unanswered question in the CBT Score for Correct, CBT Score for Wrong, CBT Score for Unanswered, CAT Score for Correct and CAT Score for Wrong columns, according to the scoring rules you use. - Explanation
Enter an explanation of the answer if needed. - Question Image Links
Optional. Enter the image link(s) for this question. If the question has several images, put one link per line in the same cell (up to 10 images). - Passage Code
Optional. Enter a passage code from the Passage Data sheet (for exampleW1) if the question uses a shared reading text.
Fill in the Answer Data sheet
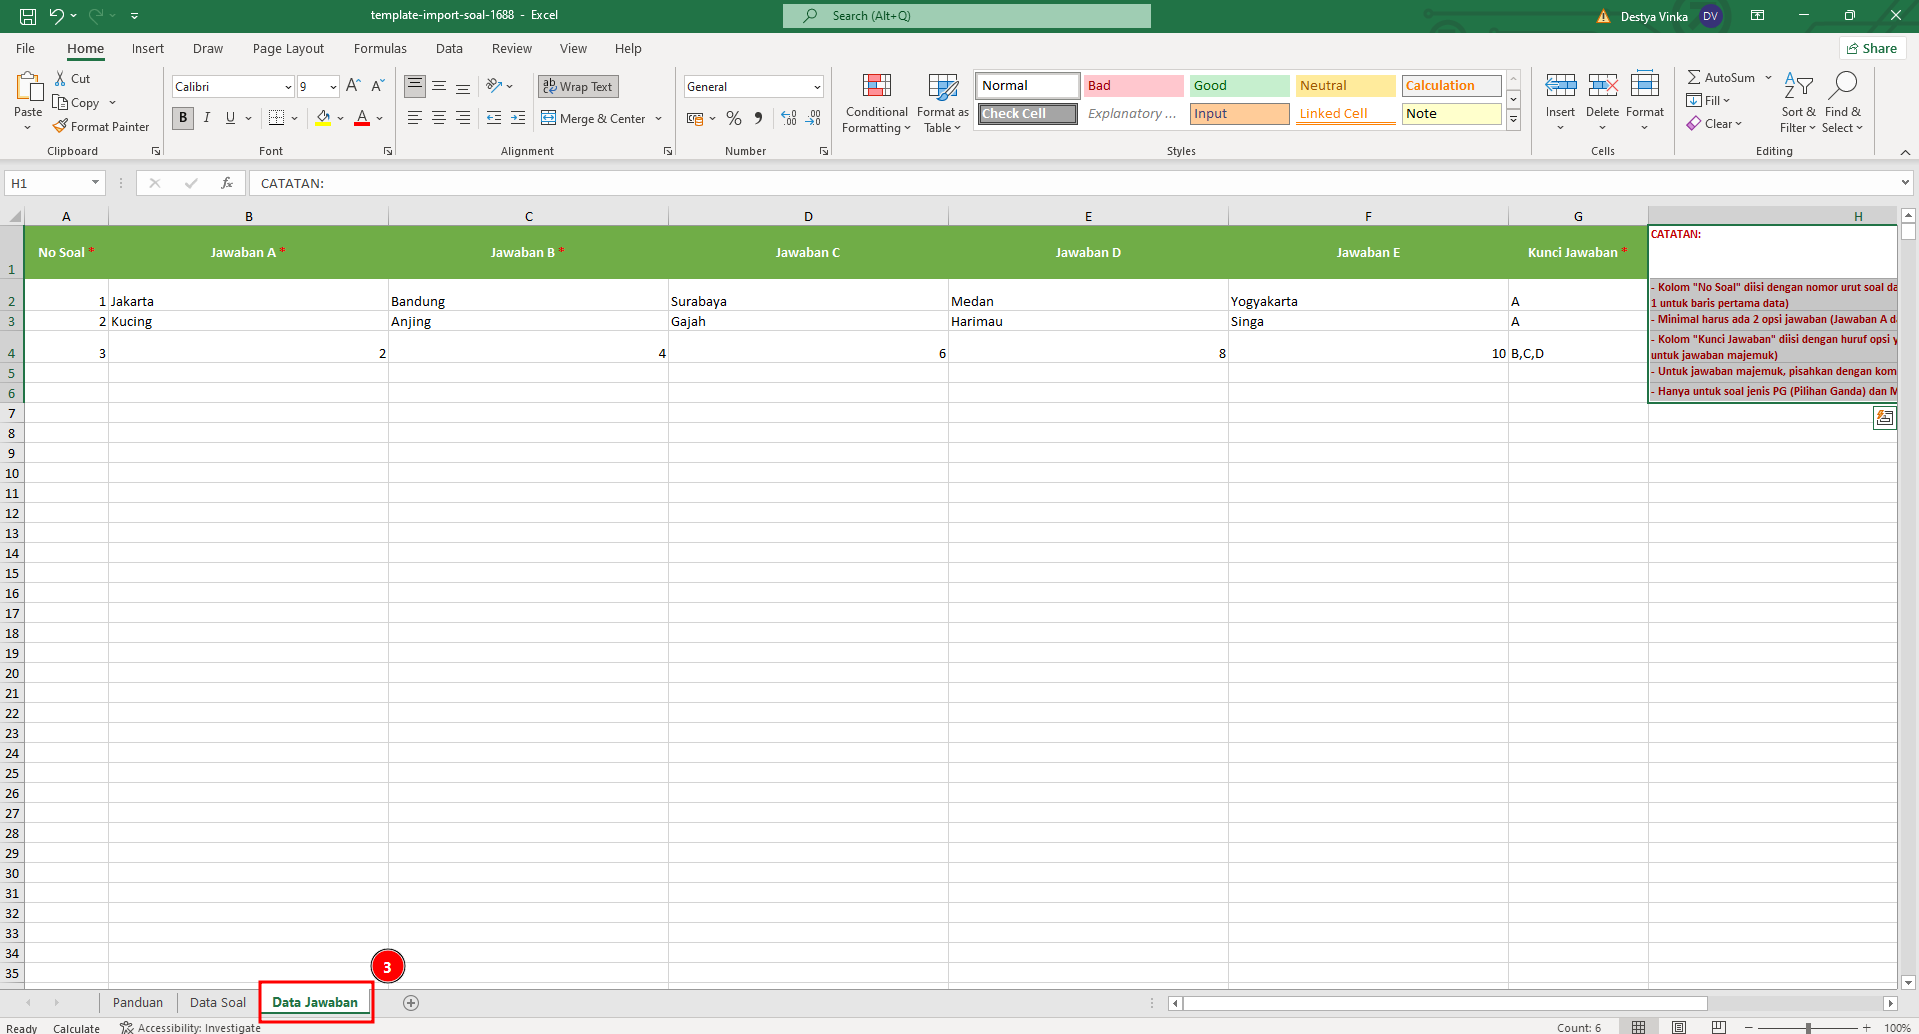
- Question No
Enter the same number as in the Question Data sheet. - Answer A to Answer E
Enter the answer options participants will see. There must be at least two answer options (Answer A and Answer B), as text or as an image link. - Answer Key
Enter the letter of the correct answer. For example:- Enter A if only Answer A is correct.
- Enter B,C,D (separated by commas, without spaces) if there is more than one correct answer.
- Image Link A to Image Link E
Optional. Enter one image link for the matching answer option. An answer option can be text, an image or both.
- Use a full link that starts with
https://and points directly at a JPG, PNG, GIF or WebP image file of up to 5 MB. An easy check: when you open the link in a browser, only the image is shown. - Page links, such as a Google Drive sharing page or a web page that contains the image, are not image links and will be rejected.
- Images are downloaded and stored in your project’s storage, not linked to the original address. The question stays intact even if the original link later changes or is deleted, and the image size counts towards your storage quota.
- For security, the system only downloads from public servers on the internet and checks that the file really is an image.
- If one image fails to download, the whole import is cancelled and the notification names the rows to fix. A file can contain up to 300 image links.
Fill in the Passage Data sheet (optional)
- Passage Code
A unique code for each passage, for exampleW1,W2. Write this code in the Passage Code column of the Question Data sheet for every question that uses the passage. - Passage Title
Optional and only visible to admins. If left empty, the code is used as the title. - Passage Text
The reading text, up to 20,000 characters. It can be left empty if the passage uses Passage Image Links instead. - Passage Image Links
Optional. Image links follow the same rules as question image links; put one link per line for several images.
Upload the template
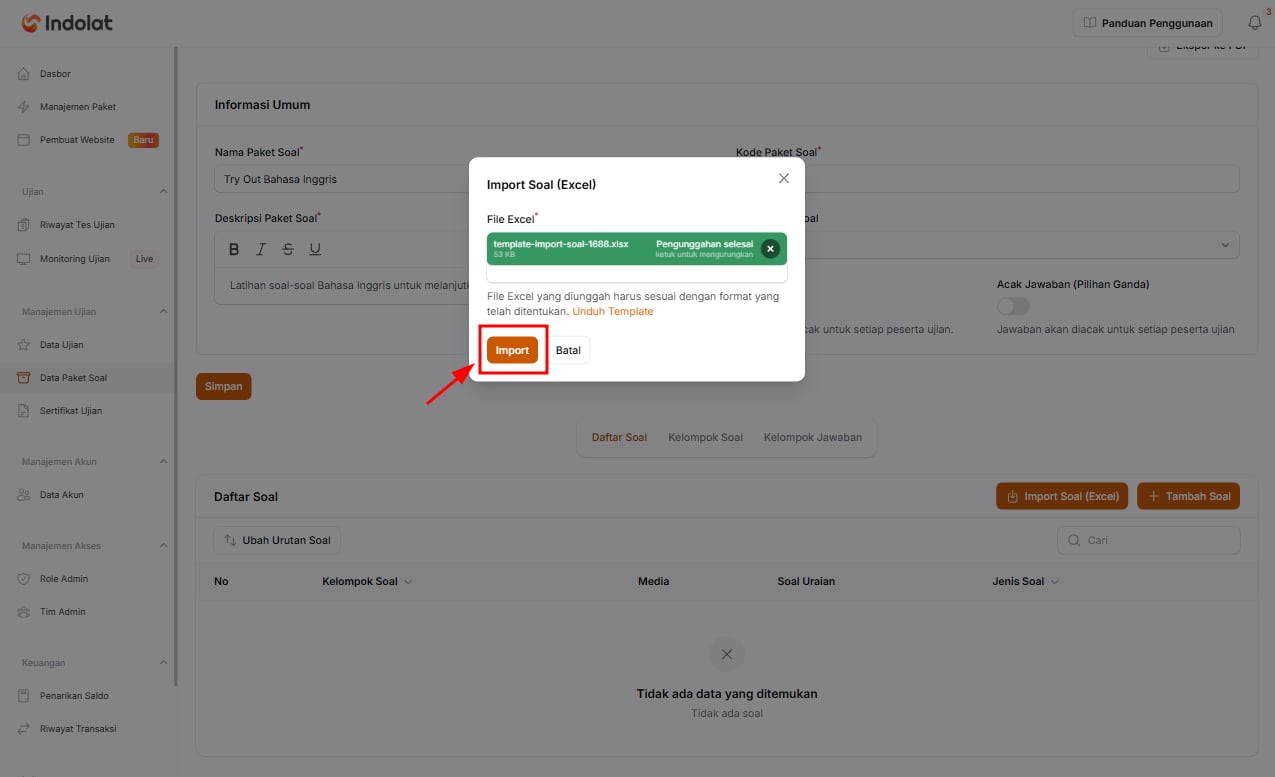
- Save the Excel file.
- Click Import Questions (Excel) again on the question package.
- Upload the completed file.
- Click Import.
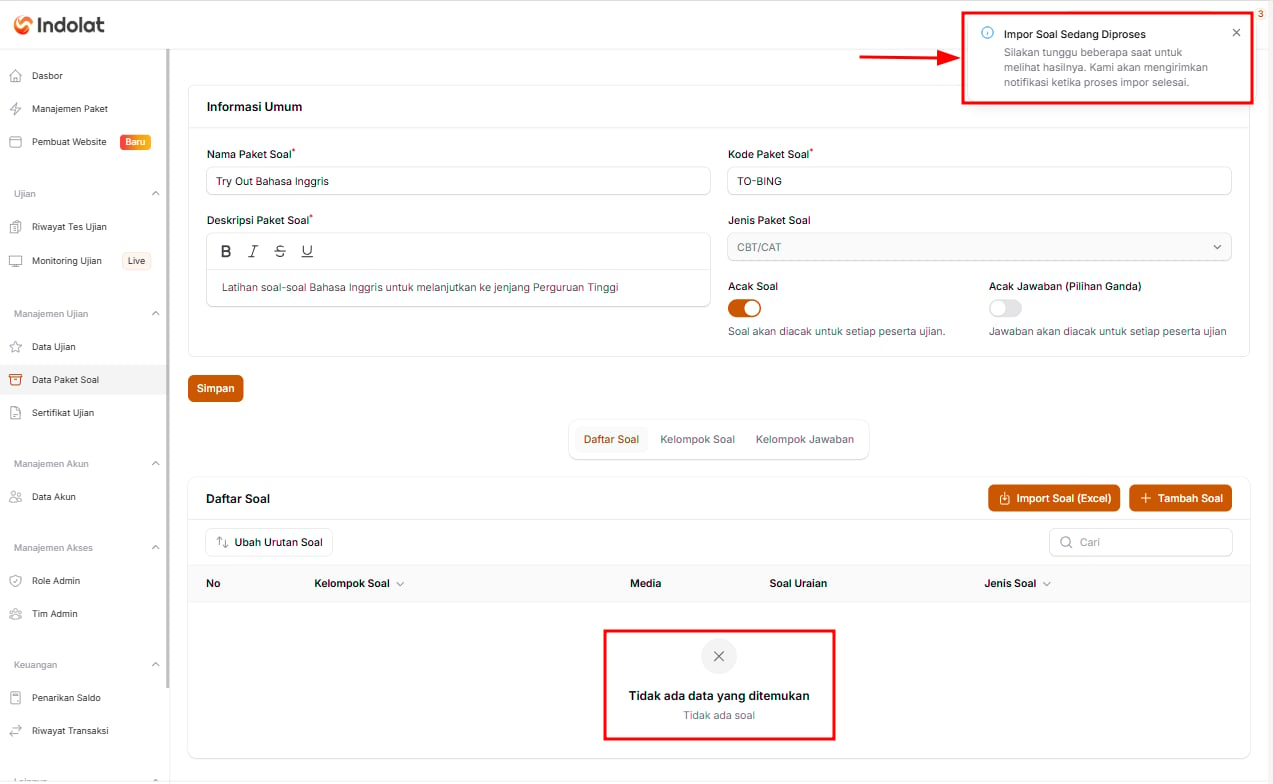
- Wait until the process is finished. The import runs in the background, and you’ll get a notification when it’s done.