

You own Indolat Tutoring Centre and want to run the SNBT 2027 Grand Tryout, a tryout (practice exam) for SNBT (Indonesia’s national university entrance test). The exam will be:
- free,
- open for participants to register themselves,
- and participants can see their scores as soon as they finish.
1. Choose How to Create the Exam
Use an Exam Template
Use an Exam Template
Exam templates help you set up the structure of an exam more quickly.When you use a template, the system automatically creates the exam, its tests and its level or round structure. You don’t have to build each part one by one.Several templates are available to suit different needs.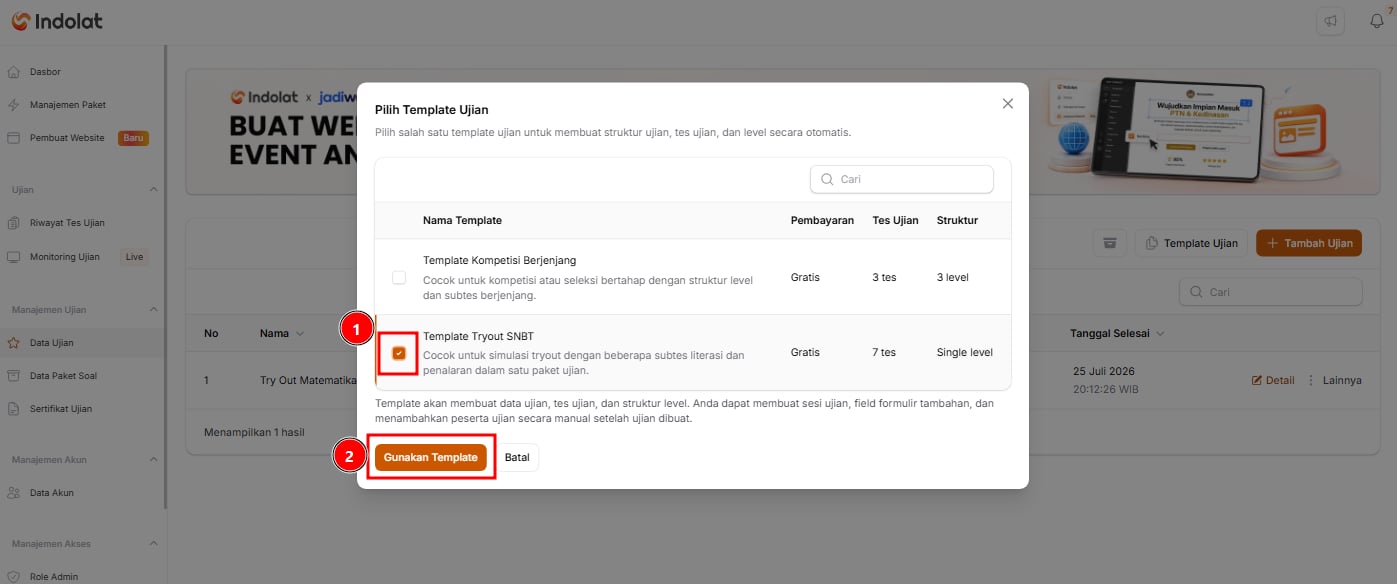
1
Click Exam Template
Open the Exam Data menu, then click Exam Template.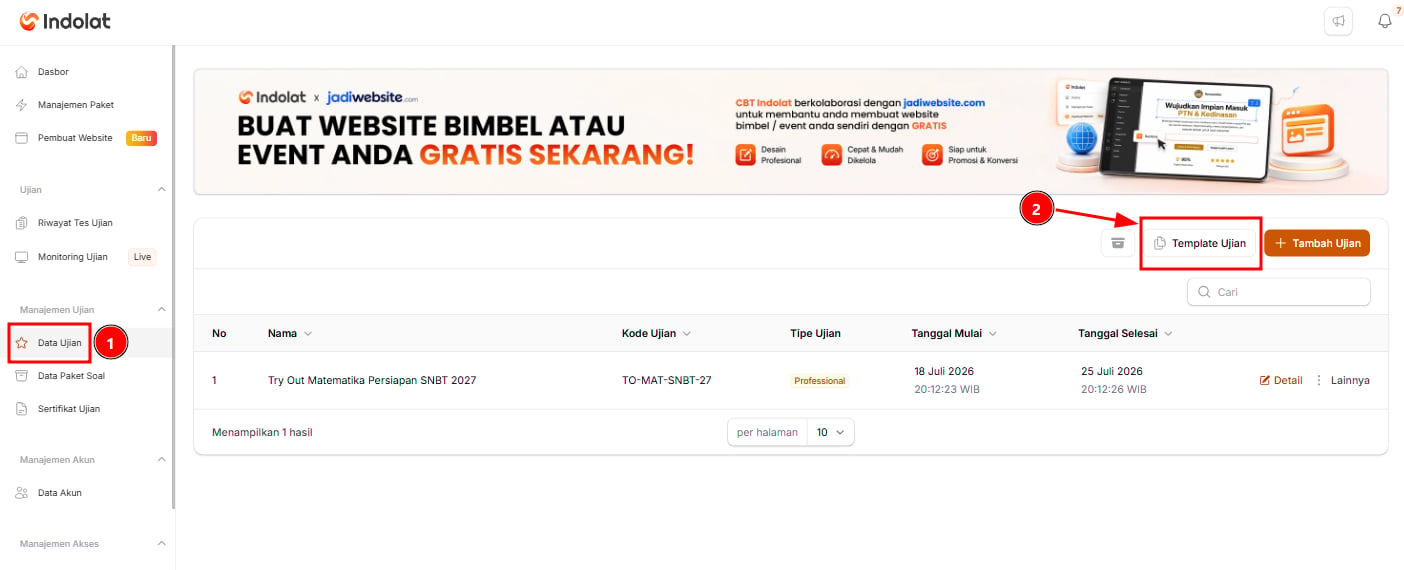
2
Choose an exam template
- Tick the box next to Template Tryout SNBT.
- Click Use Template.
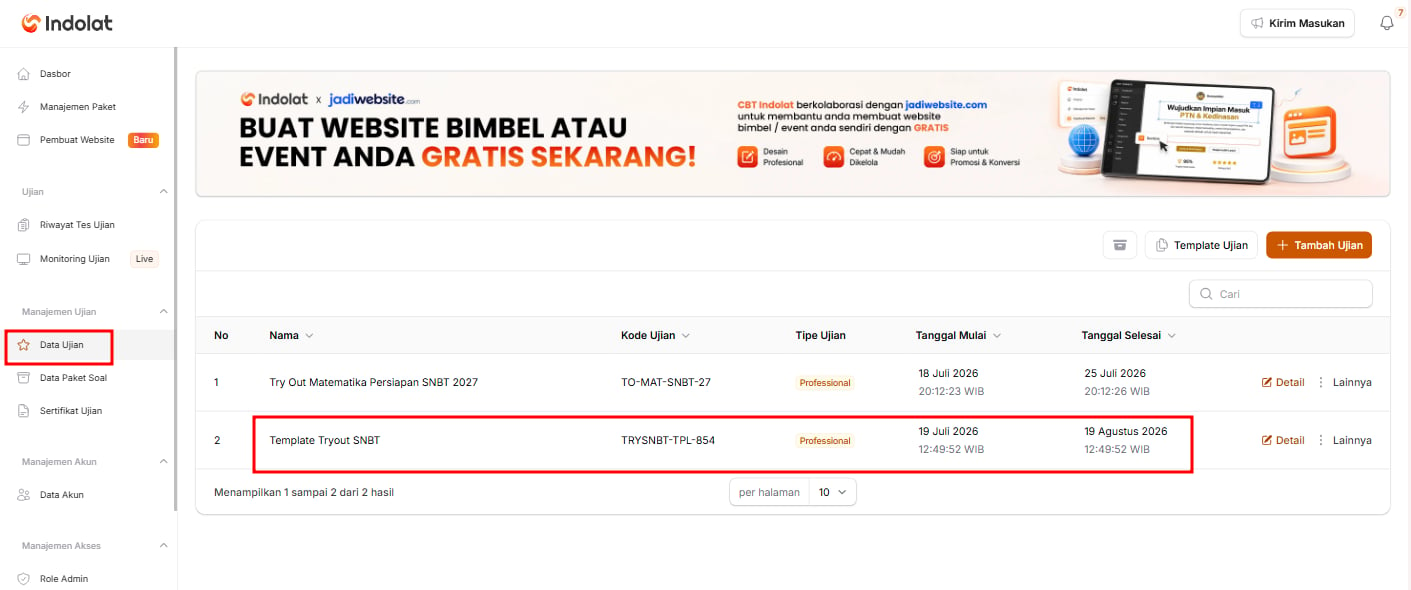
You still need to set up exam sessions and link each test to a question package.An exam created from a template is a Professional Exam (Paid Plan). You can change this in the Exam Type & Plan section.In short, a template only helps you get started faster. The system prepares the framework; you fill in the content.
Create a New Exam
Create a New Exam
Use this option if you want to define every setting yourself from the start.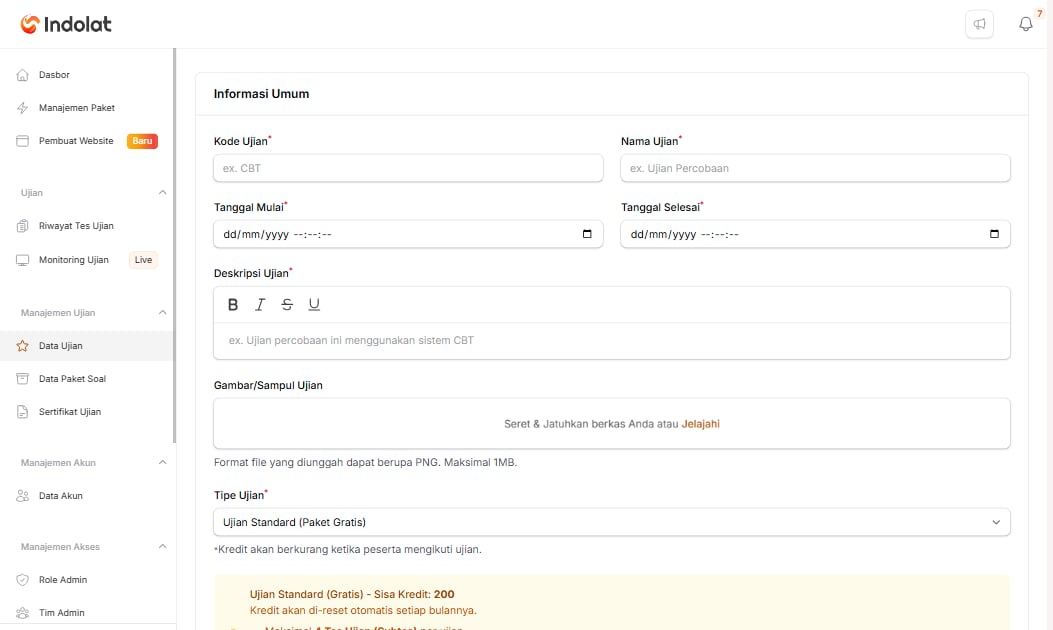
1
Click Add Exam
Open the Exam Data menu, then click Add Exam.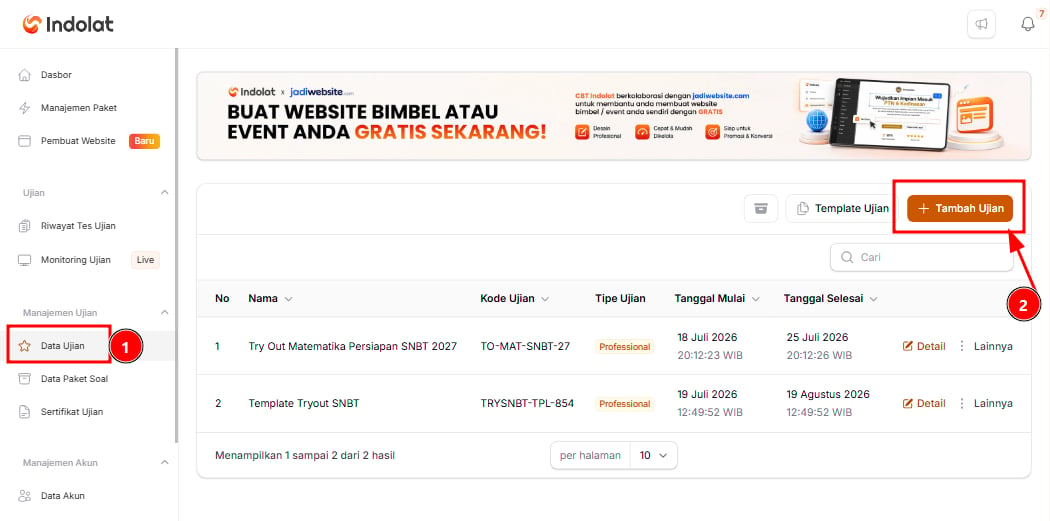
2
Fill in the exam information
2. Fill In the Basic Exam Information
1
Click Details
On the Exam Data page, click Details on the exam you’ve just created. If you created the exam with Add Exam, the exam details page is already open after you click Create, so you can skip this step.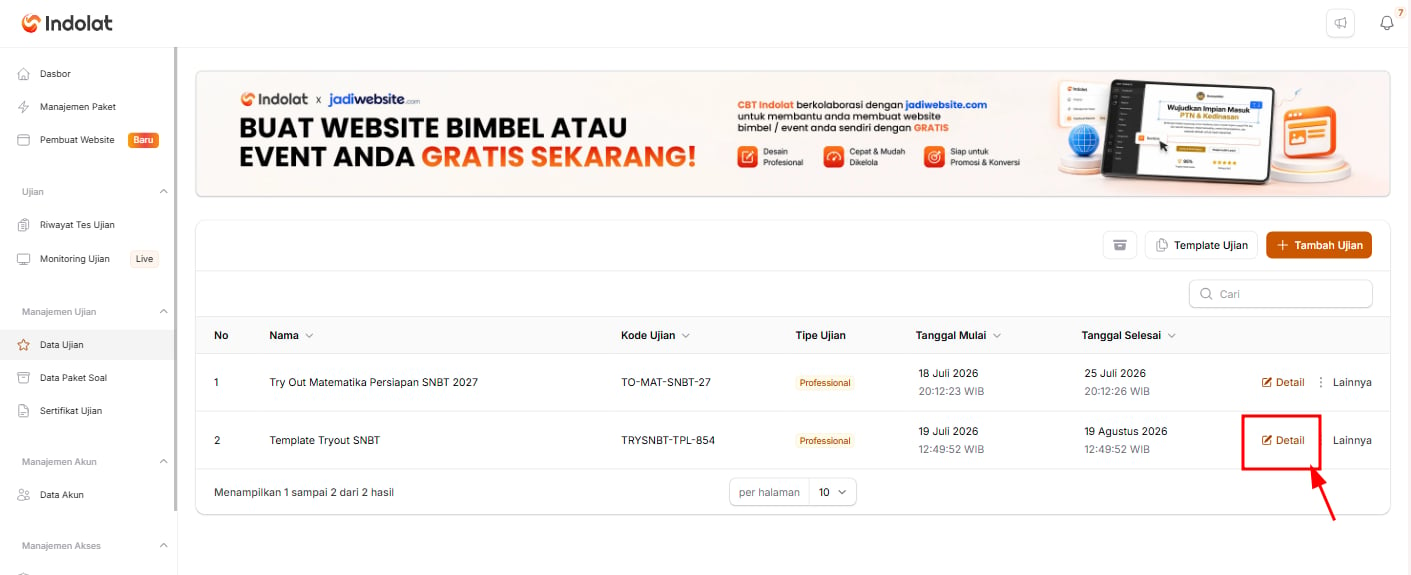
2
Fill in the exam event information
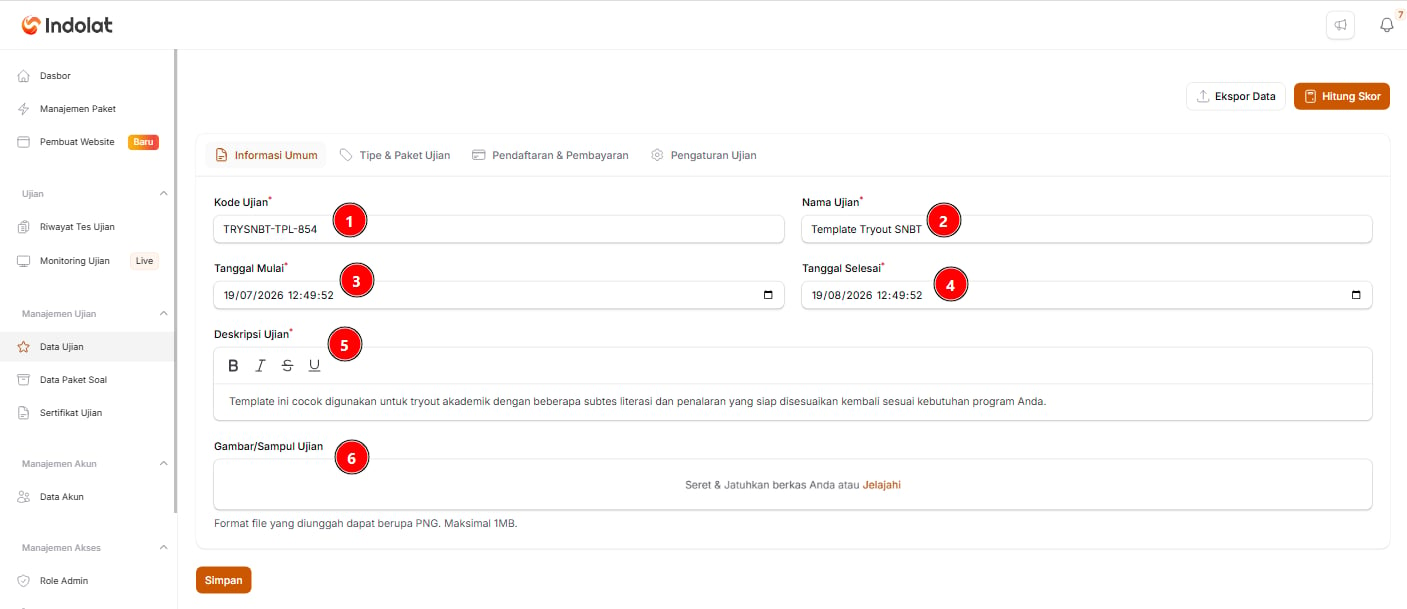
- Exam Code
Enter a short, unique code so the exam is easy to identify.
Example: TRYSNBT-TPL-854 - Exam Name
Enter the exam name that admins and participants will see.
Example: Template Tryout SNBT - Start Date
Set the date and time the exam event starts. - End Date
Set the date and time the exam event ends. - Exam Description
Give a short explanation of the exam’s purpose or content.
Example: This template suits academic tryouts with several literacy and reasoning subtests, ready to adapt to your programme’s needs. - Exam Image/Cover
Upload an image to use as the exam cover. It makes the exam easier for participants to recognise. The file must be a PNG of up to 1MB. - Once you’ve checked that all the information is correct, click Save changes to save the exam event.
3. Complete the Settings on the Exam Details Page
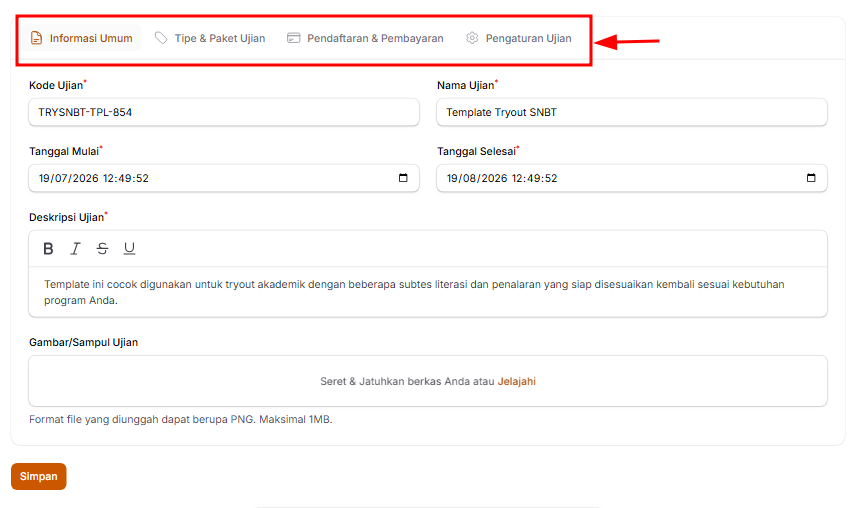
- General Information
- Exam Type & Plan
- Registration & Payment
- Exam Settings
- Additional Information
1
Review General Information
The General Information section lets you view or change the exam’s identity.Here you can change:
- the exam code
- the exam name
- the start date
- the end date
- the exam description
- the exam image or cover.
The SNBT Grand Tryout was originally scheduled for 20–25 July. If the schedule changes, you can update it in the General Information section.After making changes, click Save changes.
2
Review Exam Type & Plan
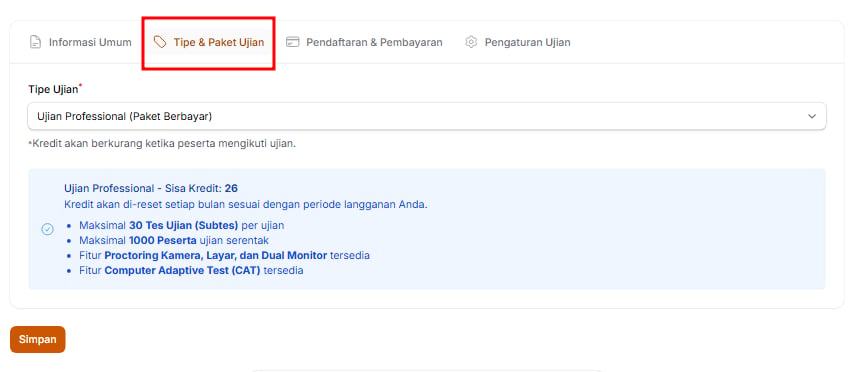
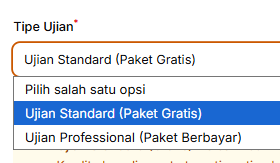
-
Standard Exam (Free Plan)
Suitable for simple exams or regular practice. Its terms:
- Credits are reset automatically every month.
- Up to 4 Tests (Subtests) per exam.
- Up to 50 participants taking the exam at once (participants working on the exam at the same time).
- Camera, Screen and Dual Monitor Proctoring is not available.
- Computer Adaptive Test (CAT) is not available.
-
Professional Exam (Paid Plan): Rp500 per exam credit
Suitable for exams with more participants and more advanced needs. Its terms:
- Credits are reset every month according to your subscription period.
- Up to 30 Tests (Subtests) per exam.
- Up to 1,000 participants taking the exam at once.
- Camera, Screen and Dual Monitor Proctoring is available. Camera and screen proctoring also use their own proctoring credits (an add-on).
- Computer Adaptive Test (CAT) is available.
3
Set up Registration & Payment
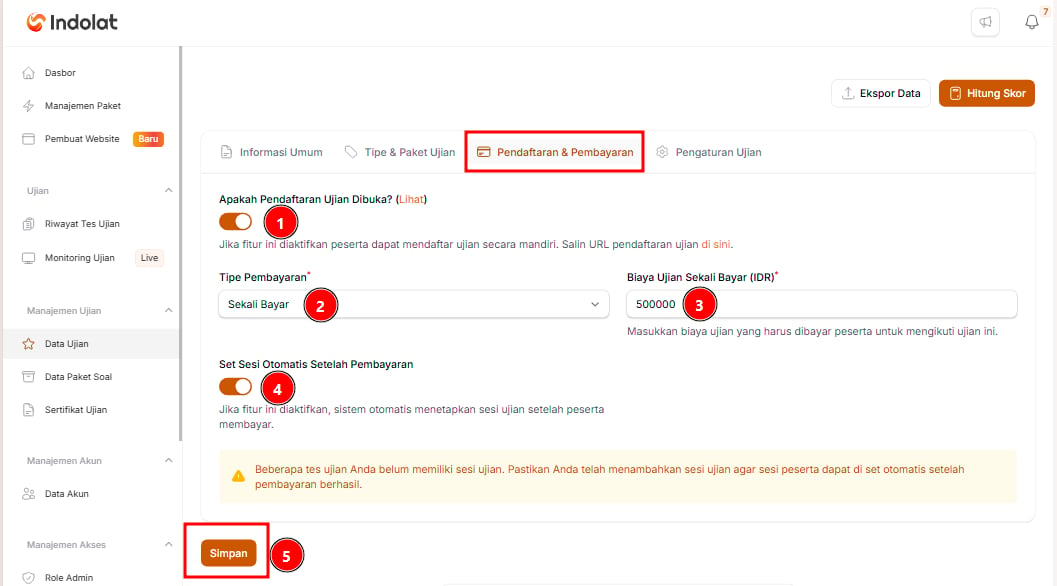
- Is Exam Registration Open?
When this is on, participants can register for the exam themselves. This setting needs the Exam Registration Page and Automatic Payment add-on. If the add-on isn’t active, the label shows “(Add-on Inactive)” and the toggle can’t be turned on. - Payment Type
Choose Free if participants don’t need to pay. If the exam is paid, choose the matching payment type. Paid payment types need the same add-on; without it, a paid exam can’t be saved.
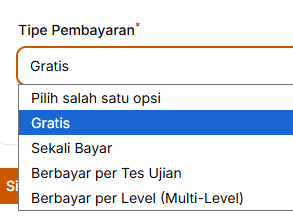
-
Free: Participants don’t pay anything.
Example: A free SNBT tryout made up of a Mathematics Test and an Indonesian Language Test. Participants can take all of them at no cost.
-
One-time Payment: Participants pay once and can then take every test in the exam event.
Example: The SNBT tryout costs Rp50,000. After paying, participants can take the Mathematical Reasoning Test, the Indonesian Literacy Test and the English Literacy Test. Participants don’t need to pay again for each test.
-
Paid per Test: Participants pay for each test they want to take.
Example: Mathematics Test: Rp20,000 Indonesian Language Test: Rp15,000 English Test: Rp15,000 A participant who only wants to take the Mathematics Test pays just Rp20,000.
-
Paid per Level (Multi-Level): For exams made up of several rounds. Participants pay for each round they take.
Example: Preliminary Round: Rp25,000 Semifinal: Rp30,000 Final: Rp40,000 Participants pay for the next round only if they pass.
- One-time Exam Fee (IDR)
The fee participants pay to take the exam. This field appears when you choose One-time Payment. - Assign the Session Automatically After Registration
Turn this on if you want participants who register successfully to be placed in an exam session automatically. With One-time Payment and Paid per Test, this setting is called Assign the Session Automatically After Payment and takes effect once the participant has paid. With Paid per Level (Multi-Level), this setting isn’t shown. It also needs the Exam Registration Page and Automatic Payment add-on. - When you’ve finished, click Save changes.
4
Complete the Exam Settings
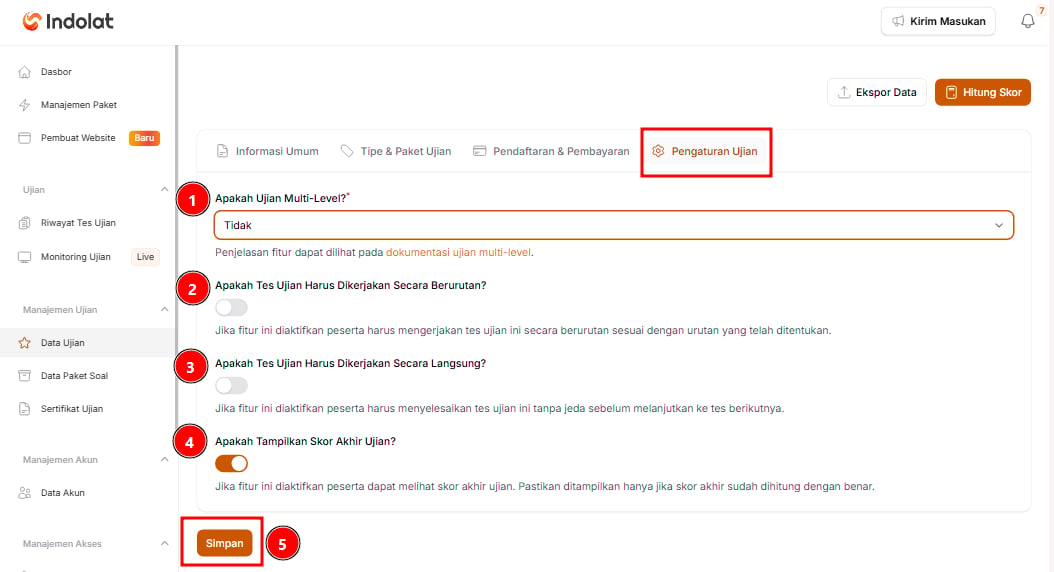
-
Is This a Multi-Level Exam?
Choose Yes (Multi-Level) if the exam runs in several stages or rounds. The full guide is in Create a Multi-Level Exam.
Example:
Choose No if the exam has only one stage.- Preliminary Round
- Semifinal
- Final
Example: an SNBT tryout held once, with no further rounds.
-
Must the Tests Be Taken in Order?
Turn this on if participants must take the tests in a set order.
Example: participants must finish the Mathematics Test before they can open the Indonesian Language Test.
If it’s off, participants can choose which test to take first. -
Must the Tests Be Taken in One Sitting?
Turn this on if participants must go straight on to the next test without a break.
Example: after finishing the Mathematics Test, participants must go straight on to the Indonesian Language Test.
If it’s off, participants can stop after finishing one test and come back for the next one while the schedule is still open. -
Final Score Type
Choose how a participant’s final score is derived from the scores of all the tests:
- Accumulated Exam Test Scores: the scores of each test are added up.
- Averaged Exam Test Scores: the total is divided by the number of tests already scored. This option is selected by default.
Example: a participant scores 80 on the Mathematics Test and 70 on the Indonesian Language Test. With Accumulated Exam Test Scores, the final score is 150; with Averaged Exam Test Scores, it’s 75.
If the exam already has participants, every participant’s final score is recalculated once you save the change. -
Show the Final Exam Score?
Turn this on if participants may see their final result once they finish.
Example: in a practice tryout, participants can see their score straight away to check how they’re doing.
Turn it off if scores still need to be checked or will be announced later.Example: selection scores are checked first and announced by the committee the next day.
- When you’ve finished, click Save changes.
5
Set up Additional Information
The Additional Information section is optional. Use it to show specific information on the dashboard of participants registered for this exam, such as a WhatsApp group link, technical guidance or the committee’s contact details. Participants in other exams don’t see it.
- Show Additional Information to Participants?
Turn this on to show the additional information on participants’ dashboards. - Information Title
Enter a title of up to 100 characters.
Example: Join the Participants’ WhatsApp Group - Information Content
Enter the information itself, up to 1,000 characters. - Button Label (Optional) and Button Link (Optional)
Fill in both if you want to show a button, such as Join Group. Use a full link starting withhttp://orhttps://. The button only appears when both its label and link are filled in. - When you’ve finished, click Save changes.
4. Review the Exam You Created
Before you move on to creating tests, check the following:- The exam name and code are correct.
- The start and end dates are right.
- The exam type fits your needs.
- Self-registration is turned on or off as intended.
- The payment type is correct.
- The test-taking rules are right.
- You’ve checked how scores are announced.
Create a Test
Add tests to the exam you’ve just created.