

- Preliminary Round
- Semifinal
- Final
All participants take the Preliminary Round first. Once the results have been checked, participants who meet the criteria can be moved on to the Semifinal. The best participants from the Semifinal then go on to the Final.
1. Choose How to Create the Exam
Use an Exam Template
Use an Exam Template
Exam templates help you set up the structure of an exam more quickly.When you use a template, the system automatically creates the exam, its tests and its level or round structure. You don’t have to build each part one by one.Several templates are available to suit different needs.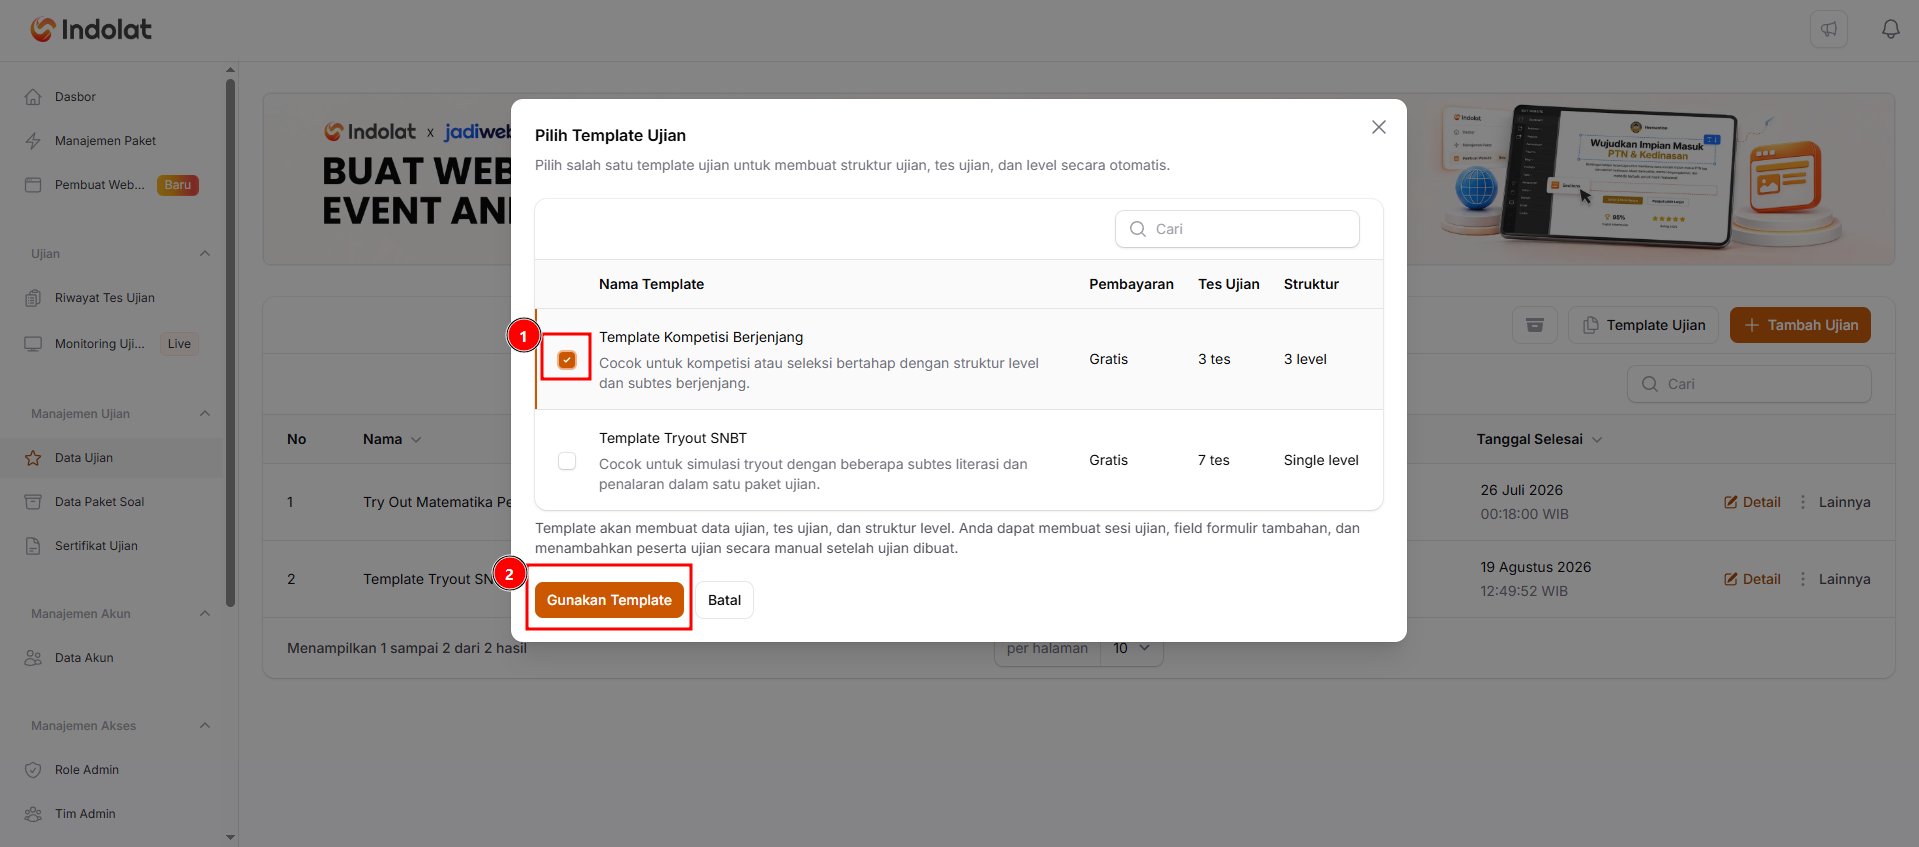
1
Click Exam Template
Open the Exam Data menu, then click Exam Template.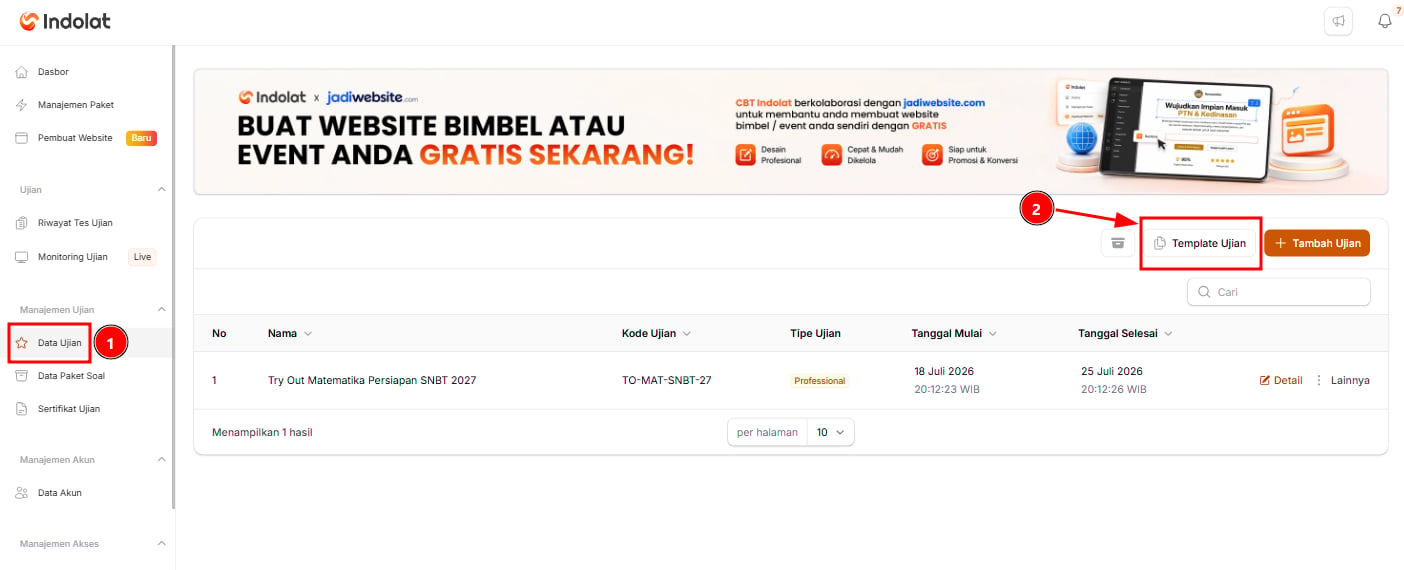
2
Choose an exam template
- Tick the box next to Template Kompetisi Berjenjang.
- Click Use Template.
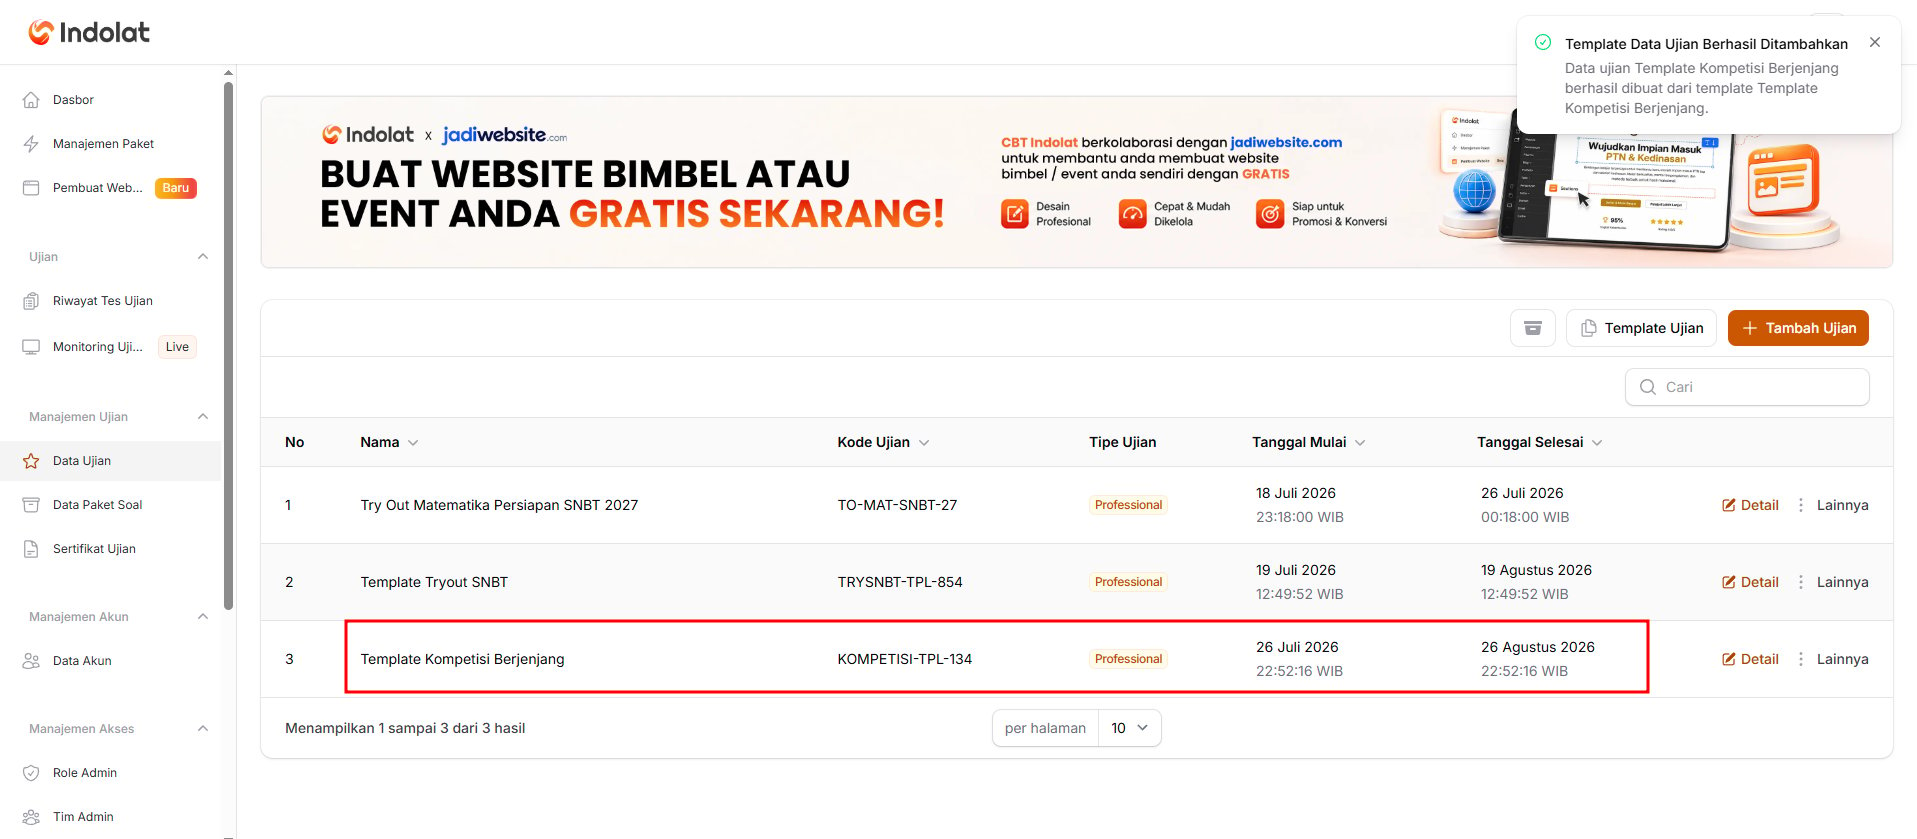
You still need to set up exam sessions and link each test to a question package.An exam created from a template is a Professional Exam (Paid Plan). You can change this in the Exam Type & Plan section.In short, a template only helps you get started faster. The system prepares the framework; you fill in the content.
Create a New Exam
Create a New Exam
Use this option if you want to define every setting yourself from the start.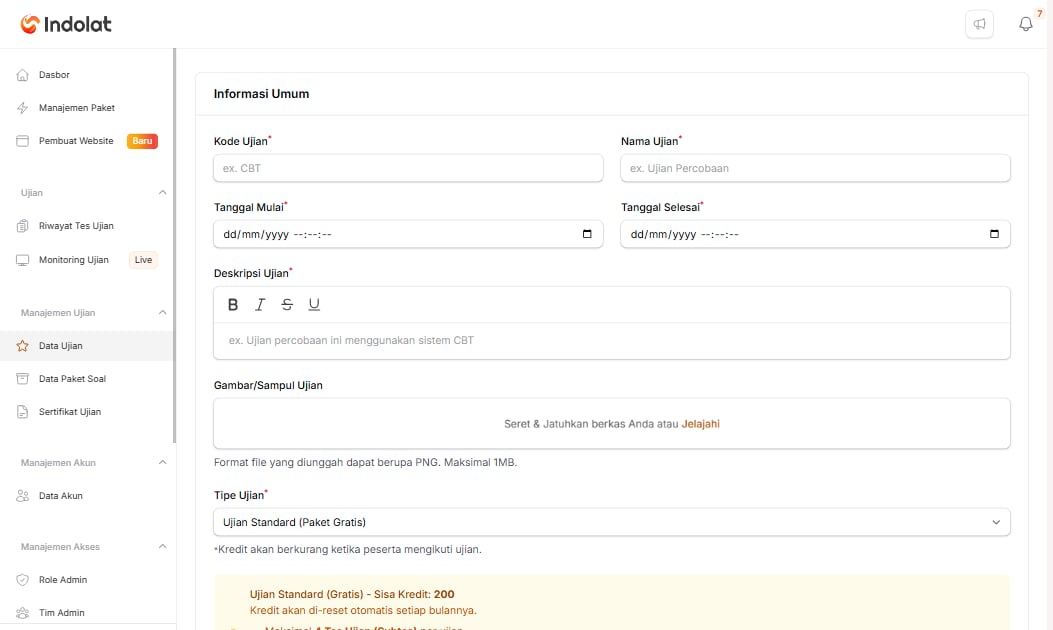
1
Click Add Exam
Open the Exam Data menu, then click Add Exam.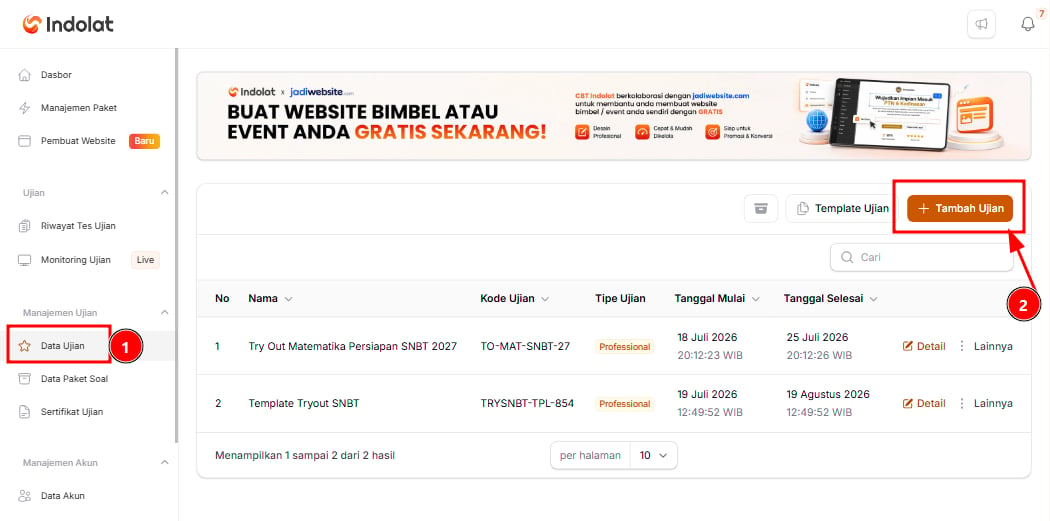
2
Fill in the exam information
2. Fill In the Basic Exam Information
1
Click Details
On the Exam Data page, click Details on the exam you’ve just created. If you created the exam with Add Exam, the exam details page is already open after you click Create, so you can skip this step.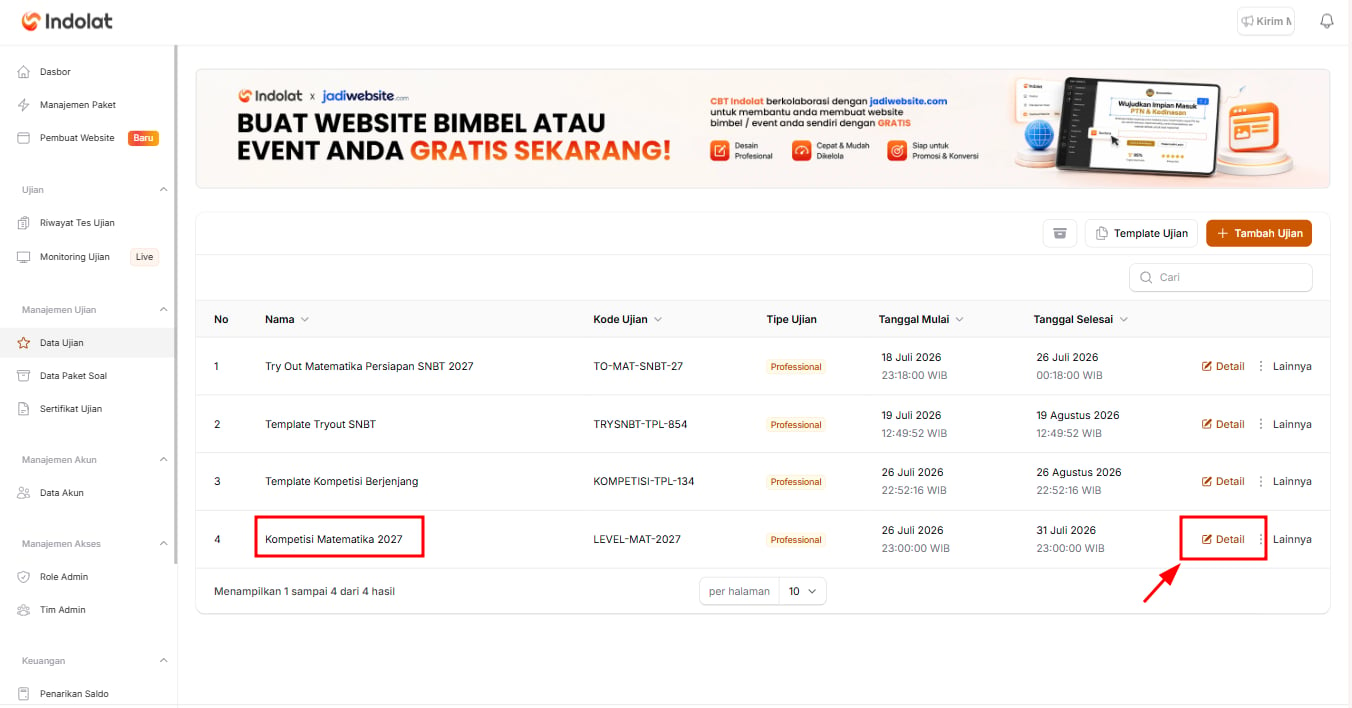
2
Fill in the exam event information
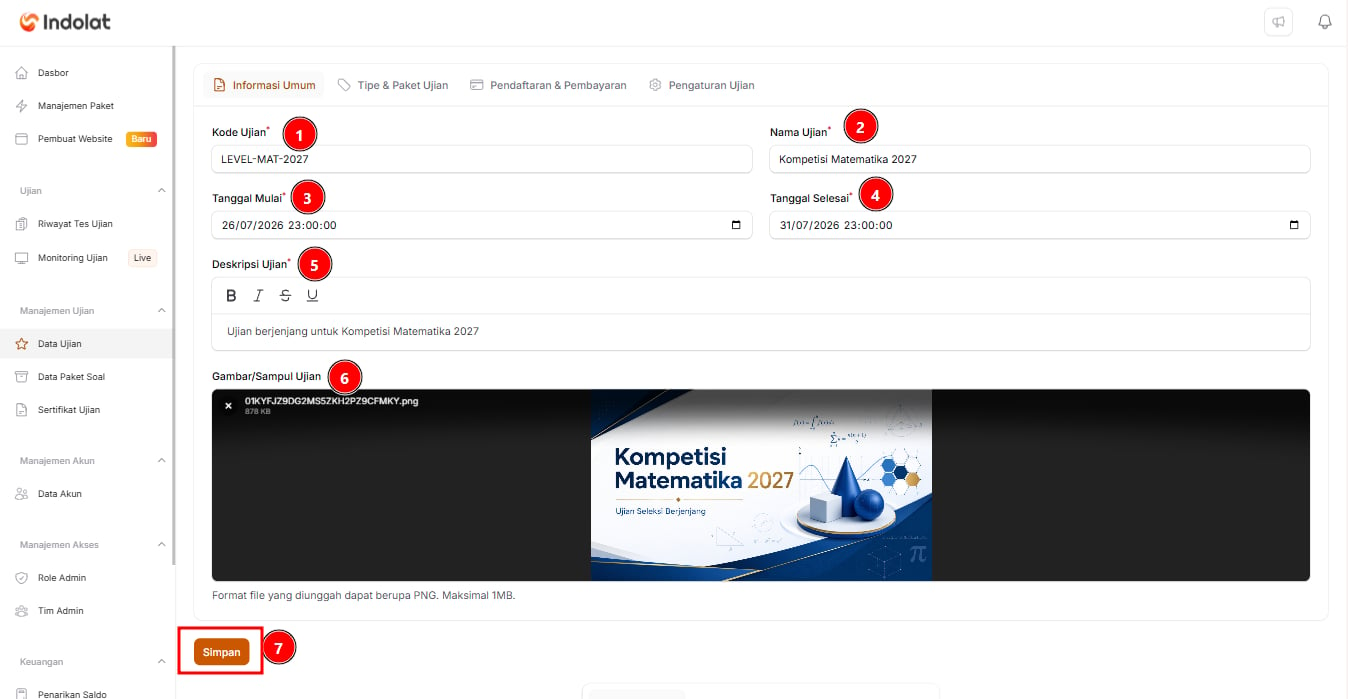
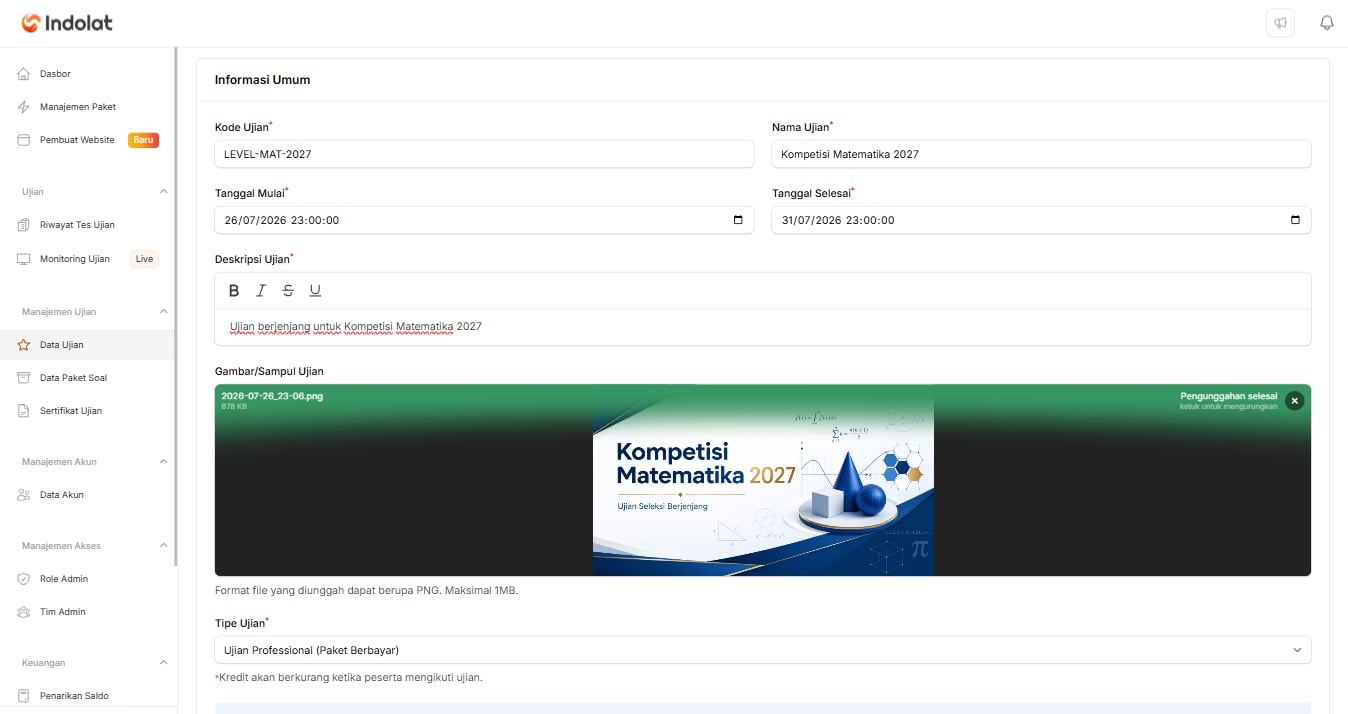
- Exam Code
Enter a short, unique code so the exam is easy to identify.
Example: LEVEL-MAT-2027 - Exam Name
Enter the exam name that admins and participants will see.
Example: 2027 Mathematics Competition - Start Date
Set the date and time the exam event starts. - End Date
Set the date and time the exam event ends. - Exam Description
Give a short explanation of the exam’s purpose or content.
Example: A multi-level exam for the 2027 Mathematics Competition - Exam Image/Cover
Upload an image to use as the exam cover. It makes the exam easier for participants to recognise. The file must be a PNG of up to 1MB. - Once you’ve checked that all the information is correct, click Save changes to save the exam event.
3. Complete the Settings on the Exam Details Page
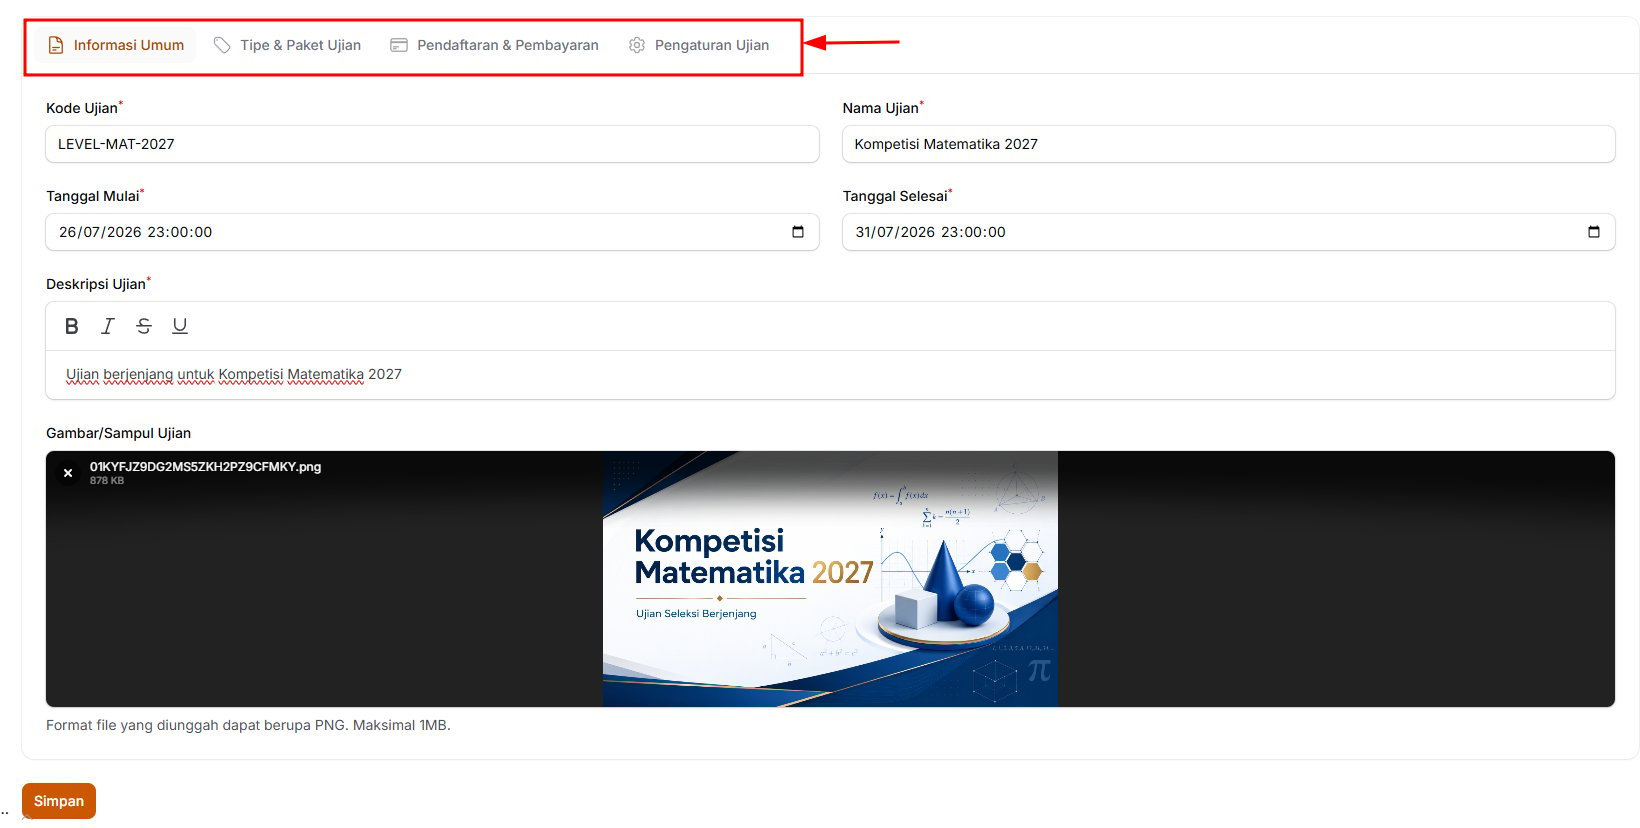
- General Information
- Exam Type & Plan
- Registration & Payment
- Exam Settings
- Additional Information
1
Review General Information
The General Information section lets you view or change the exam’s identity.Here you can change:
- the exam code
- the exam name
- the start date
- the end date
- the exam description
- the exam image or cover.
The 2027 Mathematics Competition was originally scheduled for 26–31 July. If the schedule changes, you can update it in the General Information section.After making changes, click Save changes.
2
Review Exam Type & Plan
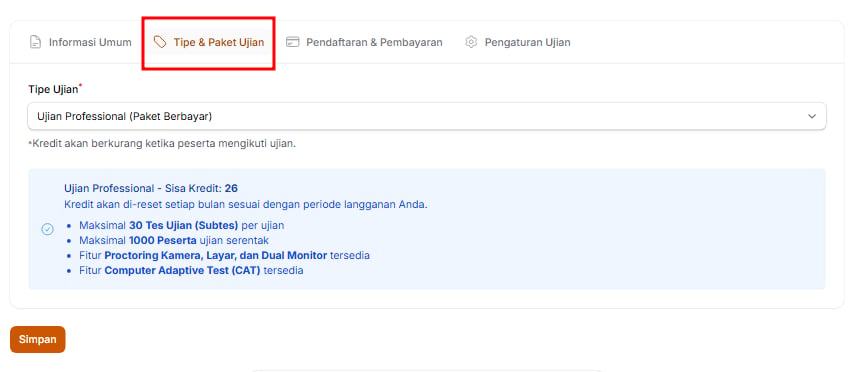
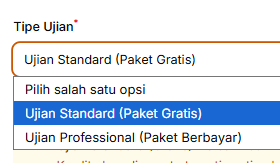
-
Standard Exam (Free Plan)
Suitable for simple exams or regular practice. Its terms:
- Credits are reset automatically every month.
- Up to 4 Tests (Subtests) per exam.
- Up to 50 participants taking the exam at once (participants working on the exam at the same time).
- Camera, Screen and Dual Monitor Proctoring is not available.
- Computer Adaptive Test (CAT) is not available.
-
Professional Exam (Paid Plan): Rp500 per exam credit
Suitable for exams with more participants and more advanced needs. Its terms:
- Credits are reset every month according to your subscription period.
- Up to 30 Tests (Subtests) per exam.
- Up to 1,000 participants taking the exam at once.
- Camera, Screen and Dual Monitor Proctoring is available. Camera and screen proctoring also use their own proctoring credits (an add-on).
- Computer Adaptive Test (CAT) is available.
3
Set up Registration & Payment
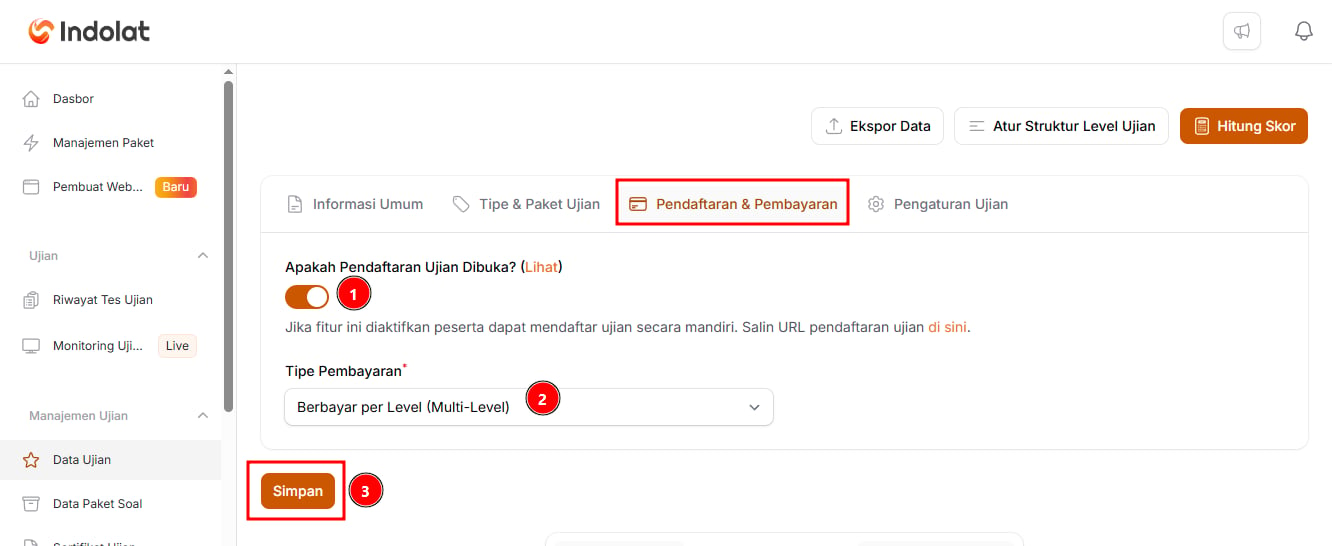
- Is Exam Registration Open?
When this is on, participants can register for the exam themselves. This setting needs the Exam Registration Page and Automatic Payment add-on. If the add-on isn’t active, the label shows “(Add-on Inactive)” and the toggle can’t be turned on. - Payment Type
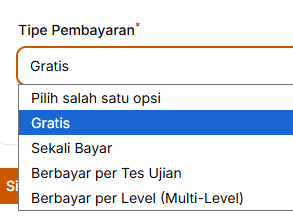
Choose Free if participants don’t need to pay. If your multi-level exam is paid, we recommend choosing Paid per Level (Multi-Level). When you choose this type, Is This a Multi-Level Exam? switches to Yes (Multi-Level) automatically. Paid payment types need the same add-on; without it, a paid exam can’t be saved.
-
Free: Participants don’t pay anything.
Example: A free tryout (practice exam) for SNBT (Indonesia’s national university entrance test), made up of a Mathematics Test and an Indonesian Language Test. Participants can take all of them at no cost.
-
One-time Payment: Participants pay once and can then take every test in the exam event.
Example: The SNBT tryout costs Rp50,000. After paying, participants can take the Mathematical Reasoning Test, the Indonesian Literacy Test and the English Literacy Test. Participants don’t need to pay again for each test.
-
Paid per Test: Participants pay for each test they want to take.
Example: Mathematics Test: Rp20,000 Indonesian Language Test: Rp15,000 English Test: Rp15,000 A participant who only wants to take the Mathematics Test pays just Rp20,000.
-
Paid per Level (Multi-Level): For exams made up of several rounds. Participants pay for each round they take.
Example: Preliminary Round: Rp25,000 Semifinal: Rp30,000 Final: Rp40,000 Participants pay for the next round only if they pass.
- When you’ve finished, click Save changes.
4
Complete the Exam Settings
-
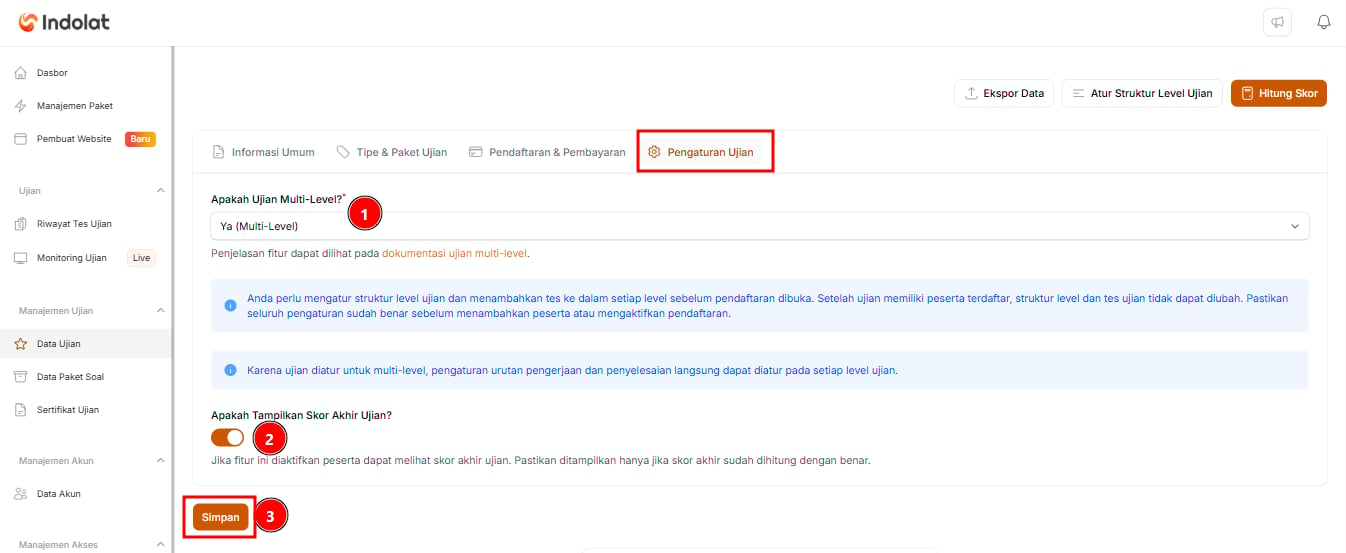
Is This a Multi-Level Exam?
Choose Yes (Multi-Level) if the exam runs in several stages or rounds.
Example:
Because the exam is set up as multi-level, the rules on taking tests in order and in one sitting are set on each exam level instead (see section 5. Set Up the Multi-Level Exam Structure below).- Preliminary Round
- Semifinal
- Final
-
Final Score Type
Choose how a participant’s final score is derived from the scores of all the tests:
- Accumulated Exam Test Scores: the scores of each test are added up.
- Averaged Exam Test Scores: the total is divided by the number of tests already scored. This option is selected by default.
Example: a participant scores 80 in the Preliminary Round and 70 in the Semifinal. With Accumulated Exam Test Scores, the final score is 150; with Averaged Exam Test Scores, it’s 75.
If the exam already has participants, every participant’s final score is recalculated once you save the change. -
Show the Final Exam Score?
Turn this on if participants may see their final result once they finish.
Example: in a practice tryout, participants can see their score straight away to check how they’re doing.
Turn it off if scores still need to be checked or will be announced later.Example: selection scores are checked first and announced by the committee the next day.
- When you’ve finished, click Save changes.
5
Set up Additional Information
The Additional Information section is optional. Use it to show specific information on the dashboard of participants registered for this exam, such as a WhatsApp group link, technical guidance or the committee’s contact details. Participants in other exams don’t see it.
- Show Additional Information to Participants?
Turn this on to show the additional information on participants’ dashboards. - Information Title
Enter a title of up to 100 characters.
Example: Join the Participants’ WhatsApp Group - Information Content
Enter the information itself, up to 1,000 characters. - Button Label (Optional) and Button Link (Optional)
Fill in both if you want to show a button, such as Join Group. Use a full link starting withhttp://orhttps://. The button only appears when both its label and link are filled in. - When you’ve finished, click Save changes.
4. Add the Tests for Each Round
1
Click Add Test
Open the Test List tab, then click Add Test.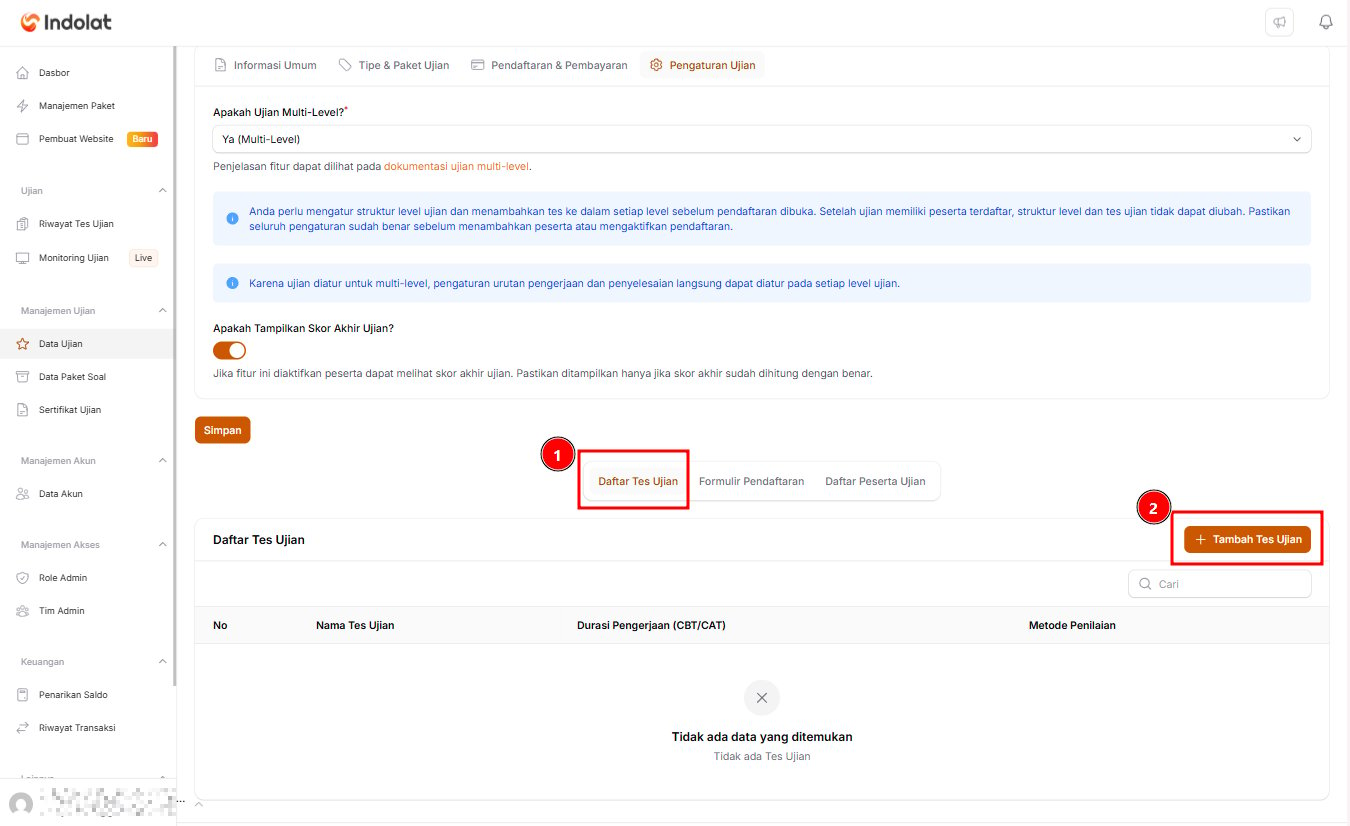
2
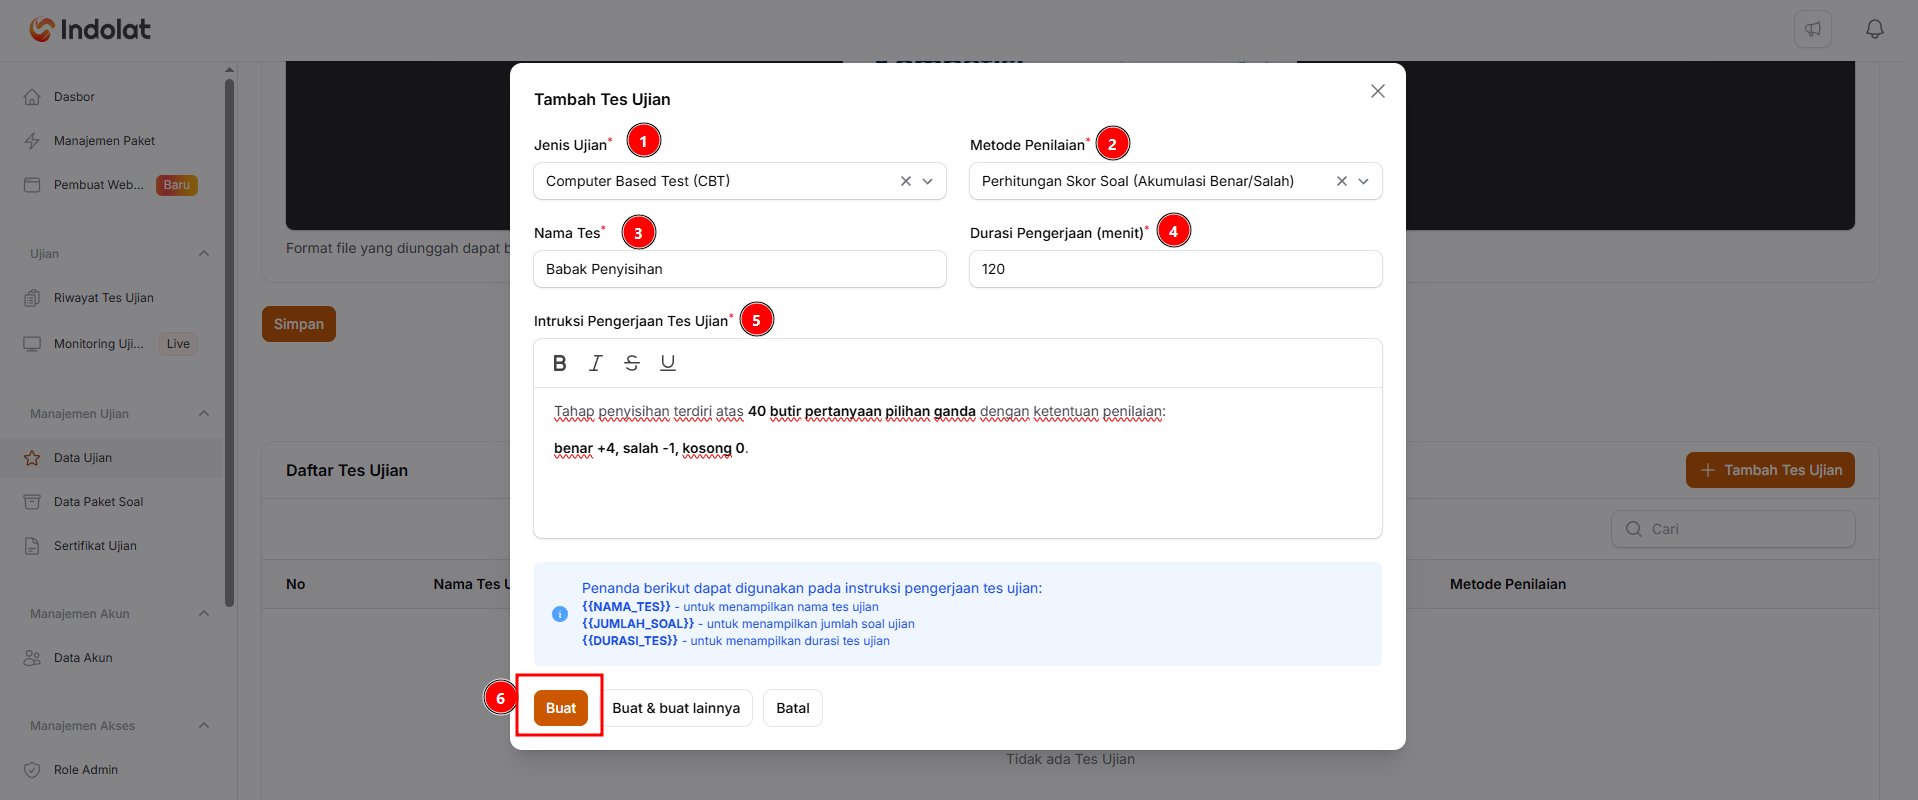
Fill in the test information
-
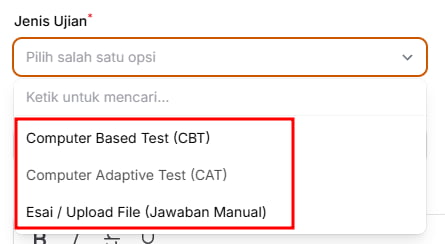
Exam Type: Choose the type of test you are running.
-
Computer Based Test (CBT)
Participants see the questions on screen and choose or type their answers directly in the system.Example:
A participant sees the question: 10 × 5 = … and then selects the answer 50 on screen. -
Computer Adaptive Test (CAT)
The next question adapts to the participant’s ability. This type can only be chosen for a Professional Exam (Paid Plan).Example:
A participant answers the first question correctly. The system then gives a slightly harder question. If the participant answers incorrectly, the system can give an easier or similar question.
CAT is like an exam that “follows the participant’s ability”. The more correct answers, the harder the next questions can get. -
Essay / File Upload (Manual Grading)
Participants don’t choose an answer as they would in a multiple-choice question. They write a long answer or upload a file.Examples:
- Writing an essay answer directly in the system.
- Uploading a photo of an answer sheet.
- Uploading a PDF or Word file.
-
Computer Based Test (CBT)
-
Scoring Method: Decide how the system calculates participants’ scores.
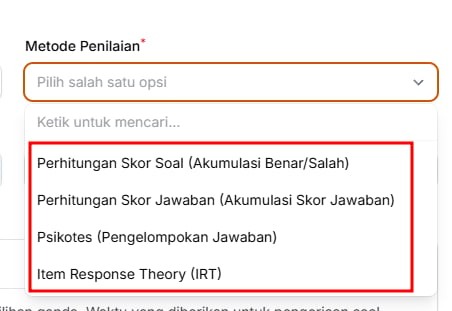 The scoring methods on offer depend on the Exam Type. All the methods below are available for CBT. CAT only offers Question Score Calculation (Sum of Correct/Wrong), and Essay / File Upload (Manual Grading) uses Manual Scoring.
-
Question Score Calculation (Sum of Correct/Wrong)
The score is calculated from the number of questions answered correctly.Example:
- Correct answer: 10 points
- Wrong answer: 0 points
- The participant answers 8 out of 10 questions correctly
- Participant’s score: 80
-
Answer Score Calculation (Sum of Answer Scores)
Each answer option can carry a different score.Example: Question: How often do you study in a week?
- Every day: 4 points
- 3–4 times: 3 points
- 1–2 times: 2 points
- Never: 1 point
-
Psychometric (Answer Grouping)
The participant’s answers are grouped to reveal certain tendencies or traits.Example: Question: When working in a group, you prefer to…
- Organise how the tasks are shared → Leadership group
- Help the other members → Teamwork group
- Work on your own part → Independent group
-
Item Response Theory (IRT)
The score doesn’t just count correct answers; it also takes the difficulty of each question into account. IRT comes in three options:- IRT (UTBK reference, 0-1000): scores are reported on a 0–1,000 range, based on the UTBK scale.
- IRT TKA for SMA/SMK (200-800): scores are reported on a 200–800 range, based on the scale of TKA (Indonesia’s academic ability test) for SMA/SMK (senior and vocational high school).
- IRT TKA for SD/SMP (0-100): scores are reported on a 0–100 range, based on the TKA scale for SD/SMP (primary and junior high school).
Example:
- Many participants answer the easy questions correctly.
- Only a few participants answer the hard questions correctly.
- Participants who can answer the hard questions can get a higher ability score.
-
Question Score Calculation (Sum of Correct/Wrong)
-
Test Name: Enter a test name that matches the round you’re creating.
Example: Preliminary Round -
Working Time (minutes): Enter how long participants have to work on the test, in minutes.
Example: 120. This field doesn’t appear for the Essay / File Upload (Manual Grading) type. -
Test Instructions: Write the instructions participants read before they start.
You can use these placeholders in the instructions:
{{NAMA_TES}}shows the test name.{{JUMLAH_SOAL}}shows the number of questions.{{DURASI_TES}}shows the working time.
-
Click Create to save, then repeat the same steps to create the Semifinal and the Final.
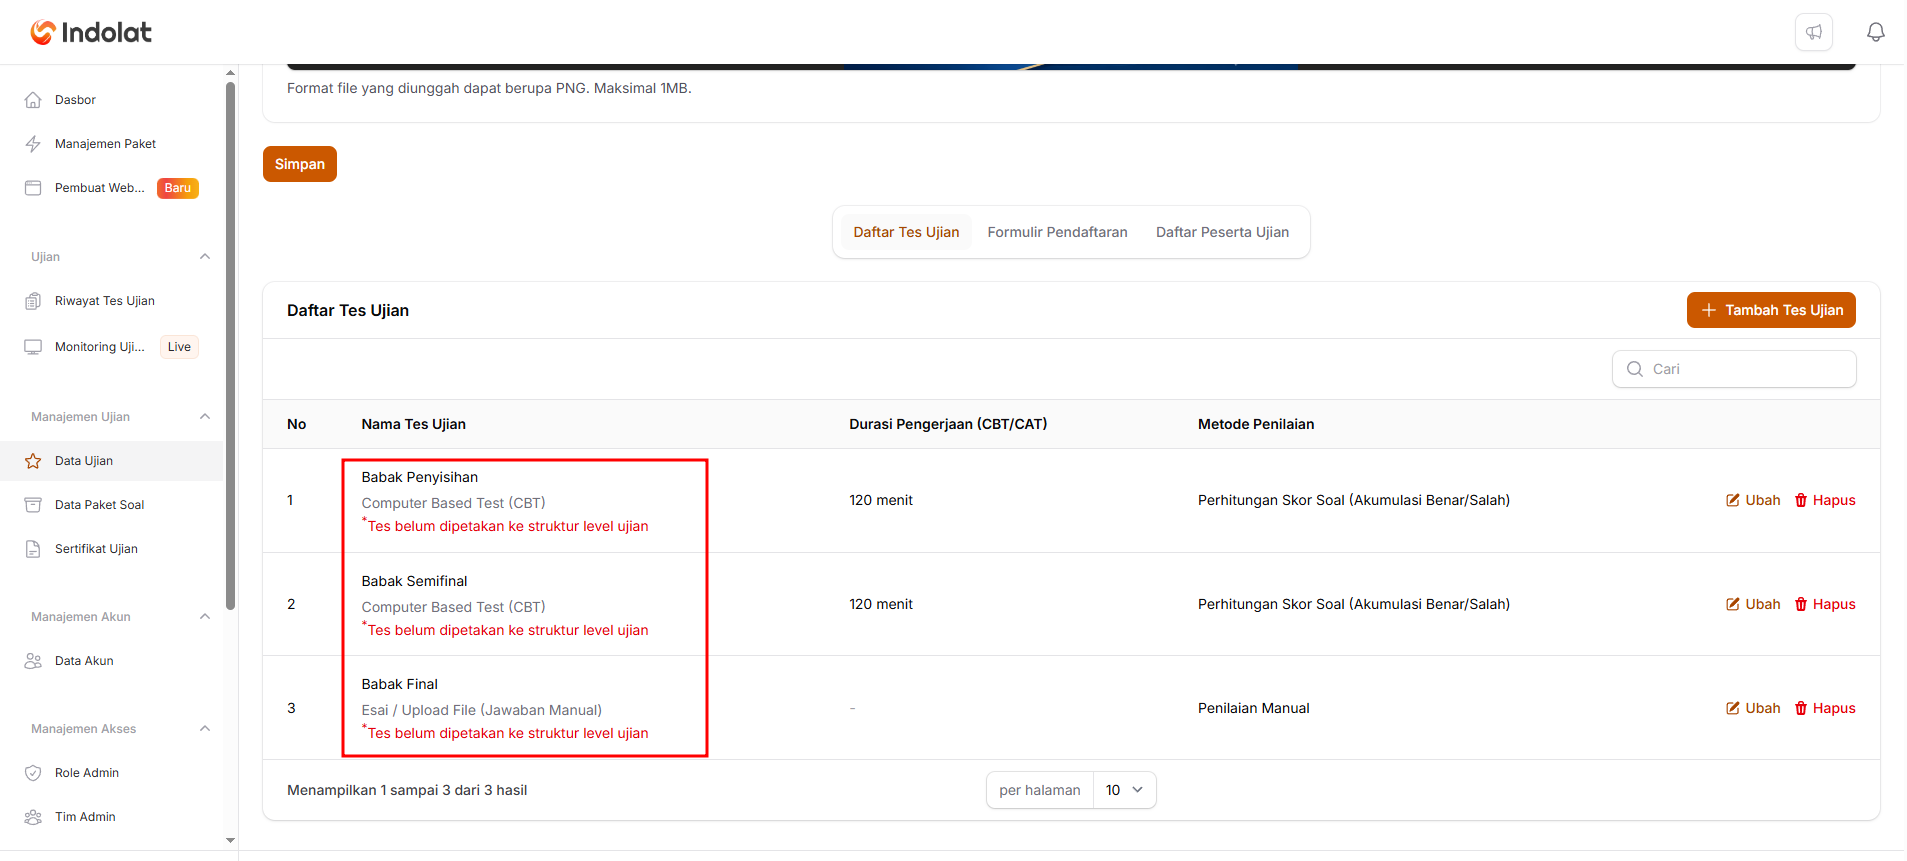
5. Set Up the Multi-Level Exam Structure
Once all the tests for the Preliminary Round, Semifinal and Final have been created, the next step is to place each test in the right level or round. This structure tells the system the path participants follow, from the first round to the last.1
Open the exam details
Open the Exam Data menu, then click Details on the multi-level exam you created earlier.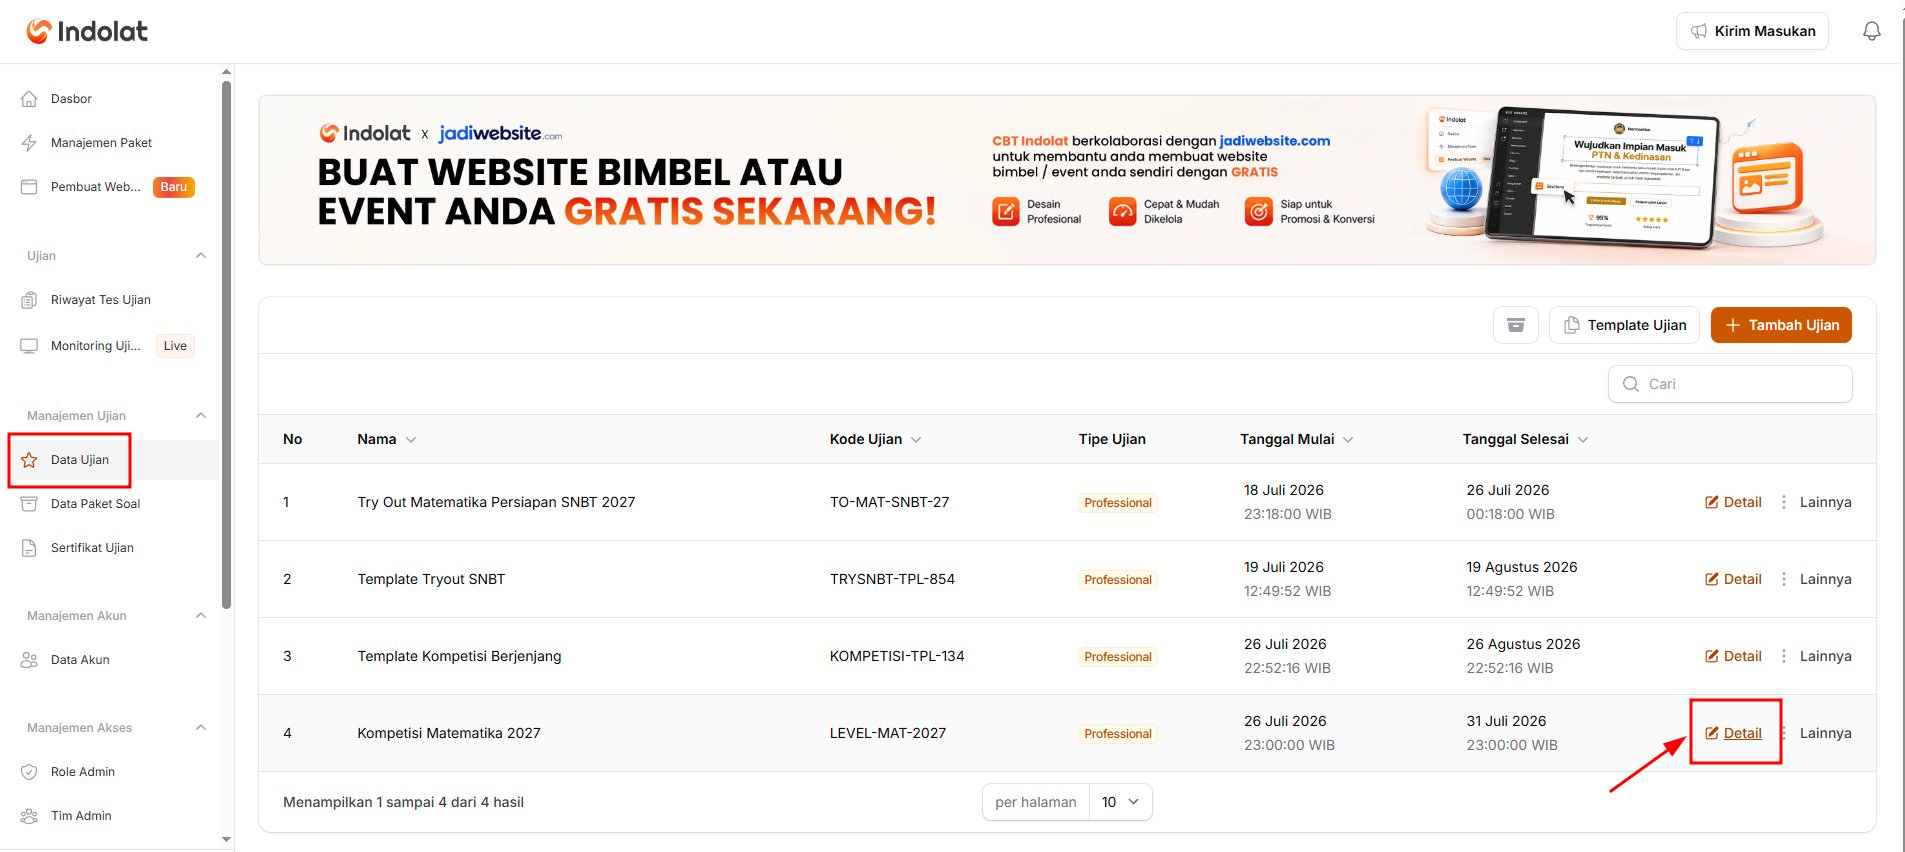
2
Click Set Up the Exam Level Structure
Click Set Up the Exam Level Structure in the top-right corner of the page.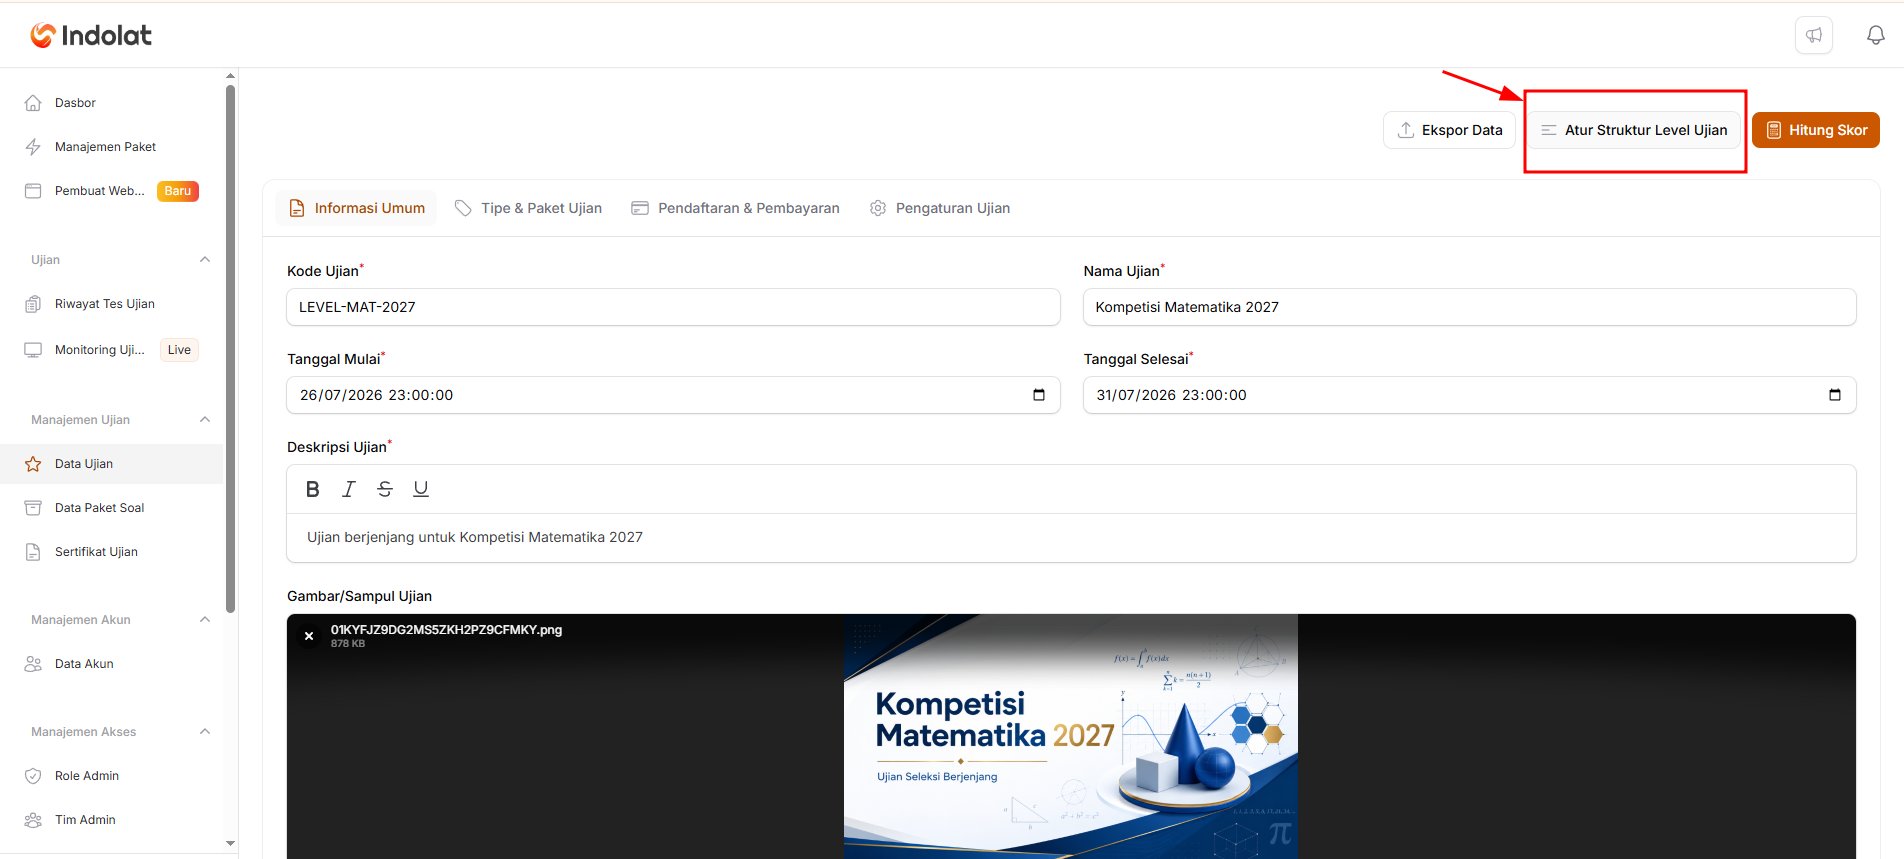
3
Click New Level
Click New Level to create an exam level.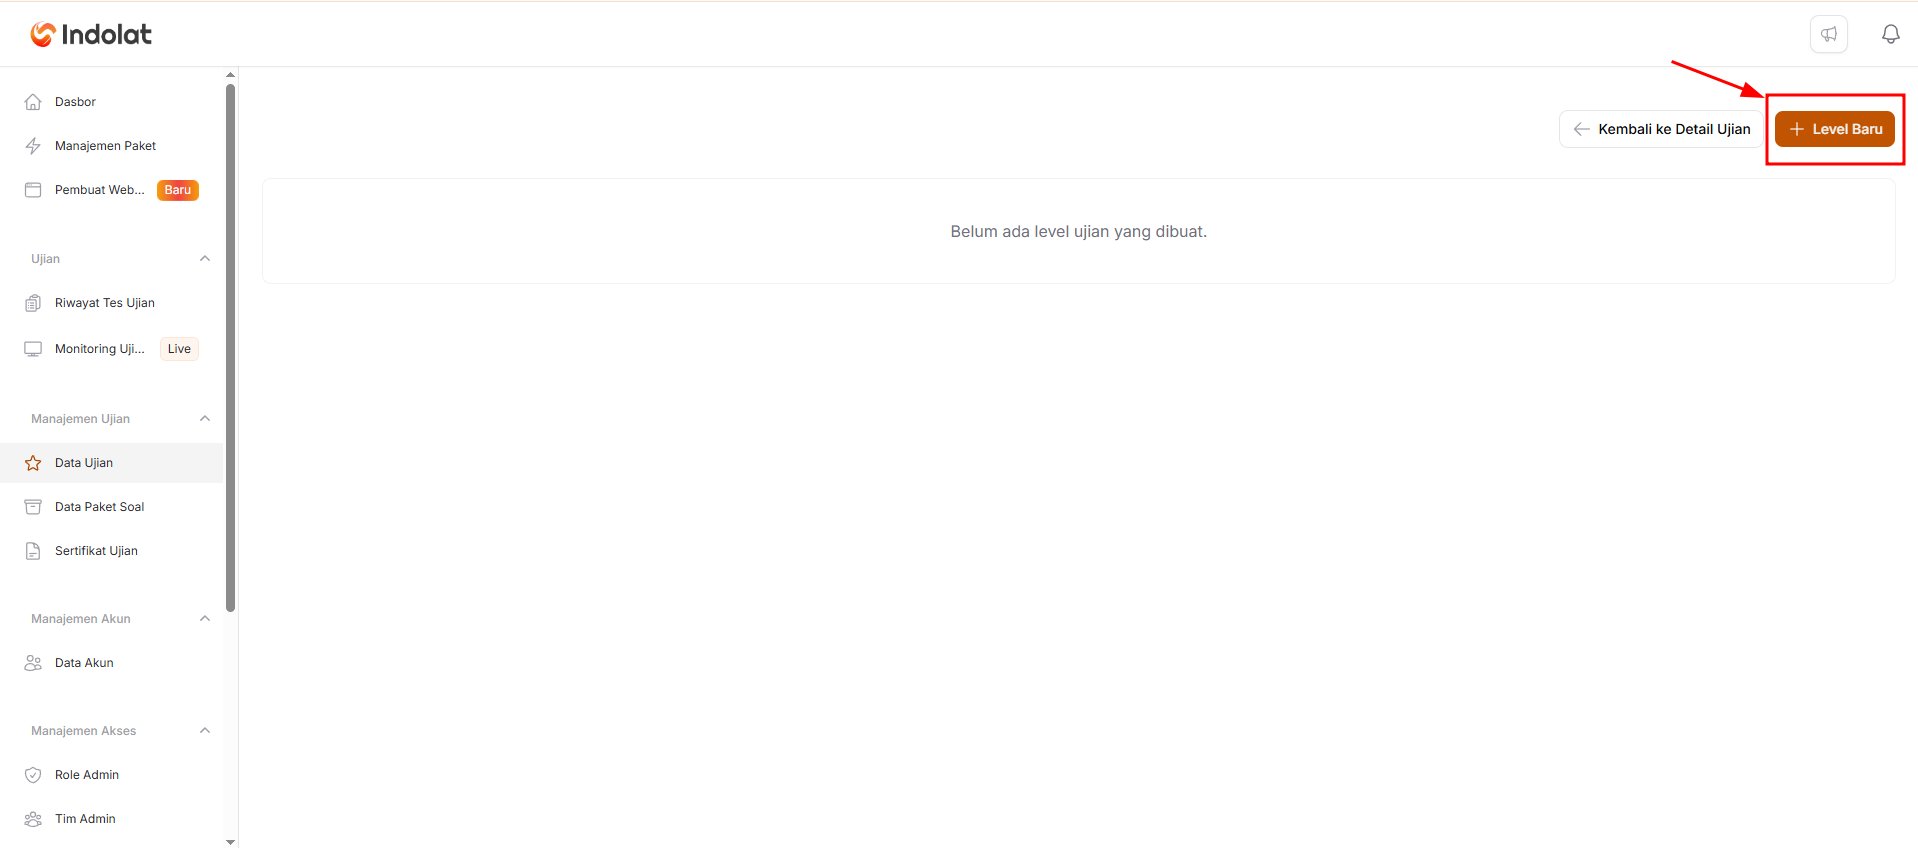
4
Create an exam level
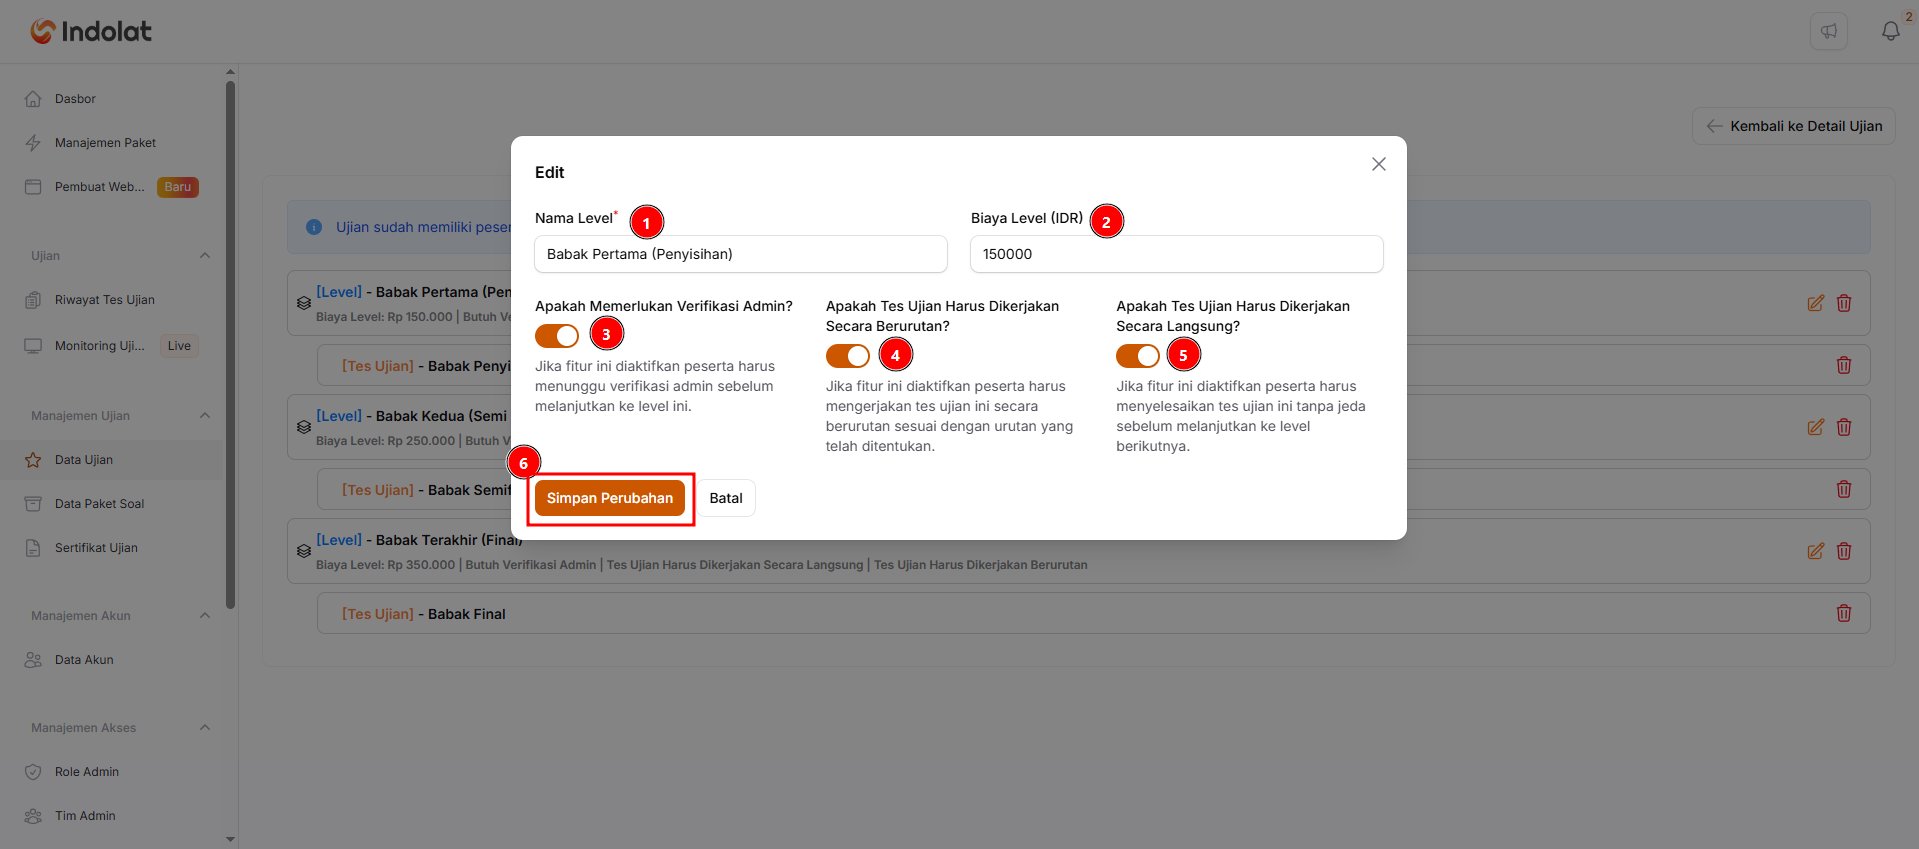
-
Level Name
Enter the name of the round or stage you’re creating. Use a clear name so you can tell the stages apart.
💡 Example:
- Preliminary Round
- Semifinal
- Final
-
Level Fee (IDR)
This field appears when the exam’s payment type is Paid per Level (Multi-Level).
- Enter the fee participants pay to take this level.
- Leave it empty if participants aren’t charged an extra fee for this level.
💡 Example:
- Preliminary Round: Rp20,000
- Semifinal: Free
- Final: Free
- Preliminary Round: Rp20,000
- Semifinal: Rp15,000
- Final: Rp10,000
-
Does It Require Admin Verification?
Use this setting if participants may enter this level only after an admin has verified that they passed.
💡 For example:
- All participants go straight into the Preliminary Round.
- Participants who pass the Preliminary Round are verified by an admin so they can enter the Semifinal.
- Participants who pass the Semifinal are verified again so they can enter the Final.
-
Must the Tests Be Taken in Order?
Turn this on if a level contains several tests that must be taken in a set order.
💡 Example: The Preliminary Round has two tests:
- Basic Mathematics Test
- Mathematical Reasoning Test
- If this setting is on, participants must finish the Basic Mathematics Test first. Only then can they open the Mathematical Reasoning Test.
- If this setting is off, participants can choose which test to take first.
-
Must the Tests Be Taken in One Sitting?
Turn this on if all the tests in a level must be completed in one go, without a break.
💡 Example: The Preliminary Round has two tests:
- Basic Mathematics Test, 60 minutes
- Mathematical Reasoning Test, 60 minutes
- If this setting is on, after finishing the Basic Mathematics Test, participants must go straight on to the Mathematical Reasoning Test. They can’t stop and continue at another time.
- If this setting is off, participants can finish the first test and take the next one at another time while the exam schedule is still open.
- When the settings are right, click Add Level. Repeat these steps up to the last level that participants who pass must take.
5
Click Add Test
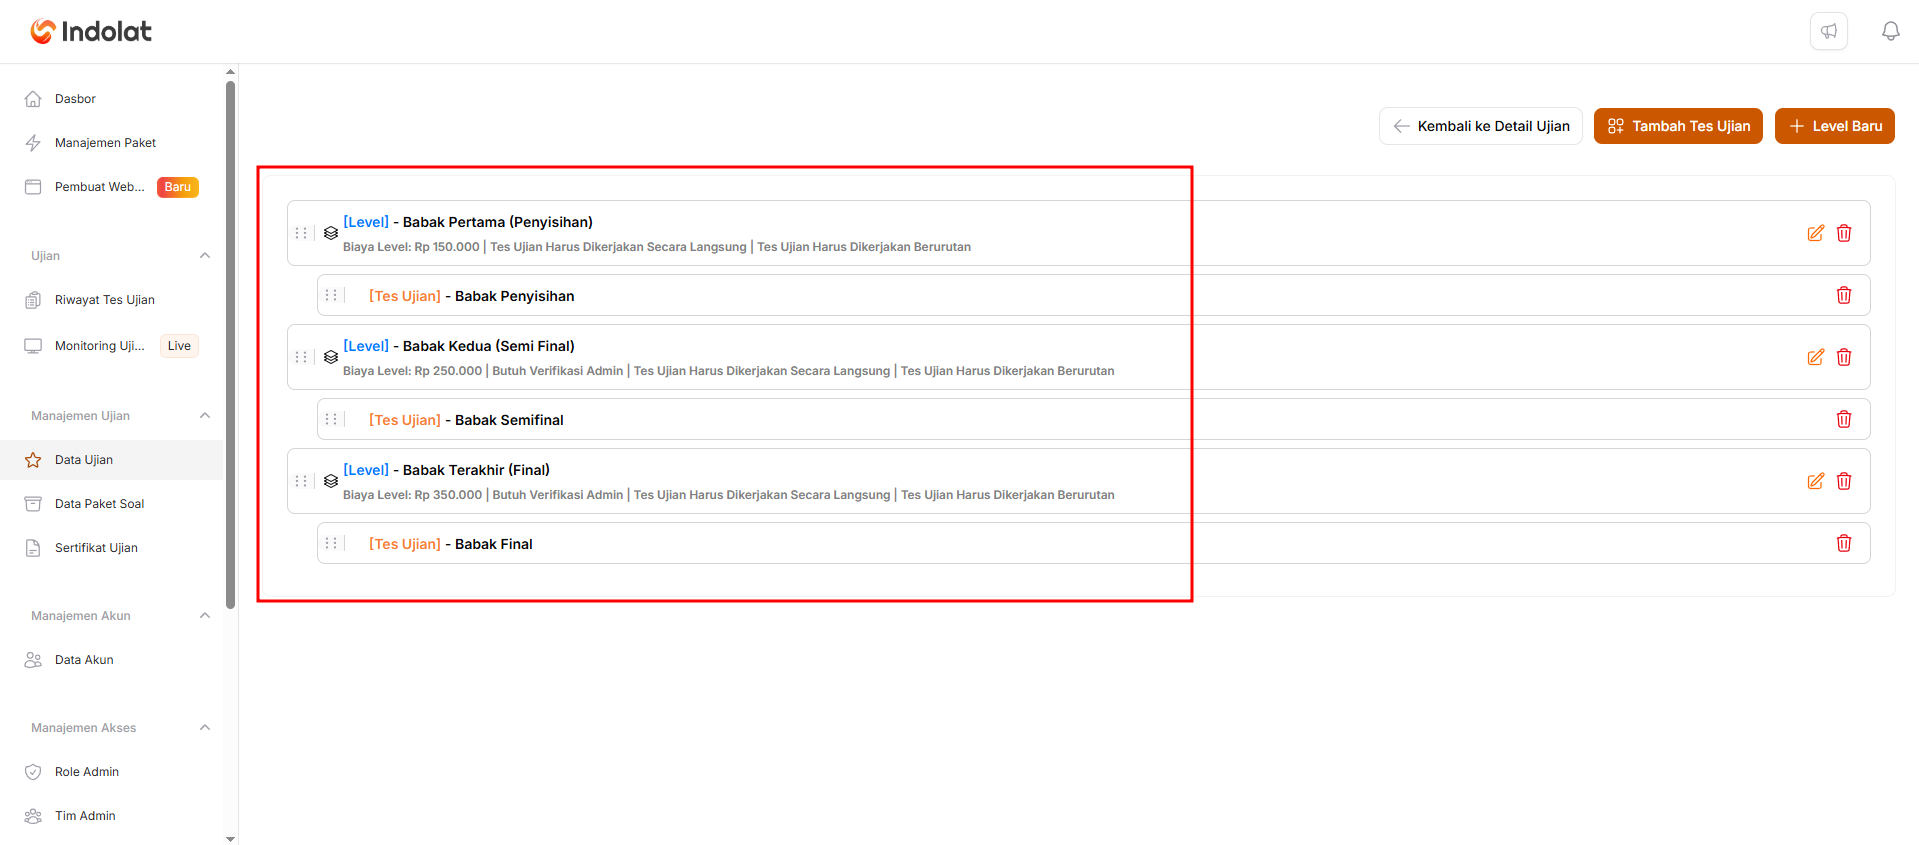
Once all the levels have been created, link each test to its level. Click Add Test in the top-right corner of the page.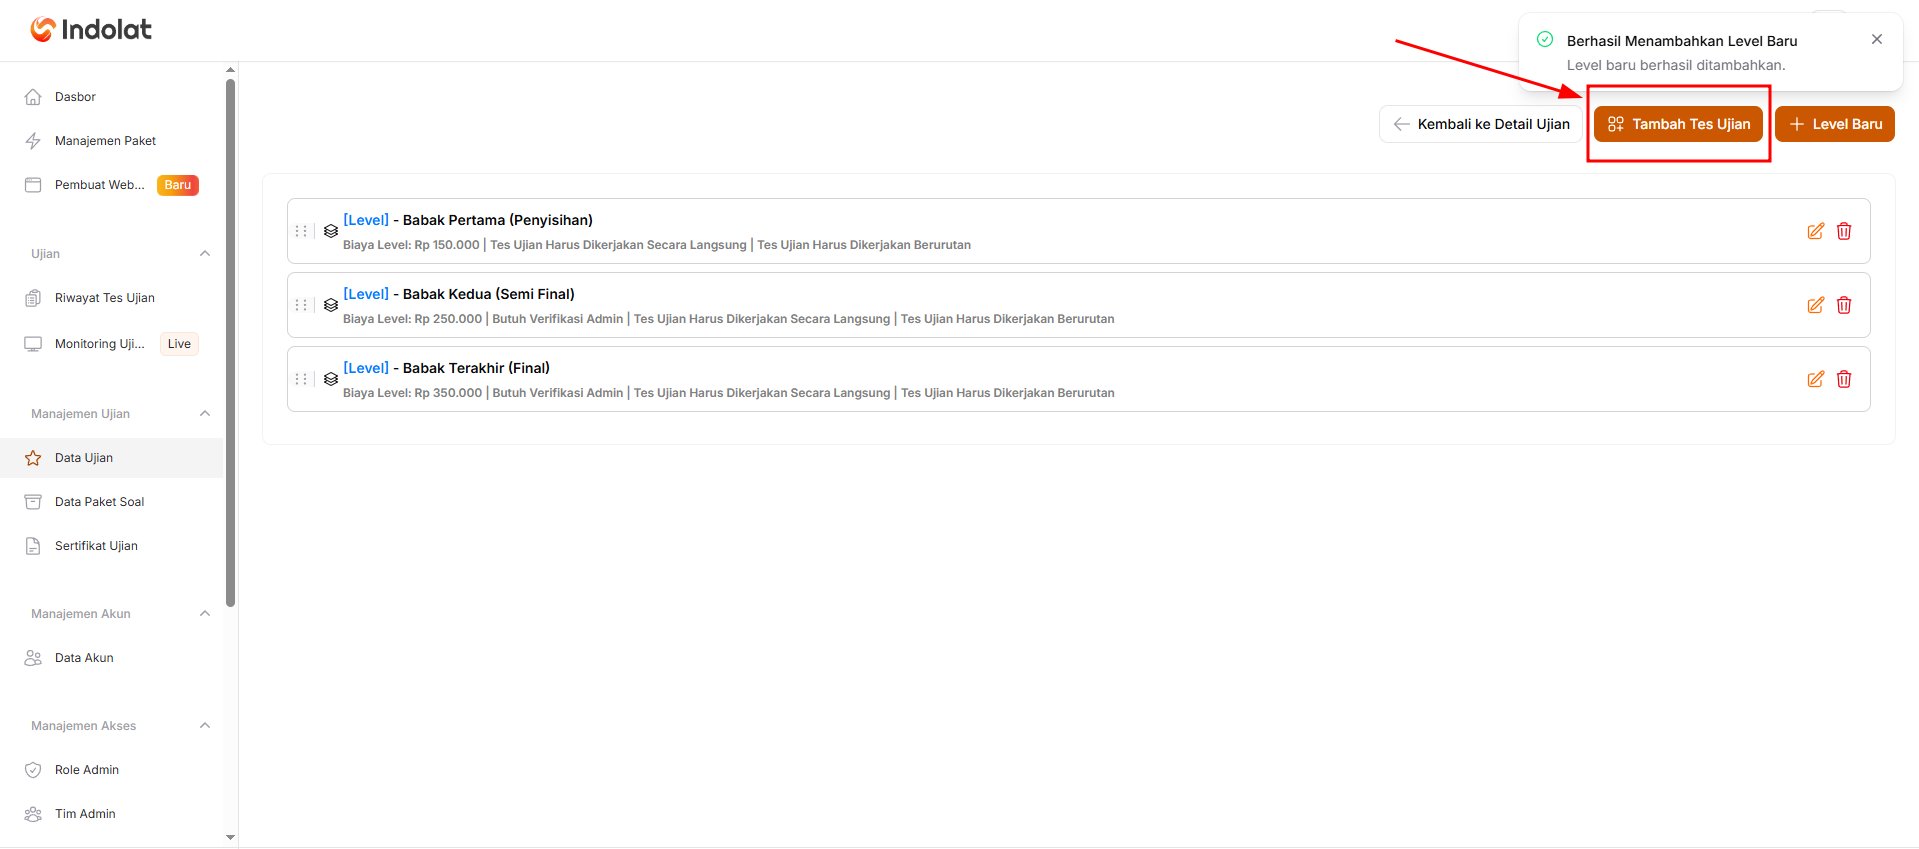
To make this easier to follow, here is the difference between an exam level and a test:
- Test: a test you created earlier.
- Exam Level: the round in which that test is taken.
6
Choose the test and exam level
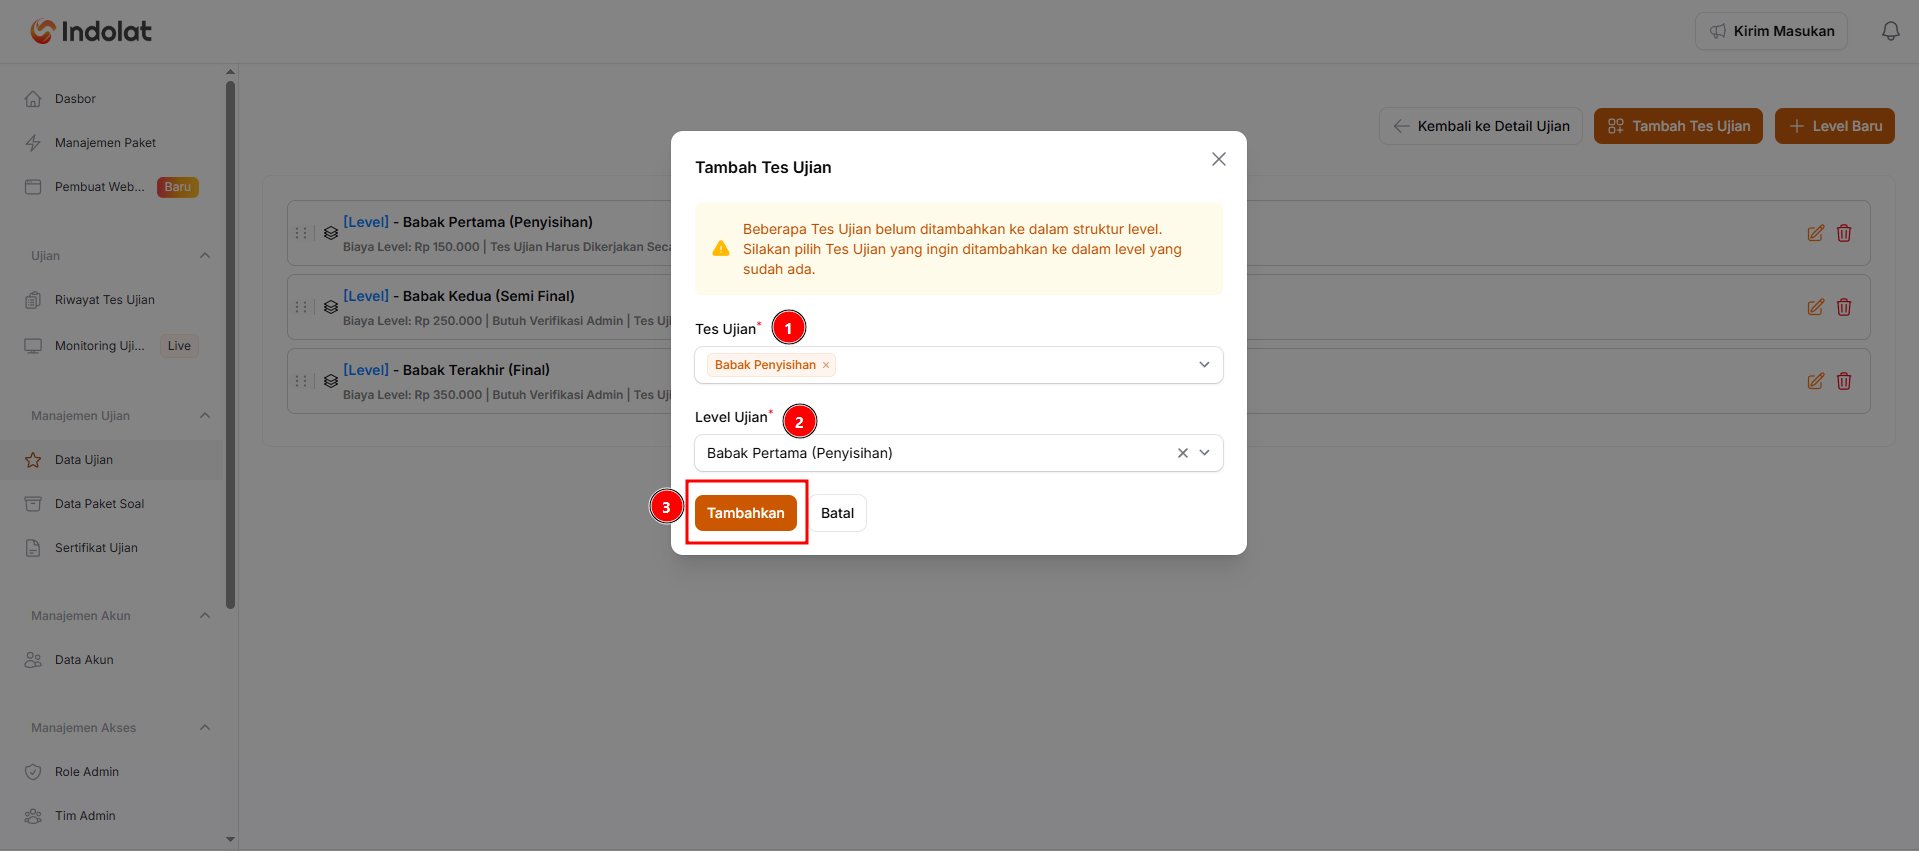
-
Test is the part of the exam that participants actually take. Choose the tests you want to add. You can select more than one test at once.
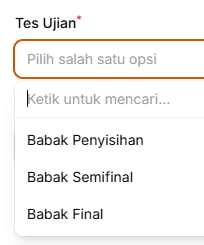
For example:
- Basic Mathematics Test
- Mathematical Reasoning Test
- Problem Solving Test
-
Exam Level is the round or stage in which the test takes place.
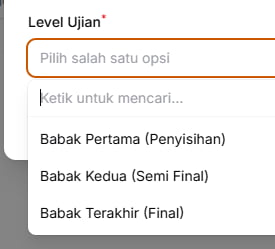
For example:
- First Round (Preliminary)
- Second Round (Semifinal)
- Final Round (Final)
- Click Add.
6. Add Sessions to the Multi-Level Exam
1
Open the test
Go back to the exam details page, open the Test List tab, then click Edit on the test you want to add an exam session to.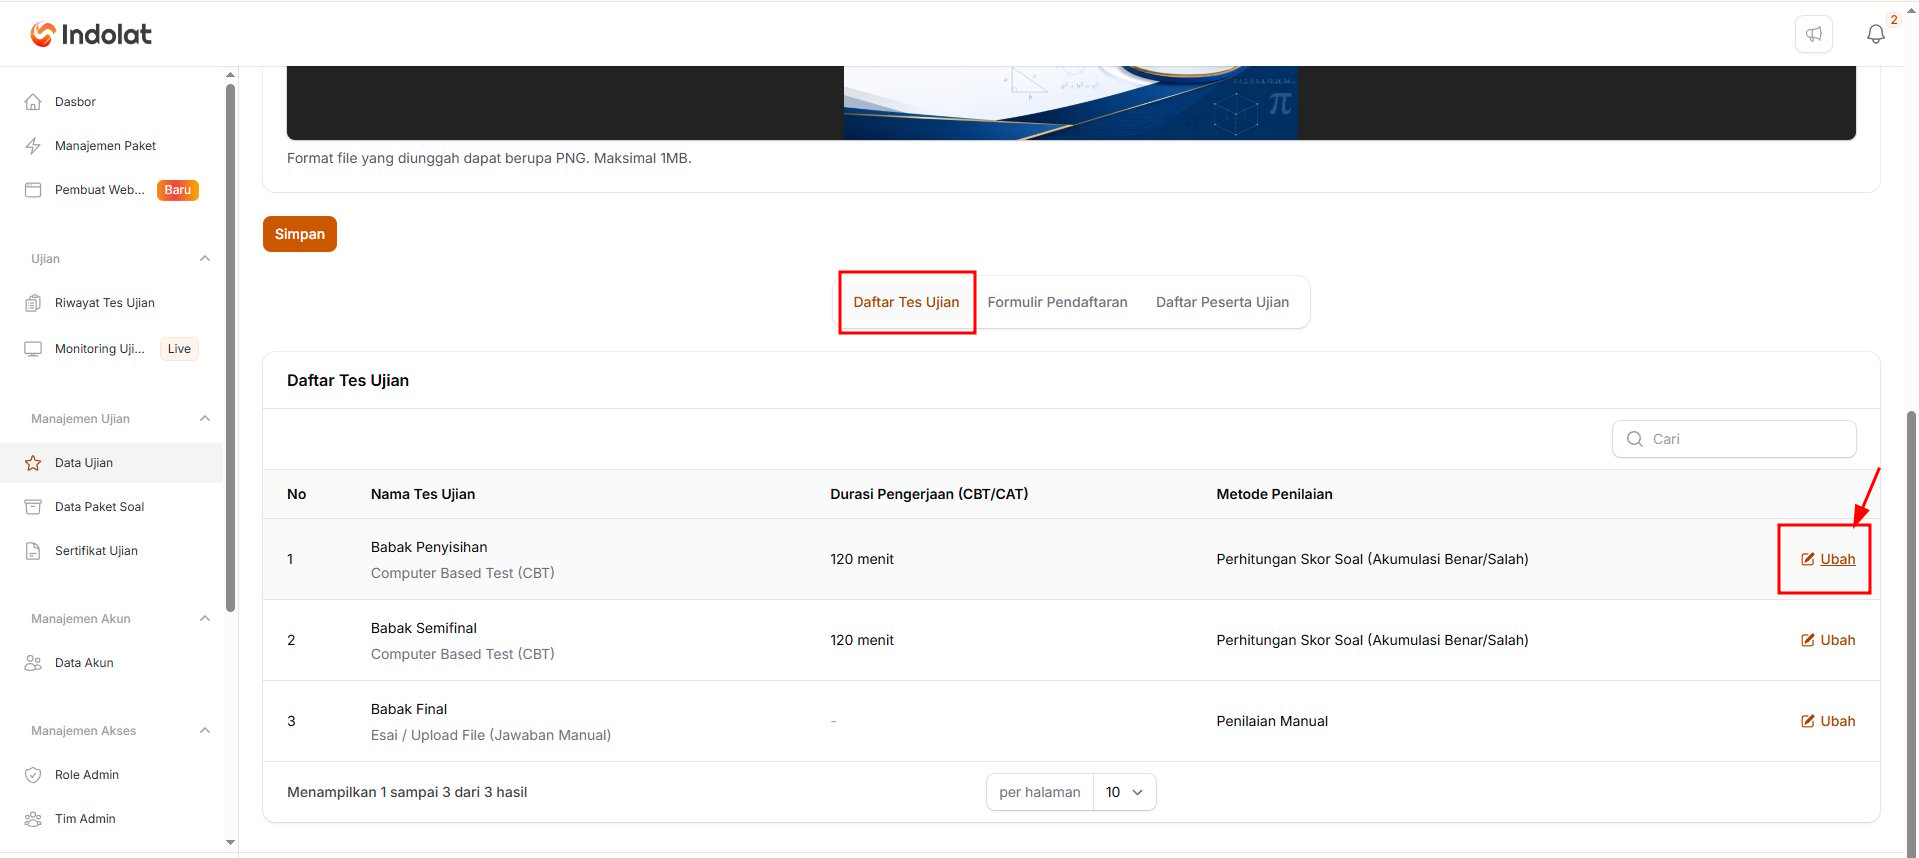
2
Click Add Exam Session
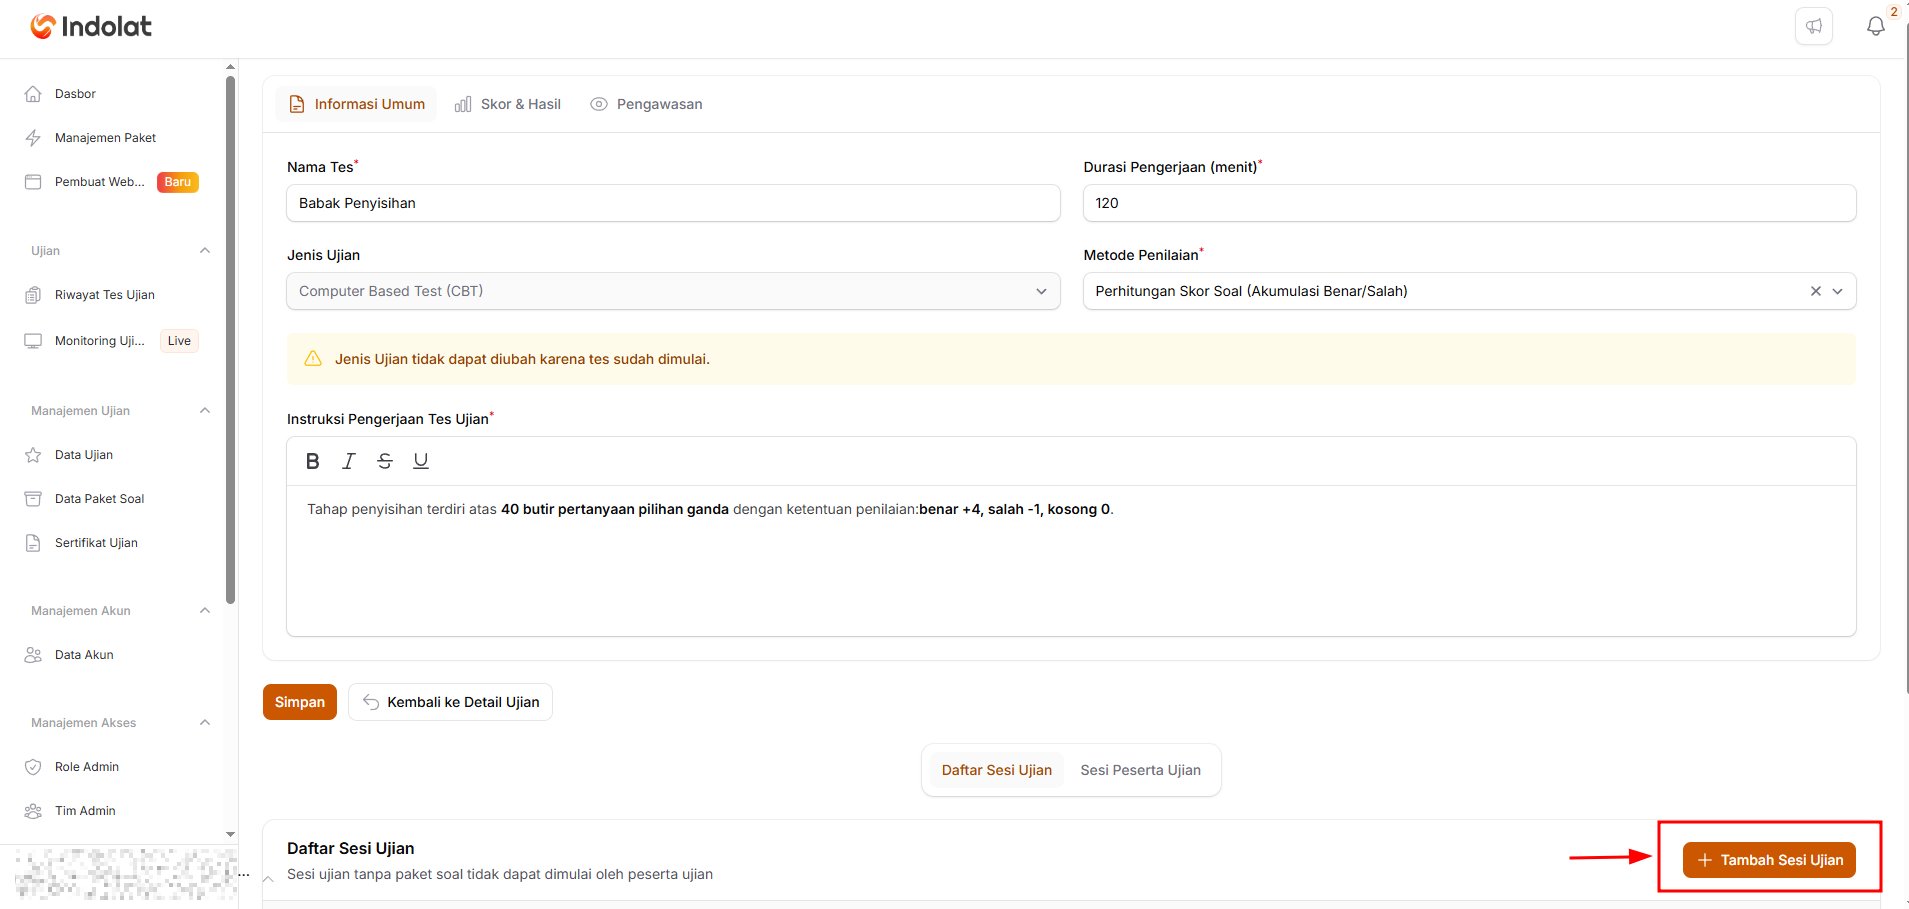
3
Fill in the exam session information
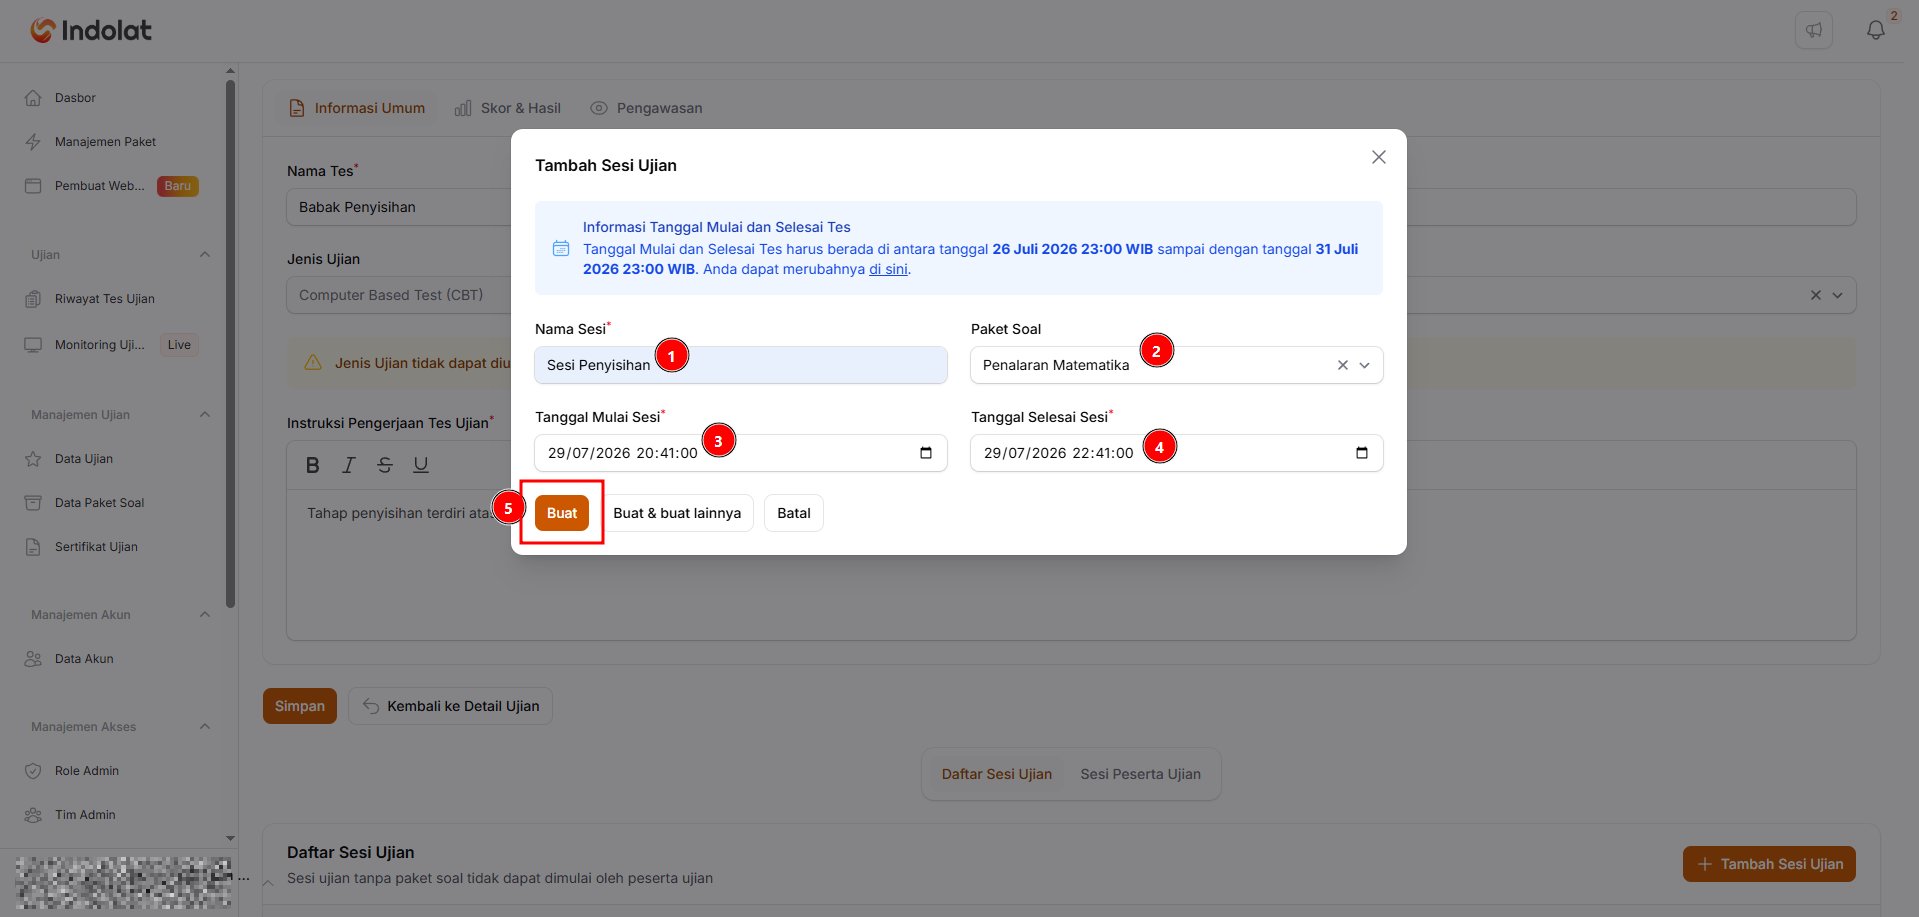
- Session Name: Enter a name that’s easy to recognise.
Example: Preliminary Session - Question Package: Choose a question package you’ve already created.
Make sure you choose one, because participants can’t start a session that has no question package. - Session Start Date: Set the date and time from which participants can start the test.
- Session End Date: Set the last moment participants can work on the test.
The session dates must fall within the date range of the main exam.
The exam runs from 26 to 31 July 2026.Once everything is filled in, click Create. Choose Create & create another if you want to add the next session straight away.
So a session could be scheduled on 26 July 2026, 08:00–10:00.
7. Verify Participants in a Multi-Level Exam
After participants finish a round, you need to decide whether they can move on to the next one. 💡 For example, a participant named Rico Sadewa has finished the Preliminary Round of the 2027 Mathematics Competition. After checking the results, you decide that the participant has earned a place in the next round. This is what participants see while you haven’t yet verified whether they’ve passed to the next round. The next round shows the status Verification in Progress.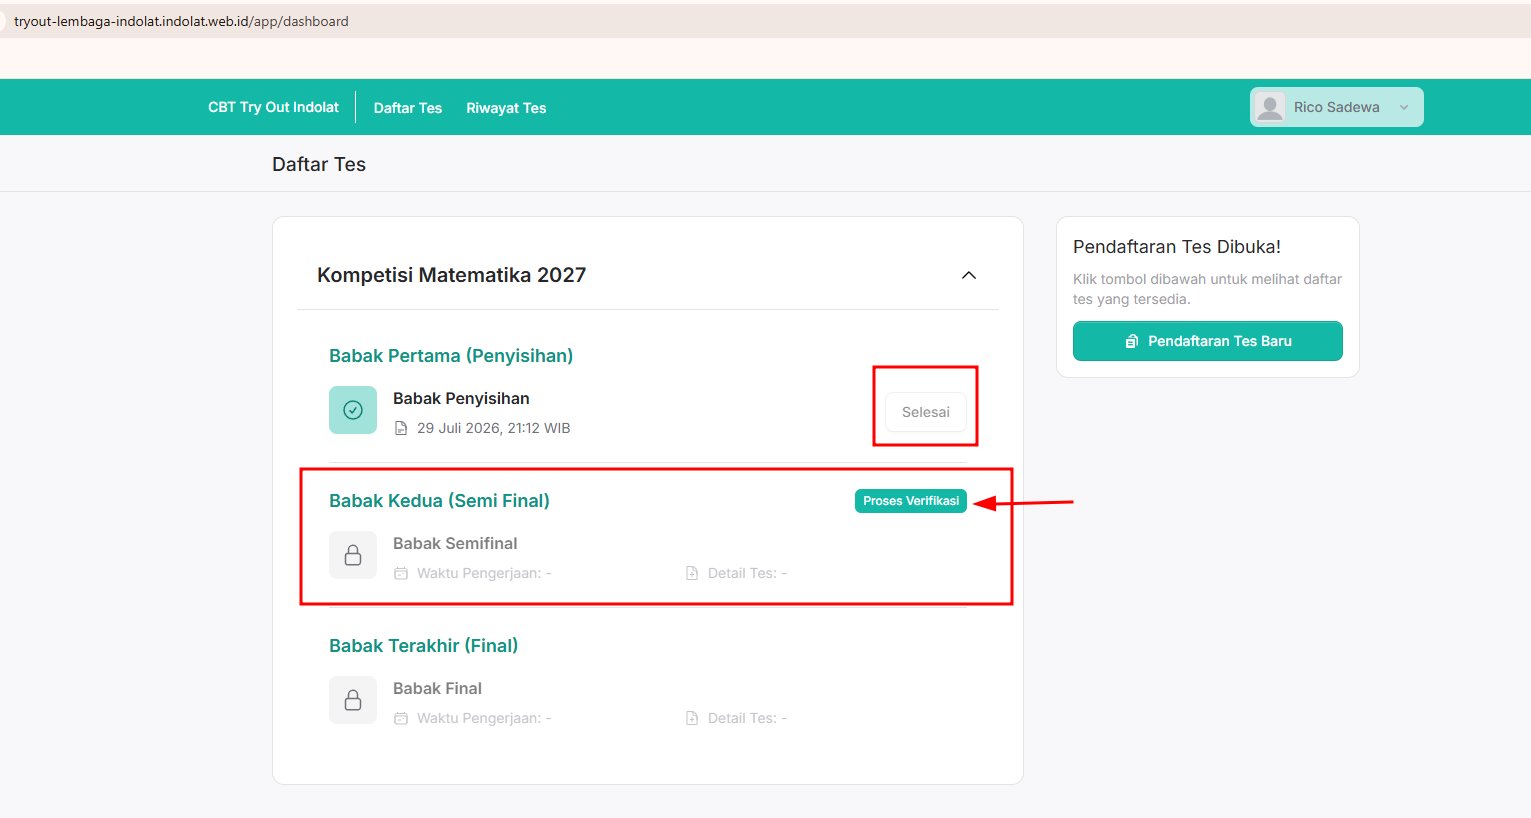
1
Open the exam details
Open the Exam Data menu, then click Details on the multi-level exam you’re managing.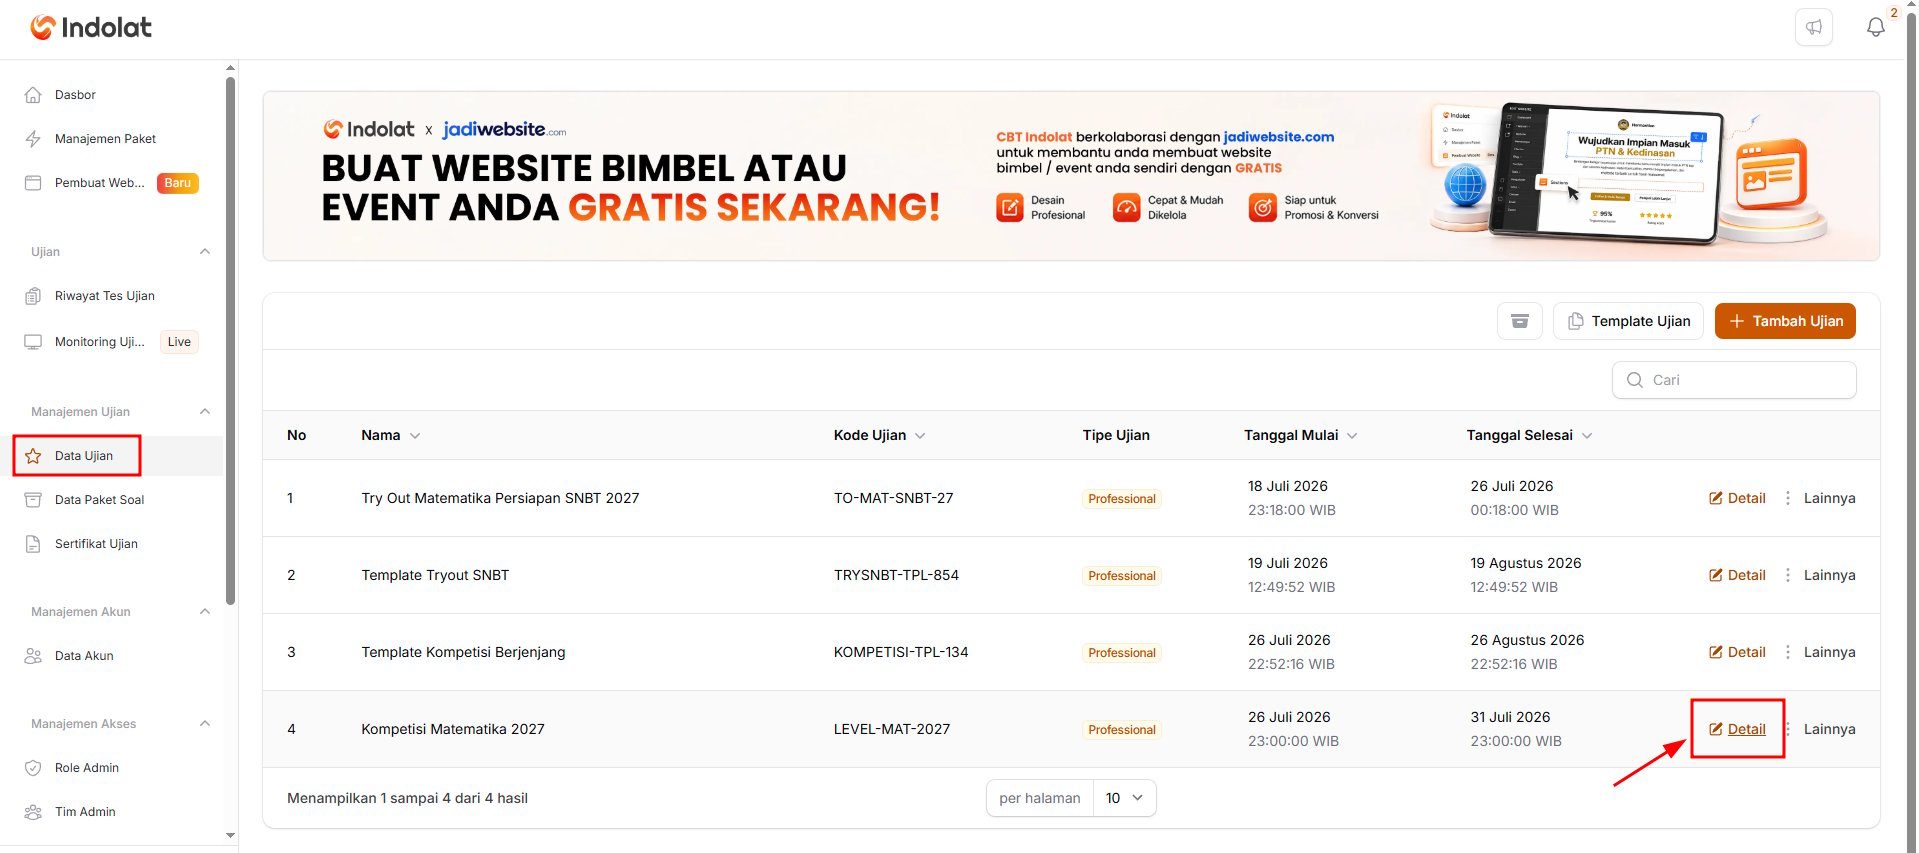
2
Open the Exam Participant List tab
Scroll down the page and open the Exam Participant List tab.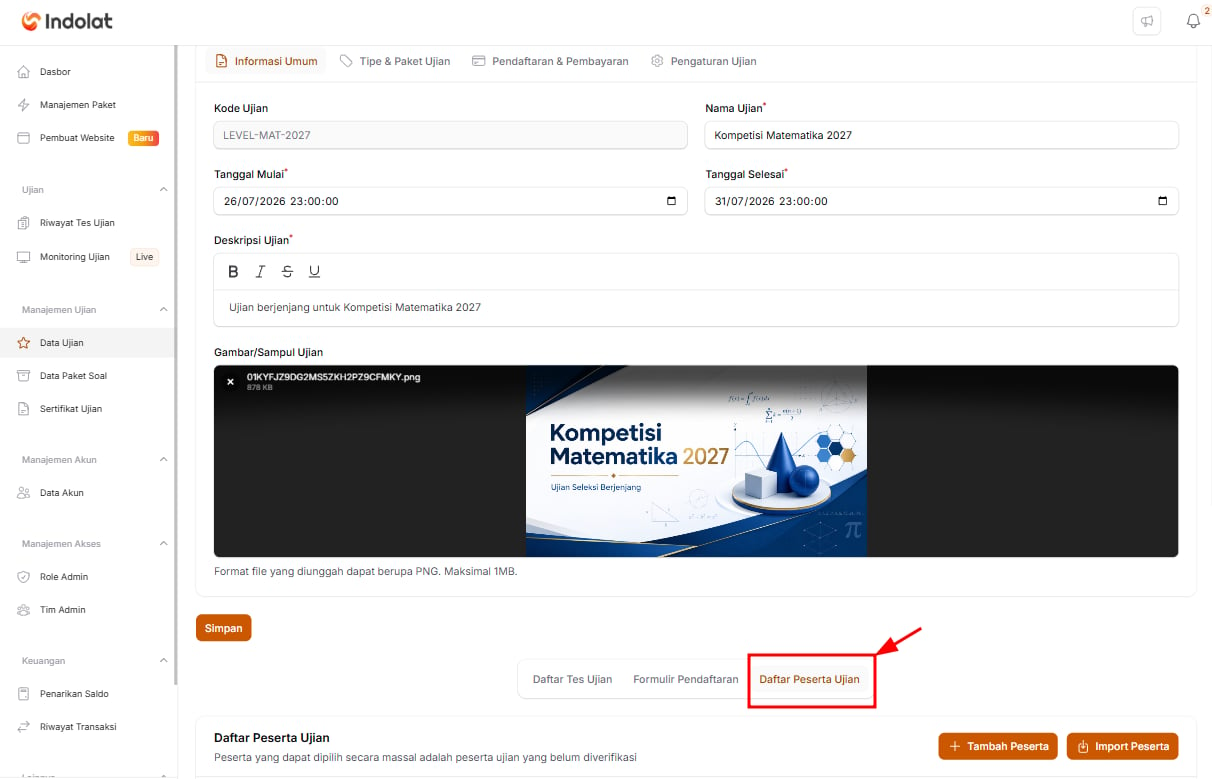
3
Click View on the participant
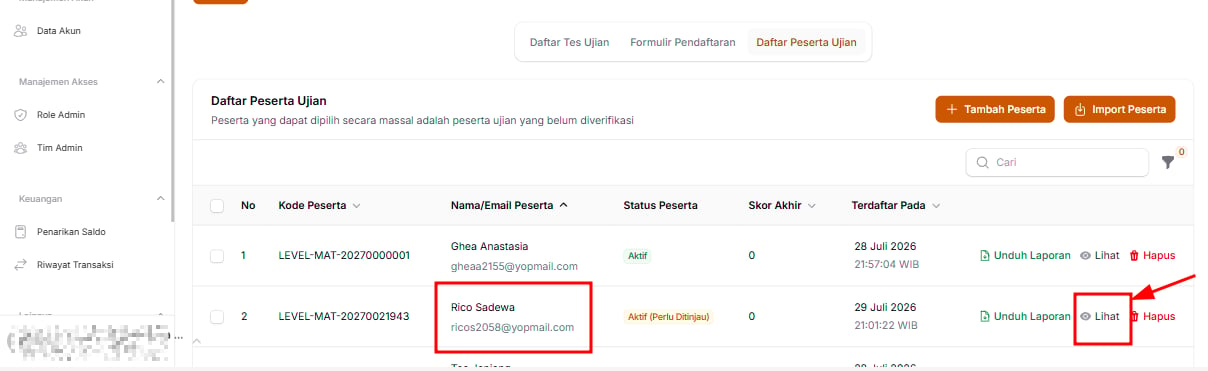
4
Decide whether the participant passes
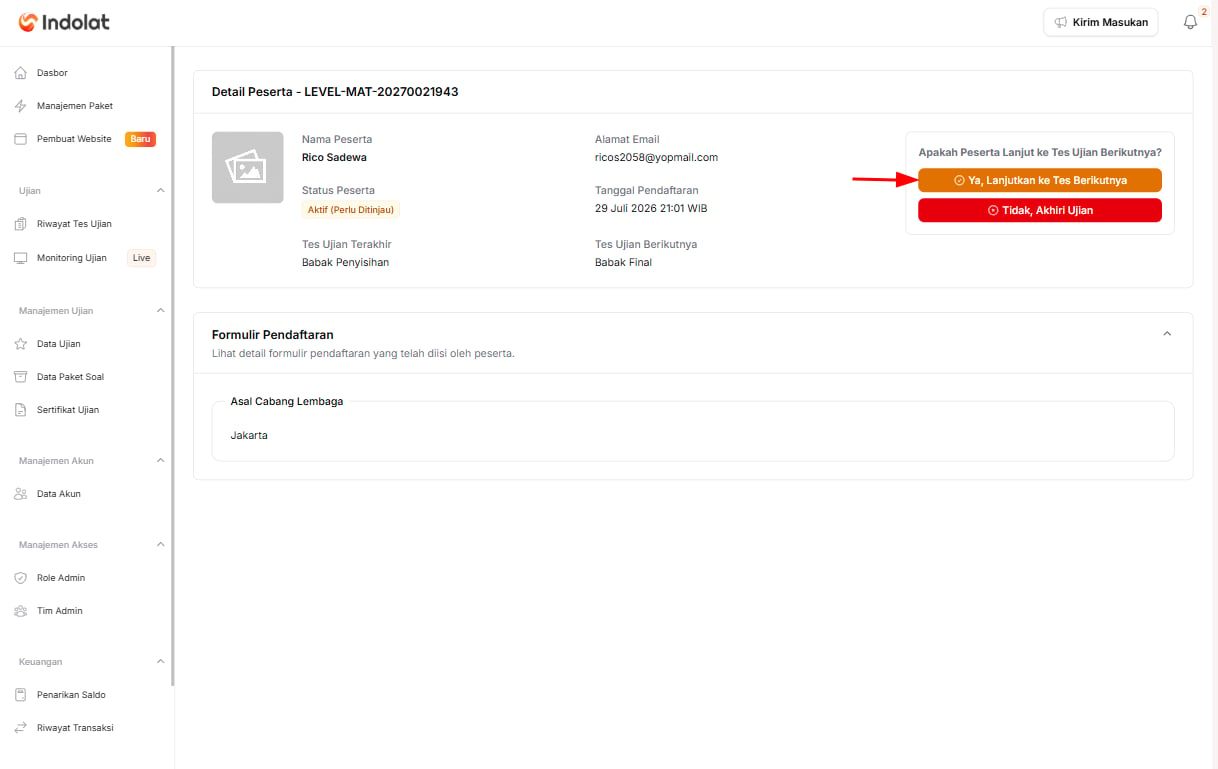
5
Set the payment deadline
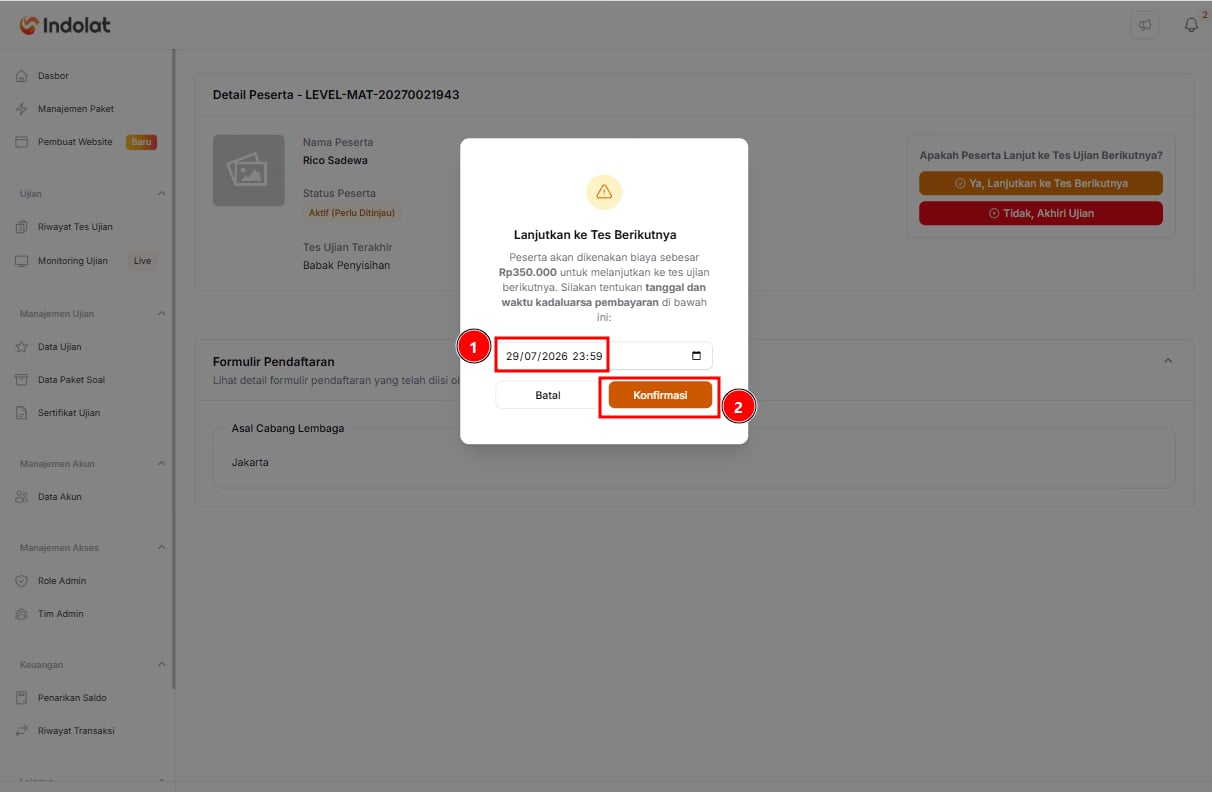
- Set the deadline by which the participant must pay the bill.
- Click Confirm to save the rule you’ve set.
6
Wait for the participant to pay
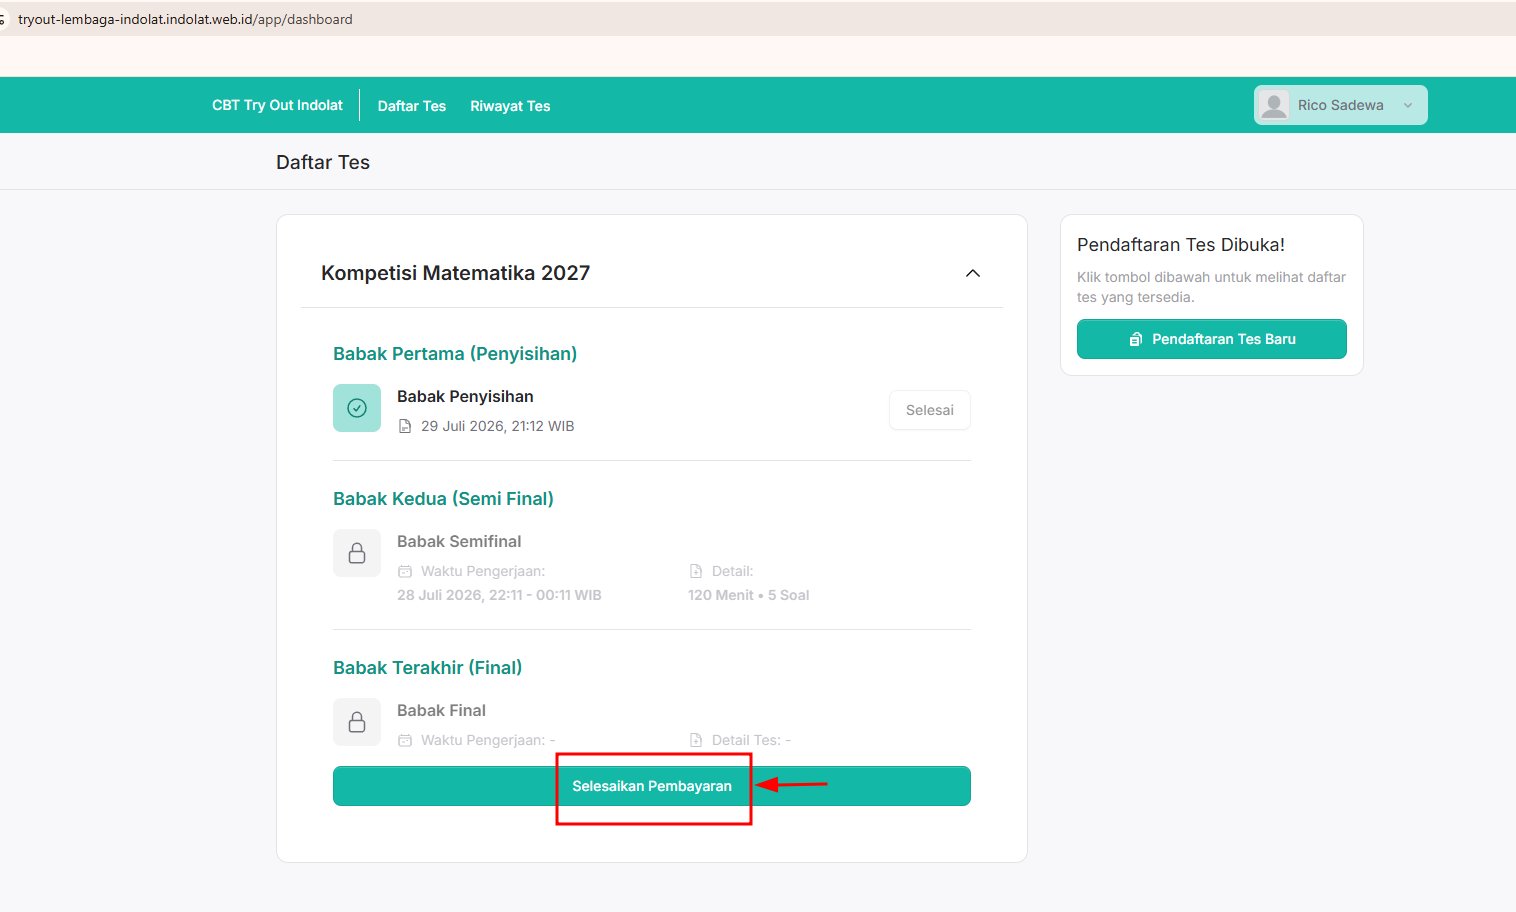
If the next level has no fee, the participant can move on straight away without paying.