

Parts of an Exam
Put simply, creating an exam involves four parts:- Question Package: where a set of questions is stored, often called a question bank.
- Exam: the main event that participants take part in.
- Test: a part or subject inside an exam.
- Exam Session: the schedule on which participants take the exam.
- Question package: Mathematical Reasoning Package
- Exam: SNBT 2027 Grand Tryout
- Test: Mathematics
- Exam session: Morning Session, 10:00–12:00
1. Create a Question Package
Before running an exam, first set up a container for the questions participants will answer. A question package stores all the questions together with their answers; you could also call it a question bank. Next, choose the package type: CBT/CAT or Essay/File Upload.- Question package 1: Mathematics Multiple Choice — CBT/CAT type
- Question package 2: Mathematics Essay — Essay/File Upload type
CBT / CAT
CBT / CAT
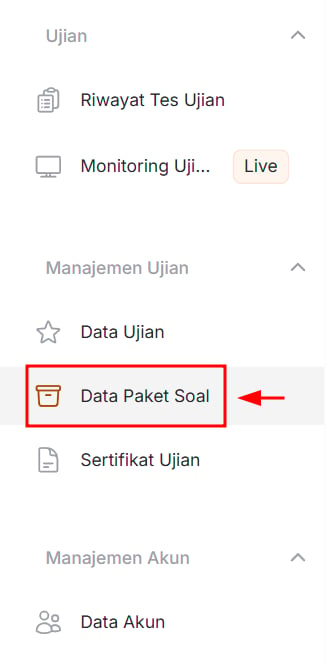
Open the Question Package Data menu
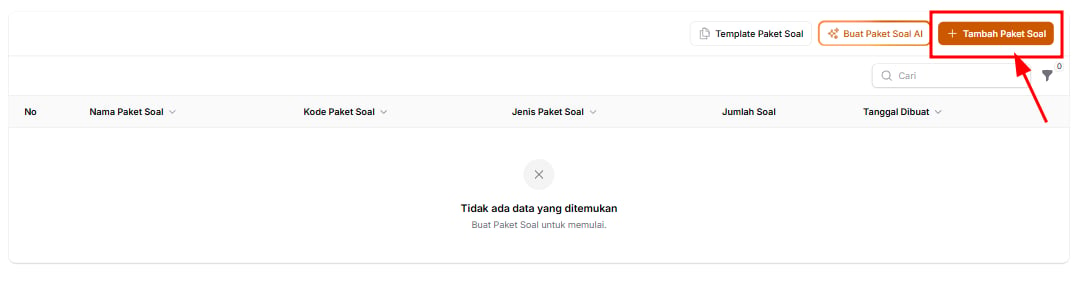
Click Add Question Package
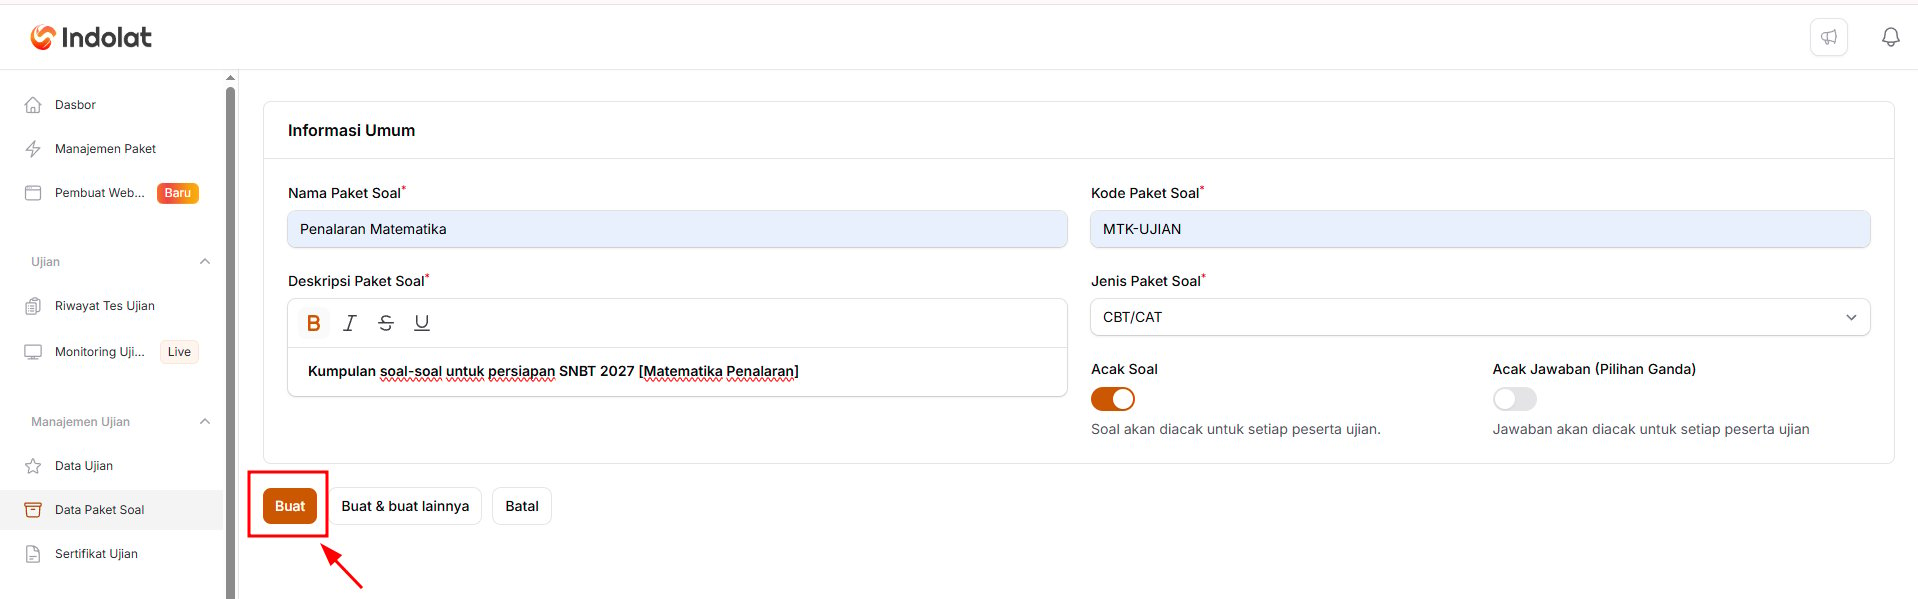
Fill In the Question Package Details
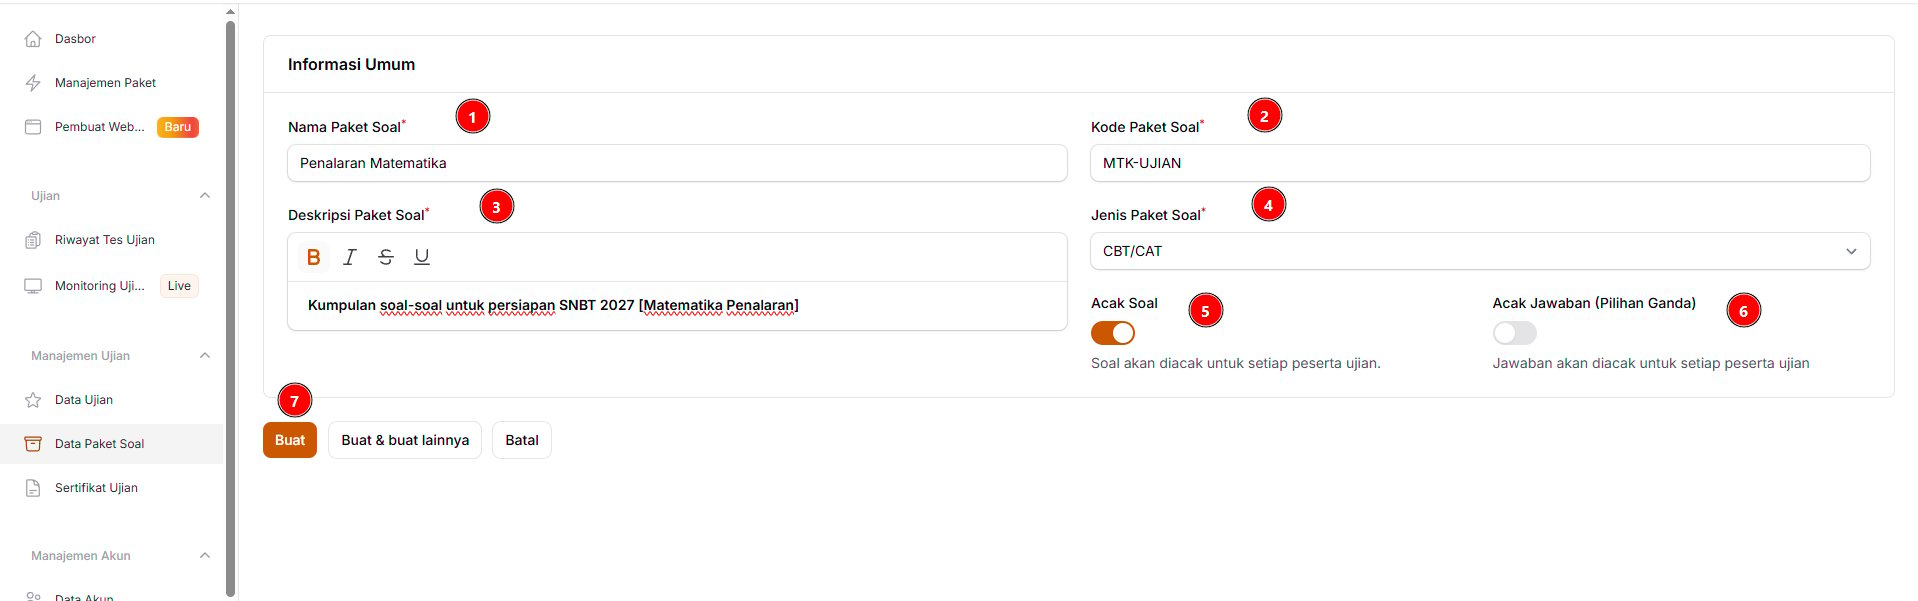
- Question Package Name
Enter a name that’s easy to recognise, for example Mathematical Reasoning. - Question Package Code
Enter a unique code to tell question packages apart, for example MTK-UJIAN. - Question Package Description
Add a short description of the package’s content or purpose. - Question Package Type
Choose CBT/CAT if participants will work through and answer the questions directly in the system. - Shuffle Questions
Turn this on if you want the question order to differ for each participant. - Shuffle Answers (Multiple Choice)
Turn this on if you want the order of the answer options to differ for each participant. This setting applies to multiple-choice questions. - Save the question package
Click Create to save the question package and move on to adding questions.
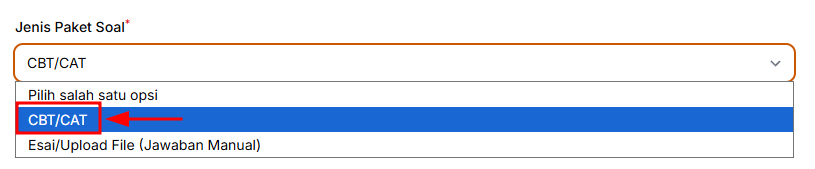
- Choose CBT/CAT if participants will see the questions on screen and enter their answers directly on the exam platform. This type is well suited to UTBK-SNBT tryouts, olympiads and other computer-based exams.
- Choose Essay/File Upload (Manual Grading) if the questions are already in a single file, such as a PDF. Participants open the file to read the questions, then submit their answers as the exam instructions say.
Save the Question Package
Essay/File Questions
Essay/File Questions
Open the Question Package Data menu
Click Add Question Package
Fill In the Question Package Details
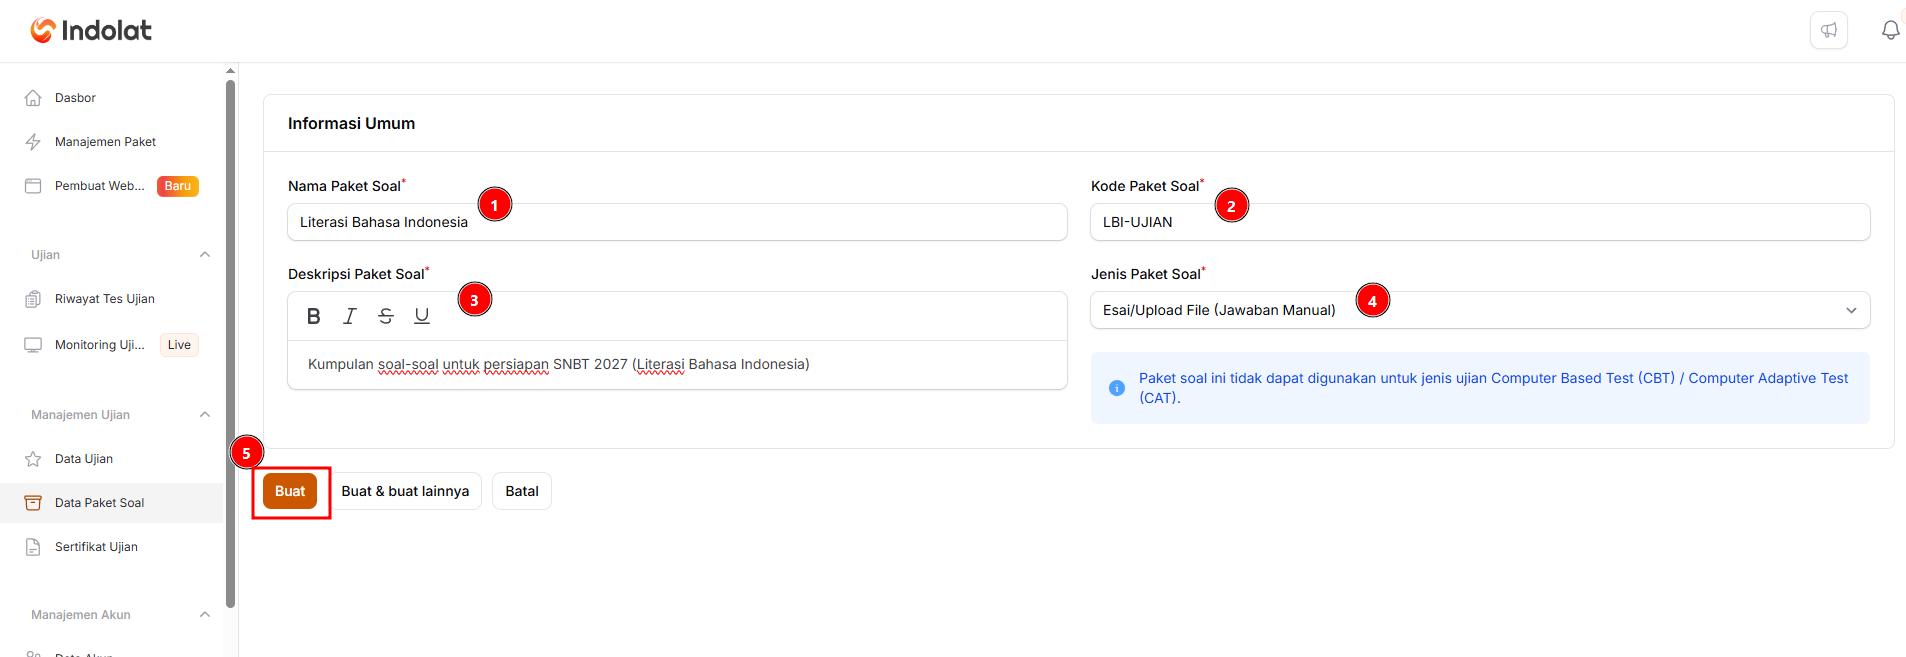
- Question Package Name: Enter a name that’s easy to recognise.
Example: Indonesian Language Literacy. - Question Package Code: Enter a short, unique code.
Example: LBI-UJIAN. - Question Package Description: Write a short description of the package’s content.
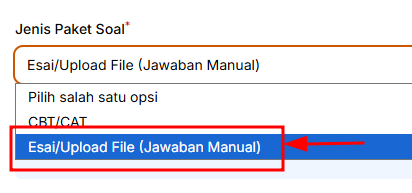
Example: A set of Indonesian Language Literacy questions to prepare for SNBT 2027. - Question Package Type: Choose Essay/File Upload (Manual Grading). Use this option if participants:
- write long answers directly in the system, or
- upload answer files, such as a PDF, a Word document or a photo of an answer sheet. Participants’ answers then need to be checked and graded manually by a grader.
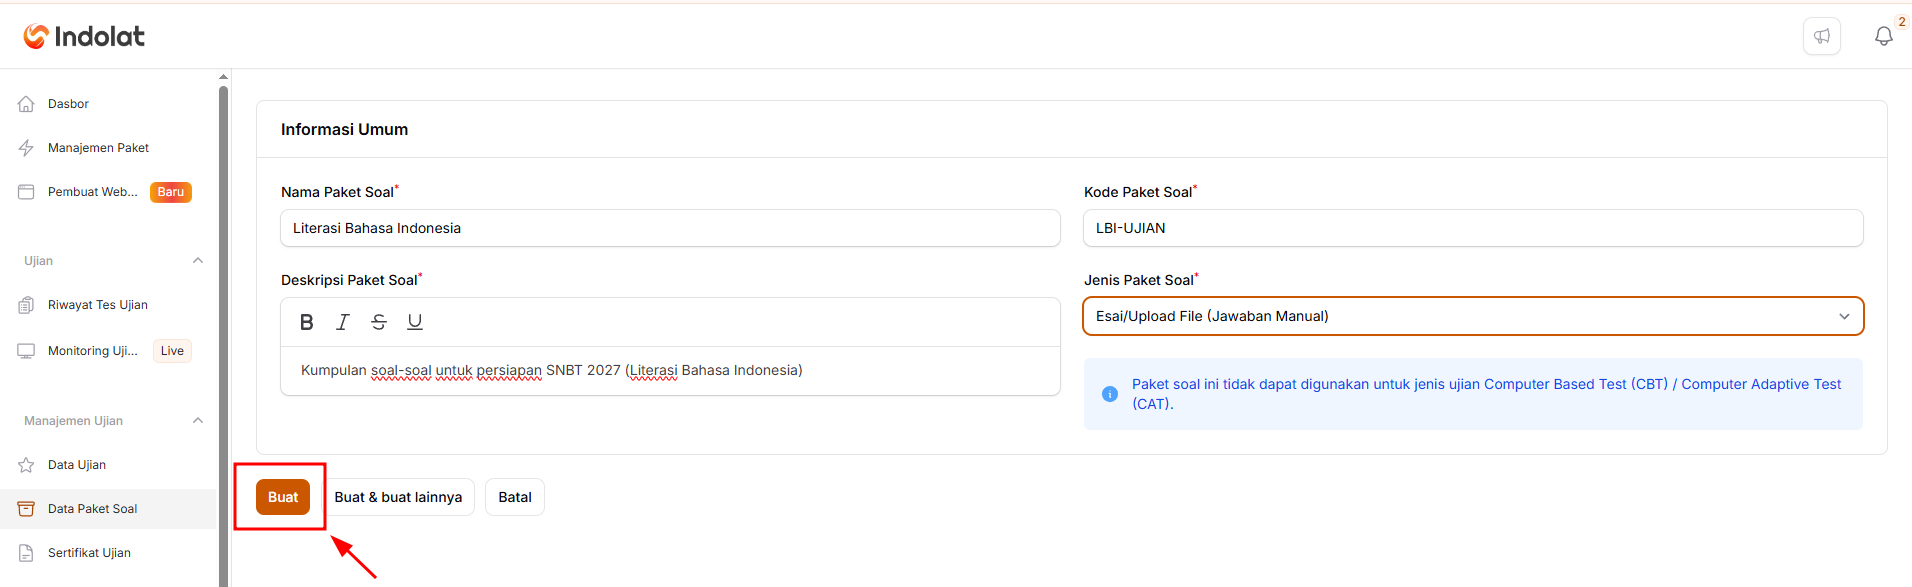
- Create
Once everything is filled in, click Create to save the question package.
- Choose CBT/CAT if participants will see the questions on screen and enter their answers directly on the exam platform. This type is well suited to UTBK-SNBT tryouts, olympiads and other computer-based exams.
- Choose Essay/File Upload (Manual Grading) if the questions are already in a single file, such as a PDF. Participants open the file to read the questions, then submit their answers as the exam instructions say.
Save the Question Package
2. Create the Questions and Answers
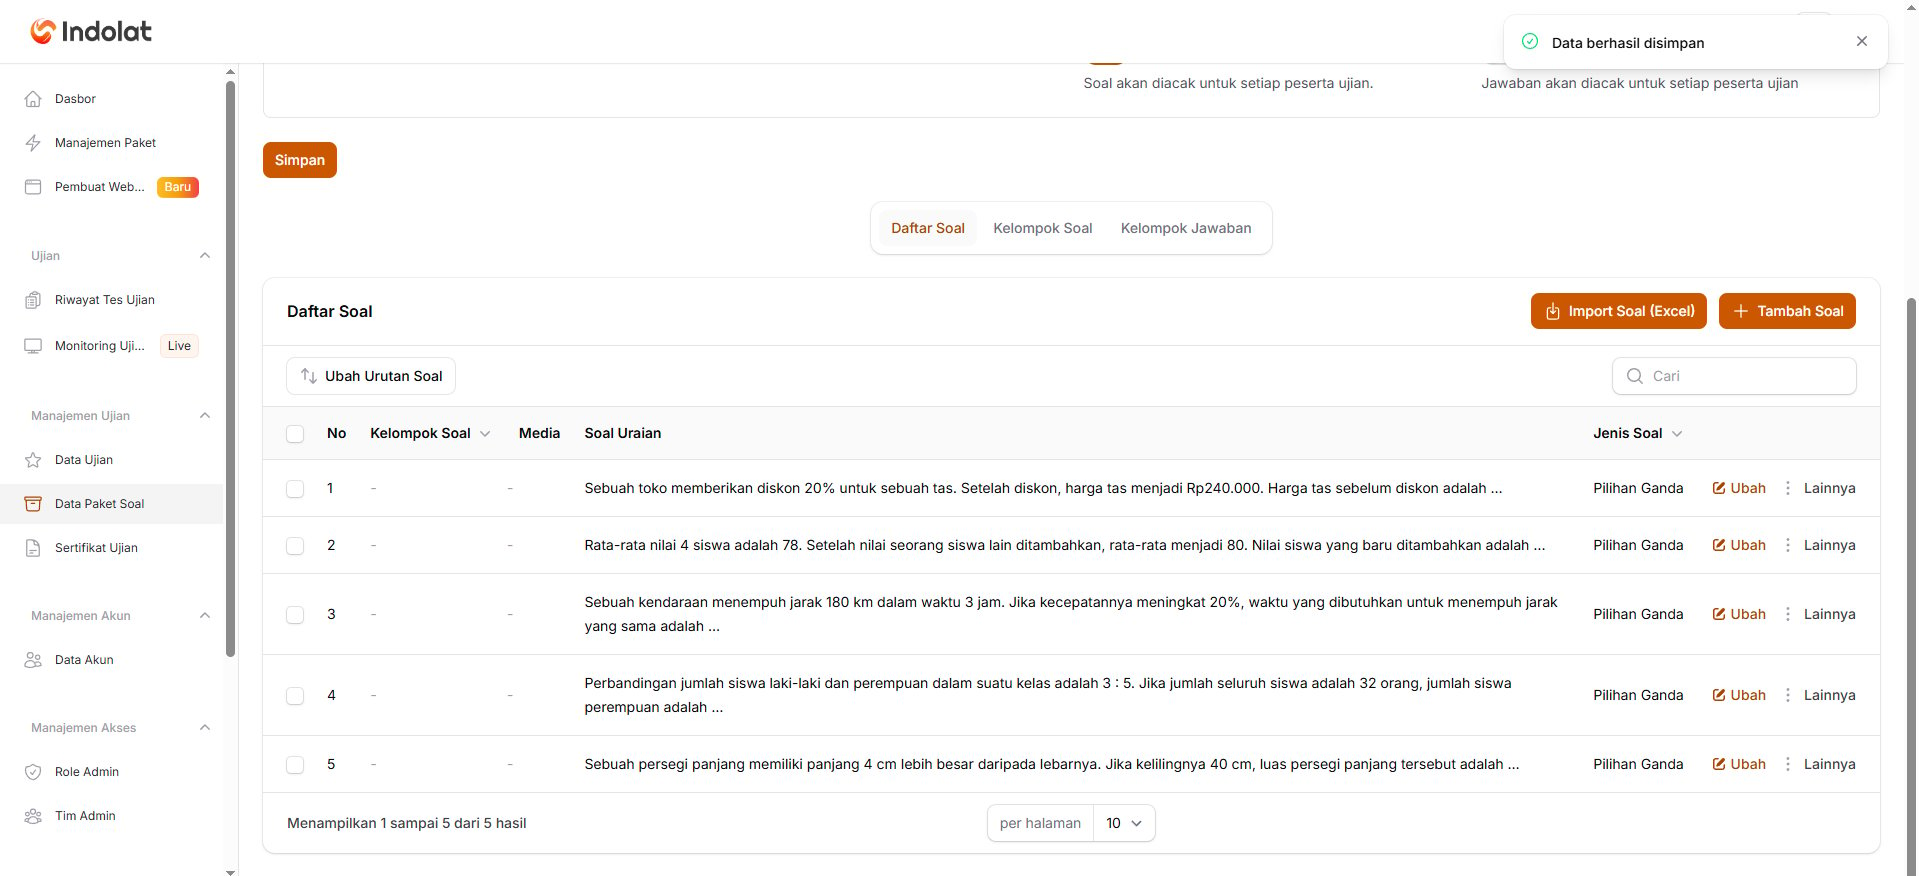
Once the question package is created, the next step is to add questions to it.Click Add Question
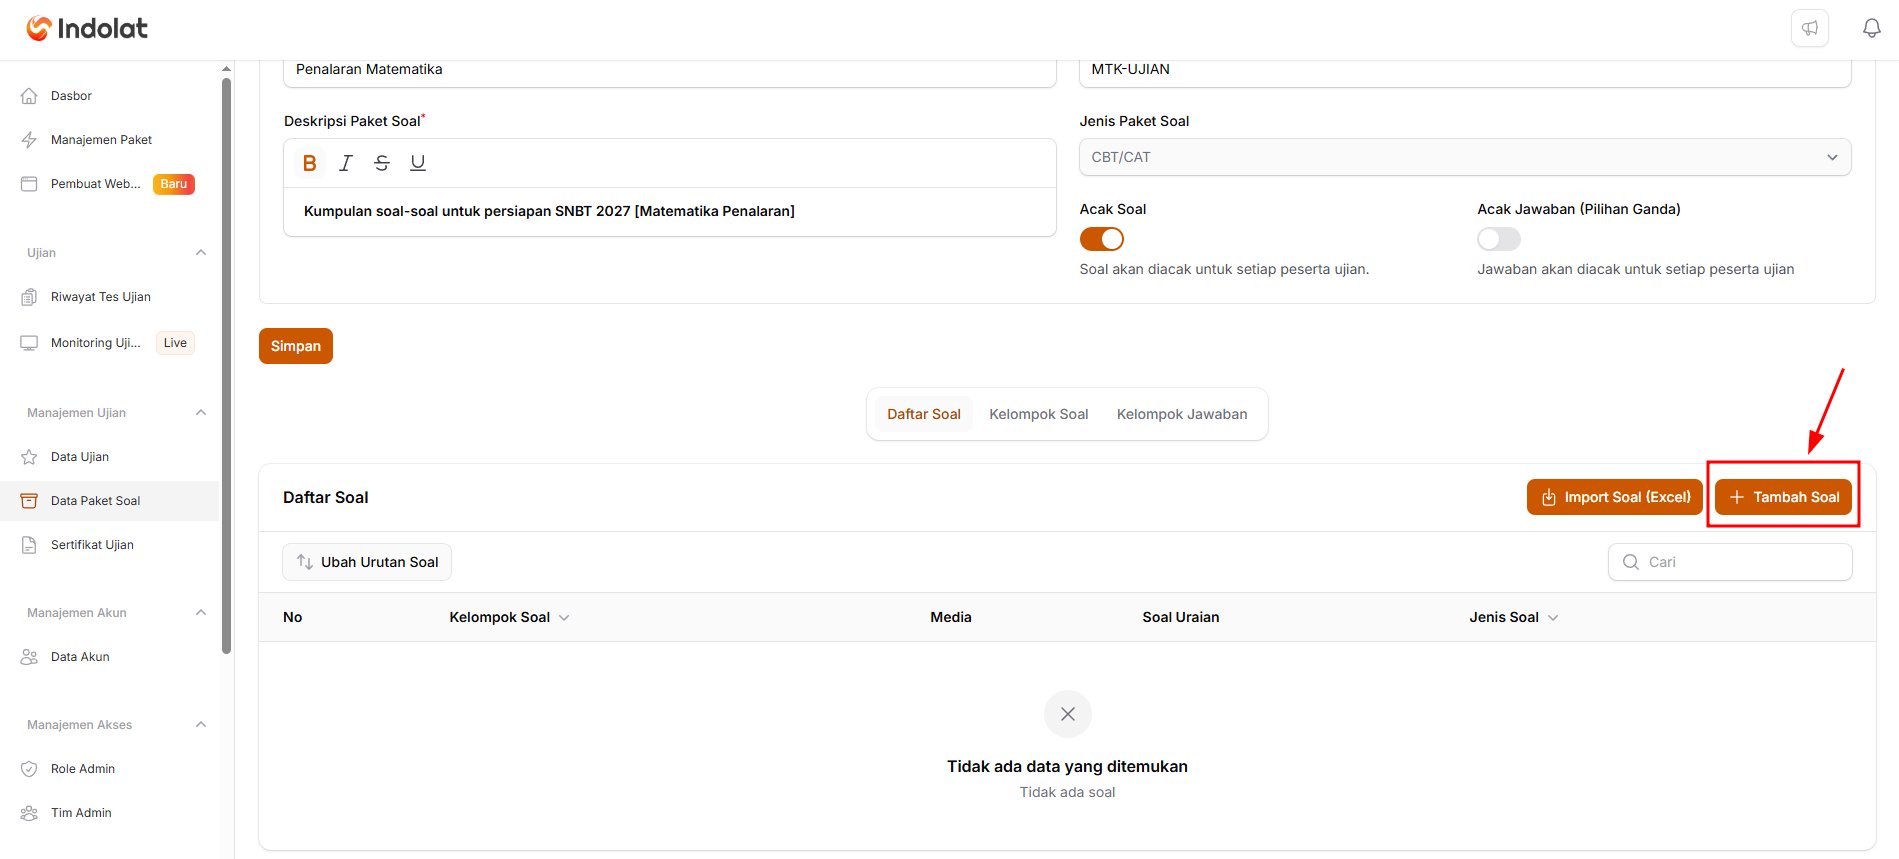
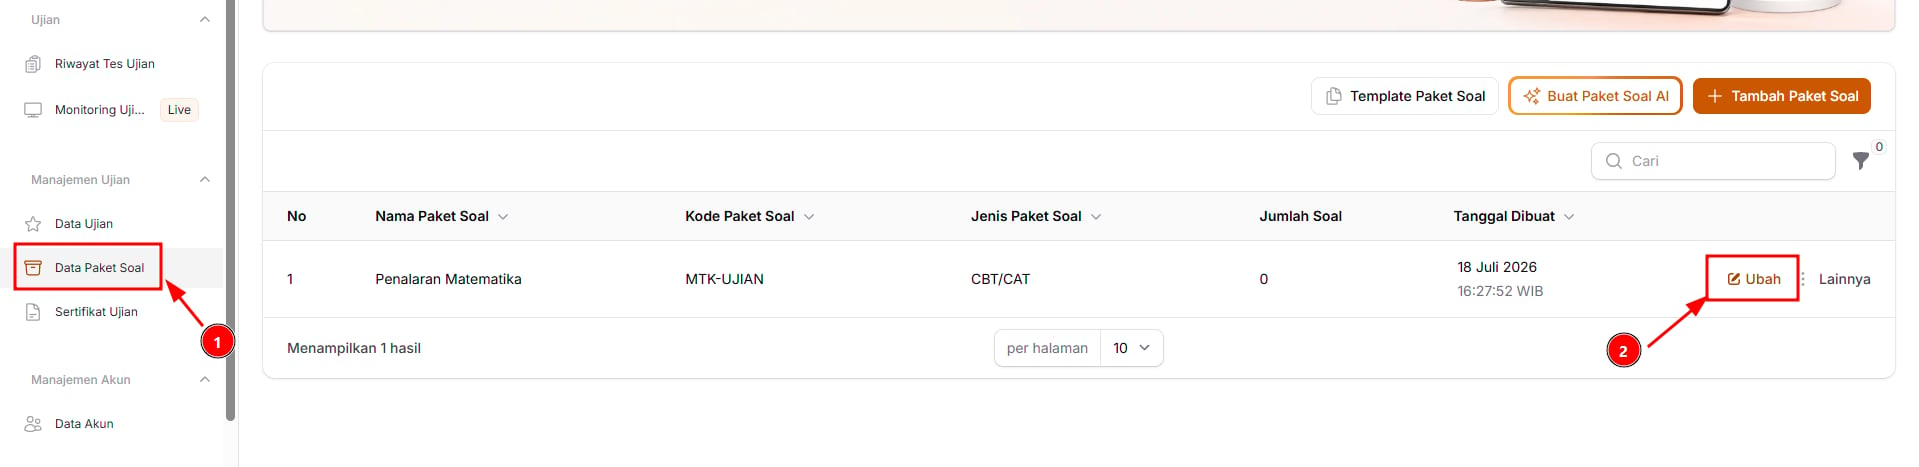
- Open the Question Package Data menu.
- Choose the question package whose questions haven’t been added yet.
- Click Edit on that question package.
- Add the questions in the Question List section with the Add Question button.
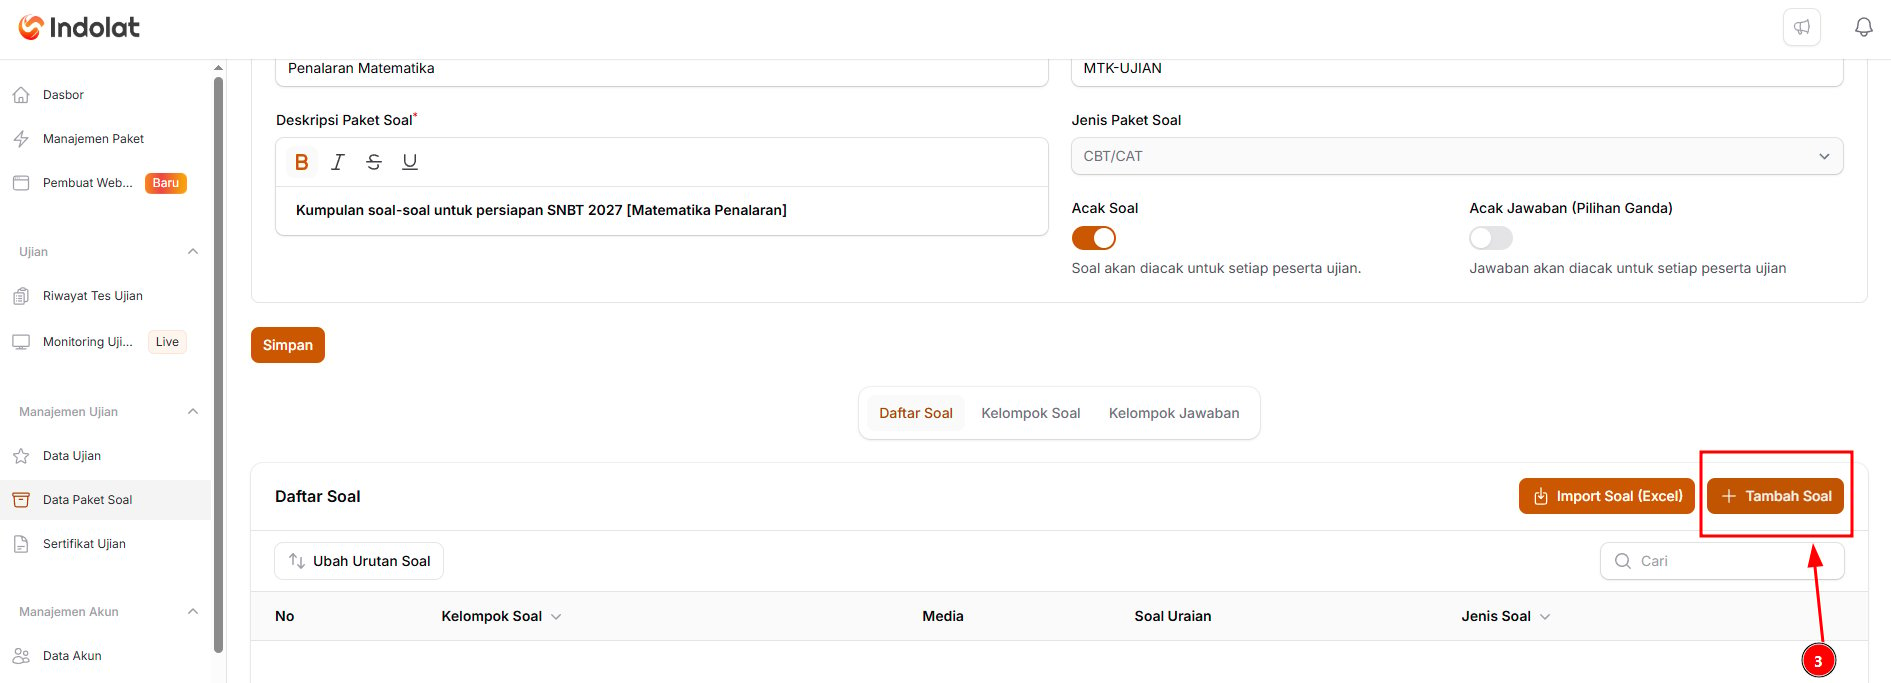
Fill In the Question Details
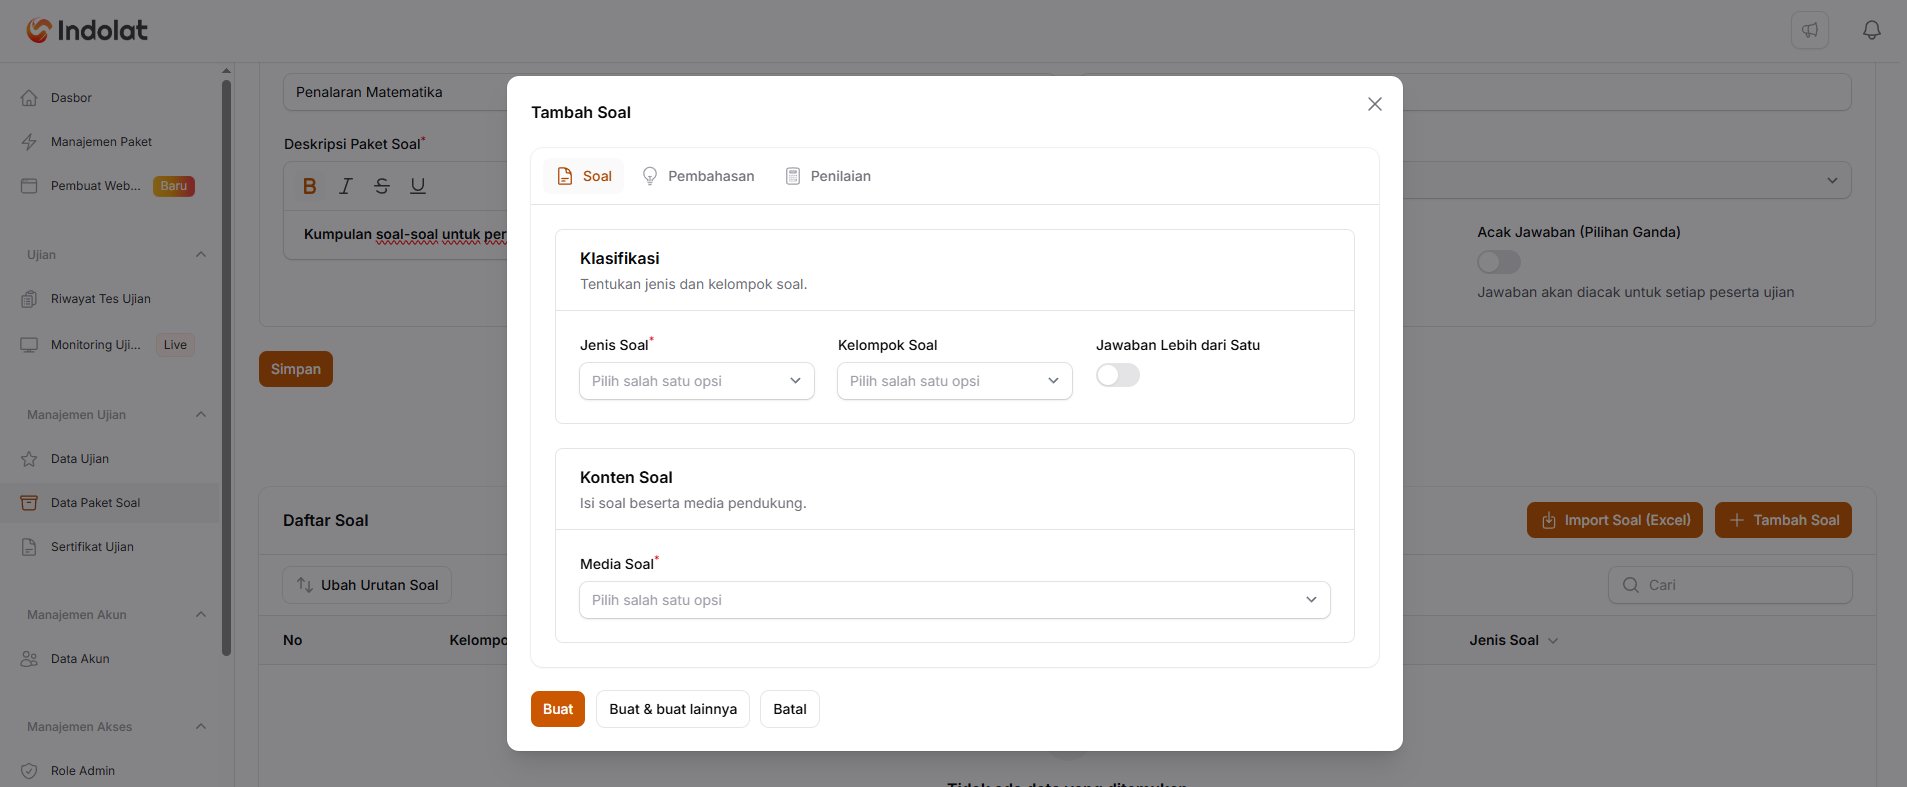
-
Question Type: decides what kind of question participants will answer:
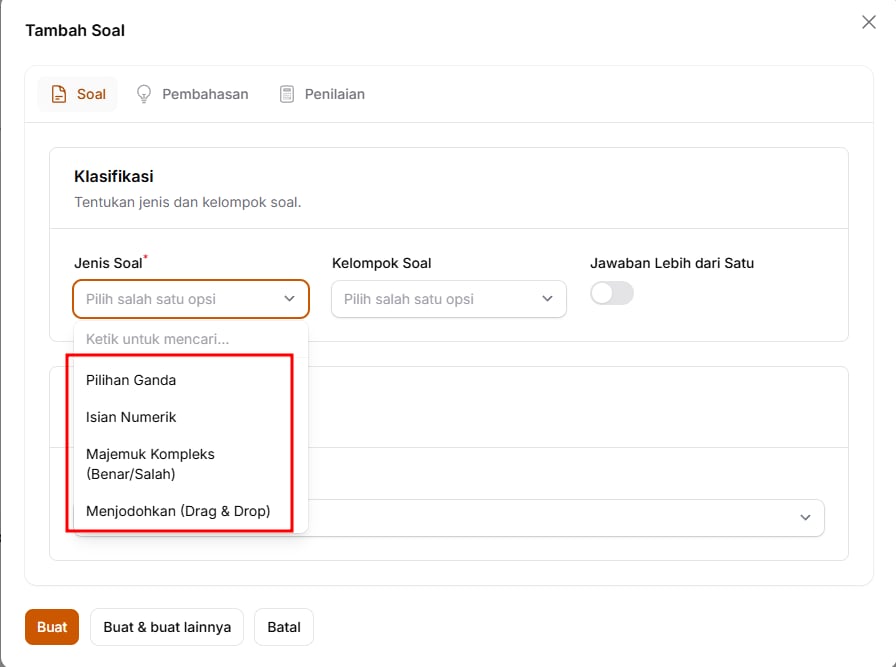
- Multiple Choice
Participants choose the one correct answer.
Example: The capital of Indonesia is …
A. Bandung
B. Jakarta
C. Surabaya - Short Answer
Participants type a short answer, either a number or text. You can set more than one answer that counts as correct. Set the key in the Answer Key section that appears when you choose this type: Answer Format (Text or Number), Main Answer Key and Other Accepted Answers.
Example: The capital of Indonesia is …
Correct answers: DKI Jakarta or Jakarta - Complex Multiple Response (True/False, Fact/Opinion, etc.)
For each statement, participants choose one of two labels. The labels can be True/False, Fact/Opinion, Matches/Does Not Match, Agree/Disagree, Yes/No or any other labels you set. Choose them in Label Pair under Statement Column Labels; choose Other labels (type your own) to write your own.
Example:- The sun rises in the east — True
- Water freezes at 100°C — False
- Matching (Drag & Drop)
Participants pair up the options that belong together. Fill in the pairs in the Matching Pairs section (Statement (Left) and Answer (Right)); the right-hand side is shuffled during the exam.
Example:- Indonesia → Jakarta
- Japan → Tokyo
- Multiple Choice
-
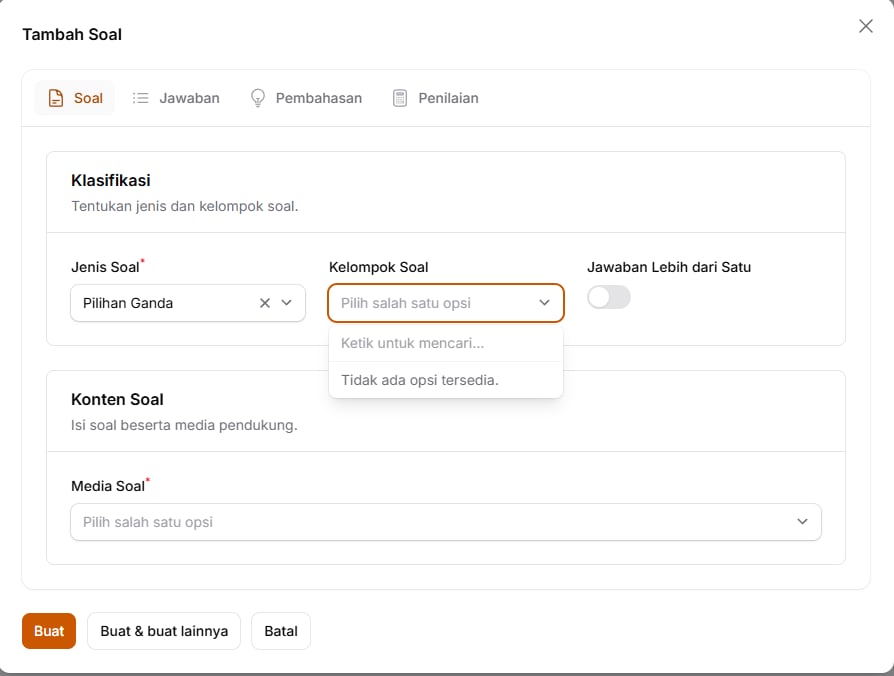
Question Group: groups several questions that share the same material or topic.
Example: there is one reading passage called “School Environment”, and 3 questions are written about it. All three questions can go into the School Environment question group. Participants read the same material, then answer several related questions. Another example:
- Question group: Reading Text 1
- Question 1: What is the main idea of the text?
- Question 2: Who are the characters in the text?
- Question 3: What is the conclusion of the text?
If each question stands on its own and doesn’t use shared material, you can leave Question Group empty.
- Passages: choose a shared reading text to show above the question text. The list of passages comes from the Passages tab of the question package (see the Create Passages (Shared Reading Texts) section on the Create a Question Package page). Leave it empty if the question doesn’t use a reading text.
-
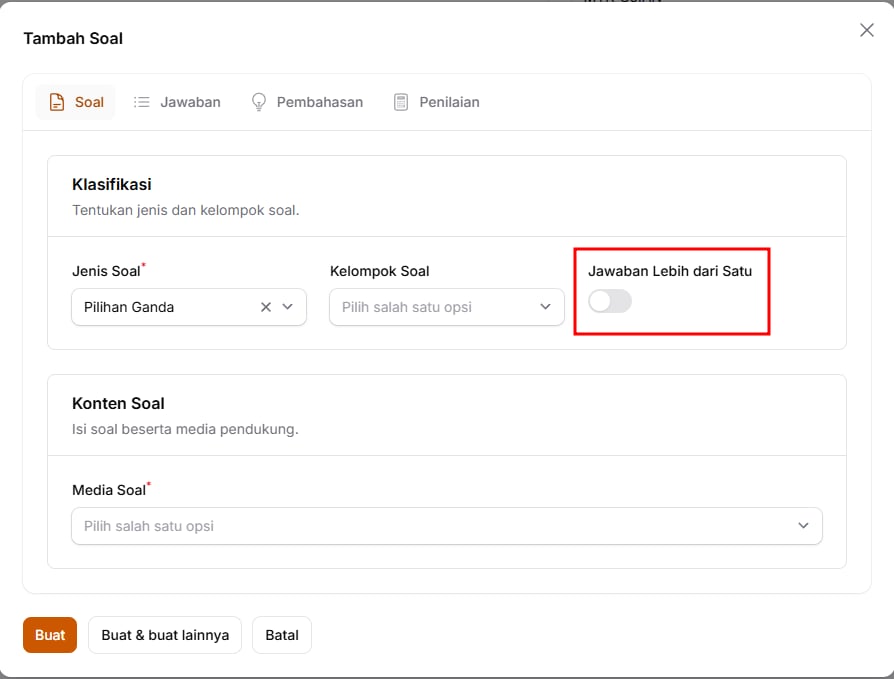
More Than One Answer: use this when a question has more than one correct answer. This setting only appears for Multiple Choice questions.
Example: Select the animals that are mammals:
- Cat ✅
- Cow ✅
- Chicken
- Fish
Only turn this setting on if participants are really allowed to select several answers. If there is only one correct answer, leave it off.
-
Question Media: decides what form the question takes for participants to see or hear.
You can choose more than one Question Media for a single question.
 This means one question can combine text, images and audio. For example:

- Text to write the question.
- Image to show a chart or an illustration.
- Audio for listening material.
Choose the media you need for the kind of question you are creating.
Enter the Question
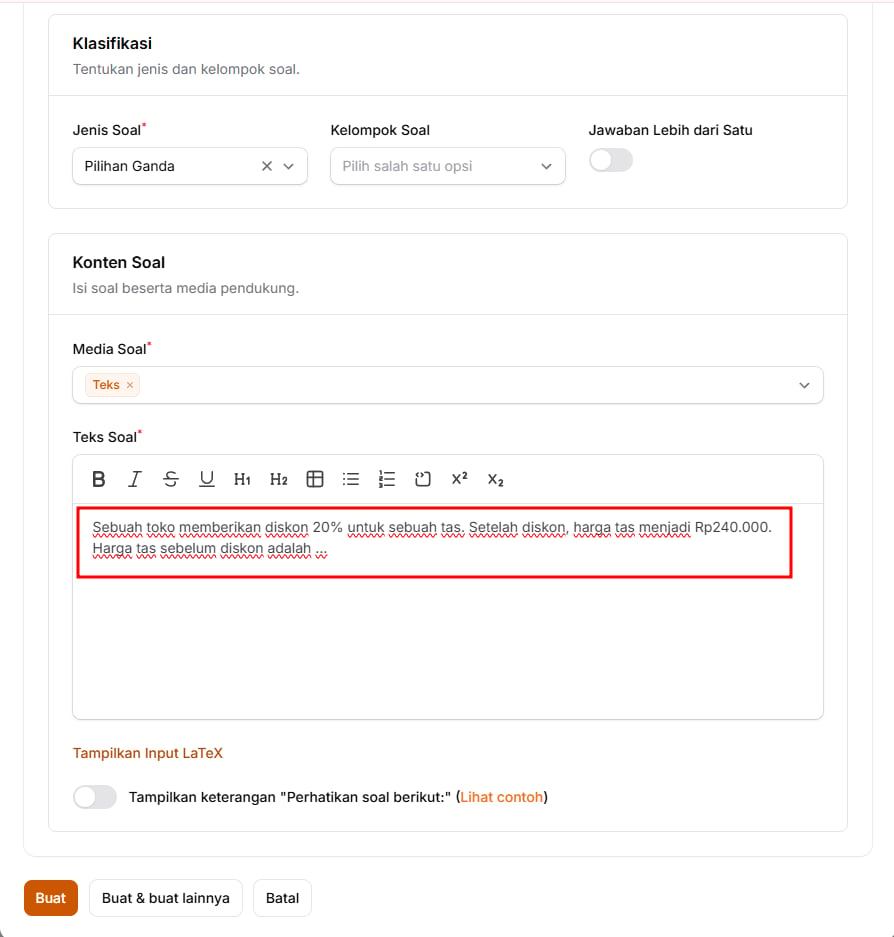
A shop gives a 20% discount on a bag. After the discount, the bag costs Rp240,000. The price of the bag before the discount is …Use the buttons at the top of the field to format text, create lists, add tables or write maths formulas. The question text can be up to 5,000 characters.
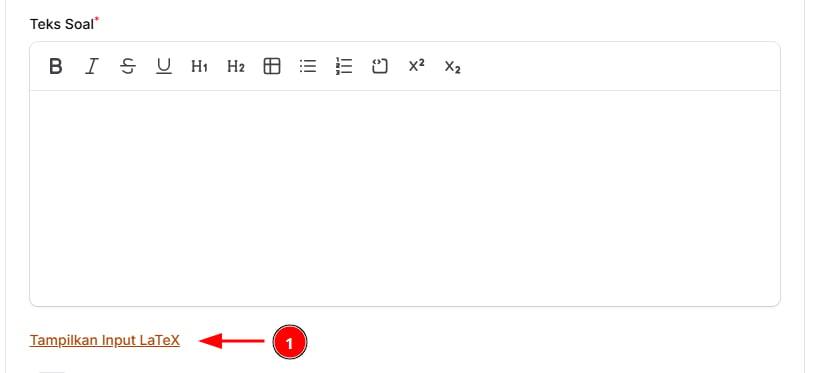
- Click Show LaTeX Input.
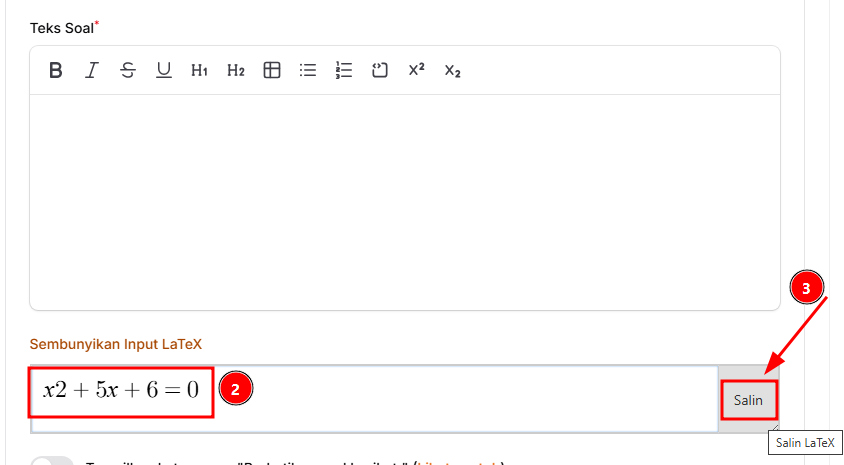
- Type the formula in the field provided.
- Click Copy.
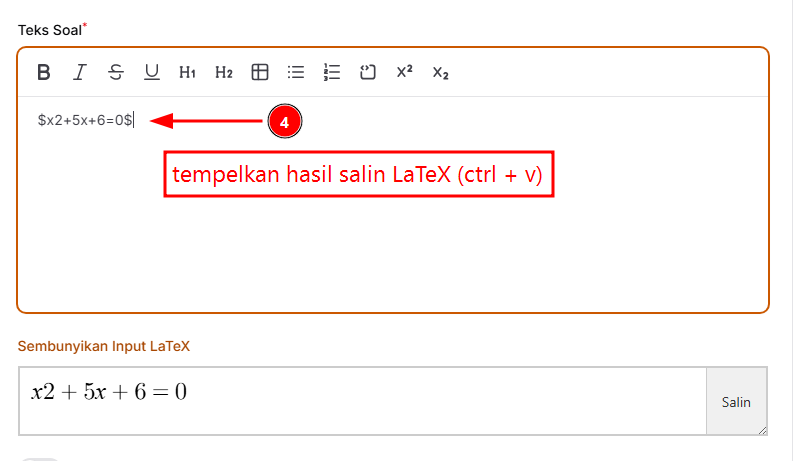
- Paste the formula into the Question Text section.
Add the Answer Options
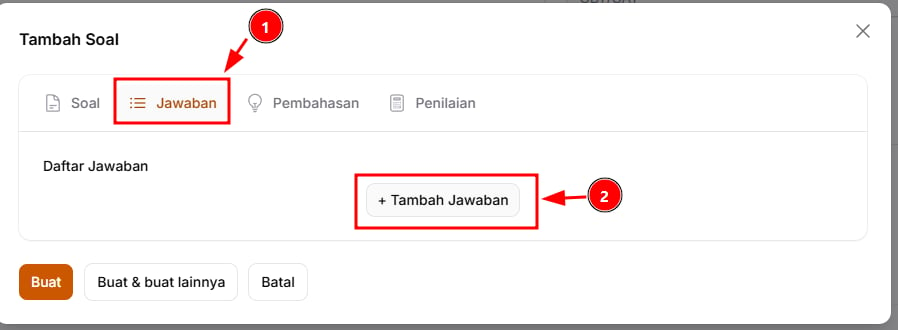
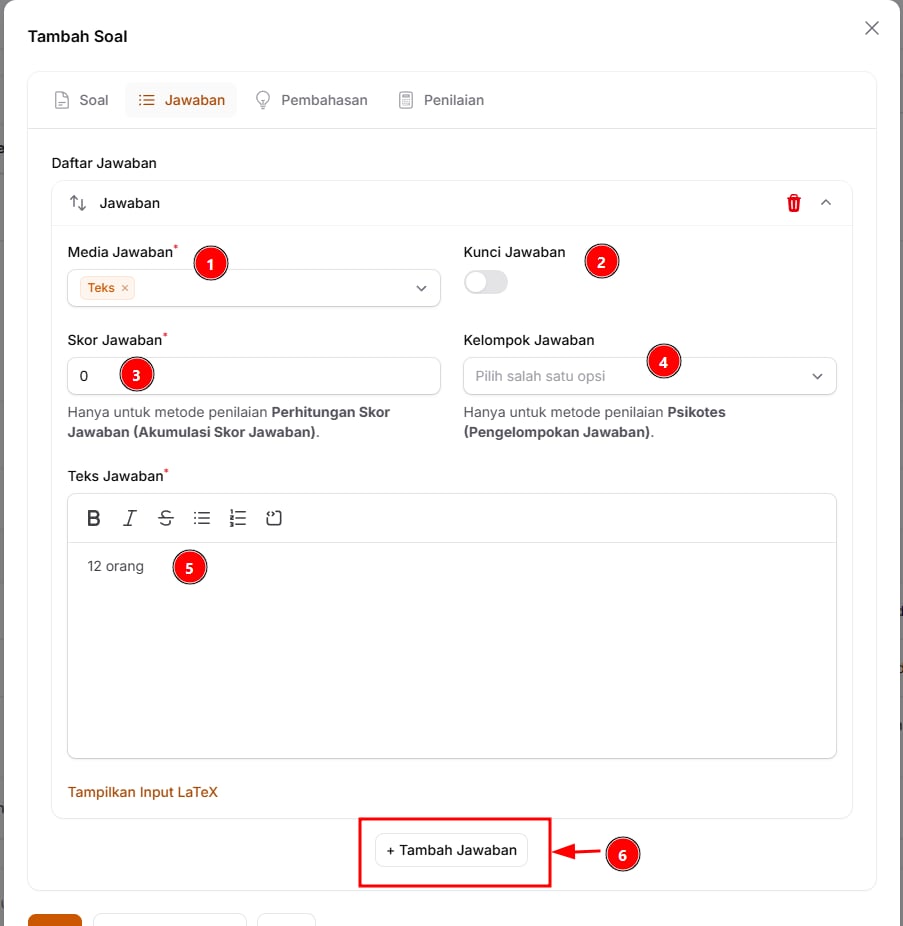
- Answer Media: Choose the form of the answer, for example text, image or audio.
- Answer Key: Turn this on only for the correct option. If More Than One Answer is on, turn it on for every correct option.
For example, if the correct answer is Rp300,000, turn on Answer Key only for that option. Leave it off for the other options.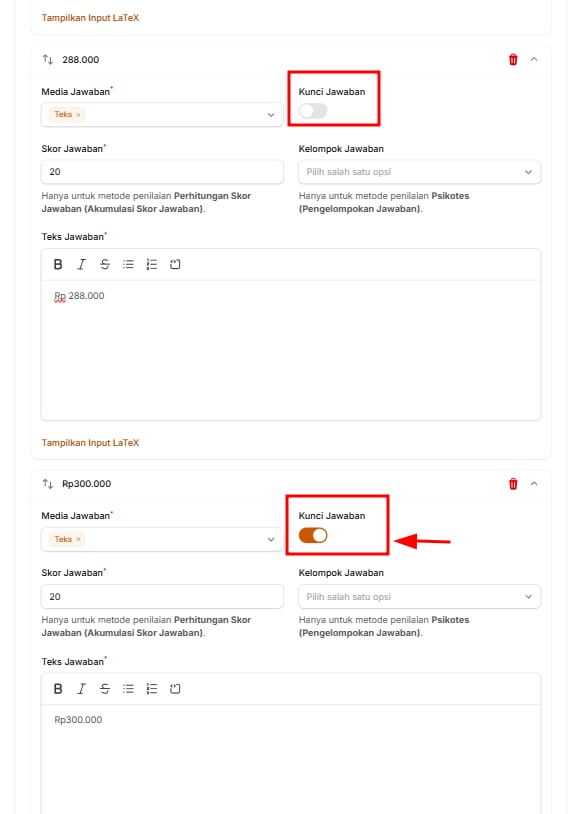
- Answer Score: Enter the score for that option. This field is only used by the Answer Score Calculation (Sum of Answer Scores) scoring method.
For example, a wrong answer can be given a score of 0. - Answer Group: Used only by the Psychometric (Answer Grouping) scoring method. If you don’t use it, you can leave this empty.
- Answer Text: Write the answer option participants will see.
- Add Answer: Click Add Answer to create the next answer option.
3. Create the Exam
Once the questions and answers are created, the next step is to prepare the exam. 💡 Exam: This is the main container for the whole exam event.Example: SNBT 2027 Grand Tryout This exam will hold several tests, participants, a registration form and payment settings.💡 Test: This is a test section inside the exam.
For example, the SNBT 2027 Grand Tryout contains:💡 Exam Session: This is the schedule for a test.Each test has its own duration, scoring method and settings.
- Mathematical Reasoning
- Indonesian Language Literacy
- English Language Literacy
Example: Mathematical Reasoning — Morning Session, 20 July 2026, 08:00–09:00
Mathematical Reasoning — Afternoon Session, 20 July 2026, 15:00–16:00 In the session, you choose the question package and decide when participants can start and must finish.
Create an Exam
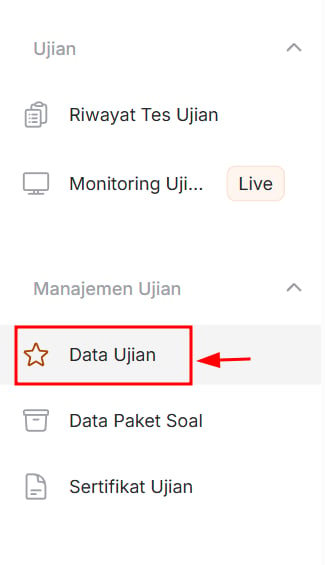
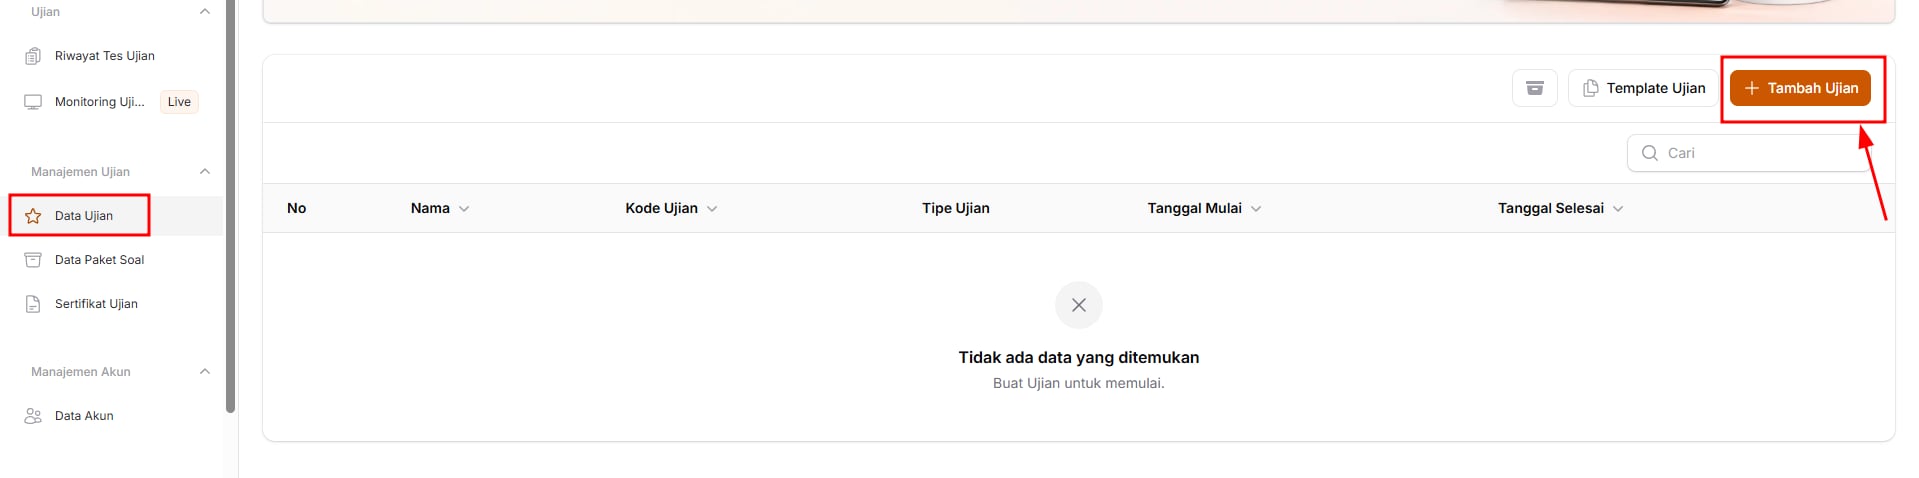
Open the Exam Data menu
Click Add Exam
Fill In the Exam Details
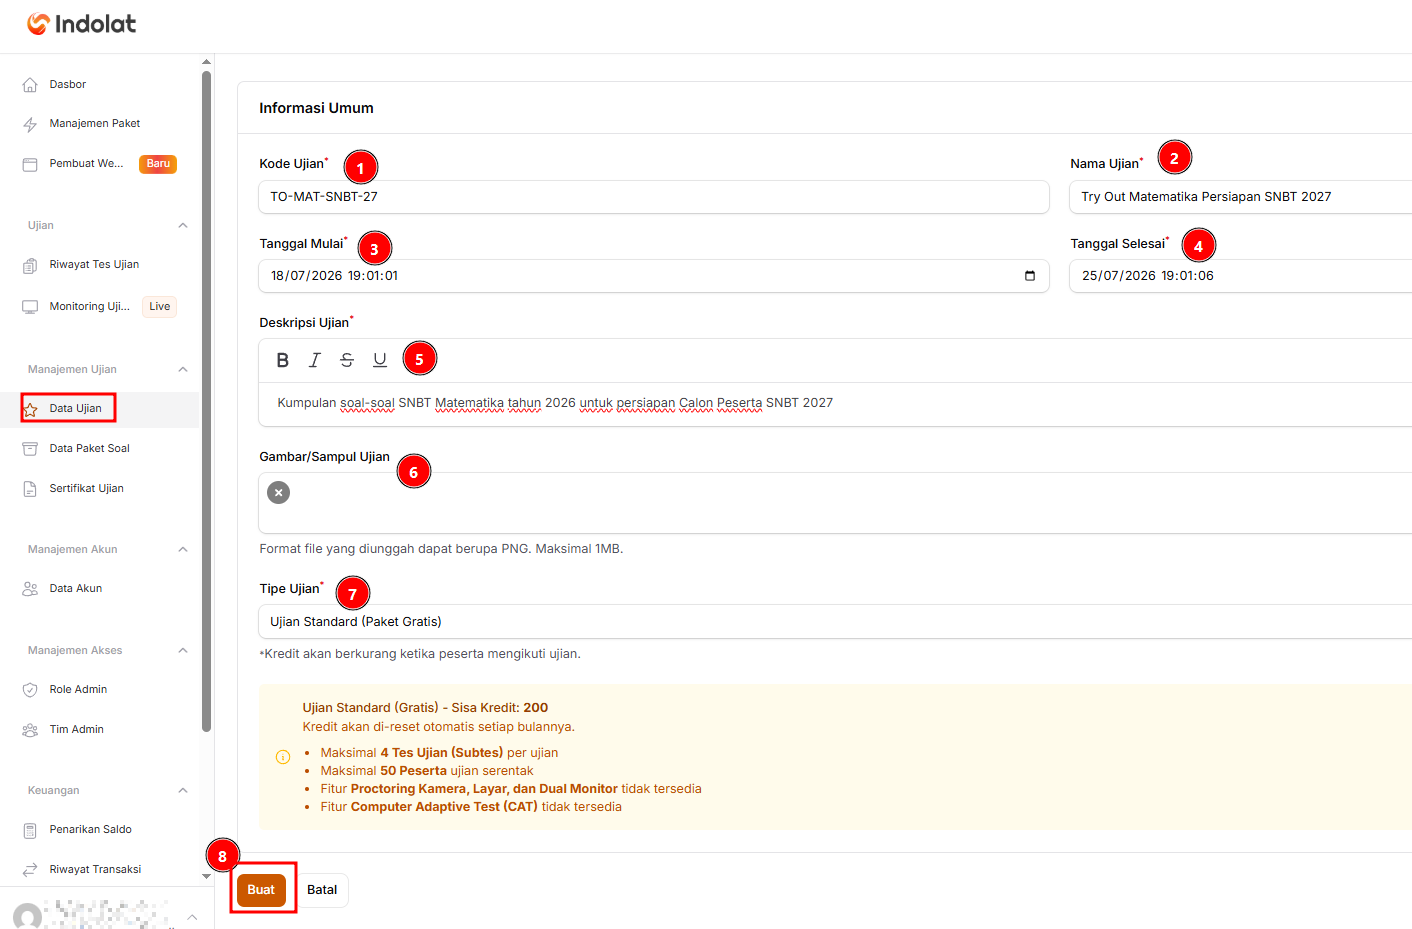
- Exam Code
Enter a short, unique code so the exam is easy to identify.
Example: TO-JULI-26 - Exam Name
Write the exam name that admins and participants will see.
Example: SNBT 2027 Grand Mathematics Tryout - Start Date
Set the date and time the exam starts. - End Date
Set the date and time the exam ends. - Exam Description
Give a short description of the exam’s purpose or content.
Example: A tryout with a set of Mathematics questions to help participants prepare for SNBT 2027. - Exam Image/Cover
Upload an image to use as the exam cover (PNG format, up to 1 MB). This helps participants recognise the exam. - Exam Type
Choose the exam type you need. This example uses Standard Exam (Free Plan). Check the limits the system shows before you continue.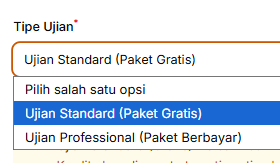
- Create
Once you’ve checked that all the details are correct, click Create to save the exam.
Choose the Exam Type & Plan
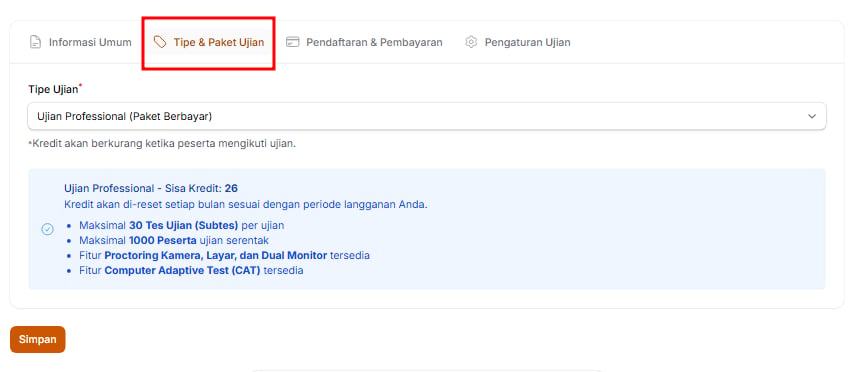
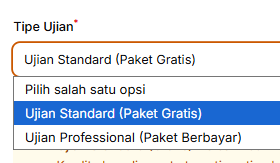
- Credits are reset automatically every month.
- Up to 4 Tests (Subtests) per exam.
- Up to 50 participants taking the exam at once (at the same time).
- Camera, screen and dual monitor proctoring is not available.
- Computer Adaptive Test (CAT) is not available.
- Credits are reset every month according to your subscription period.
- Up to 30 Tests (Subtests) per exam.
- Up to 1,000 participants taking the exam at once.
- Camera, screen and dual monitor proctoring is available.
- Computer Adaptive Test (CAT) is available.
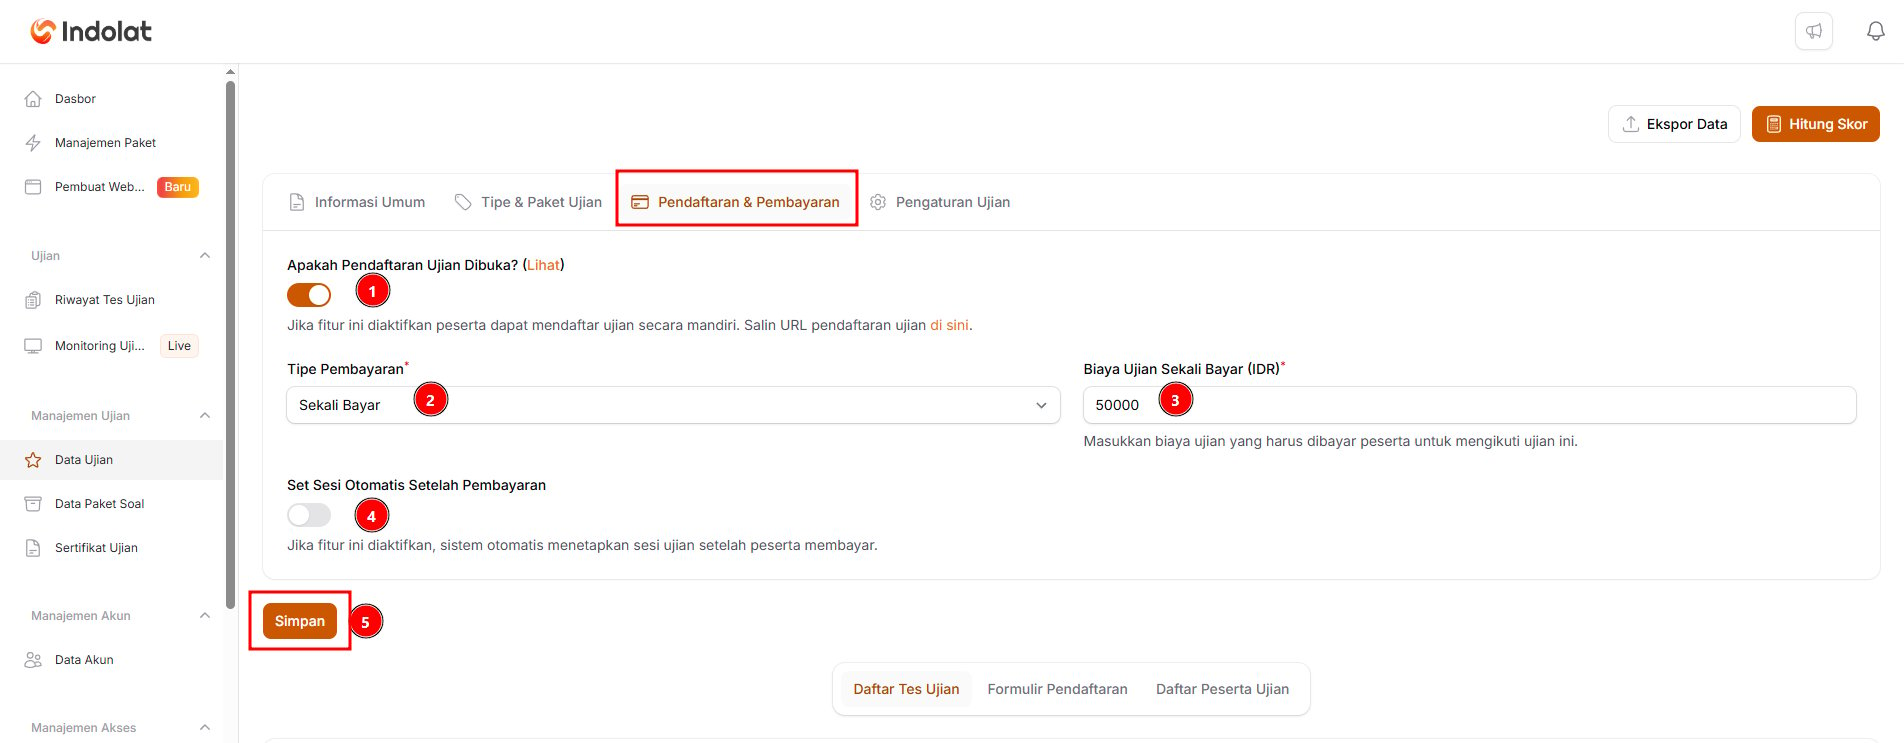
Open the Registration & Payment section
-
Is Exam Registration Open?
When this is on, participants can register for the exam themselves. This setting needs the Exam Registration Page and Automatic Payment add-on. If the add-on isn’t active, the setting’s label shows (Add-on Inactive) and the setting can’t be turned on. -
Payment Type
Choose Free if participants don’t need to pay. If the exam is paid, choose the matching payment type.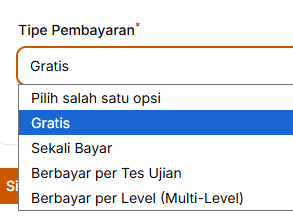
-
Free: Participants don’t need to pay.
Example: A free SNBT tryout made up of a Mathematics Test and an Indonesian Language Test. Participants can take all of them at no cost.
-
One-time Payment: Participants pay once and can then take every test in the exam.
Example: The SNBT tryout fee is Rp50,000. After paying, participants can take the Mathematical Reasoning Test, the Indonesian Language Literacy Test and the English Language Literacy Test. Participants don’t need to pay again for each test.
-
Paid per Test: Participants pay for each test they want to take.
Example: Mathematics Test: Rp20,000 Indonesian Language Test: Rp15,000 English Language Test: Rp15,000 Participants who only want to take the Mathematics Test pay just Rp20,000.
-
Paid per Level (Multi-Level): Used for exams made up of several rounds. Participants pay for each round they take part in.
Example: Preliminary Round: Rp25,000 Semifinal: Rp30,000 Final: Rp40,000 Participants pay the fee for the next round only if they qualify.
-
Free: Participants don’t need to pay.
-
One-time Exam Fee (IDR)
The fee participants pay to take the exam. This field appears when the One-time Payment payment type is selected. -
Assign the Session Automatically After Registration
Turn this on if participants who register successfully should be put into an exam session automatically. If the Payment Type is One-time Payment or Paid per Test, this setting is called Assign the Session Automatically After Payment. - When you’re done, click Save changes.
Open the Exam Settings section
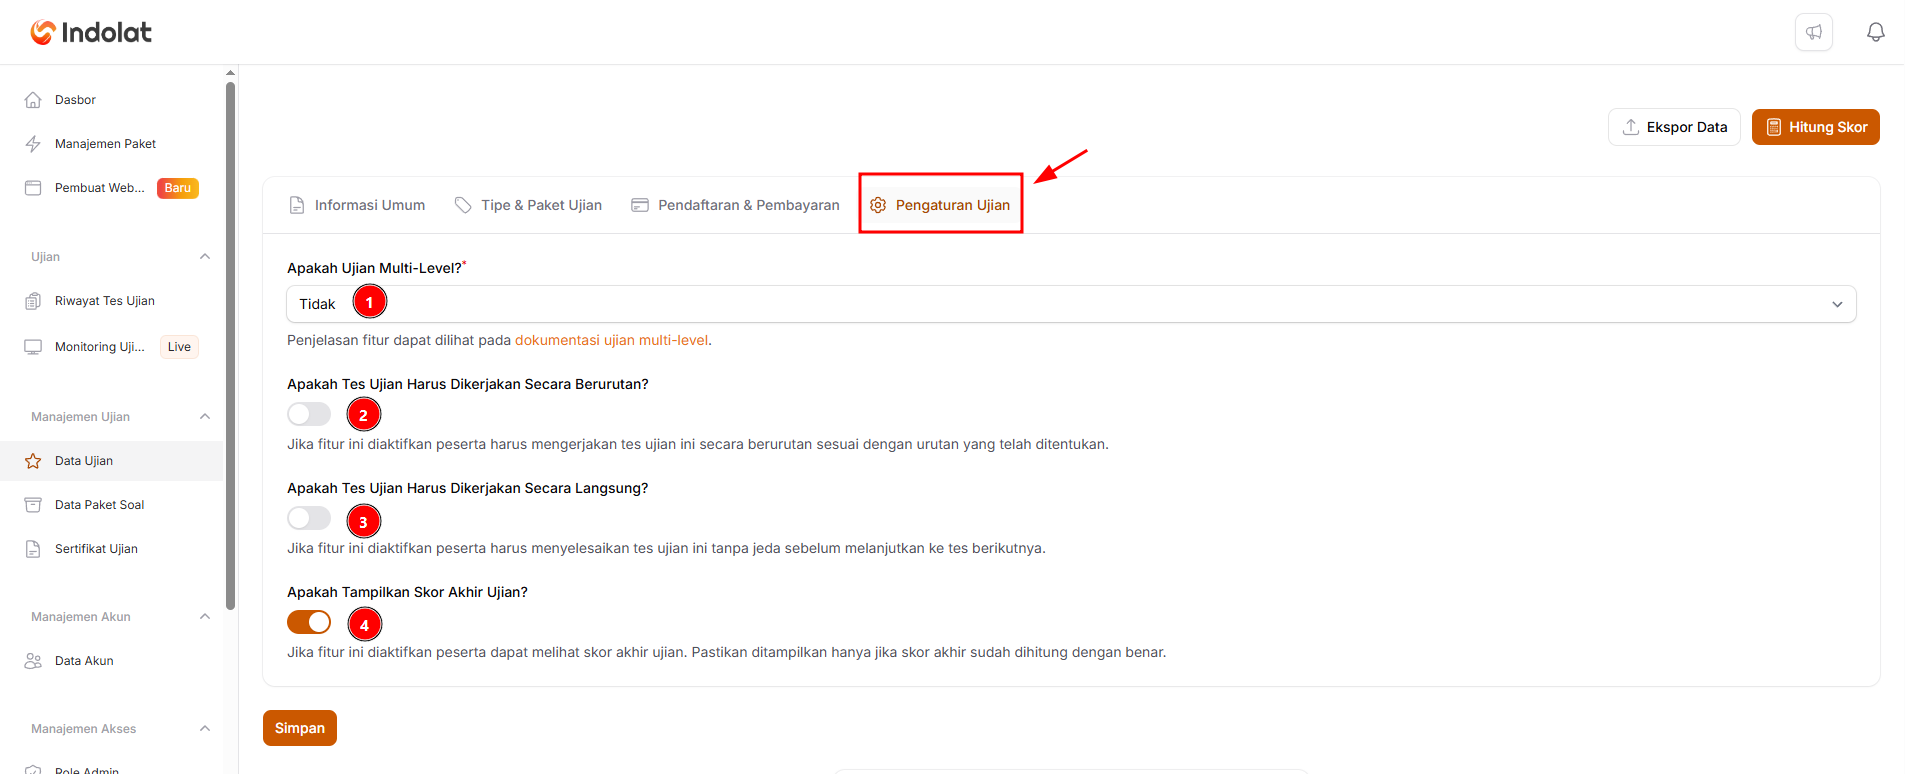
- Is This a Multi-Level Exam?
- Choose Yes (Multi-Level) if the exam has several rounds, for example Preliminary Round, Semifinal and Final.
- Choose No if the exam has only one stage.
- Must the Tests Be Taken in Order?
Turn this on if participants must take the tests in the set order.
Example: participants must finish the Mathematics Test before they can open the Indonesian Language Test. - Must the Tests Be Taken in One Sitting?
- Turn this on if participants must finish all the tests without stopping or taking a break.
- If it’s off, participants can leave and continue with the next test later, according to the schedule.
- Final Score Type
Choose how a participant’s final score is derived from the scores of every test:- Accumulated Exam Test Scores: adds up the score of each test.
- Averaged Exam Test Scores: divides the total by the number of tests already scored. This option is used by default.
- Show the Final Exam Score?
- Turn this on if participants may see their score after finishing the exam.
- Turn it off if the scores still need checking or will be announced later.
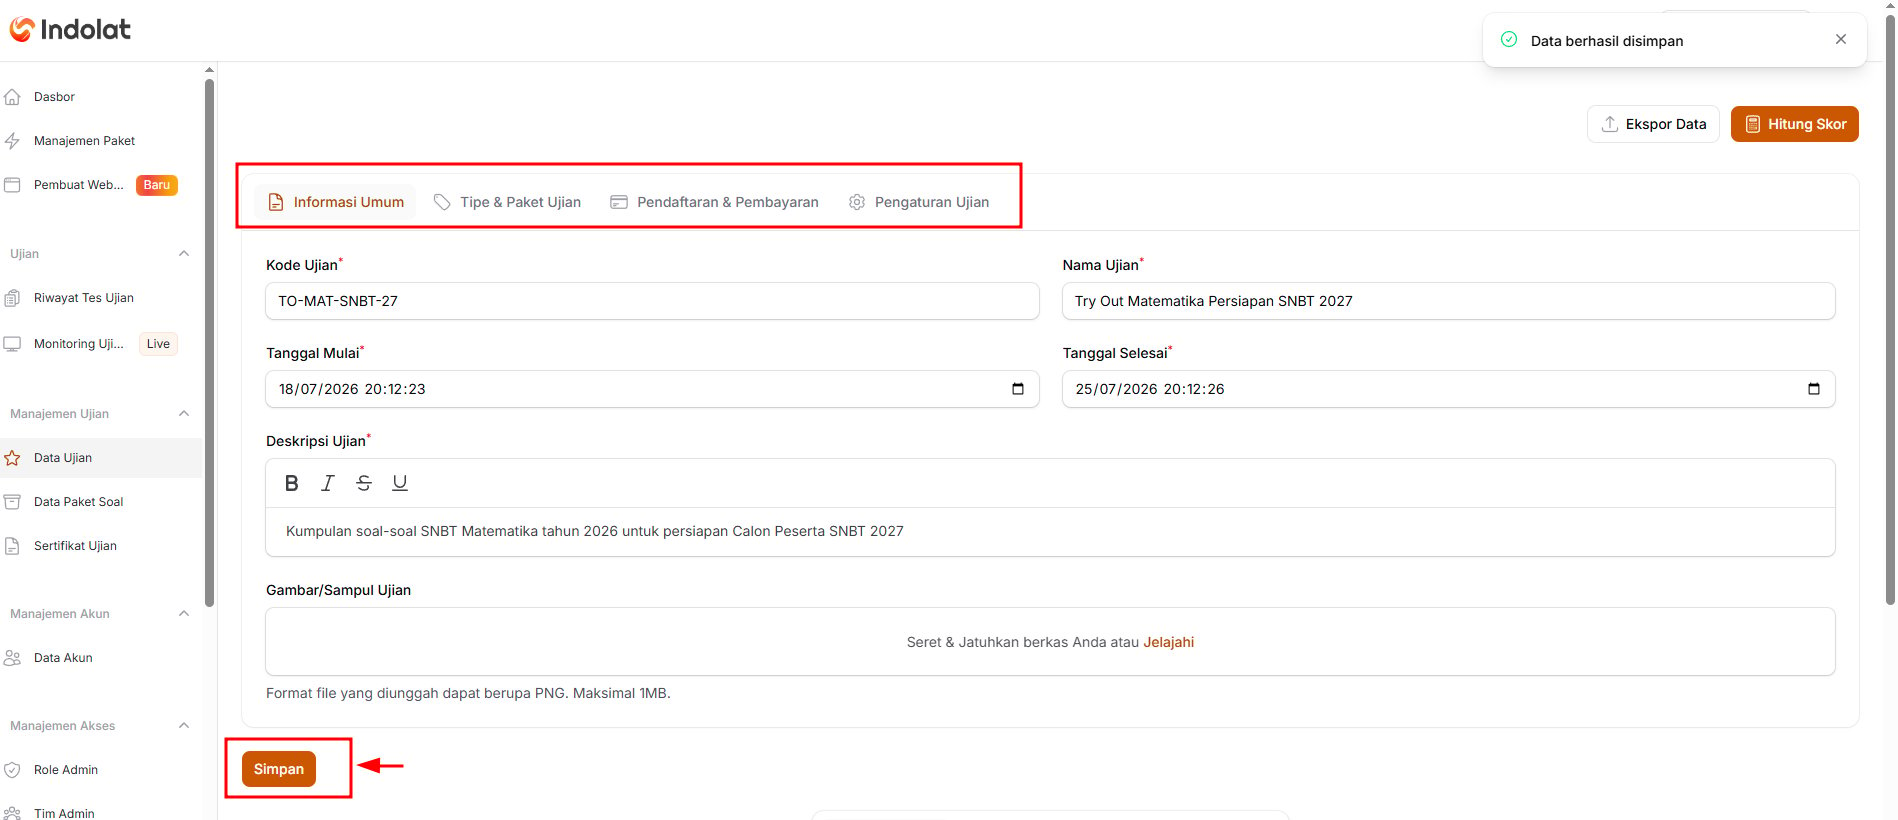
Save the Exam
Create a Test
Click Add Test
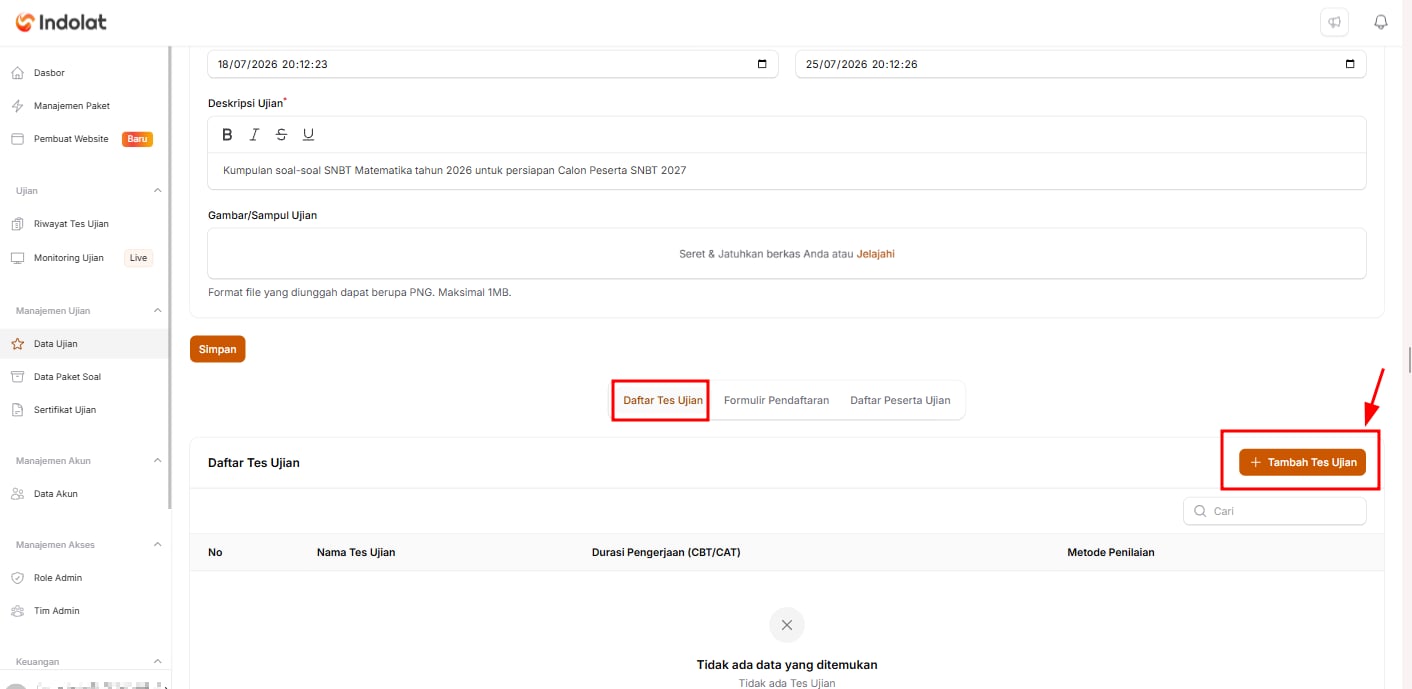
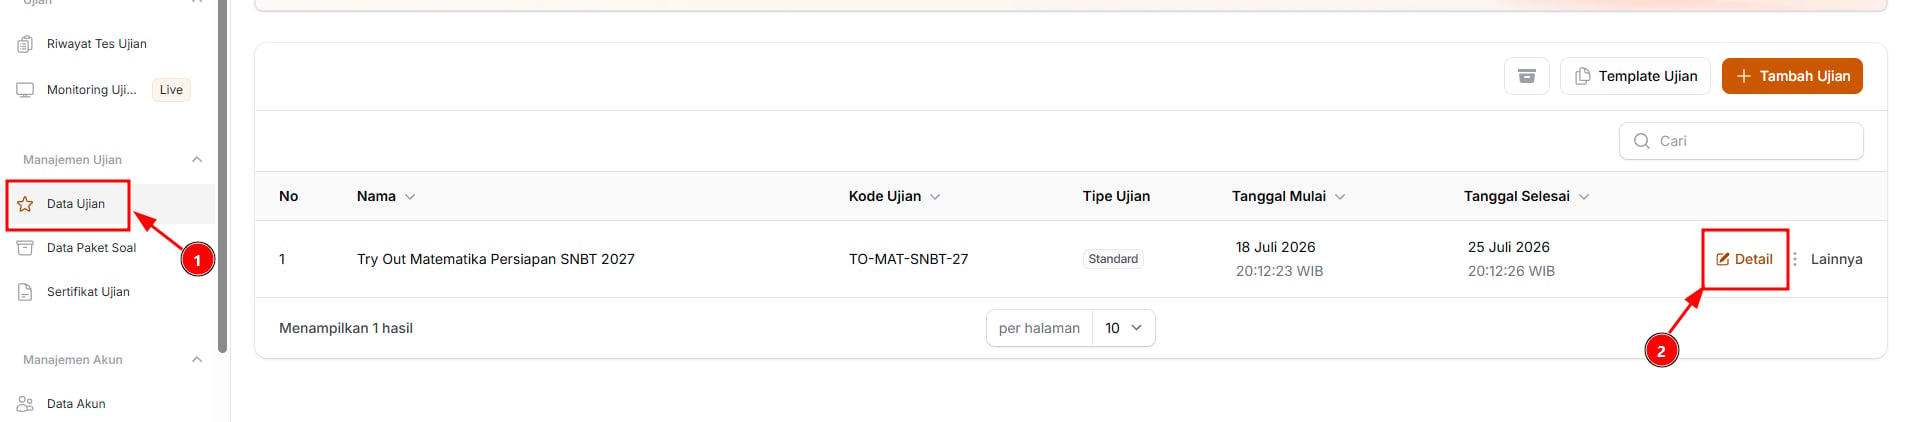
- Open the Exam Data menu.
- Choose the exam whose tests haven’t been added yet.
- Click Details on that exam.
- Add the tests in the Test List section with the Add Test button.
Fill In the Test Details
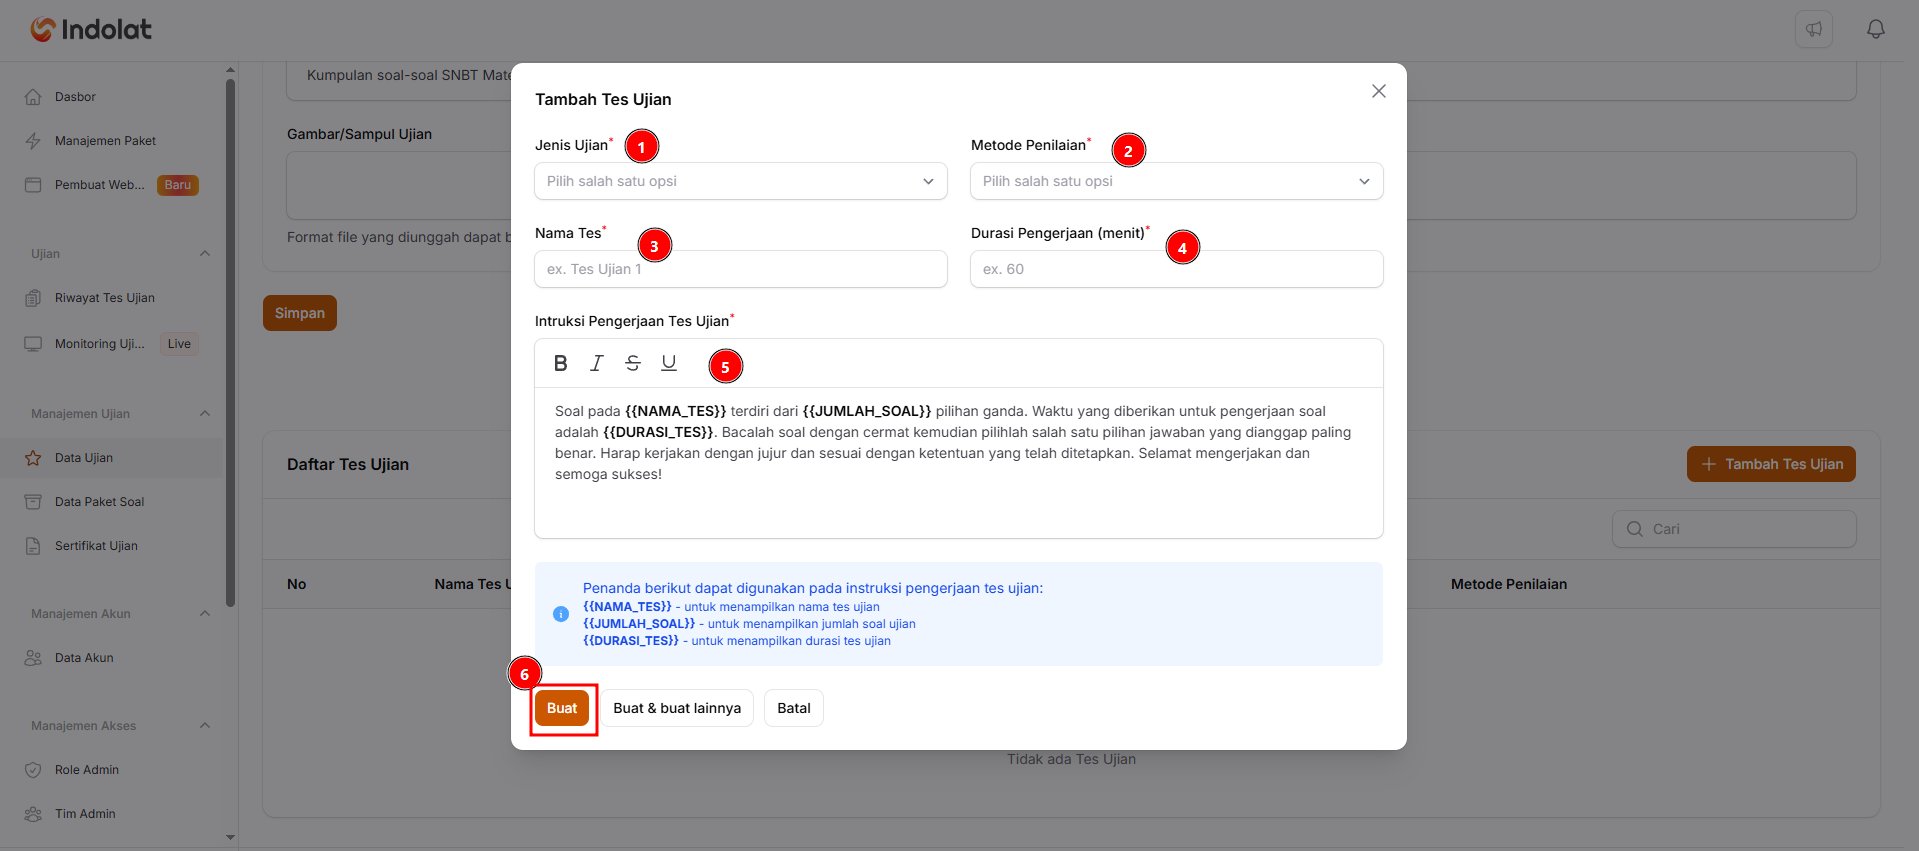
- Exam Type: Choose the type of test you are running.
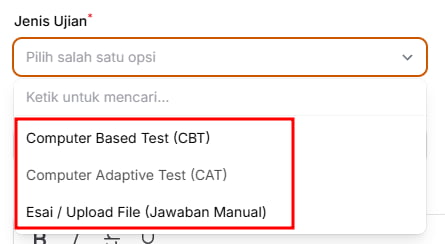
- Computer Based Test (CBT)
Participants see the questions on screen, then choose or type their answers directly in the system.Example:
A participant sees the question: 10 × 5 = … Then selects the answer 50 on screen. - Computer Adaptive Test (CAT)
The next question adapts to the participant’s ability. You can only choose this option for a Professional Exam (Paid Plan).Example:
A participant answers the first question correctly. The system then gives a slightly harder question. If the participant answers incorrectly, the system can give an easier or similar question.
CAT is like an exam that “follows the participant’s ability”. The more correct answers, the harder the next questions can get. - Essay / File Upload (Manual Grading)
Participants don’t choose an answer as they would in a multiple-choice question. They write a long answer or upload a file.Examples:
- Writing an essay answer directly in the system.
- Uploading a photo of an answer sheet.
- Uploading a PDF or Word file.
- Computer Based Test (CBT)
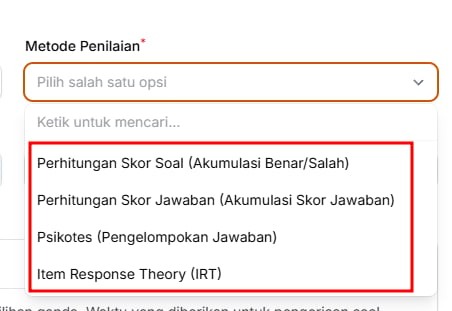
- Scoring Method: Decide how the system calculates participants’ scores. Every method below is available for Computer Based Test (CBT). A Computer Adaptive Test (CAT) test can only use Question Score Calculation (Sum of Correct/Wrong), and an Essay / File Upload (Manual Grading) test uses Manual Scoring.
-
Question Score Calculation (Sum of Correct/Wrong)
The score is calculated from the number of questions answered correctly.Example:
Suitable for tryouts or regular multiple-choice exams.- Correct answer: 10 points
- Wrong answer: 0 points
- The participant answers 8 out of 10 questions correctly
- Participant’s score: 80
-
Answer Score Calculation (Sum of Answer Scores)
Each answer option can carry a different score.Example: Question: How often do you study in a week?
The final score is the sum of the scores of all the participant’s answers.- Every day: 4 points
- 3–4 times: 3 points
- 1–2 times: 2 points
- Never: 1 point
-
Psychometric (Answer Grouping)
The participant’s answers are grouped to reveal certain tendencies or traits.Example: Question: When working in a group, you prefer to…
The result isn’t simply right or wrong; it shows which trait group the participant belongs to.- Organise how the tasks are shared → Leadership group
- Help the other members → Teamwork group
- Work on your own part → Independent group
-
Item Response Theory (IRT)
The score doesn’t just count correct answers; it also takes the difficulty of each question into account.Example:
This method suits large-scale exams or a deeper analysis of participants’ ability. IRT comes in three options:- Many participants answer the easy questions correctly.
- Only a few participants answer the hard questions correctly.
- Participants who can answer the hard questions can get a higher ability score.
- IRT (UTBK reference, 0-1000)
- IRT TKA for SMA/SMK (200-800)
- IRT TKA for SD/SMP (0-100)
-
Question Score Calculation (Sum of Correct/Wrong)
- Test Name: Enter a test name that’s easy to recognise.
Example: Mathematical Reasoning. - Working Time (minutes): Enter how long participants have, in minutes.
Example: 60 minutes. This field doesn’t appear for an Essay / File Upload (Manual Grading) test. - Test Instructions: Write the instructions participants read before they start.
{{NAMA_TES}}to show the test name.{{JUMLAH_SOAL}}to show the number of questions.{{DURASI_TES}}to show the working time.
Open the Test You Created
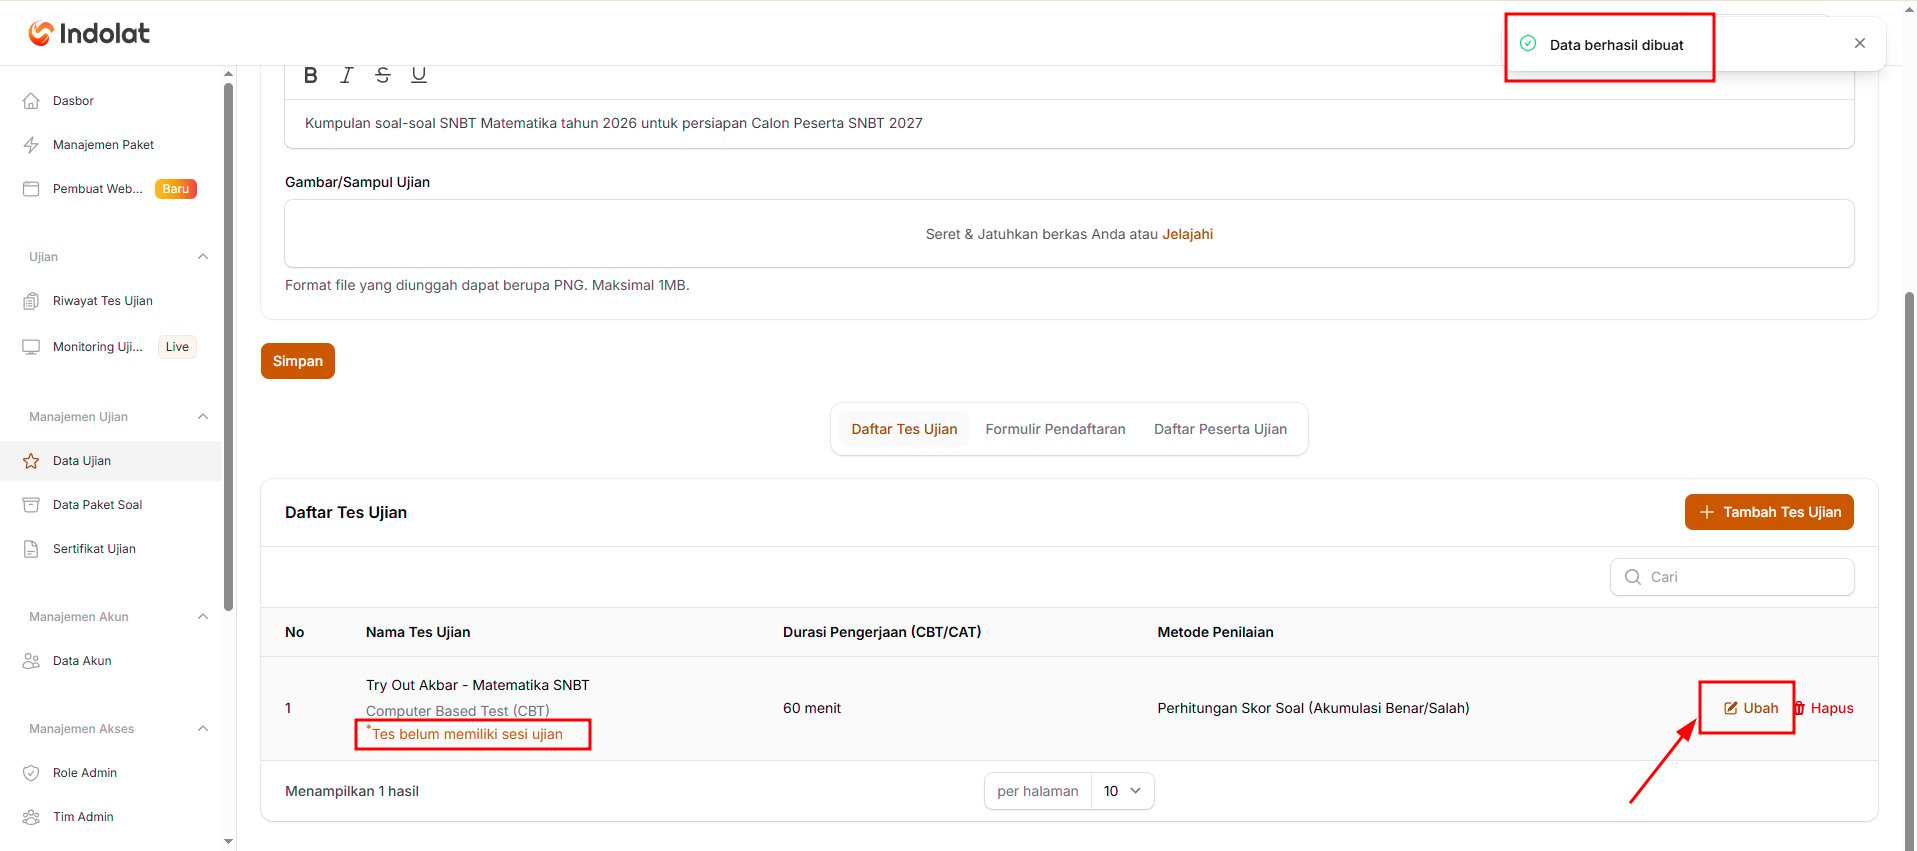
Set Up Scores and Results
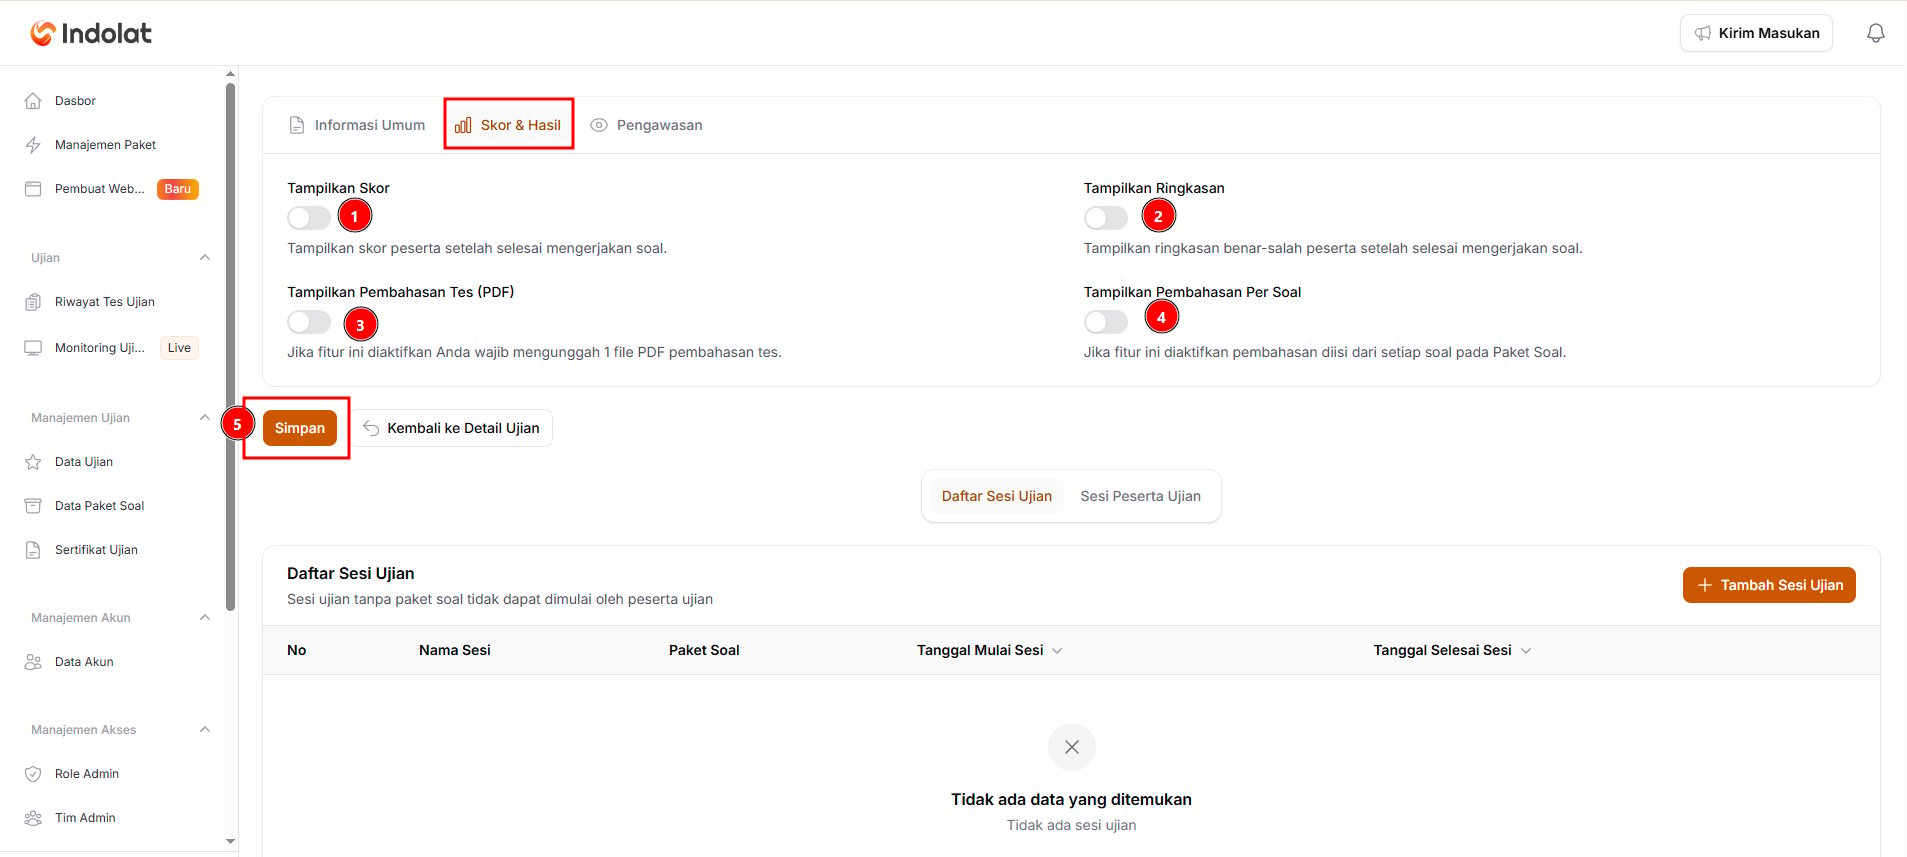
- Show Score
Turn this on if participants may see their score as soon as they finish. - Show Summary
Turn this on if participants may see how many answers they got right and wrong. - Show the Test Explanation (PDF)
Turn this on if you want to share one PDF file with explanations for all the questions. Once it’s on, upload the file in the Test Explanation File (PDF) field. - Show the Explanation per Question
Turn this on if participants may see the explanation for each question. Make sure the explanation has been filled in for each question in the question package. This setting can’t be on at the same time as Show the Test Explanation (PDF). - Save changes
When you’re done, click Save changes.
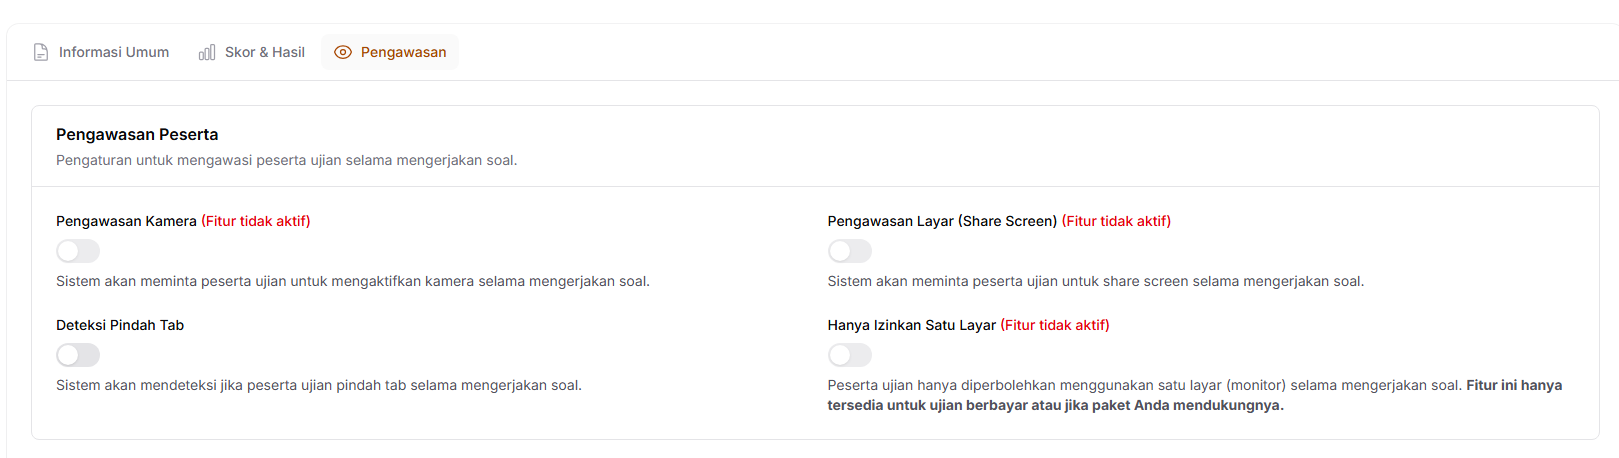
Set Up Participant Proctoring
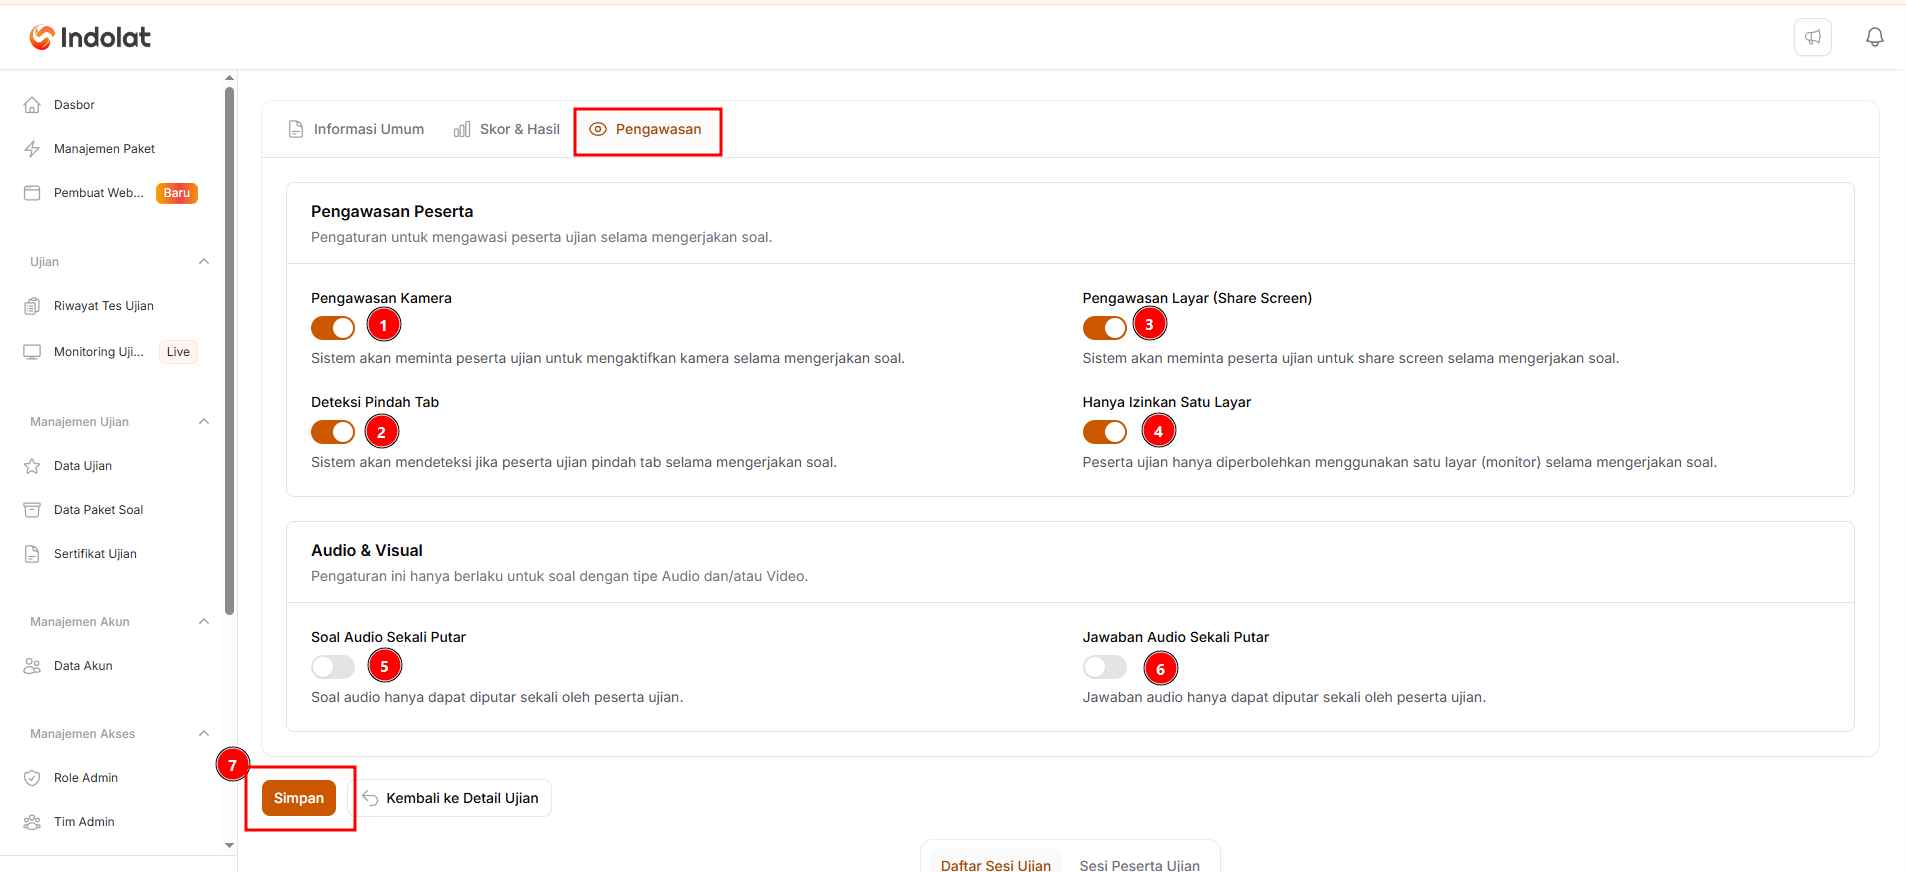
- Camera Proctoring
Turn this on if participants must keep their camera on while taking the exam.
Example: so proctors can make sure participants are doing the exam themselves. - Screen Proctoring (Screen Share)
Turn this on if participants must share their screen during the exam.
Example: proctors can see which apps or pages participants have open. - Tab Switch Detection
Turn this on if the system should record when participants open another tab or page during the exam.
Example: a participant switches from the exam page to a search engine. - Allow Only One Screen
Turn this on if participants may only use one monitor.
This setting suits exams that need stricter proctoring. - Play the Audio Question Once
Turn this on if the audio in a question may only be played once.
Example: English listening questions. - Play the Audio Answer Once
Turn this on if the audio in the answer options may only be played once.
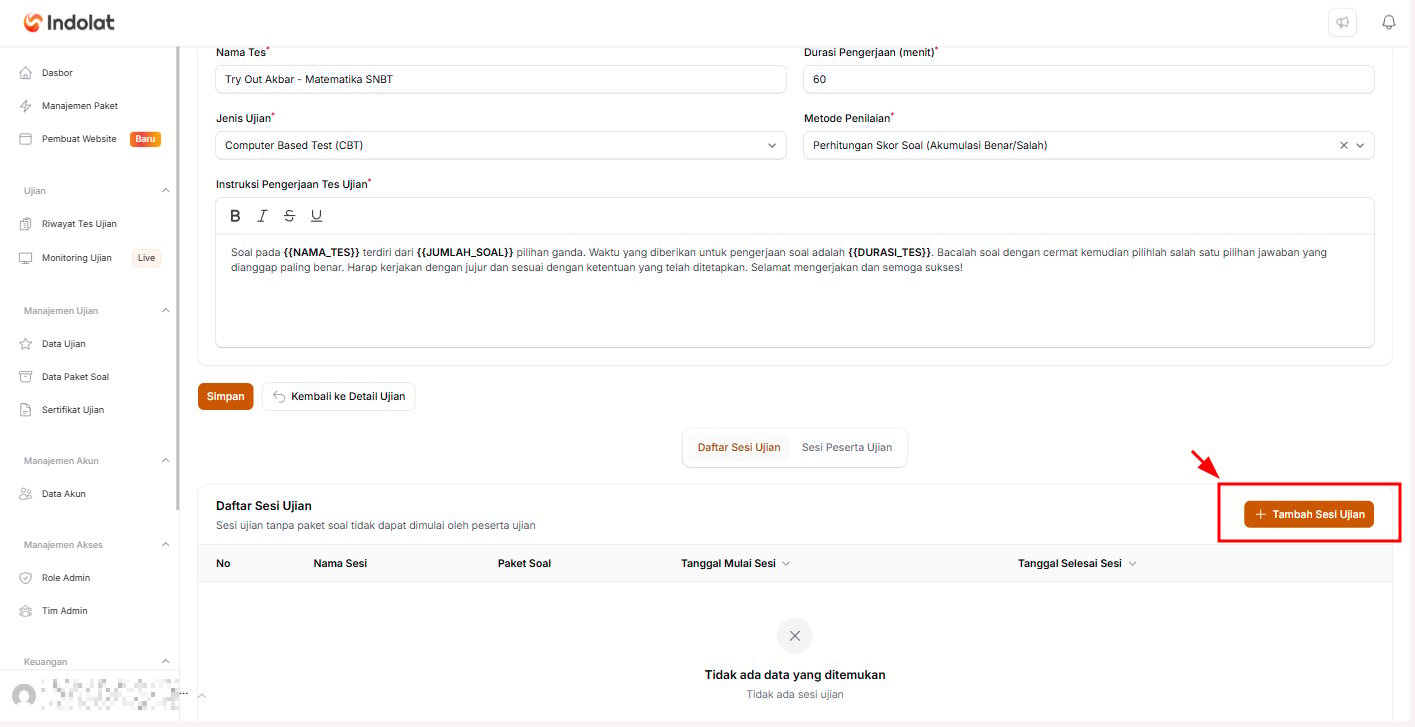
Create an Exam Session
Click Add Exam Session
Fill In the Exam Session Details
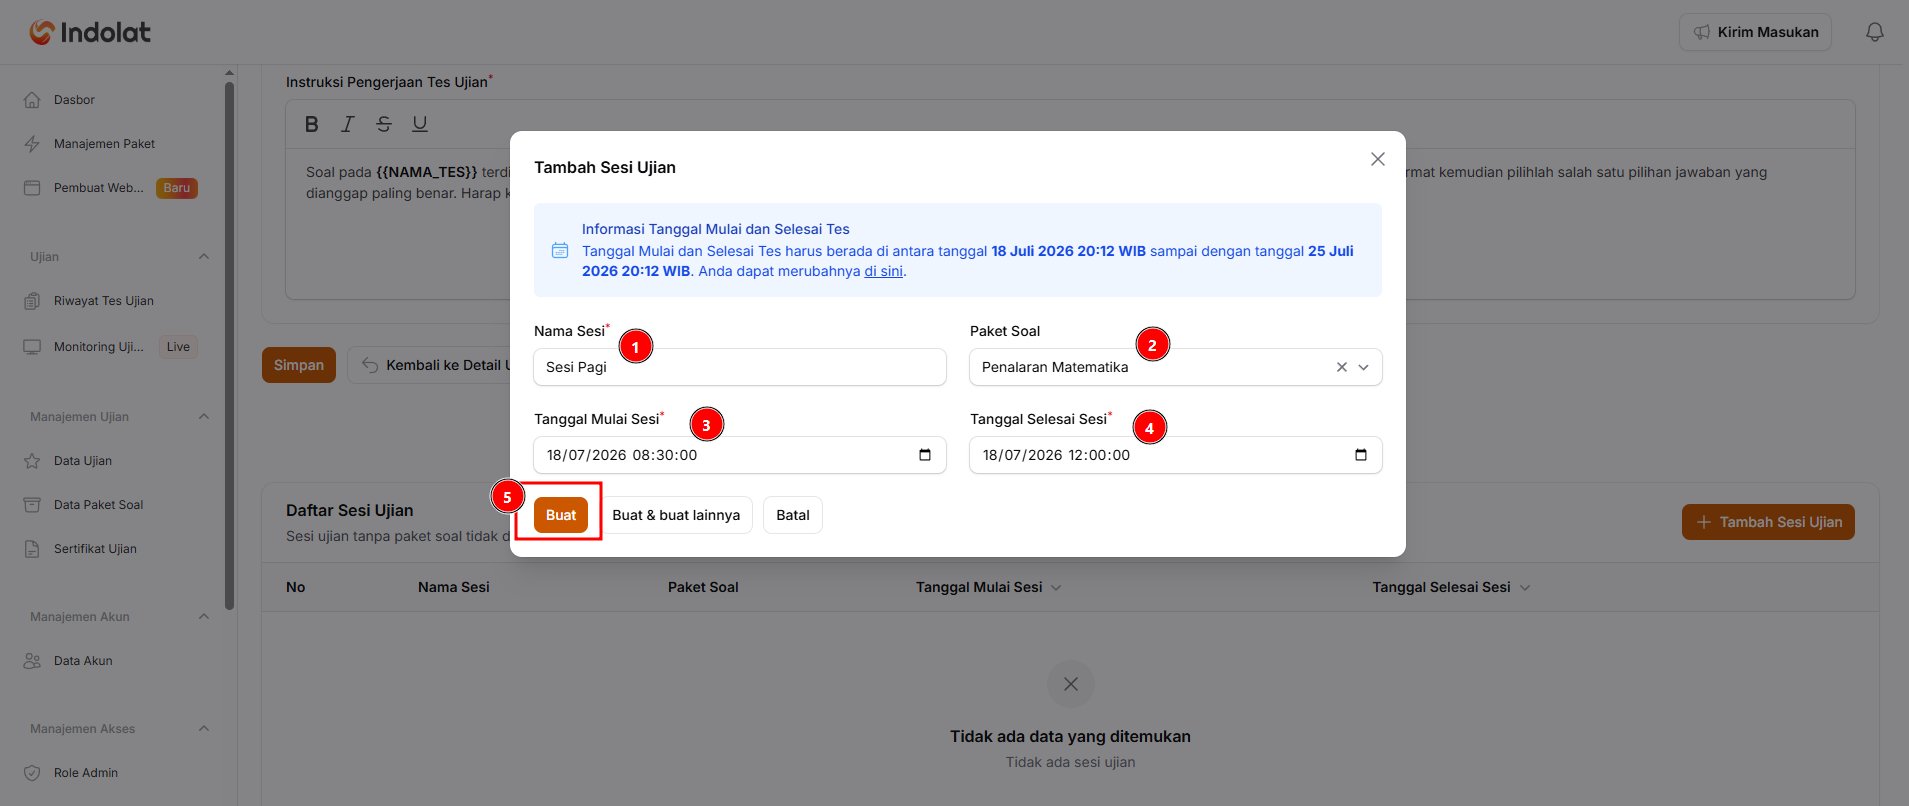
- Session Name: Enter a name that’s easy to recognise.
Example: Morning Session or Session 1. - Question Package: Choose a question package you’ve created.
Make sure you choose one, because participants can’t start a session that has no question package. - Session Start Date: Set the date and time participants can start the test.
- Session End Date: Set the deadline for participants to finish the test.
The exam runs from 18 to 25 July 2026.Once everything is filled in, click Create. Choose Create & create another if you want to add the next session straight away.
The session can then be scheduled on 20 July 2026, 08:00–10:00.
4. (Optional) Create Registration Form Rules
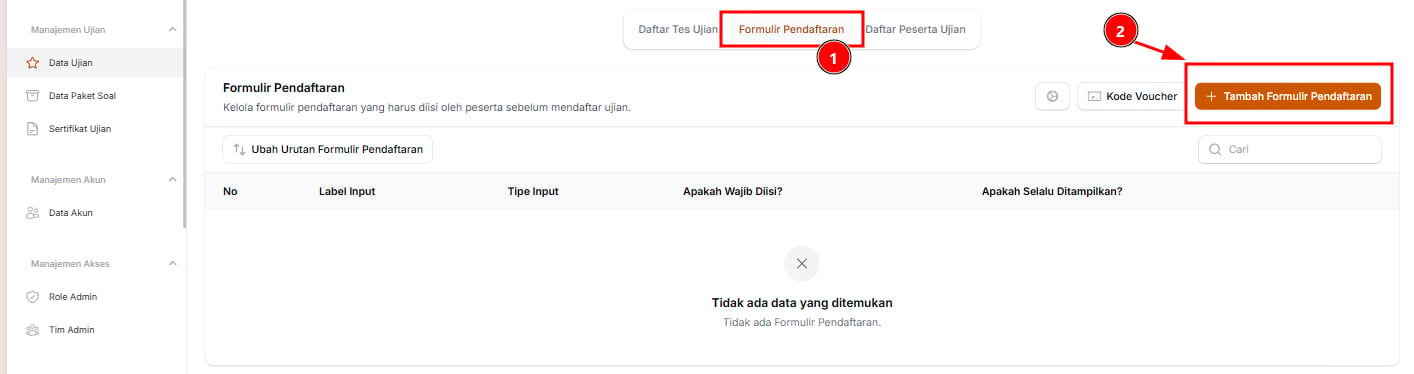
You can add registration form rules to both a Standard Exam (Free Plan) and a Professional Exam (Paid Plan), as long as the Exam Registration Page and Automatic Payment add-on is active. If the add-on isn’t active, the Registration Form section shows the Enable the Registration Form Add-on button instead of Add Registration Form.Click Add Registration Form
Fill In the Registration Form Rules
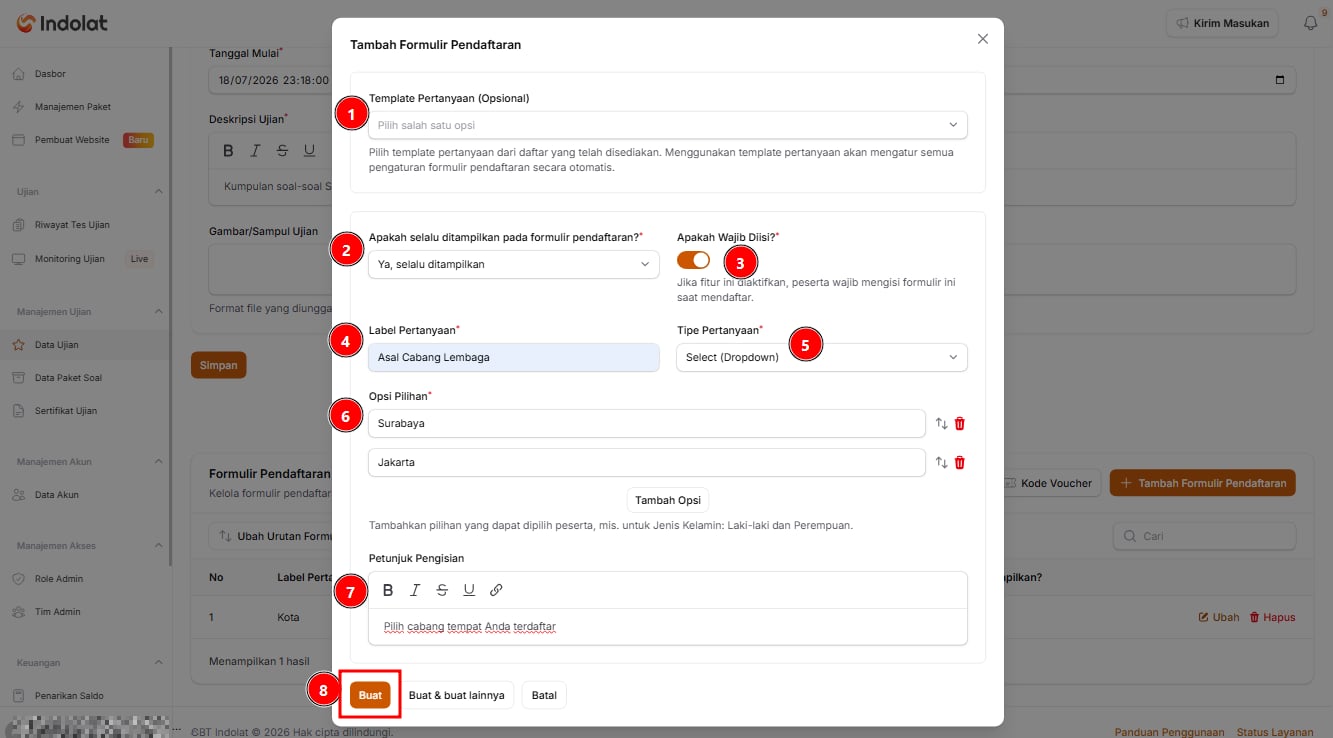
- Question Template (Optional): Choose a template if you want to use a ready-made question.
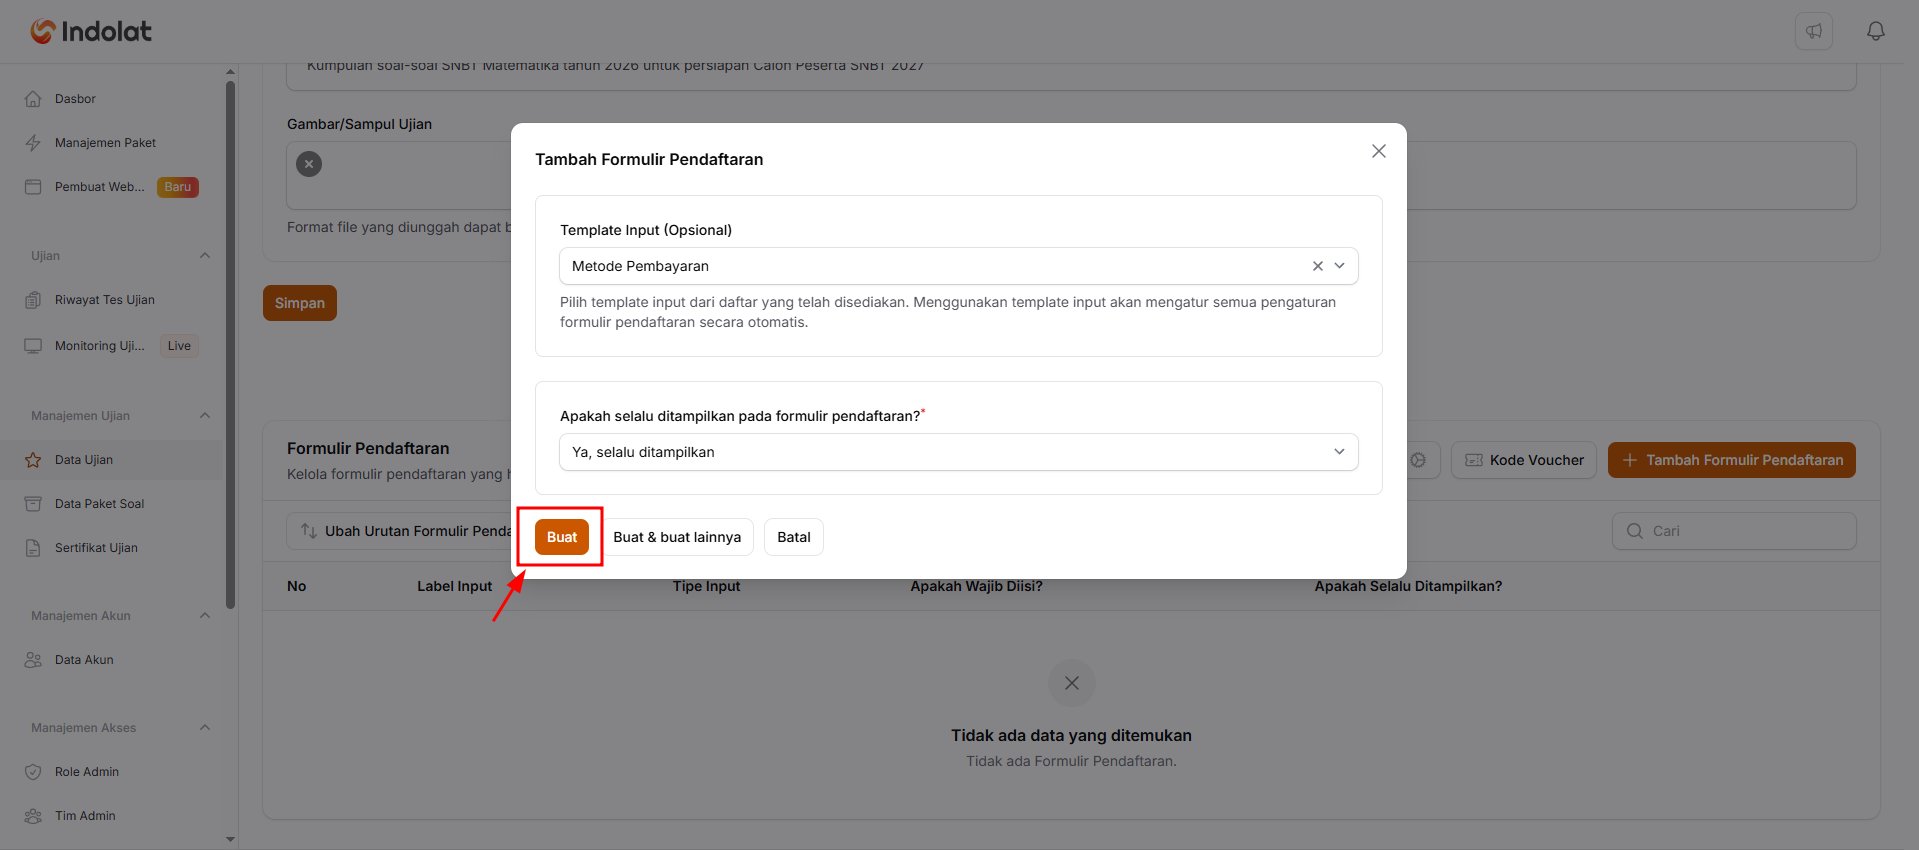
Example: Payment Method (only available when the Payment Type is One-time Payment).
If you don’t use a template, you can leave this empty. - Is it always shown on the registration form?
Choose Yes, always shown if the question must always appear on the registration form.
Choose Show it under certain conditions if the question should only appear in certain situations. - Is It Required?
Turn this on if participants can’t continue registering until they answer the question. - Question Label
Write the name of the information you are asking participants for.
Example: School, WhatsApp Number or Full Name. - Question Type
Choose the form of answer participants must give.
Examples:- Text (Input Biasa) (plain text input) for a name, school or phone number.
- Select (Dropdown) or Radio (Pilihan Tunggal) (single choice) for answers chosen from a set list.
- File (Berkas) (file upload) for uploading proof of payment or a document.
- How to Fill It In
Add guidance so participants know how to answer.
Example: Enter the full name of your school. - Create
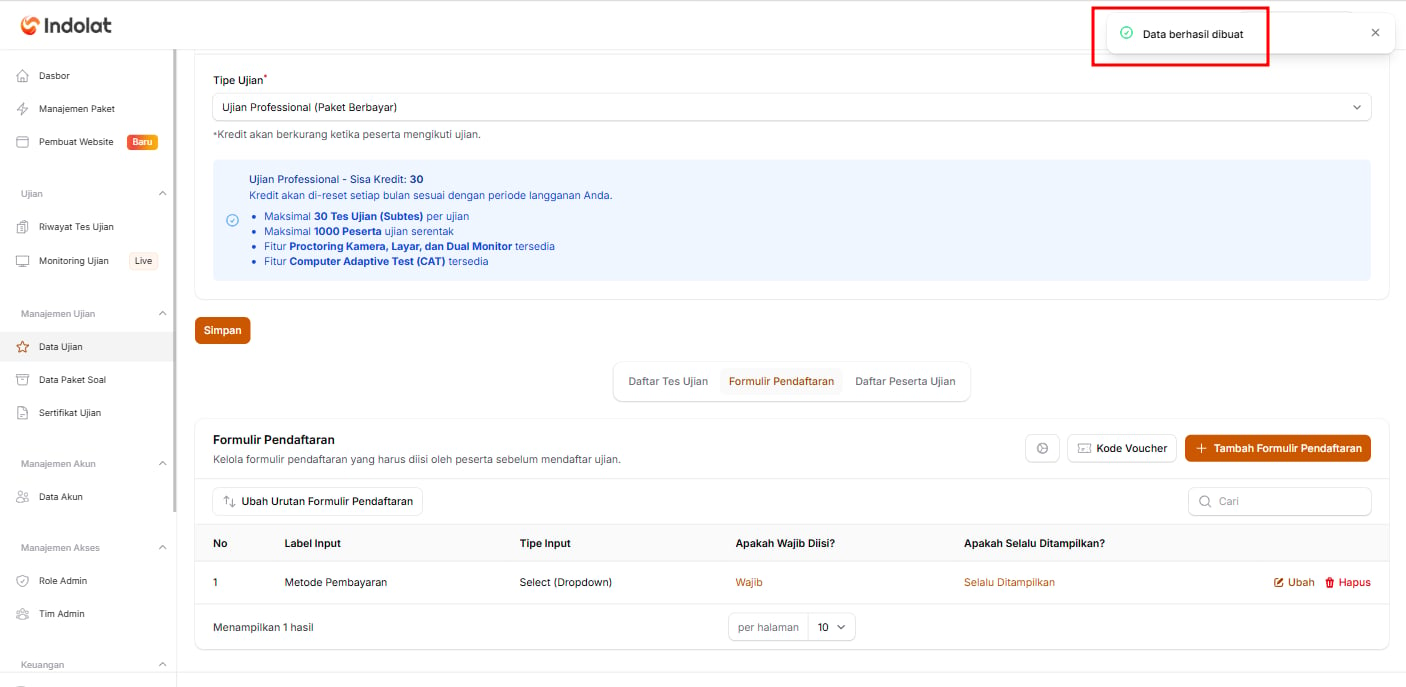
Click Create to save the question. Click Create & create another if you want to add the next question.
Click Create
5. Set the Participant Quota
Enter how many participants may register for the exam. 💡 For example: You only have 200 places for the 2027 Mathematics Competition. Once 200 participants have registered, anyone else can’t continue registering.Open the exam details
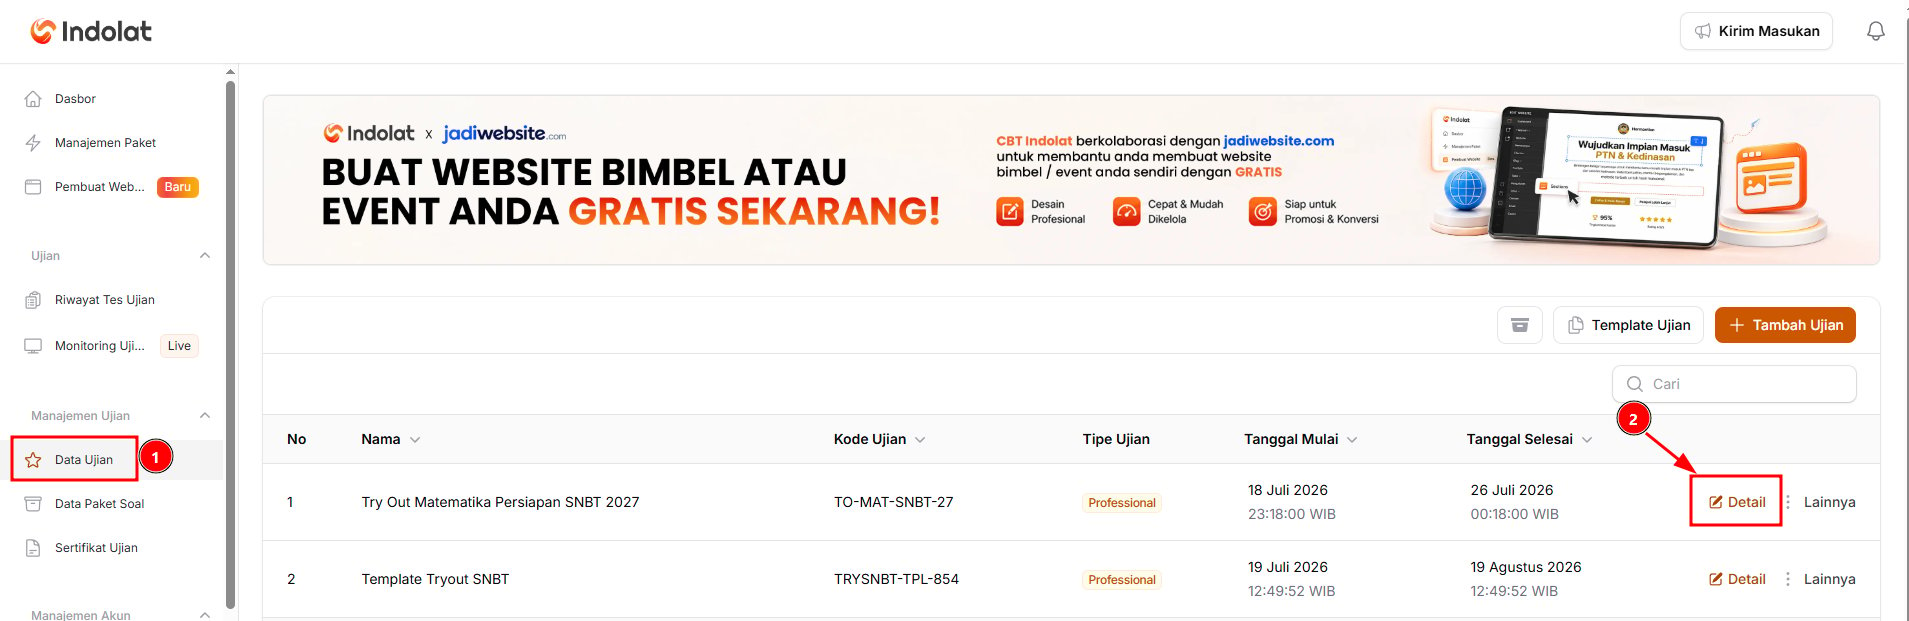
Open the Registration Form settings
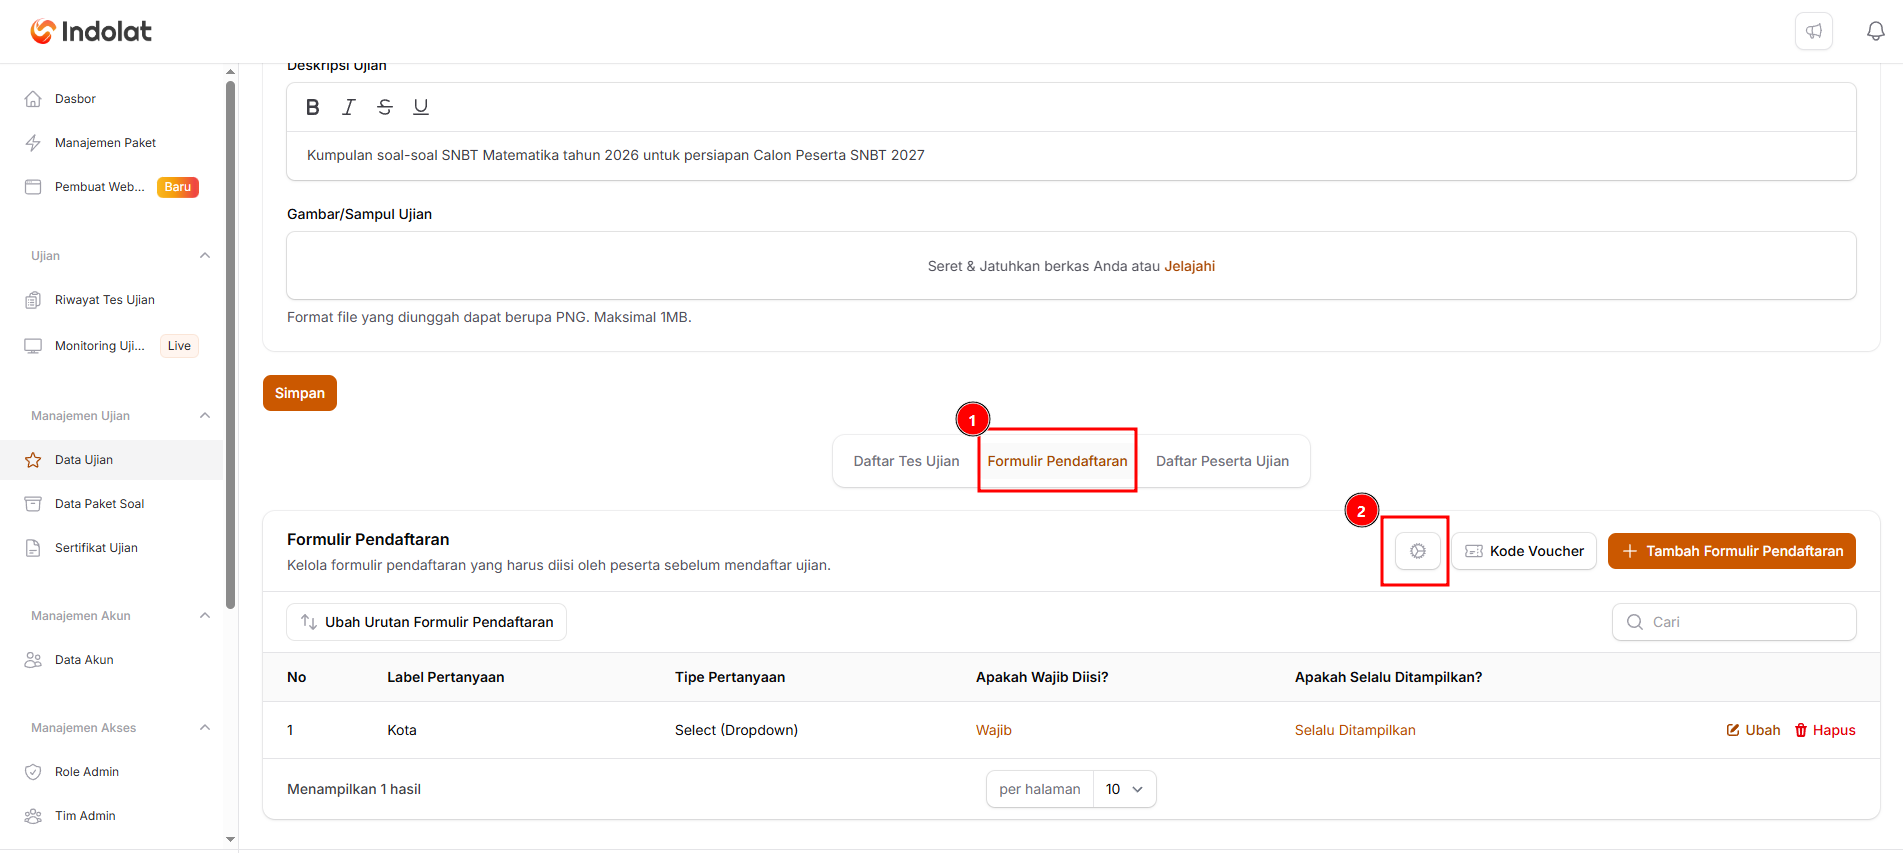
Fill In the Maximum Registration Quota
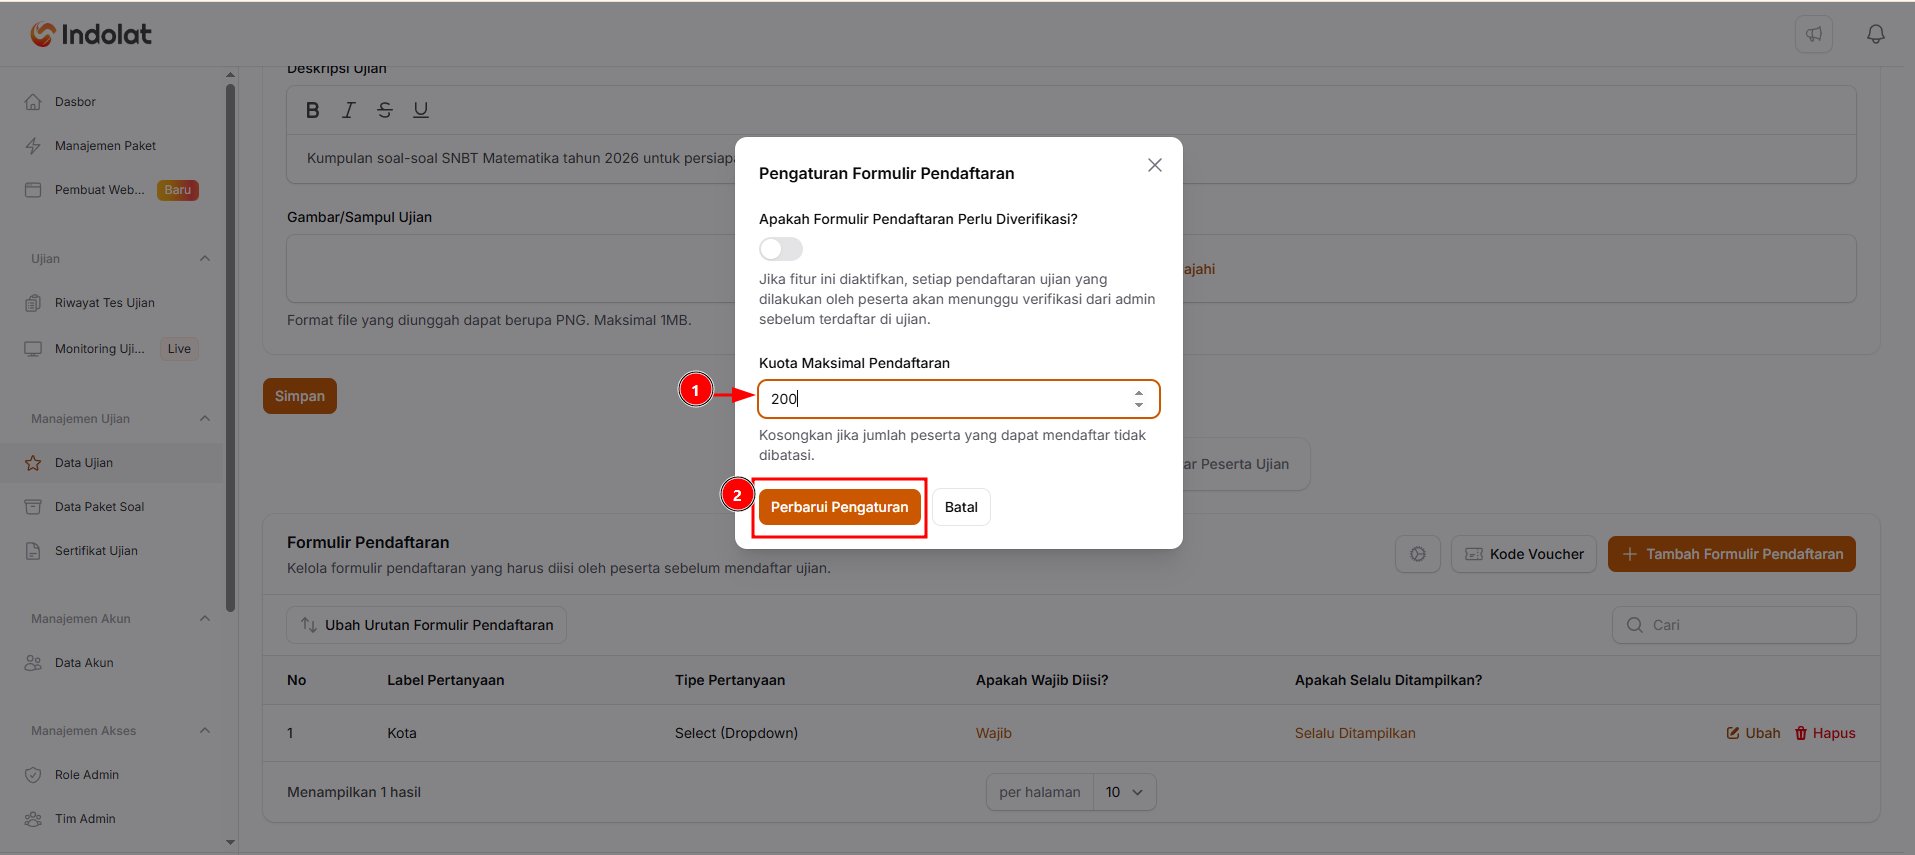
6. Manage Participant Accounts
The next step is to make sure participants have accounts and are registered for the exam. There are two ways to add participants:- Participants register themselves (self-registration), which suits exams open to the public.
- You (the organiser) add the participants, which suits internal exams at a school, institution or tutoring centre.
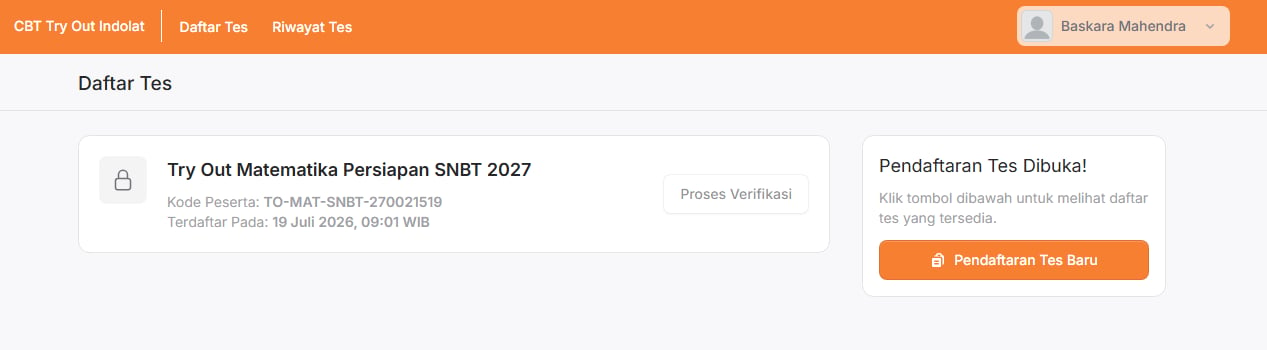
Participants Register Themselves
Participants Register Themselves
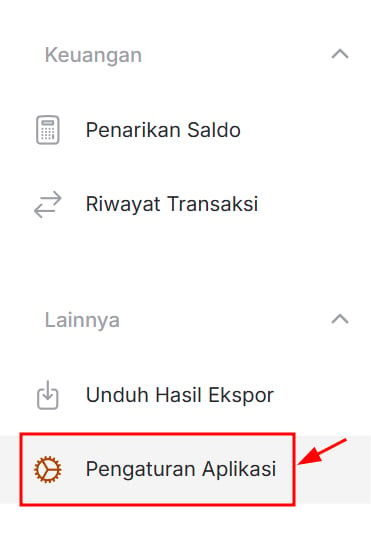
Open the Application Settings menu
Open the General Information tab
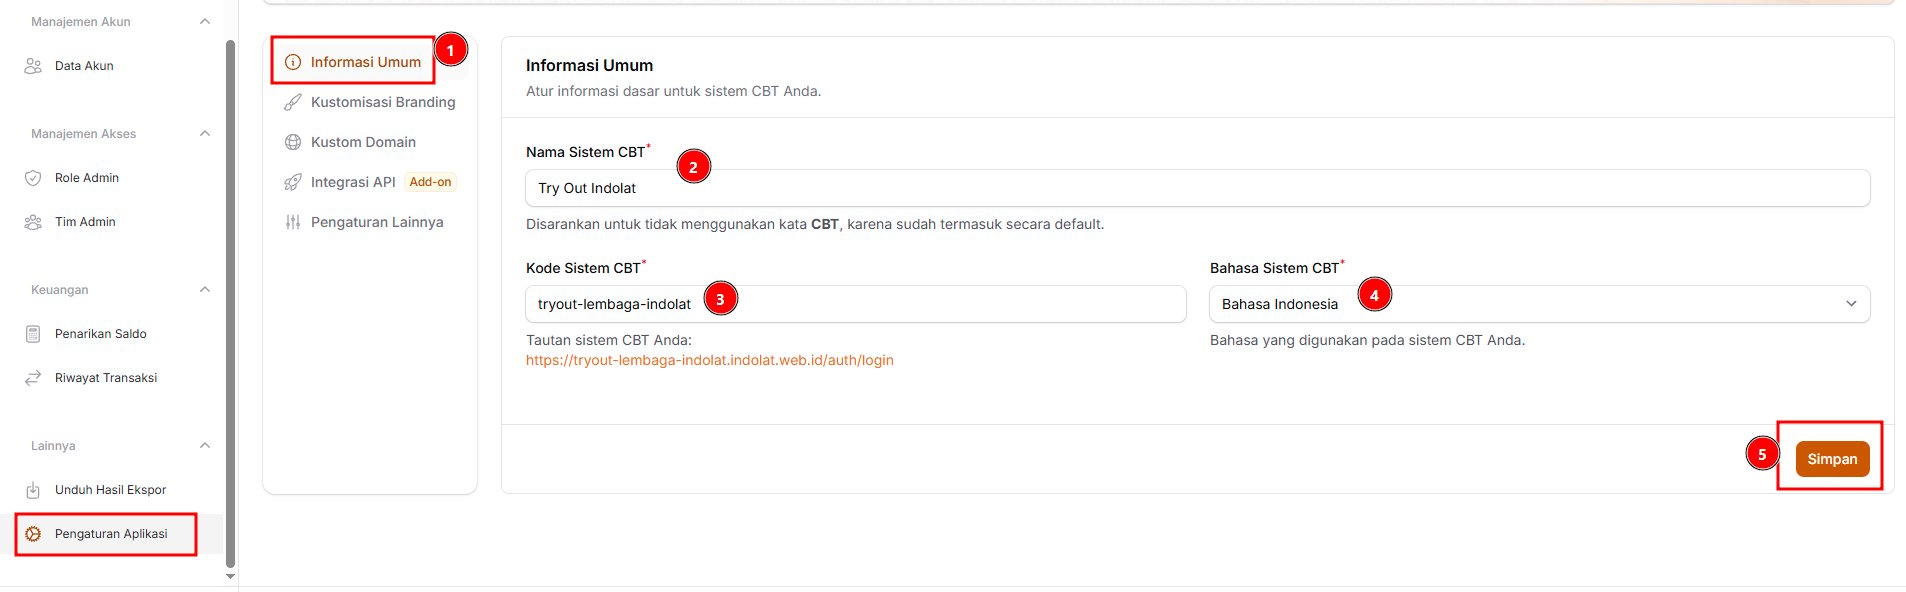
- CBT System Name
Enter the system name participants will see. Enter just the institution name, without the word CBT, because the system adds it automatically.
Example: Try Out Indolat appears as CBT Try Out Indolat in the participant app. - CBT System Code
Enter a short code that becomes your CBT system’s address. It must be at least 4 characters long and contain only lowercase letters, numbers or hyphens (-).
Example: tryout-lembaga-indolat.Once the code is filled in, the system creates a login link such ashttps://tryout-lembaga-indolat.indolat.web.id/auth/login. This is the link you share with participants so they can open the login page. - CBT System Language
Choose the language of the system’s interface.
Example: Bahasa Indonesia. - Save
Once you’ve checked everything, click Save.
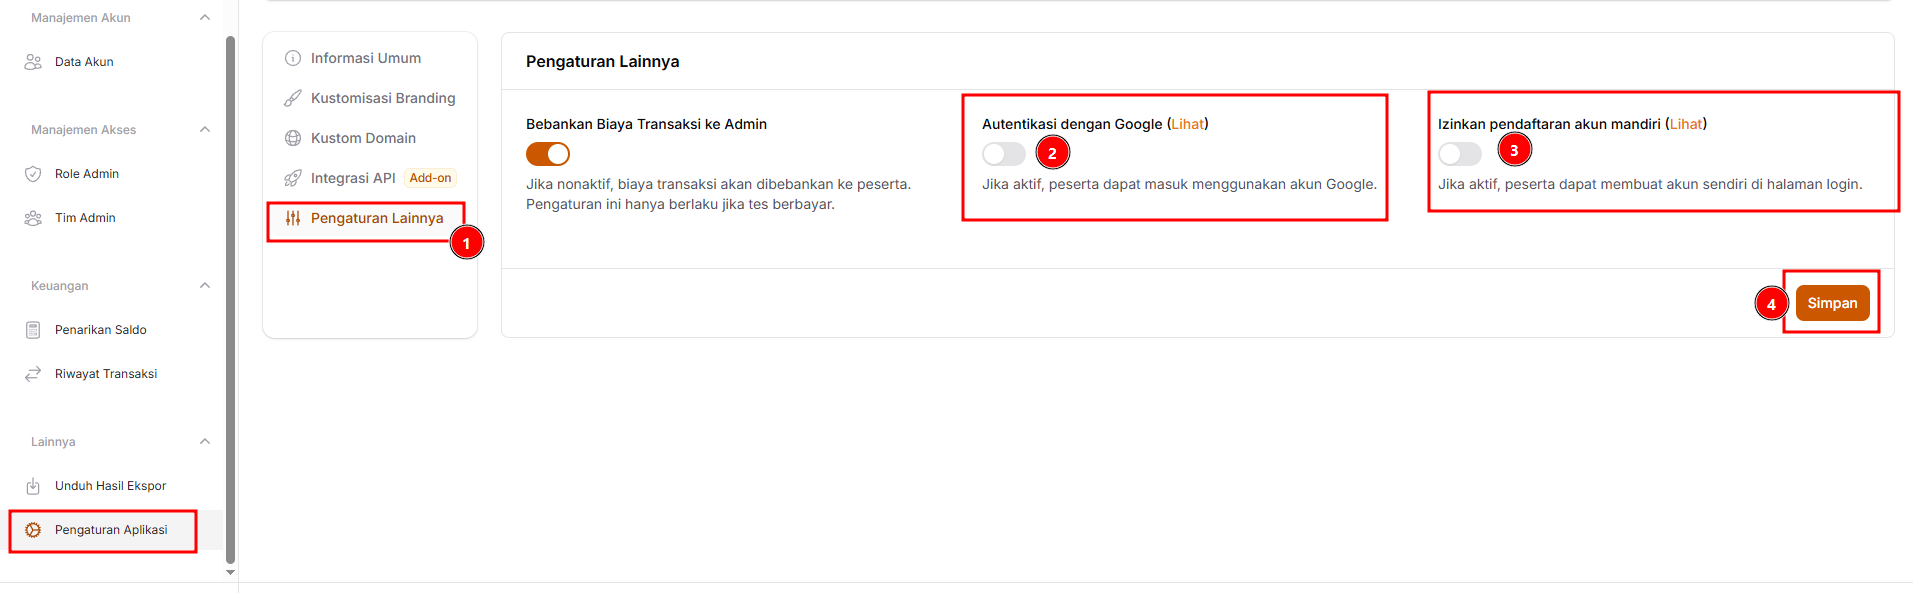
Open the Other Settings tab
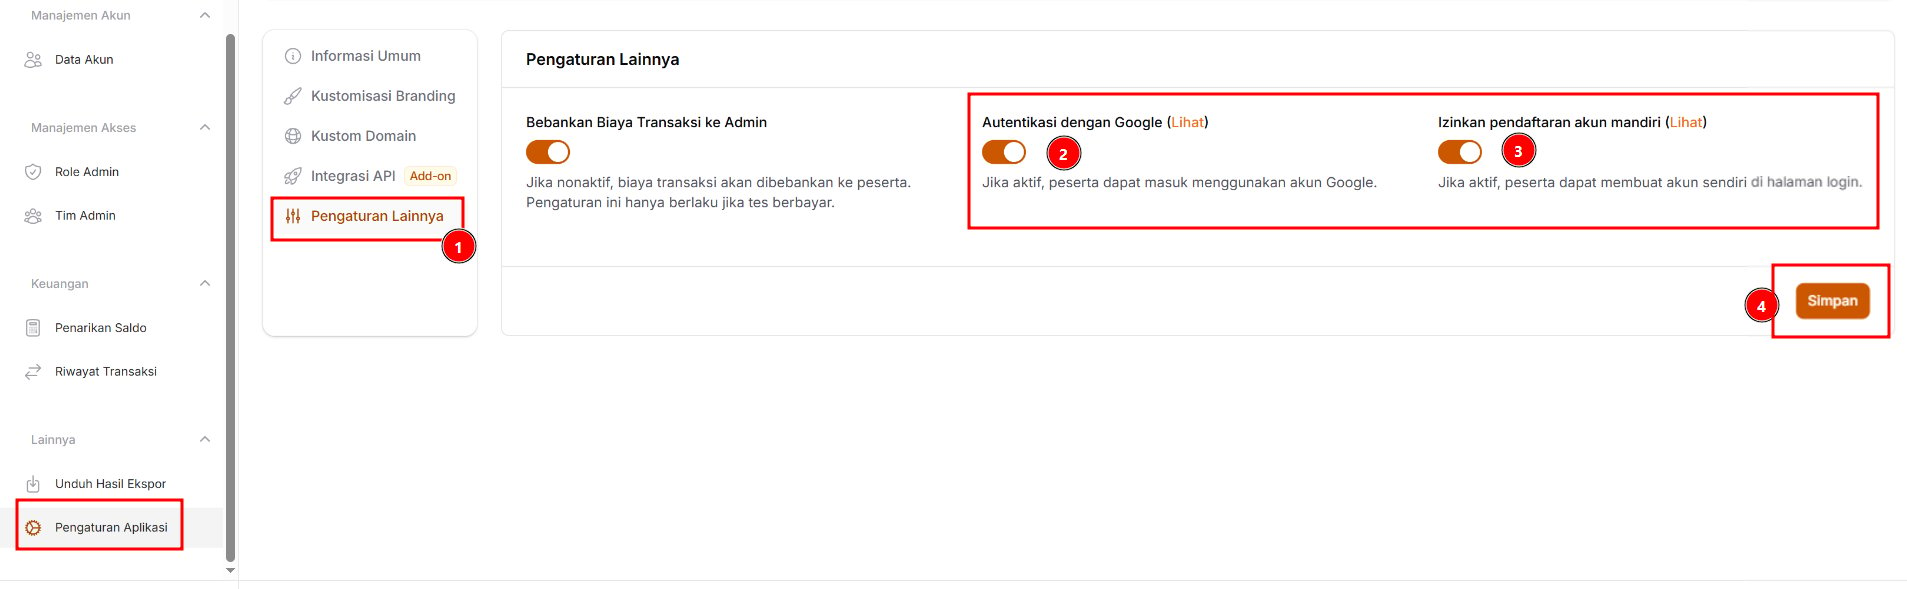
- (Optional) Authenticate with Google
Turn this on if participants may log in with their existing Google or Gmail account. That way, participants don’t need to create and remember a new password. - (Required) Allow self-service account registration
Turn this on so participants can create their own accounts from the login page. - Save
Once you’ve checked everything, click Save.
Share the CBT System Link with Participants
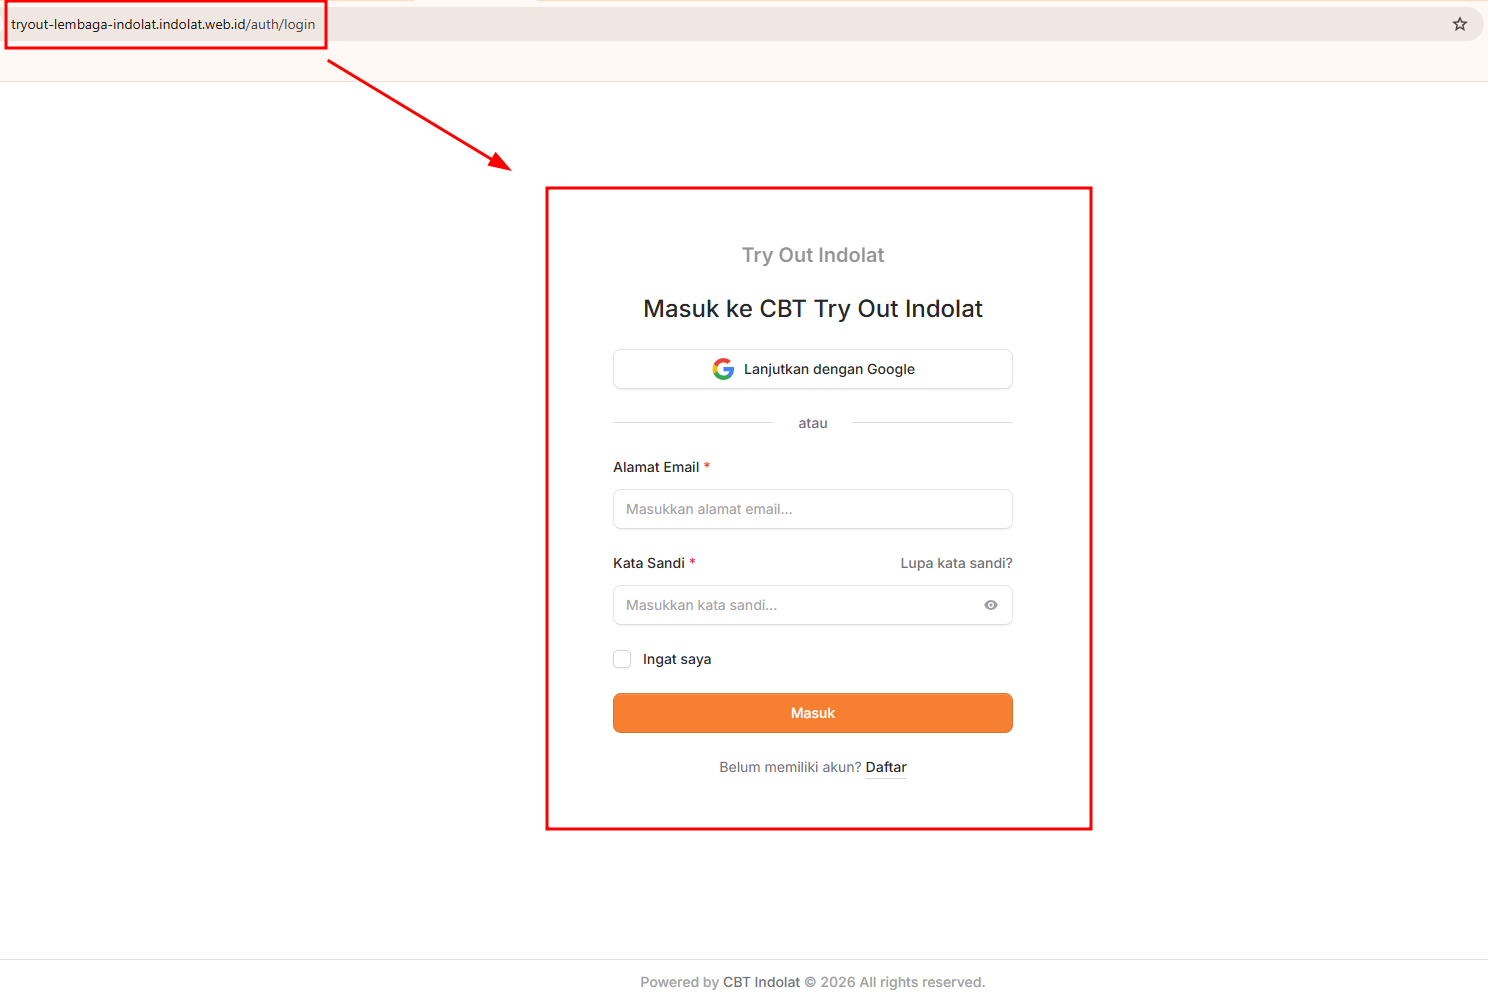
- You can share the link with exam participants through WhatsApp groups or your social media.
- Once the CBT system link is shared, participants can open it in a browser, for example
https://tryout-lembaga-indolat.indolat.web.id/auth/login. - On this page, participants have two ways to log in:
- Click Continue with Google to use a Google or Gmail account. This button only appears if Authenticate with Google is turned on.
- Enter their Email Address and Password, then click Login if they already have an account.
- If participants don’t have an account yet, they click Register at the bottom of the page.
- Once logged in, participants register for the exam with the New Exam Registration button.
Connect Participants to an Exam Session
Verify Participants
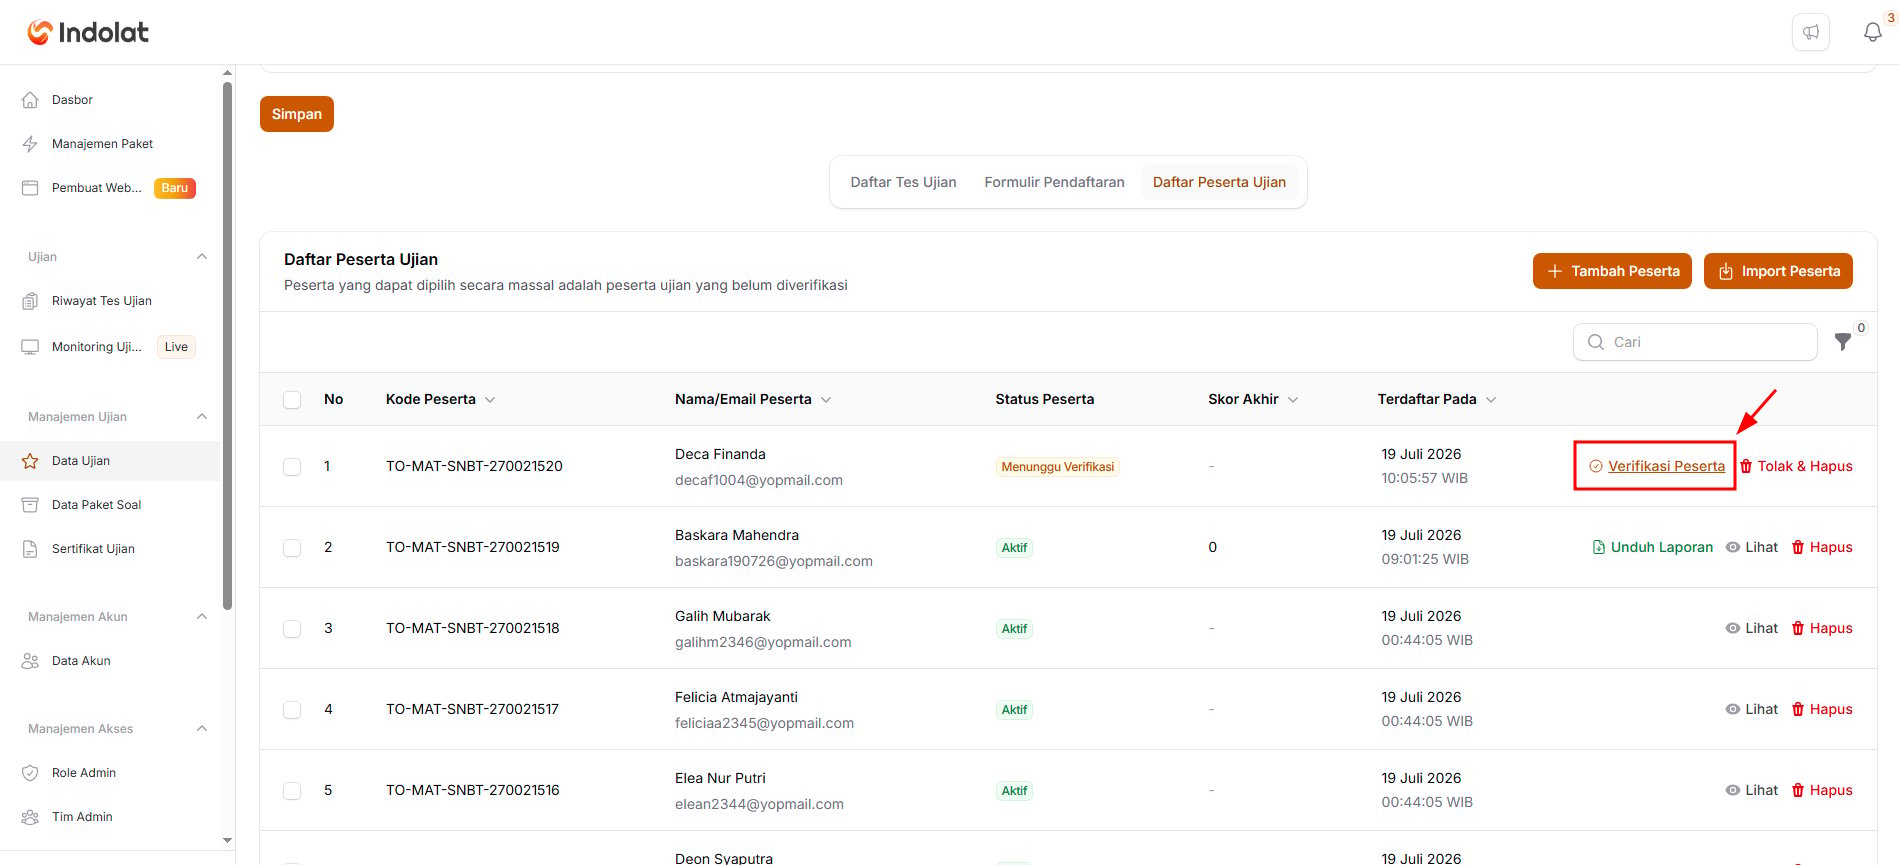
Participants Added by the Exam Organiser
Participants Added by the Exam Organiser
Open the Application Settings menu
Open the Other Settings tab
Click Import Participants

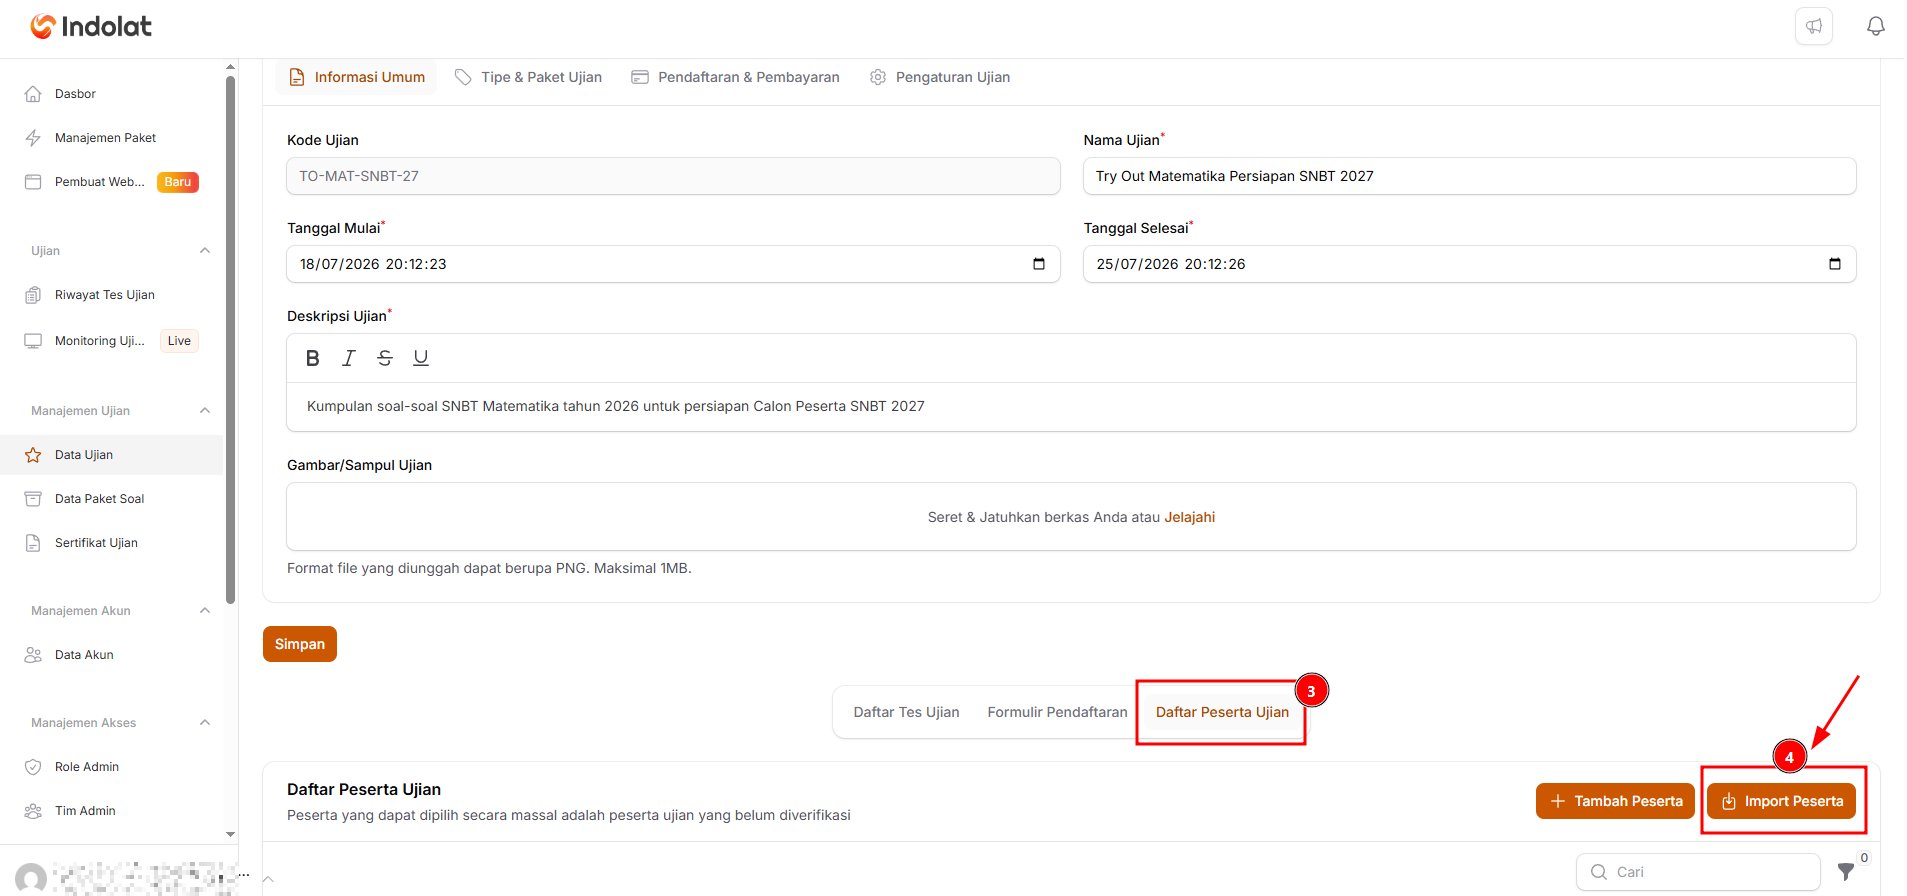
- Open the Exam Data menu.
- Choose the exam participants will take.
- Click Details.
- The system opens the details page. Go to the Exam Participant List section.
- Click Import Participants.
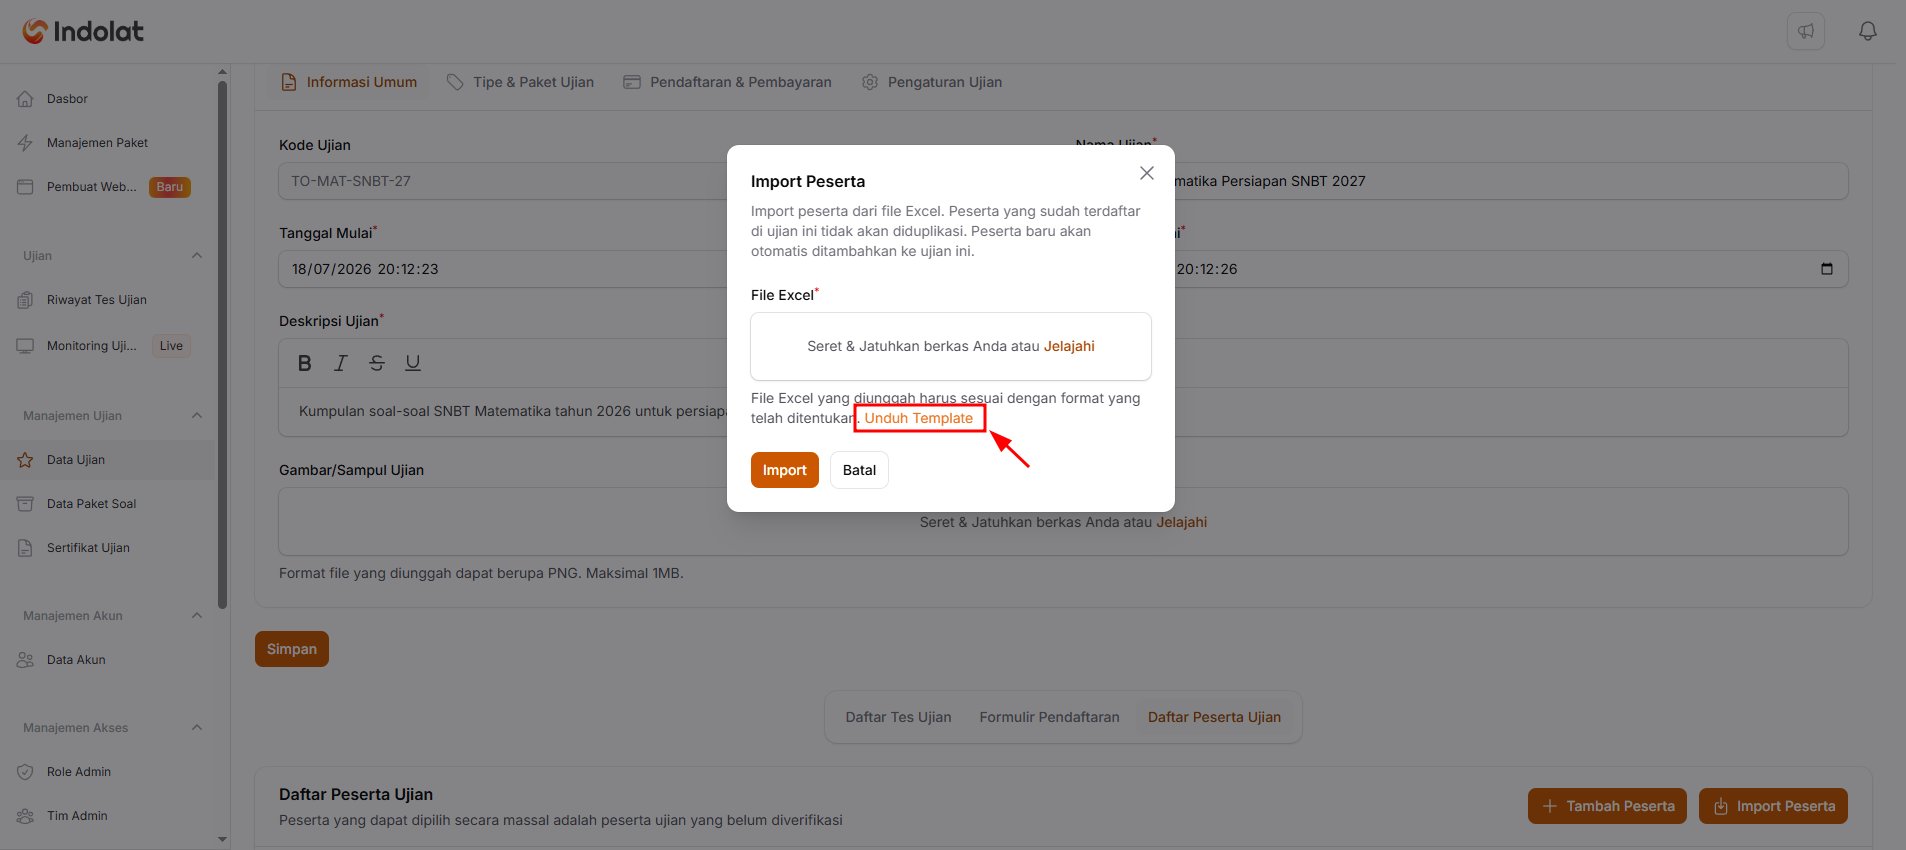
Download the Template
Enter Participant Data in the Import Template
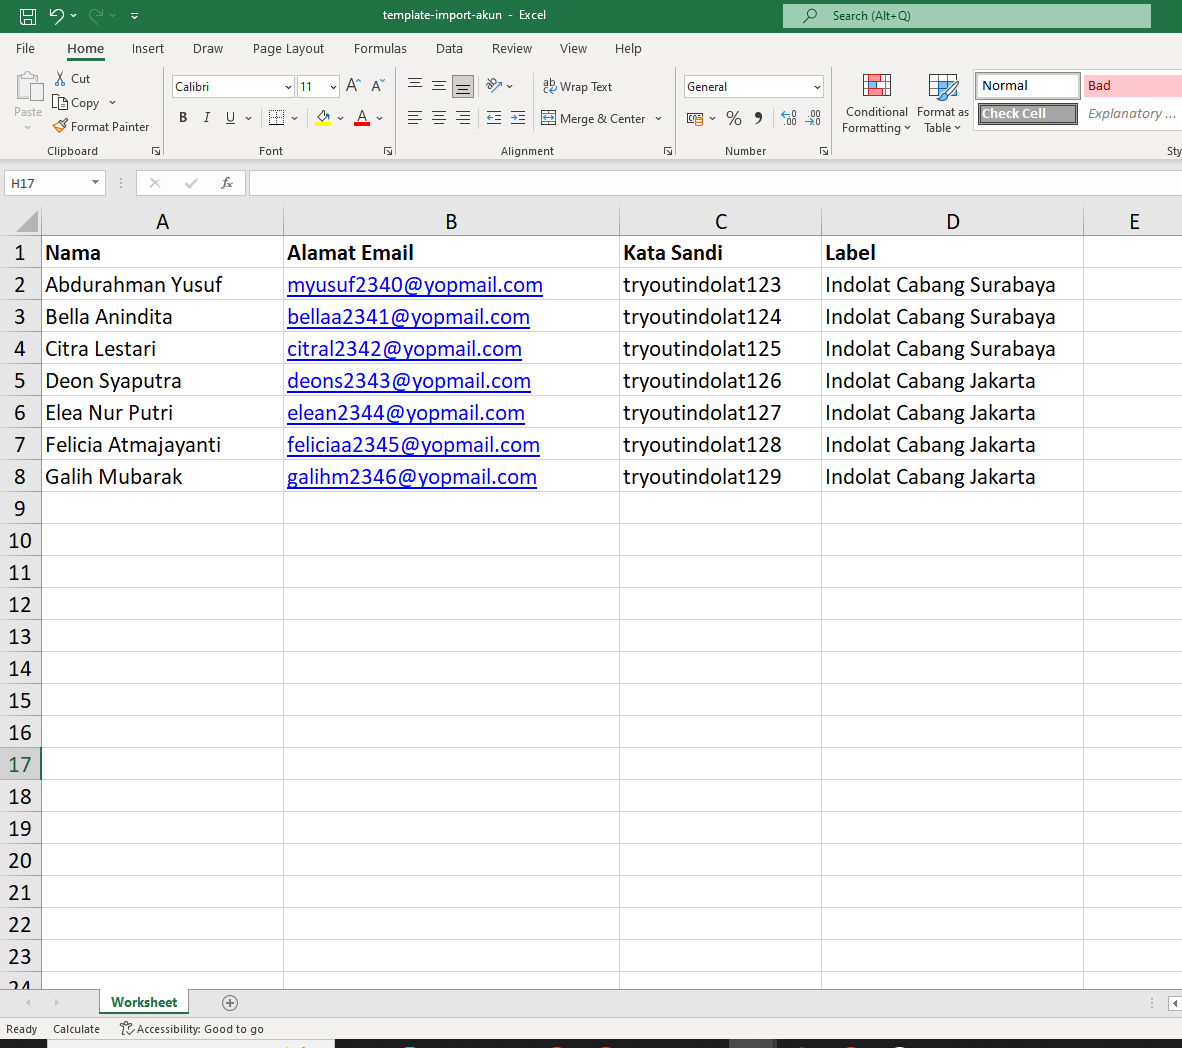
- Name: Enter the name of the participant taking the exam.
- Email Address: Enter the email the participant will use to log in.
- Password: Enter a password for each participant.
peserta001@indolat.compeserta002@indolat.com
- Label: a tag for grouping participants. You can leave this column empty if you don’t need groups.
- Year 2026
- Grade 12 IPA (science stream)
- Batch 1
- Surabaya Branch
Upload the Import File
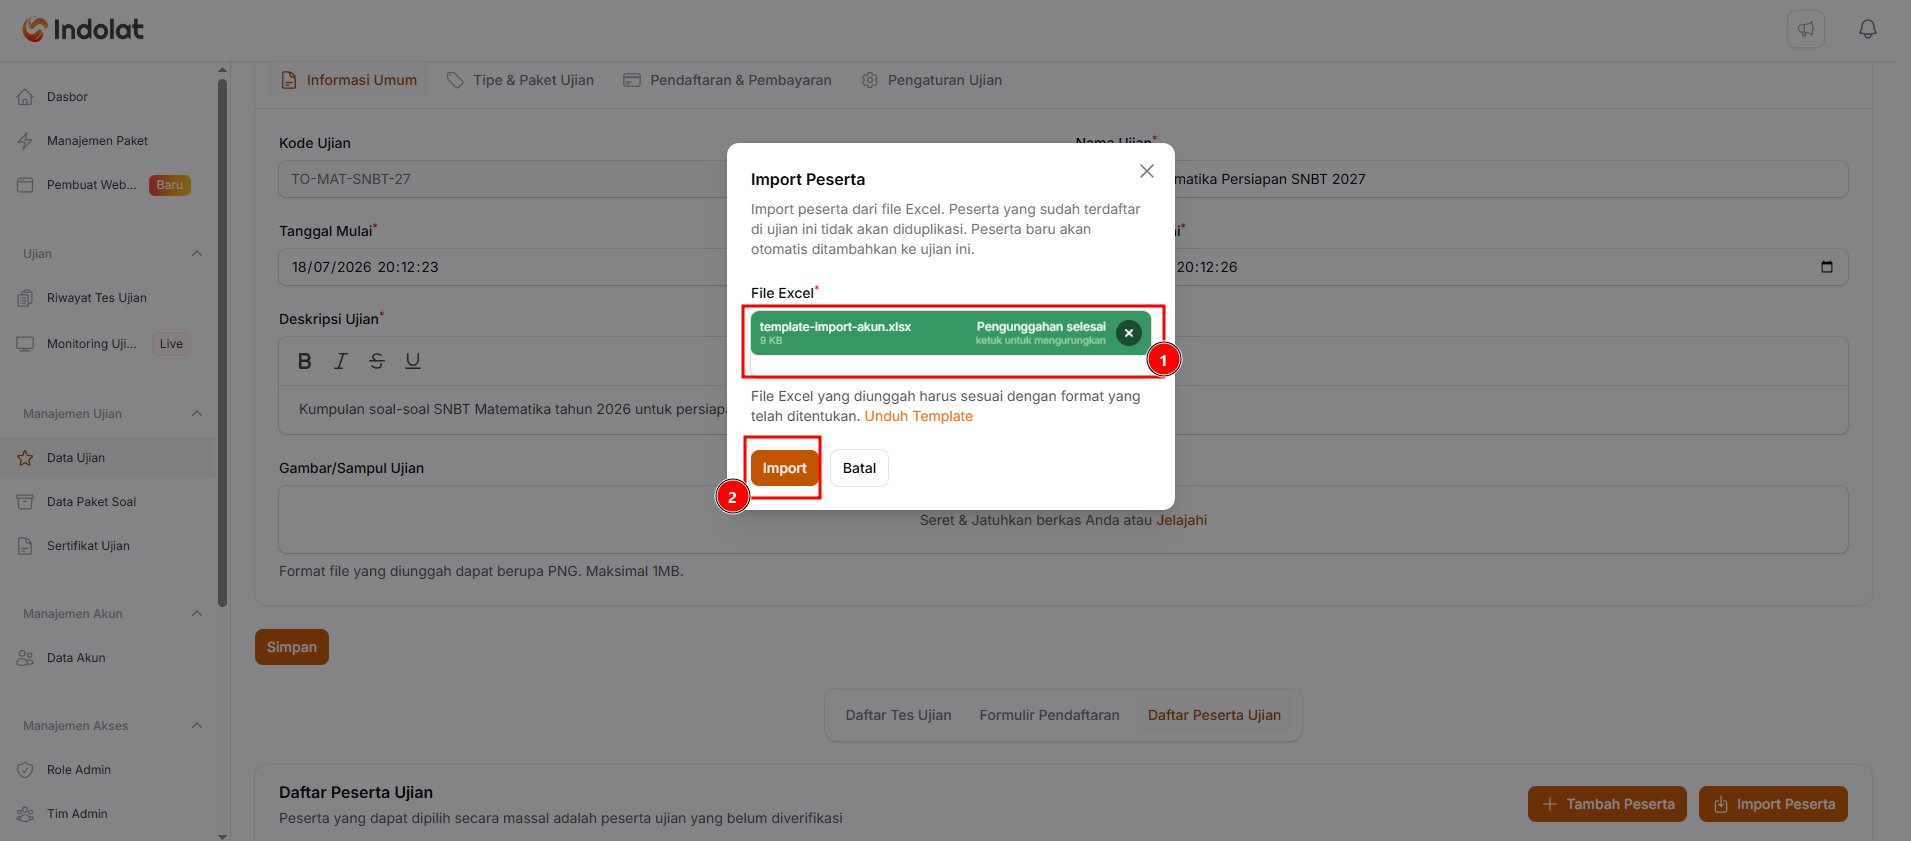
- Make sure the file name is shown along with the note Upload complete.
- Click Import.
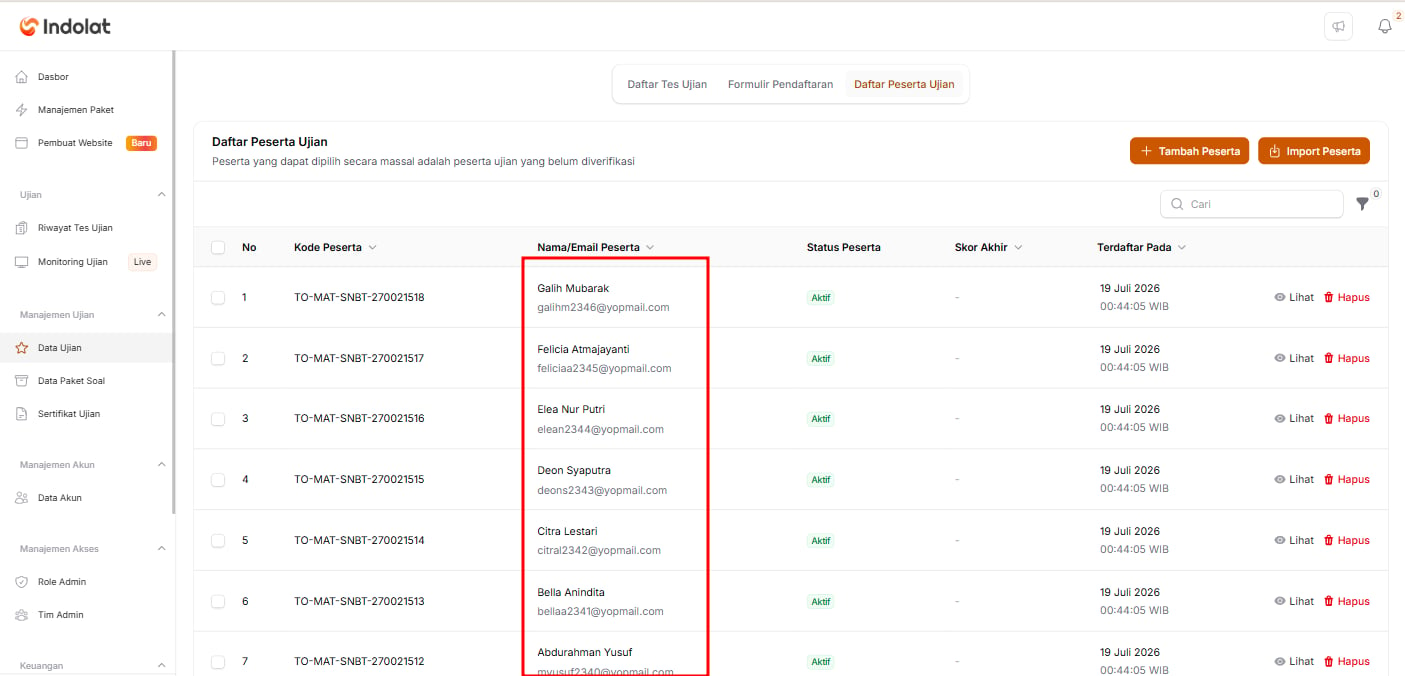
- The system creates the participant accounts and adds them to the Exam Participant List. The import runs in the background, and you get a notification when it’s finished.
Connect Participants to an Exam Session
How to Connect Participants to an Exam Session
Open Participant Exam Session

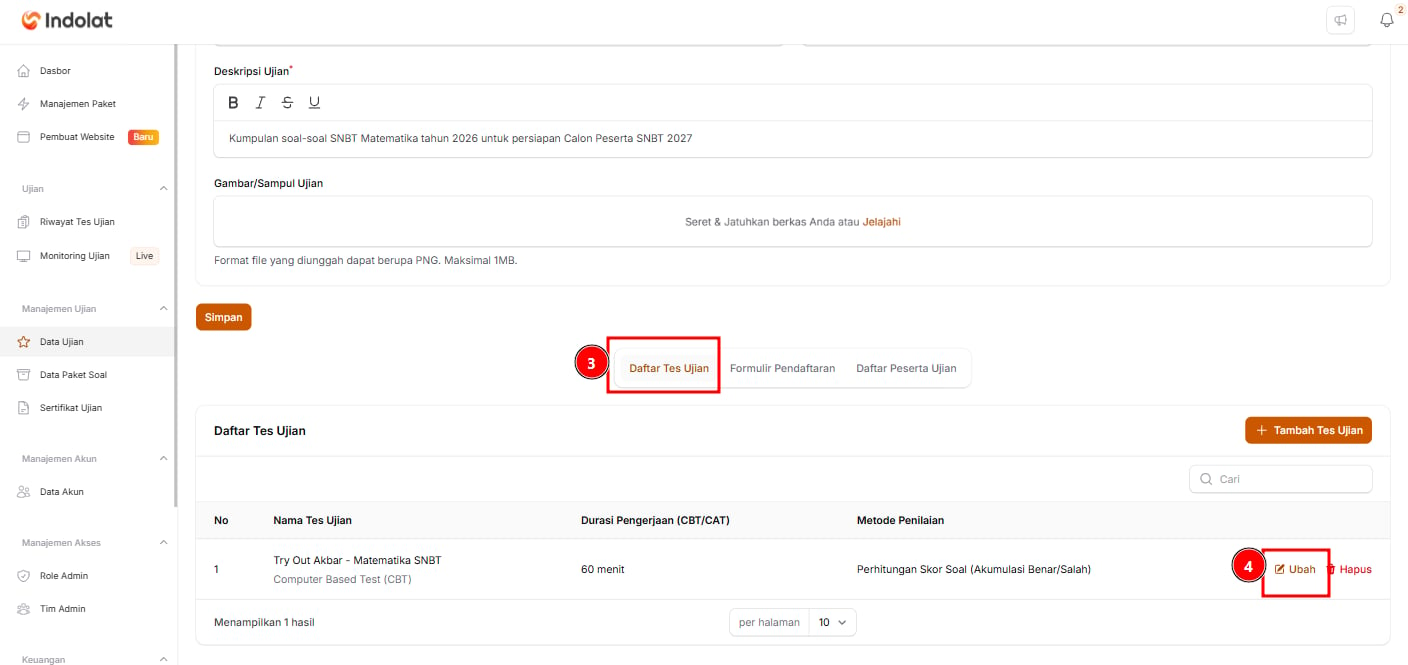

- Open the Exam Data menu.
- Choose the exam participants will take.
- Click Details.
- The system opens the details page. Go to the Test List section.
- Click Edit on the test.
- The system opens the test’s details page.
- Then choose Participant Exam Session.
Add Participants to the Exam Session
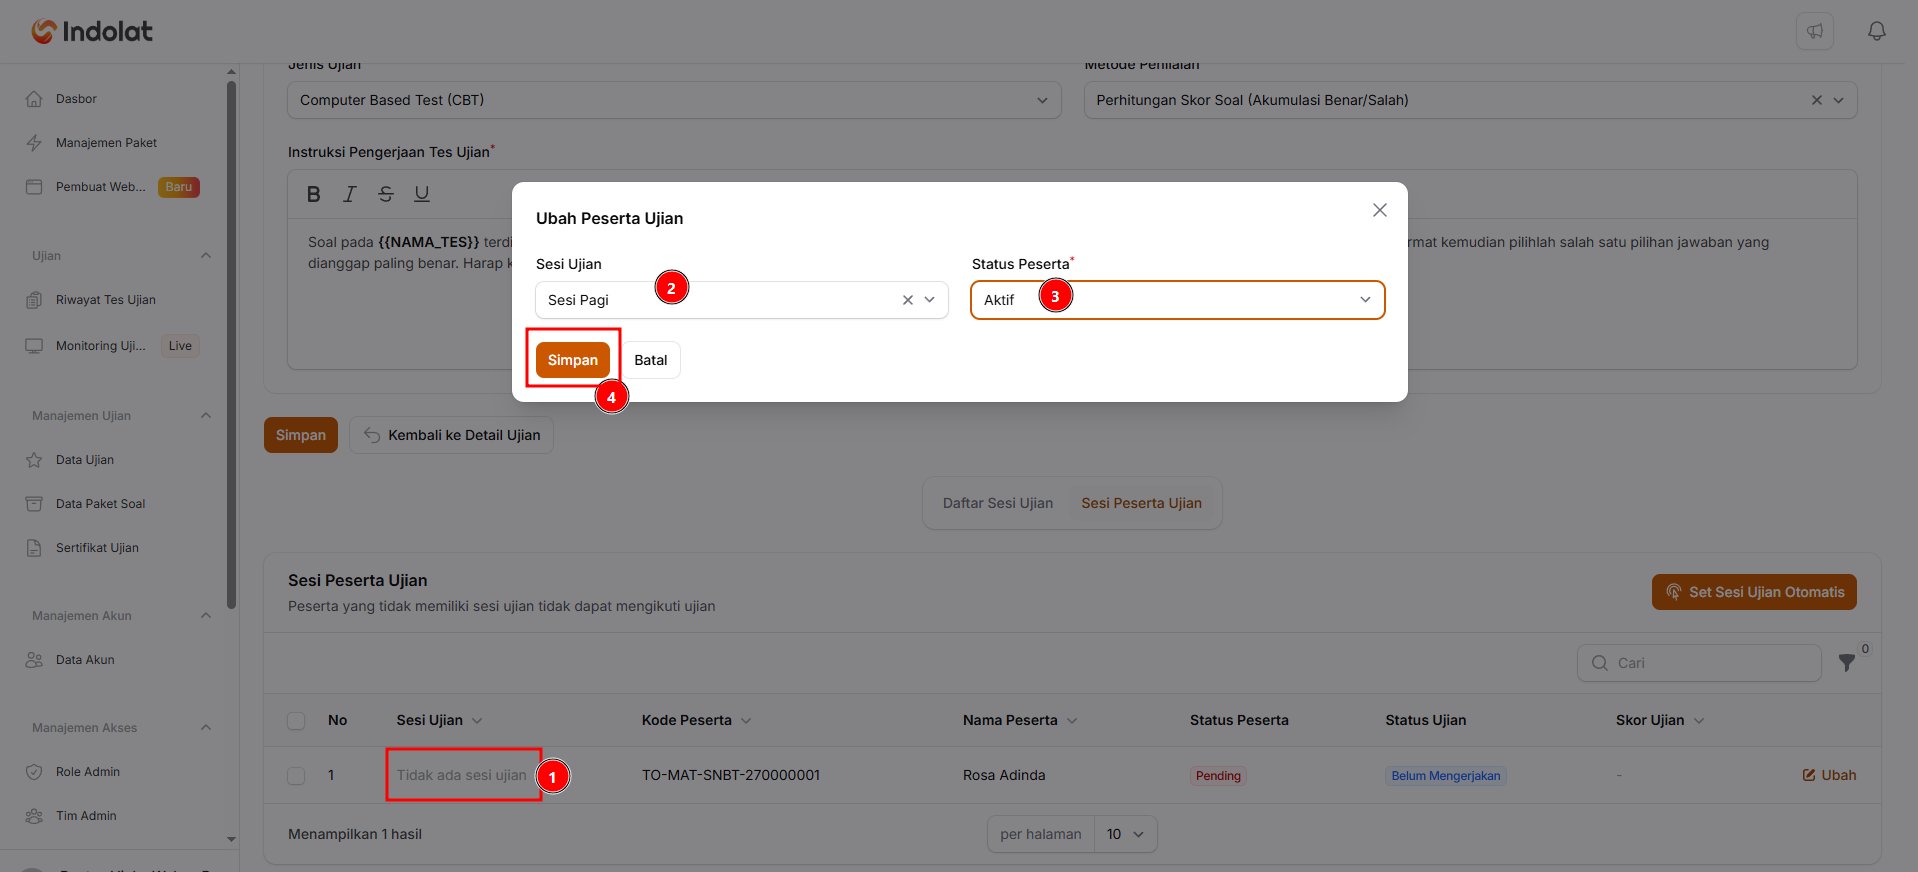
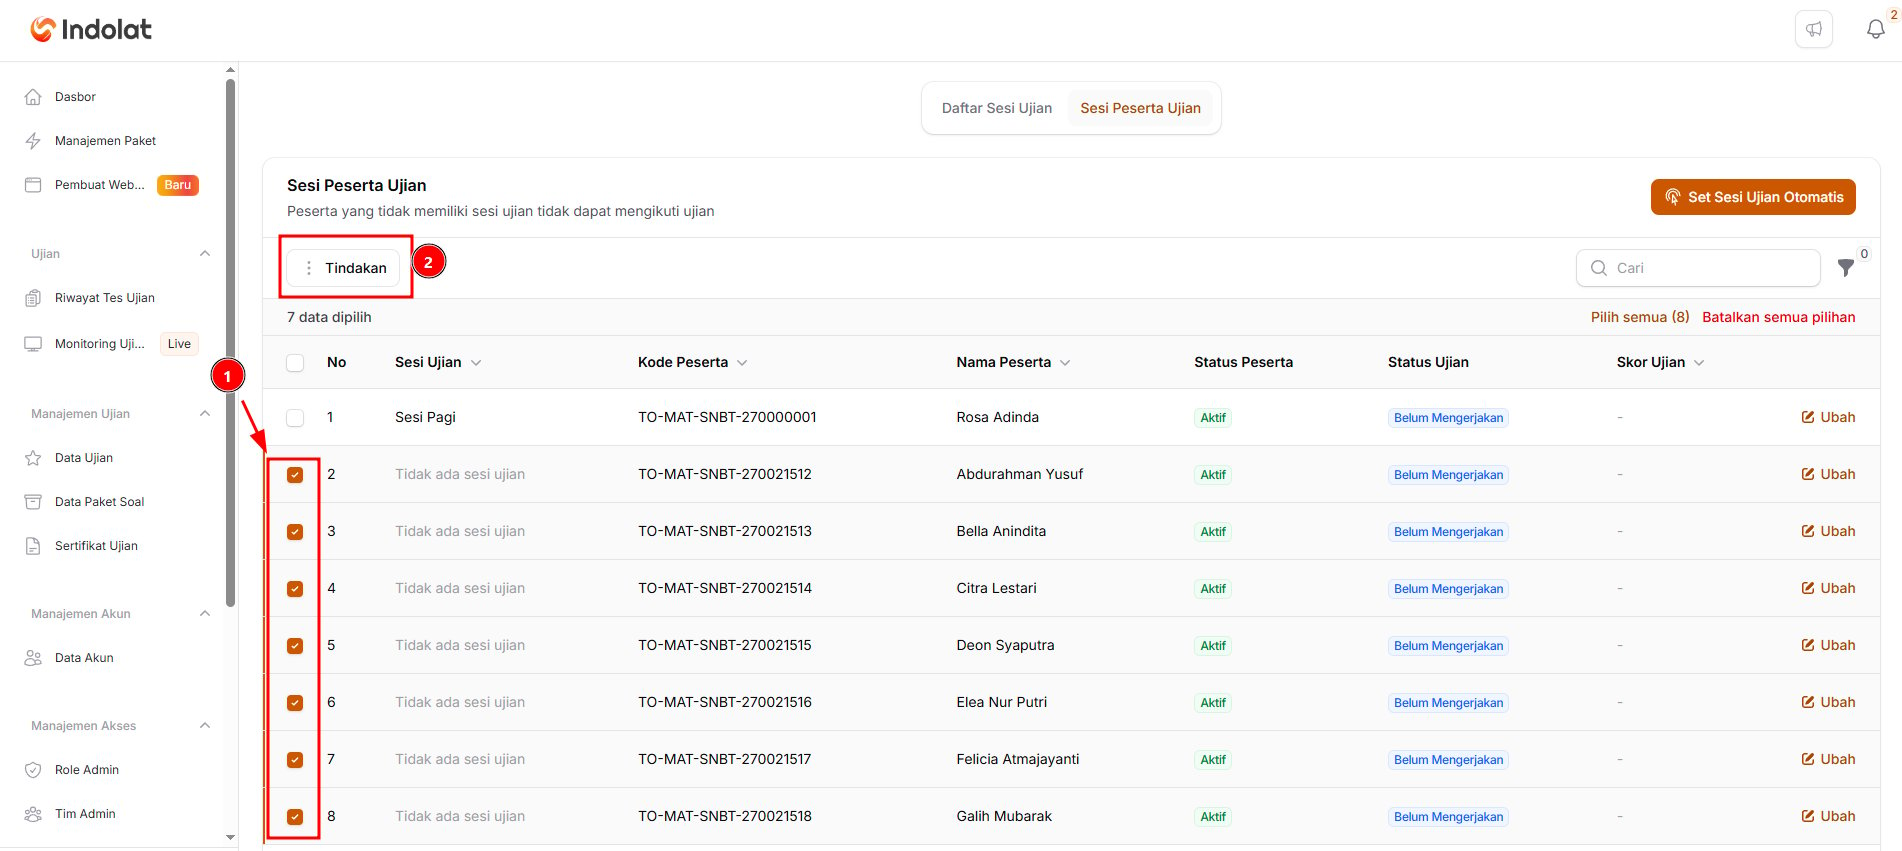
- Tick the participants who still show No exam sessions.
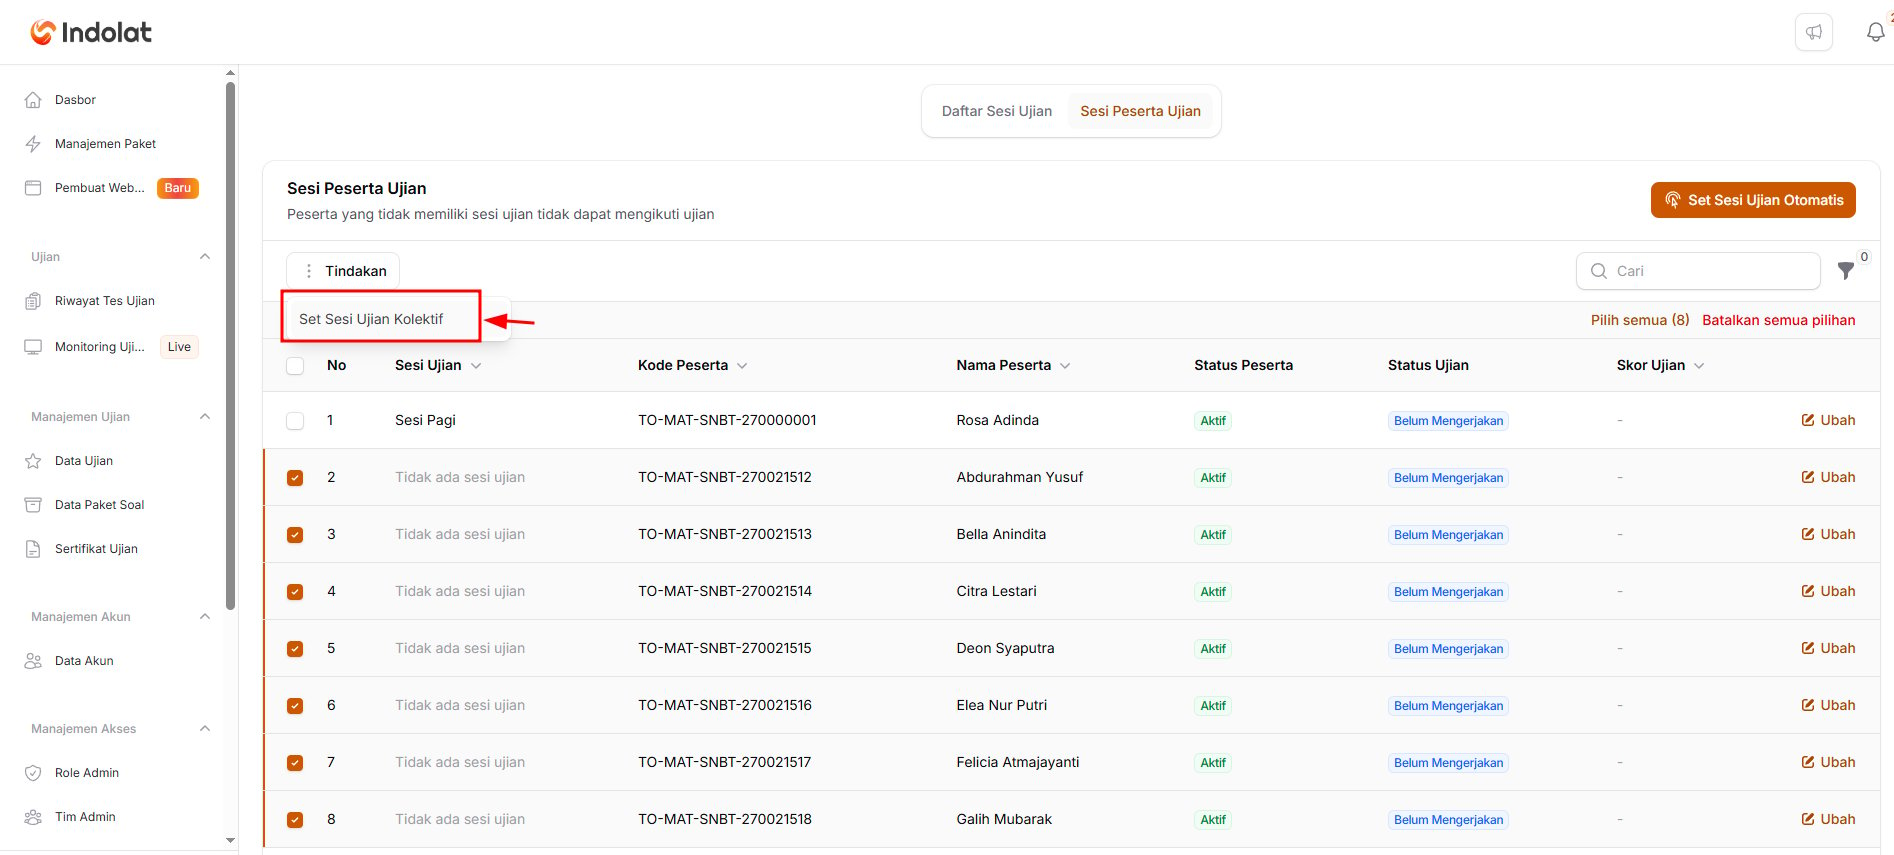
To select every participant, click Select all. - Click Bulk actions, then choose Assign Exam Sessions in Bulk.
- In the Select an Exam Session field, choose the session participants will take, for example Morning Session.
- Click Assign Exam Sessions in Bulk to save your changes.
Participants Are Ready to Take the Exam
7. Reports and Evaluation
Everything is ready. The questions are created, the exam is scheduled and participants are in their sessions. Your exam is ready to go! 🚀Monitor the Exam While It Runs
Open the Exam Monitoring menu.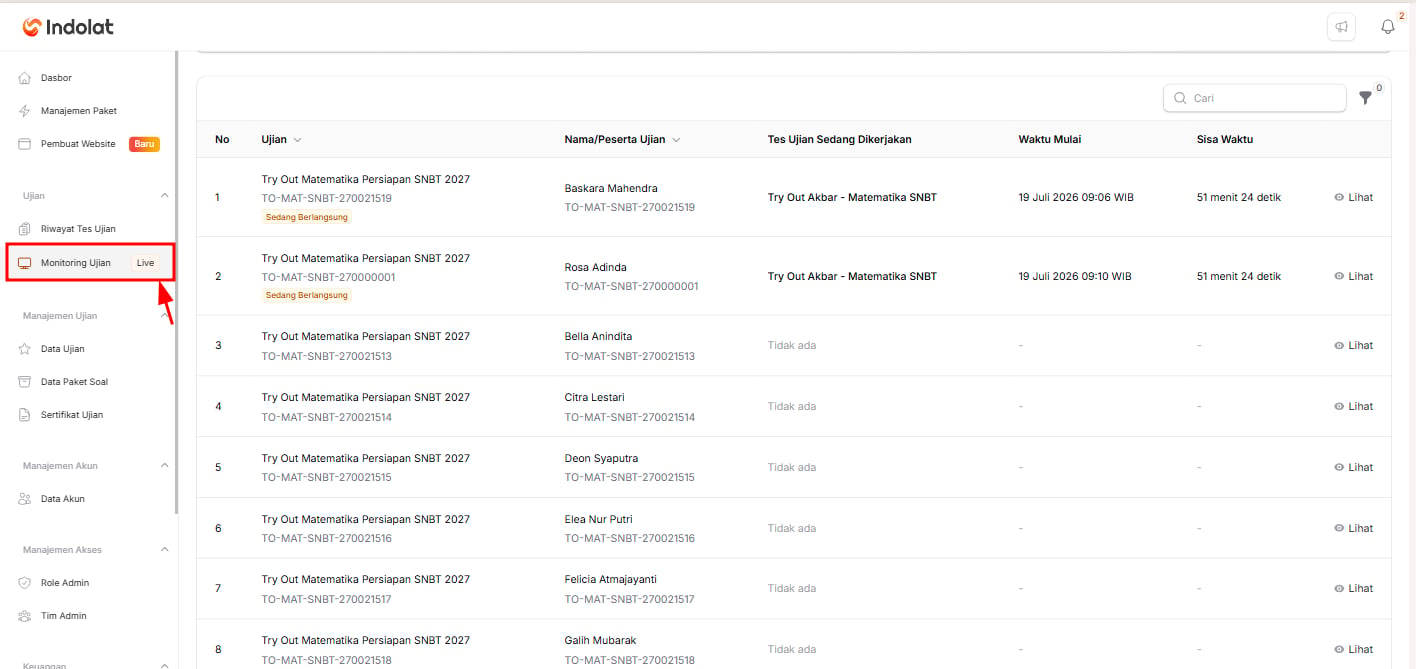
- who is currently taking the exam,
- who hasn’t started yet,
- how much time is left,
- and each participant’s exam status.
View the Results After the Exam
Open the Test History menu.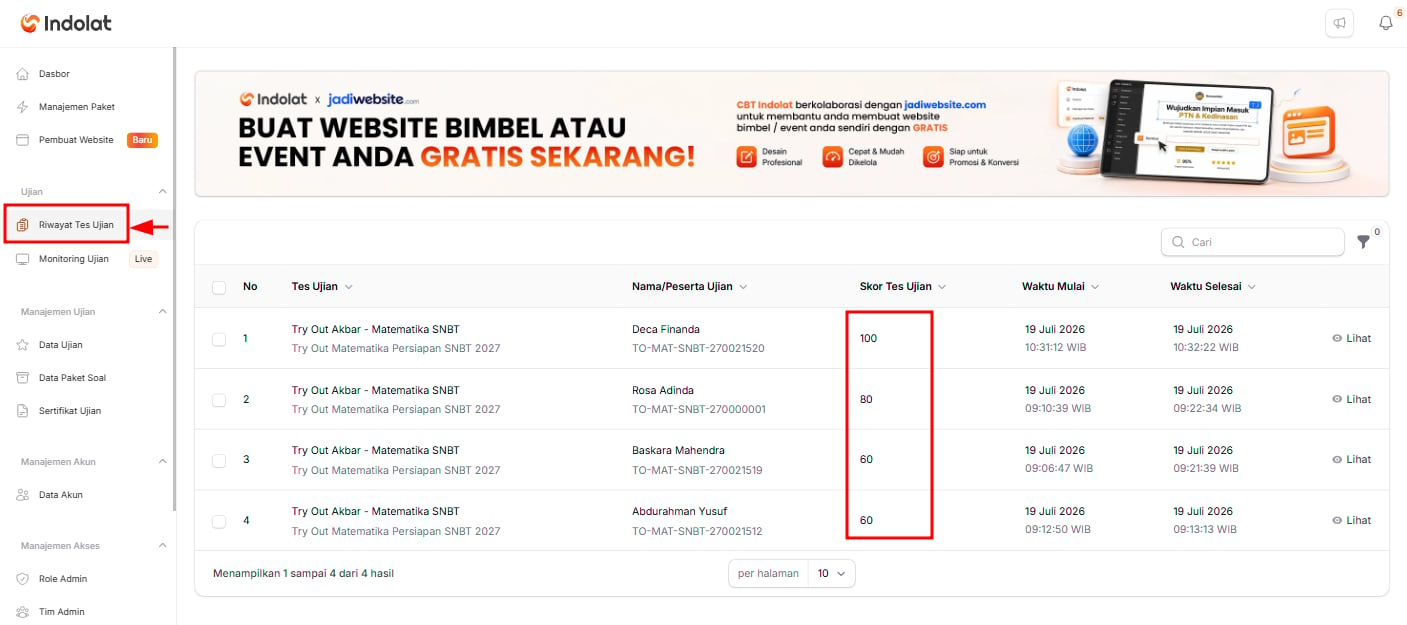
- participants’ scores (Test Score),
- when they started and finished,
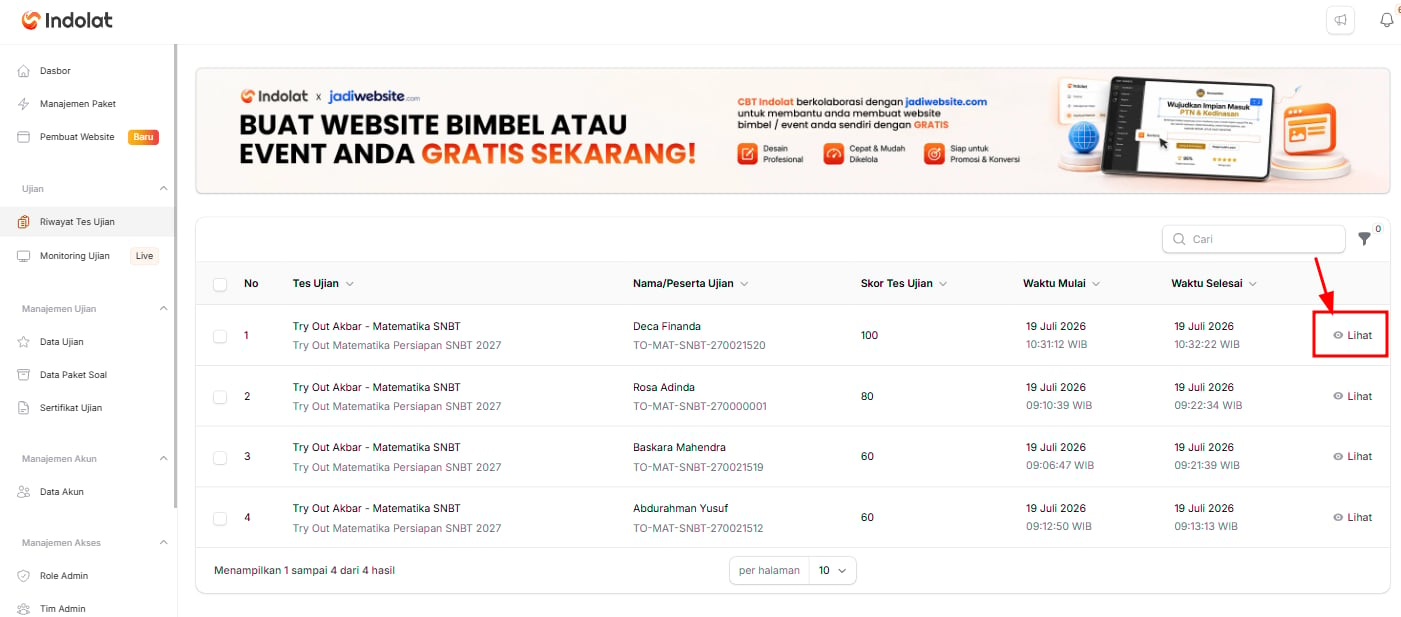
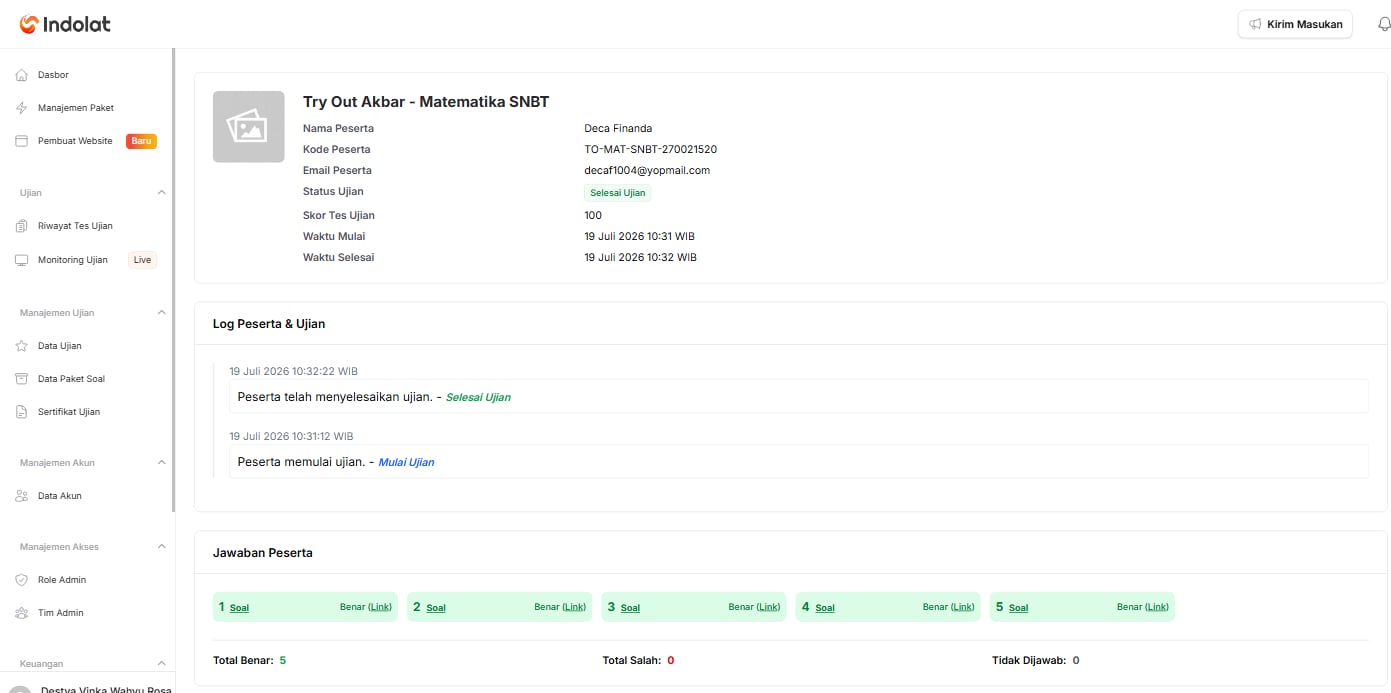
- and the answers each participant chose, by clicking View.
Calculate IRT Scores
You only need this section if you chose one of the IRT scoring methods. With IRT, participants’ scores don’t appear straight away after the exam ends. The system has to run a calculation first.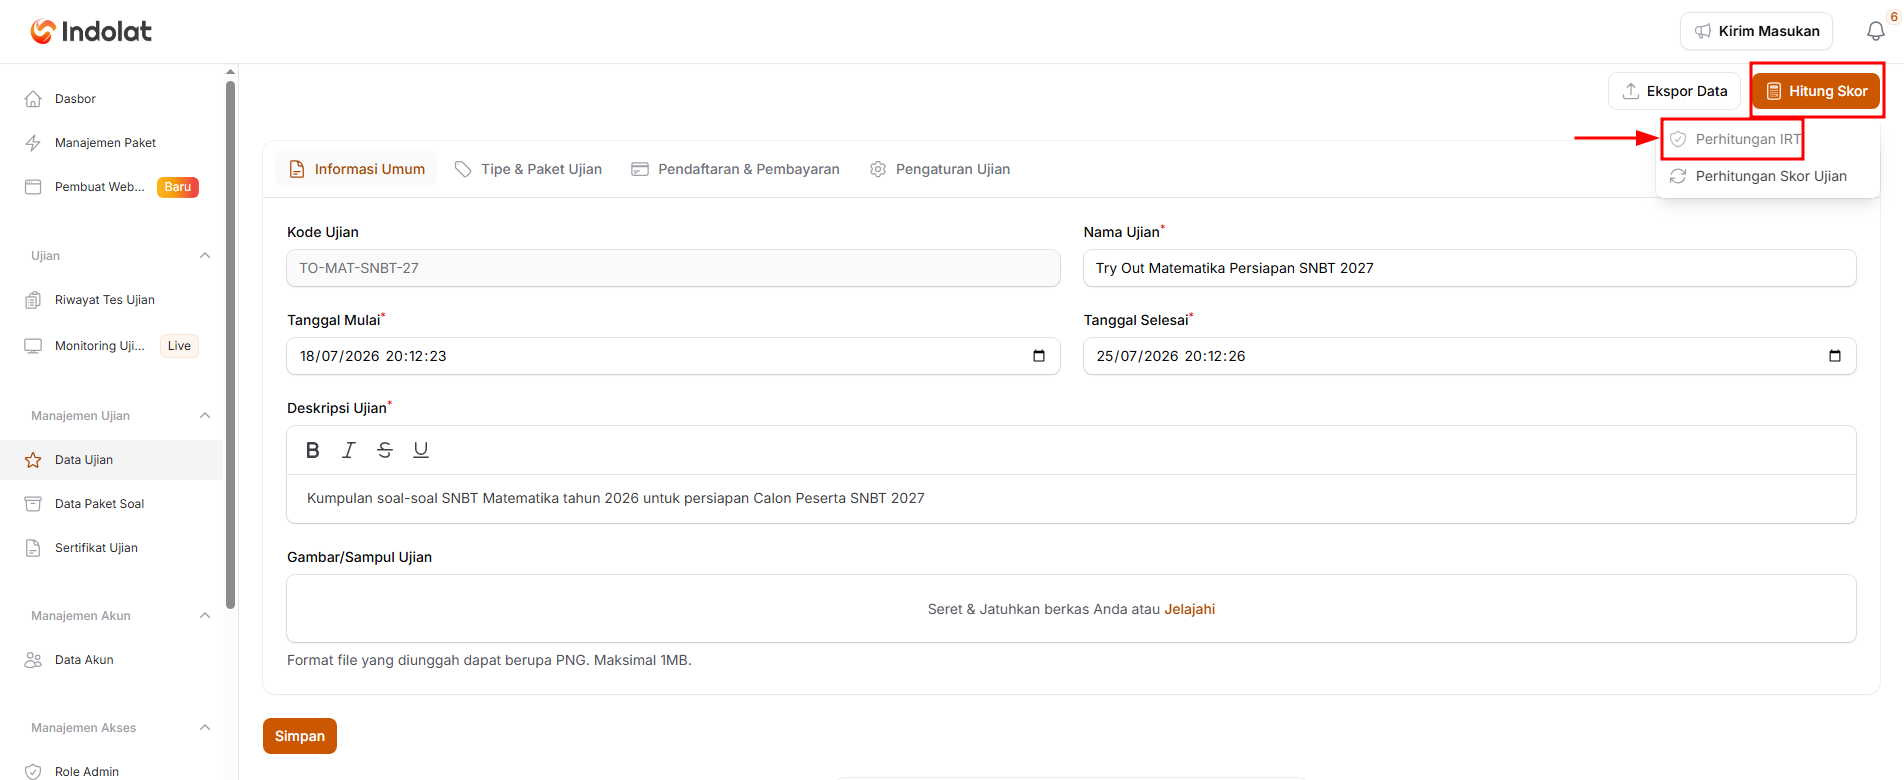
- Open the Exam Data menu.
- Choose the exam to calculate, then click Details.
- Click Calculate Score → IRT Calculation, then confirm.
- Wait until the calculation is finished. The system sends a notification when it’s done.
Download the Exam Results Report
Once the exam is over, you can save participants’ results as an Excel file.Open the Exam Data menu
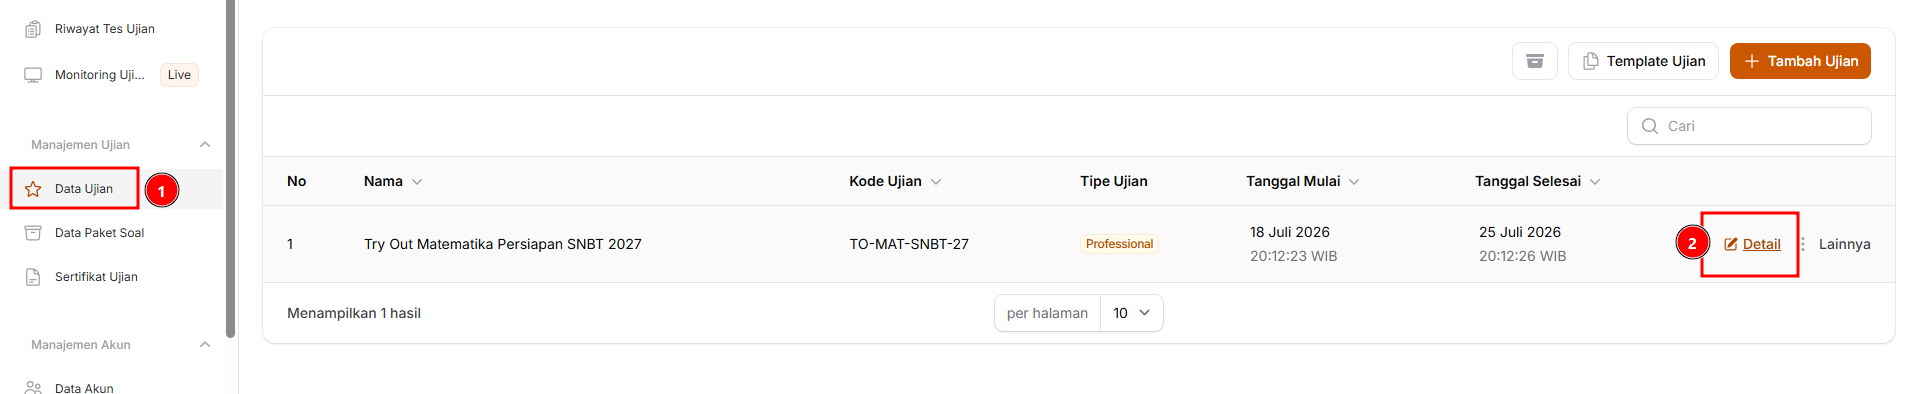
- Choose the exam whose results you want to export.
- Click Details.
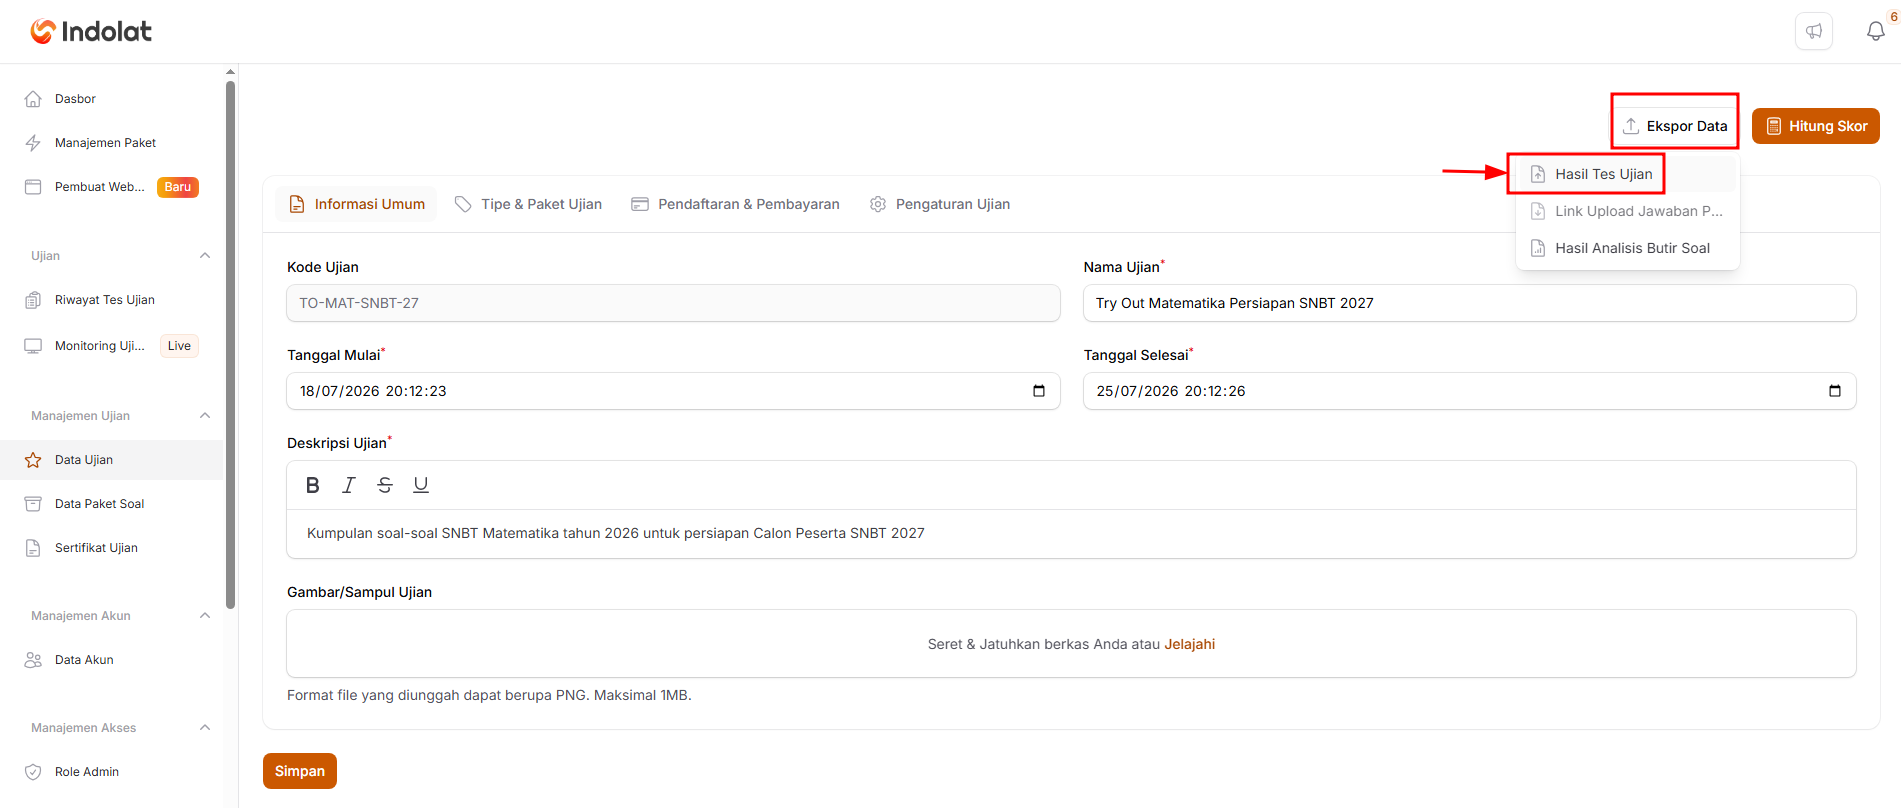
- In the top-right corner, click Export Data, then choose Test Results and confirm.
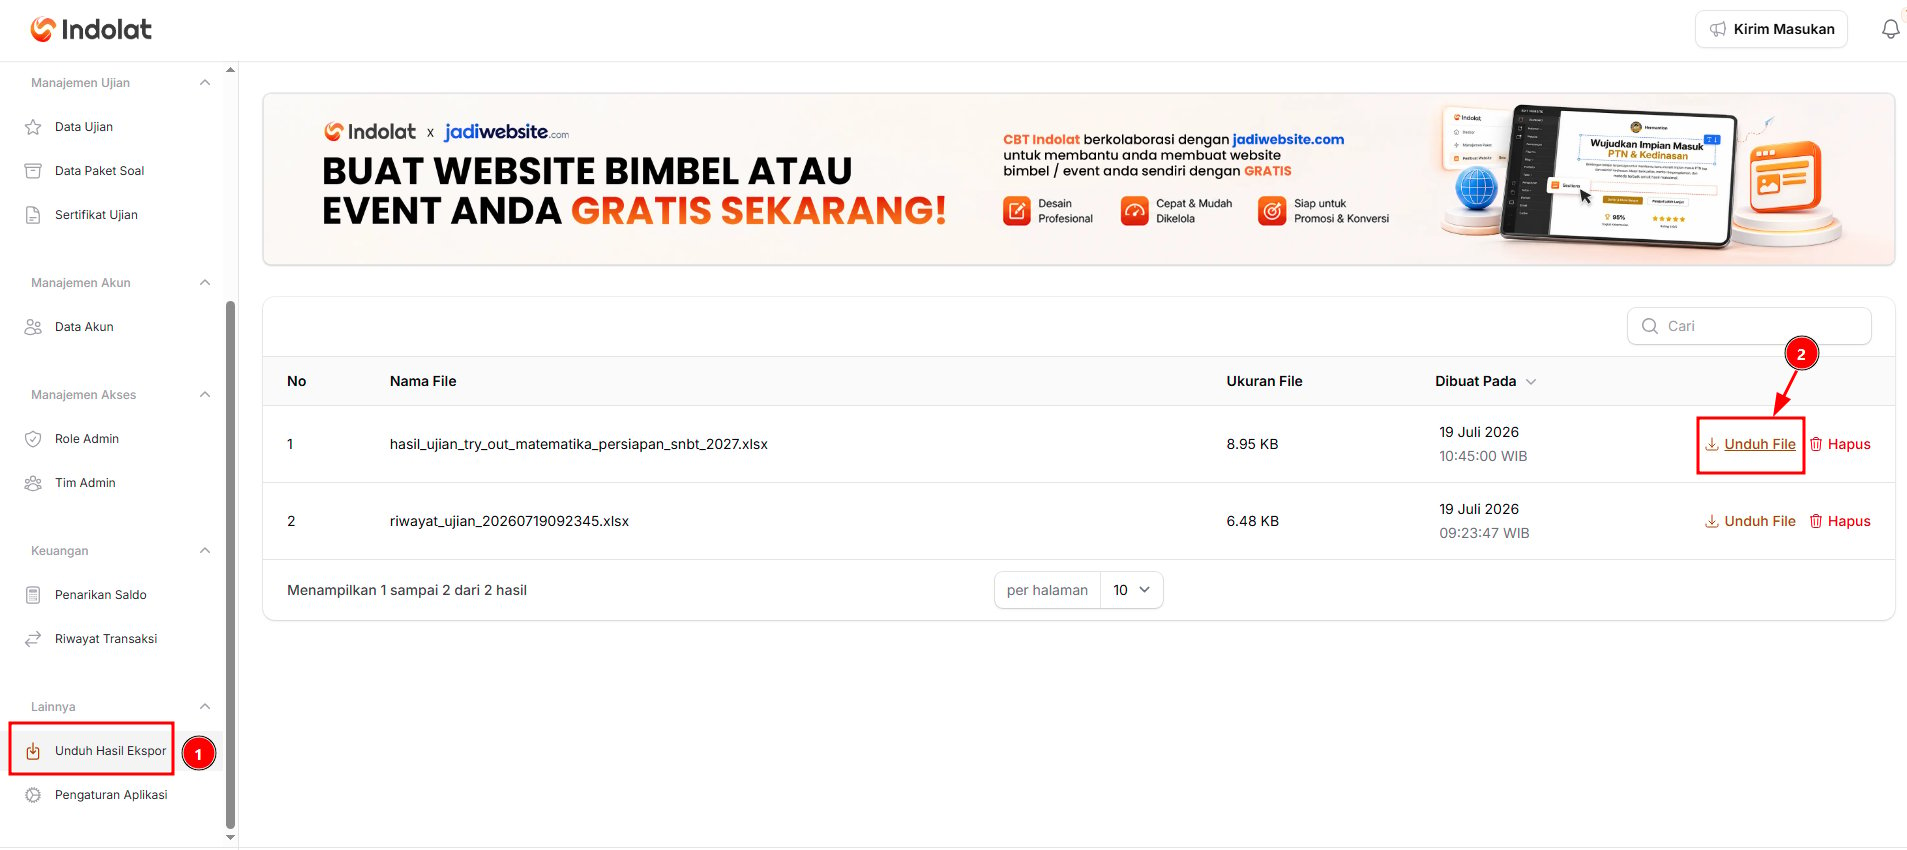
- The system prepares the Excel file in the background and sends a notification when it’s ready.
Open the Download Export Results menu
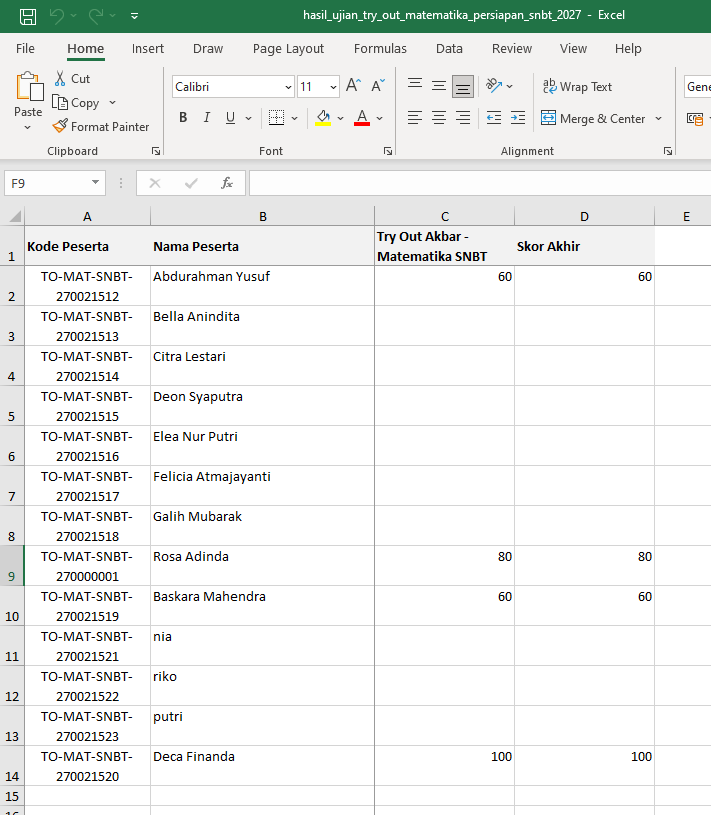
- compile a score summary,
- keep an archive of the exam,
- share the results with the people involved,
- or carry out further data processing.