
- School
- WhatsApp number
- Home city
1. Create the Registration Form
Open the exam you created
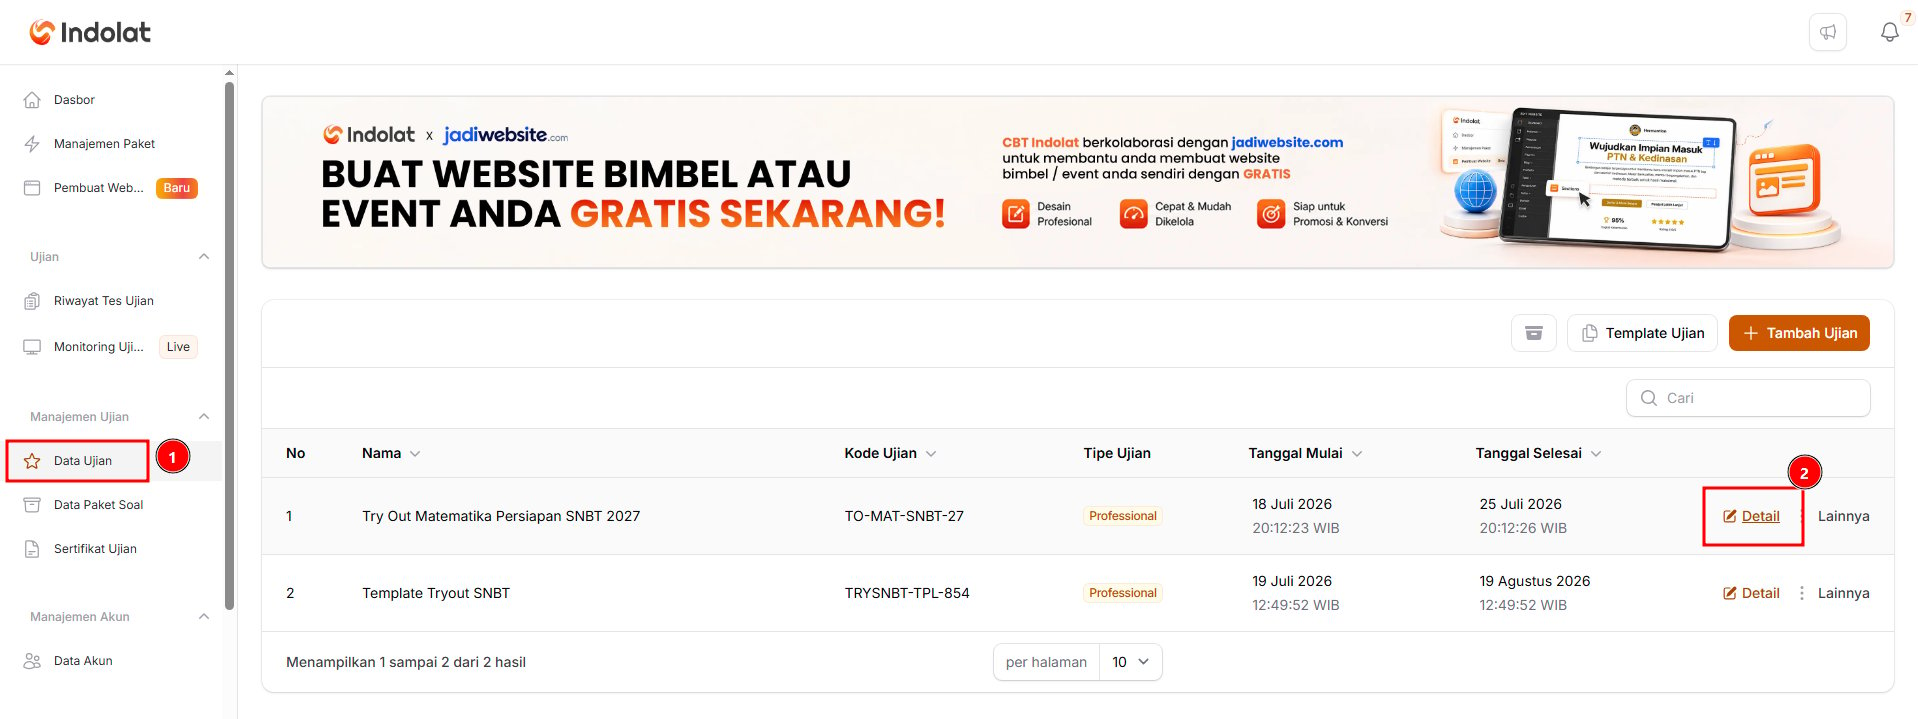
- Open the Exam Data menu and choose the exam you want to add a registration form to.
- Then click Details.
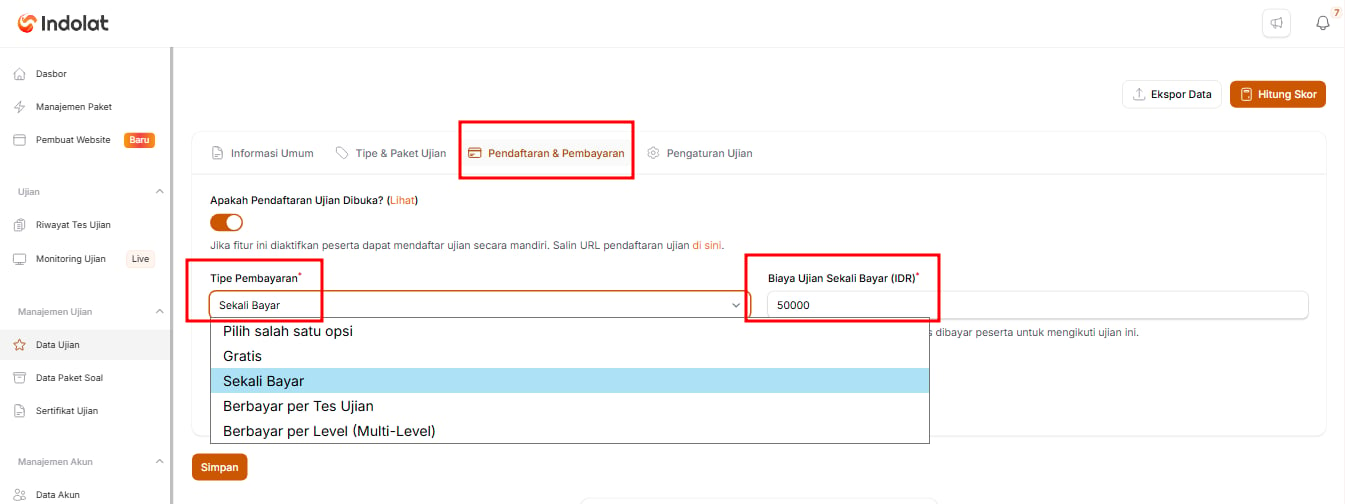
Make sure the payment type and registration fee are set
Open Registration Form and click Add Registration Form
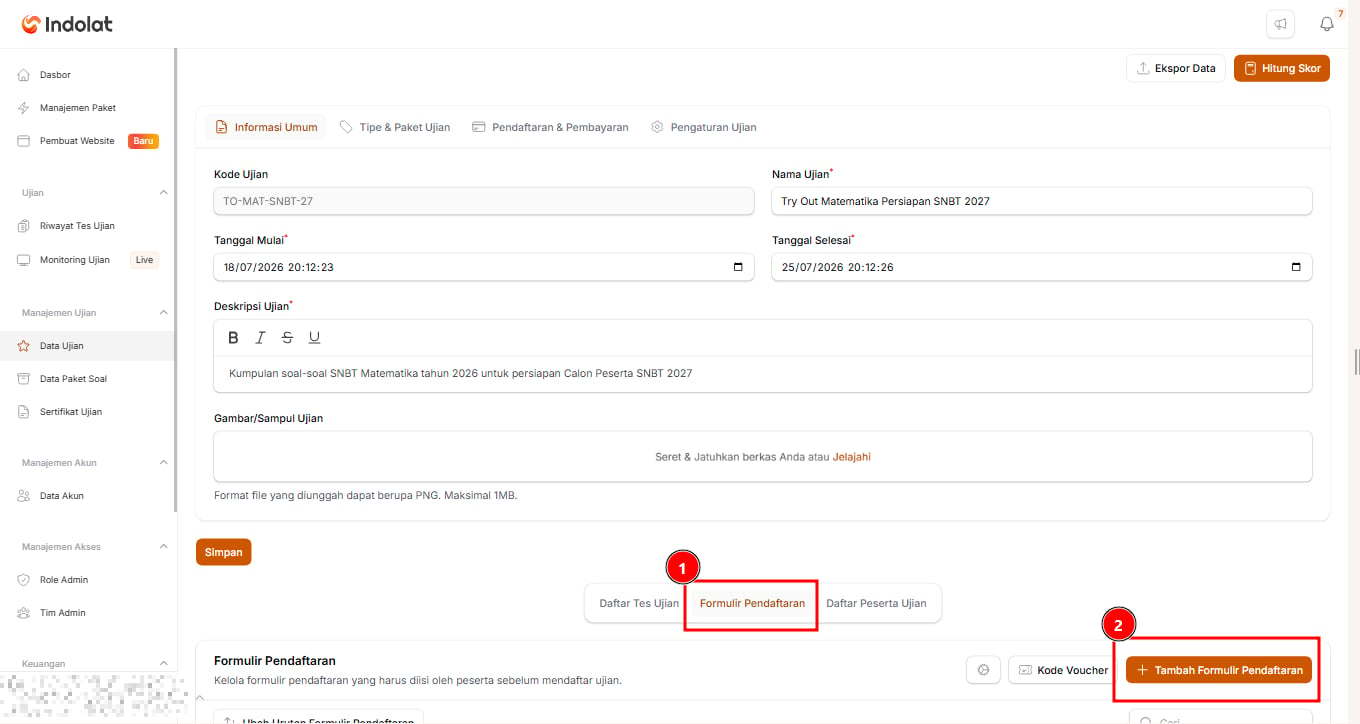
Institution Branch: _________In the system, you create those questions with the Add Registration Form button.
WhatsApp Number: _________
2. Fill In the Registration Form Details
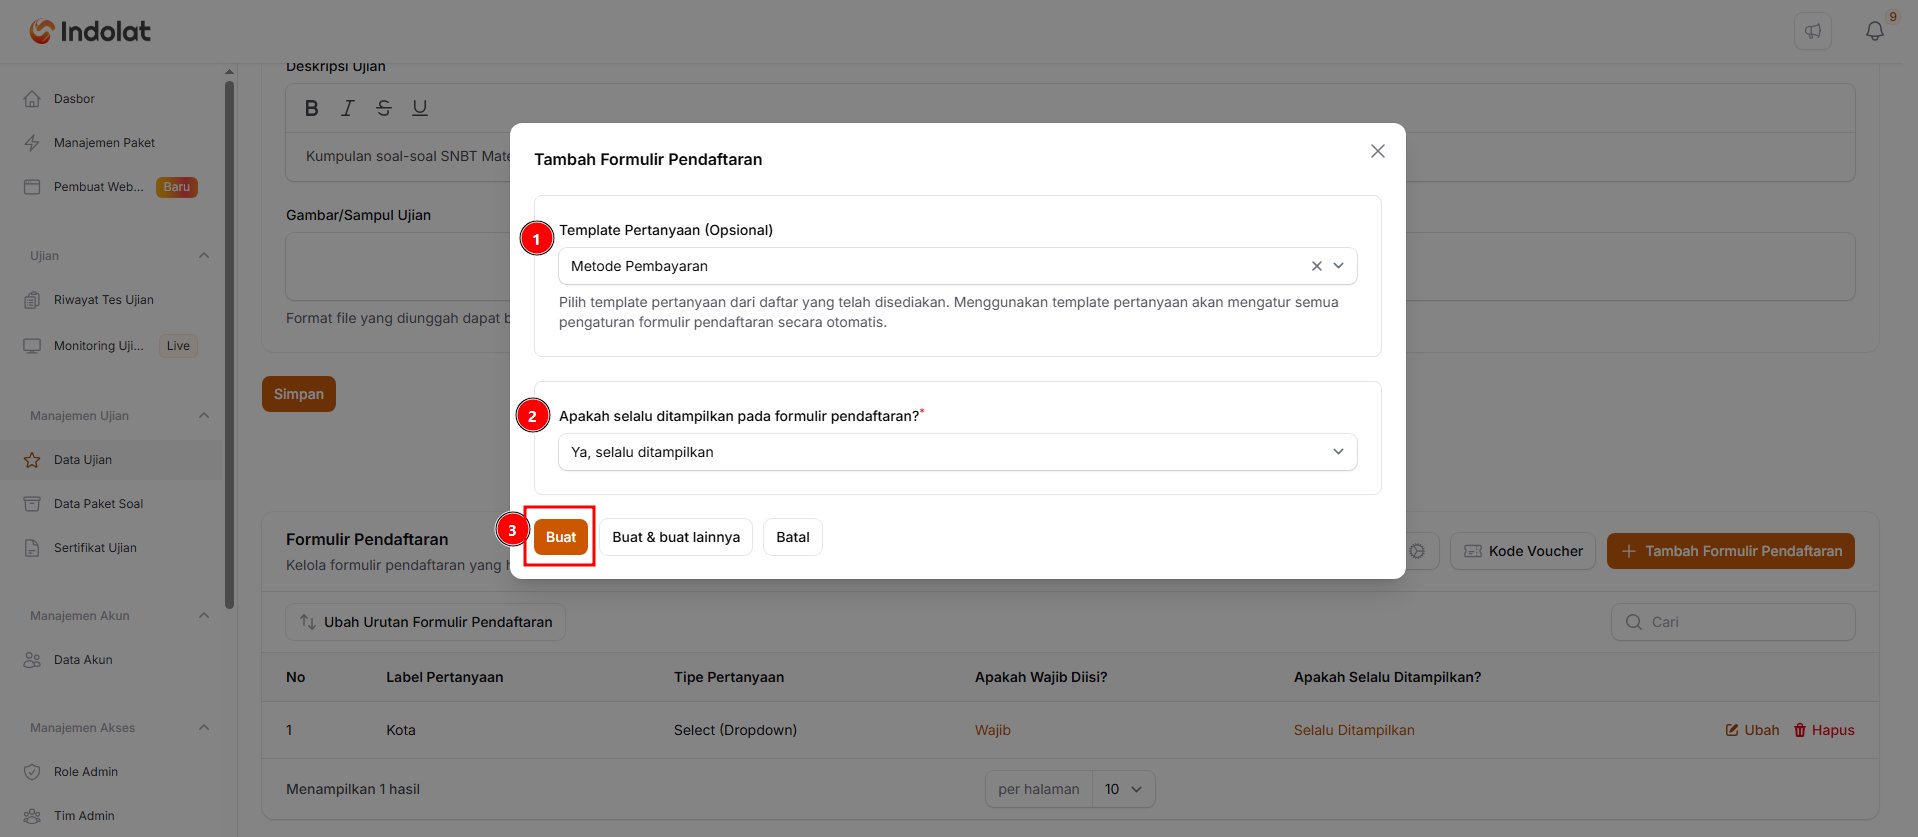
When you create the form, you decide what information to collect from participants.Use a Question Template
Use a Question Template
-
Question Template (Optional)
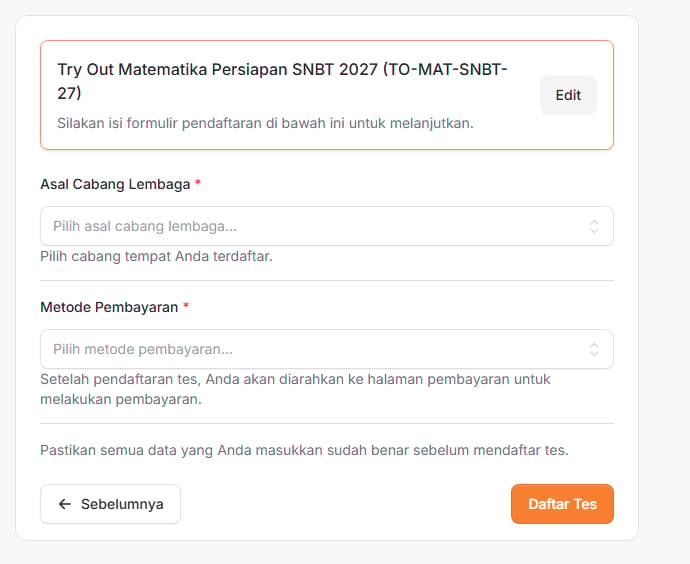
If you want to build a payment form quickly without setting up every part by hand, and you don’t need any extra data from participants, use the Payment Method question template. Here’s how that form looks to participants: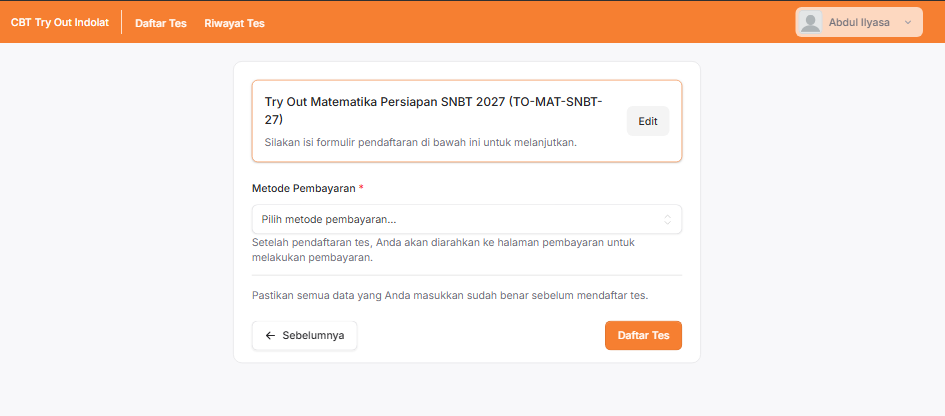
-
Is it always shown on the registration form?
This setting decides whether the question always appears on the participant’s form. Choose Yes, always shown. - Click Create to save.
Customise the Question Template
Customise the Question Template
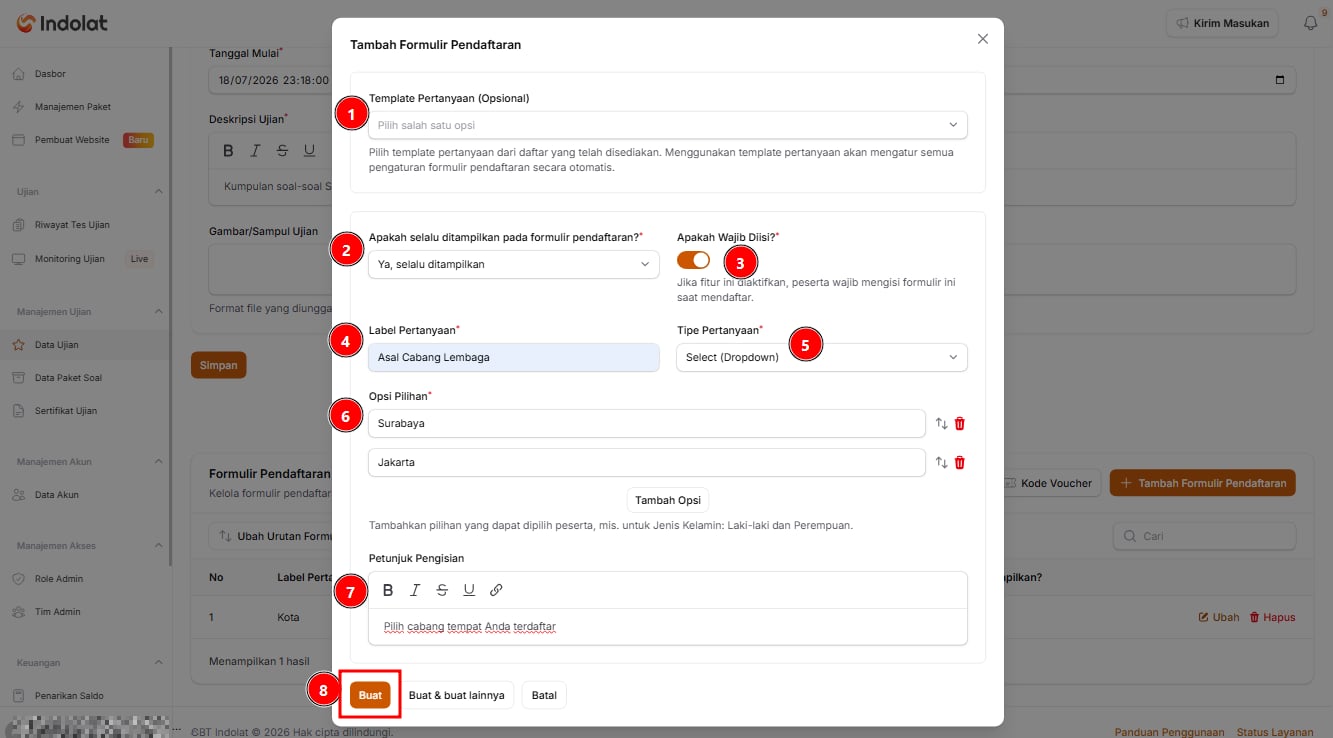
Create the input field first
-
Question Template (Optional)
Leave it empty, because you are creating your own question. If you pick one of the templates from the list, the form settings fill in automatically and the Question Label and Question Type fields are hidden. -
Is it always shown on the registration form?
Choose Yes, always shown so every participant sees this question. -
Is It Required?
Switch it on so participants can’t continue registering until they choose a branch. -
Question Label
Enter the question name participants will see.
Example: Institution Branch. -
Question Type: Select (Dropdown)
Decides how participants answer on the registration form. For the Institution Branch question, use Select (Dropdown), because participants only need to choose one branch from a list.Question Type decides how participants answer on the registration form. The type names appear in the app exactly as shown below.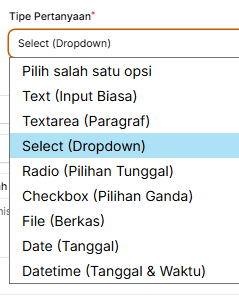
- Text (Input Biasa) (plain input)
For short answers.
Example: full name, WhatsApp number or school. - Textarea (Paragraf) (paragraph)
For longer answers.
Example: reason for taking the exam or full address. - Select (Dropdown)
When participants may choose only one answer from a list. The options appear when the field is opened.
Example: choosing the Surabaya or Jakarta branch. - Radio (Pilihan Tunggal) (single choice)
When participants may choose only one answer and you want every option shown at once.
Example: Male or Female. - Checkbox (Pilihan Ganda) (multiple choice)
When participants may choose more than one answer.
Example: choosing several subjects they are interested in. - File (Berkas)
When participants need to upload a document.
Example: proof of payment, student card or photo. - Date (Tanggal)
For choosing a date only.
Example: date of birth. - Datetime (Tanggal & Waktu)
For choosing a date and a time.
Example: a consultation slot on 25 July 2026 at 10:00.
- Text (Input Biasa) (plain input)
-
Choice Options
Enter the branches participants can choose from, for example:- Surabaya
- Jakarta
-
How to Fill It In
Add a short instruction so participants aren’t confused.
Example:Choose the branch where you are registered.
- When you’re done, click Create to save the question.
Show the form based on a condition
- Surabaya → Free
- Jakarta → Paid
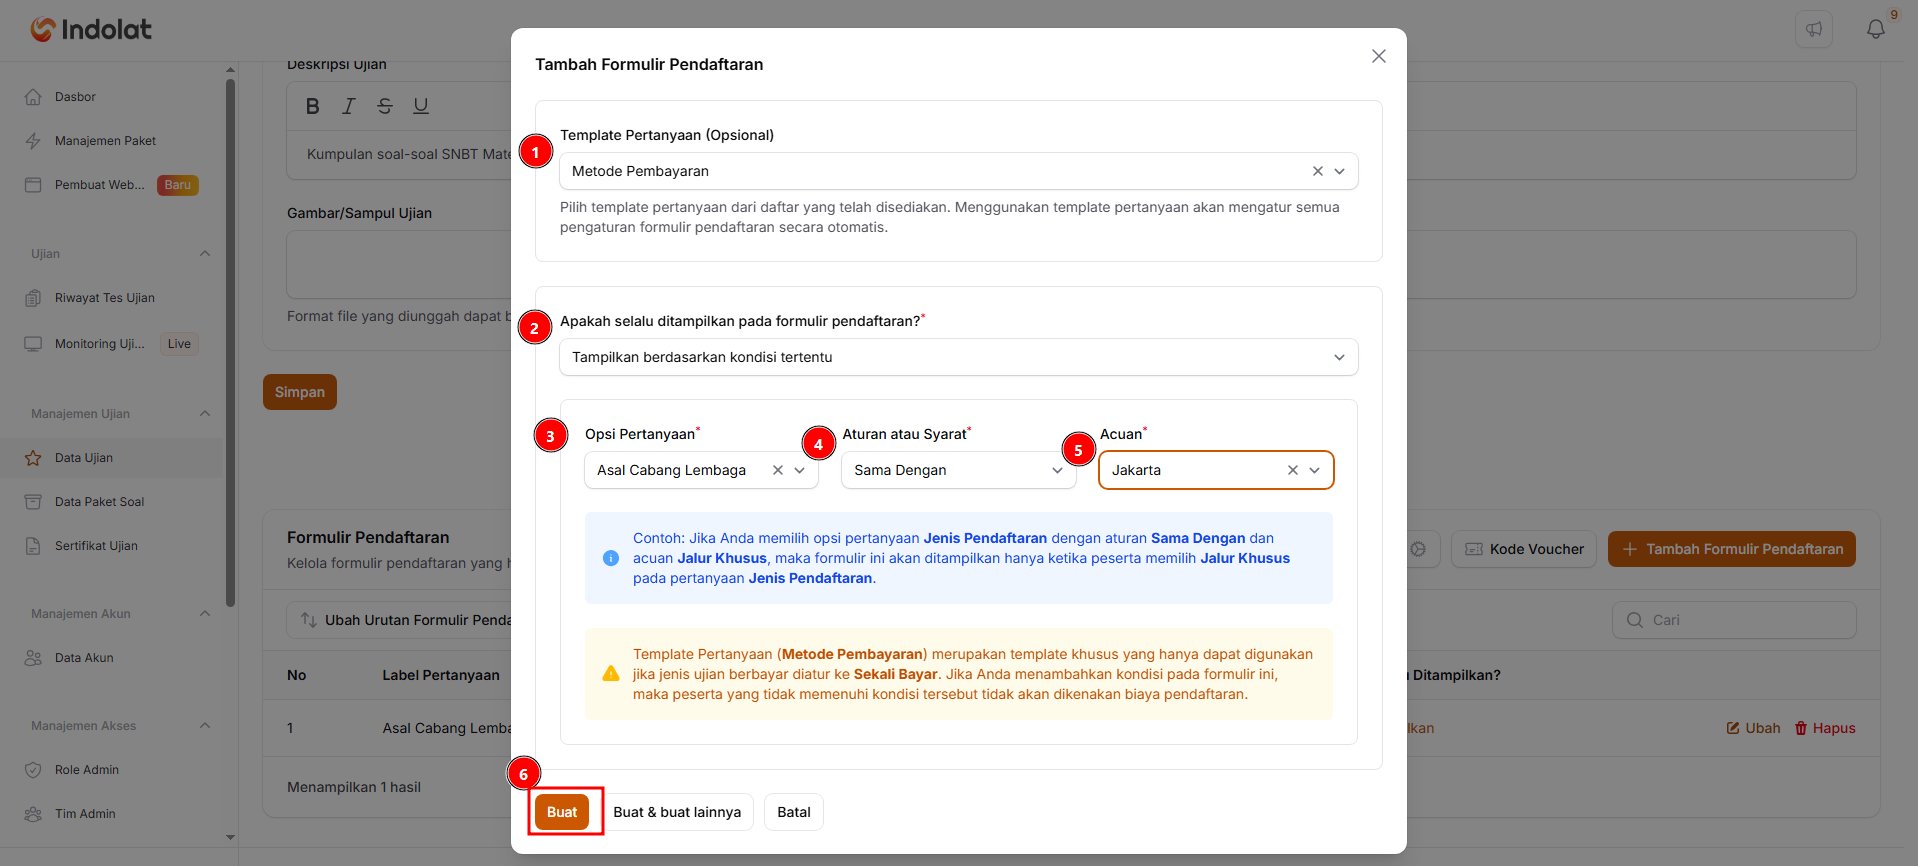
- Question Template (Optional): choose Payment Method.
- Is it always shown on the registration form?
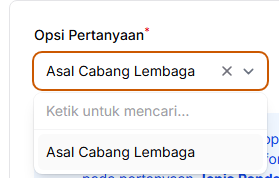
Choose Show it under certain conditions. - Question Option lists the questions you created earlier; the one you choose is what the condition is based on.
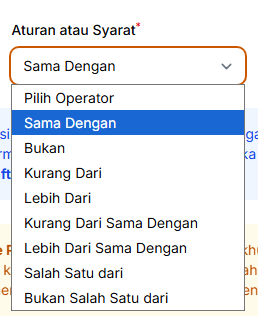
- Rules or Terms sets how the answer is checked.
-
Equals
Use it when the answer must match a particular option. Example:Institution Branch Equals Jakarta
This means the form only appears when the participant chooses Jakarta. -
Not
Use it when the answer must not be a particular option. Example:Institution Branch Not Jakarta
This means the form appears for every branch except Jakarta. -
Less Than, Greater Than, Less Than or Equal To and Greater Than or Equal To
Use them for numeric values. Example:Number of Participants Greater Than 100
-
One Of
Use it when the answer can be any of several options. Example:City One Of Jakarta, Surabaya
-
Not One Of
Use it when the answer must not be any of the given options.
- Reference sets the answer that makes the form appear.
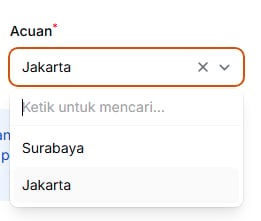
- When you’re done, click Create to save the question.
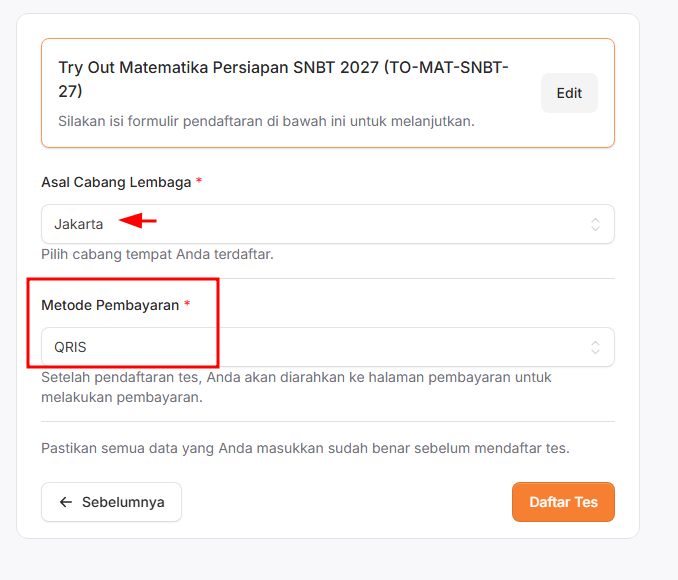
If the participant chooses Institution Branch = Jakarta, the payment method is shown.Here’s what the participant sees:
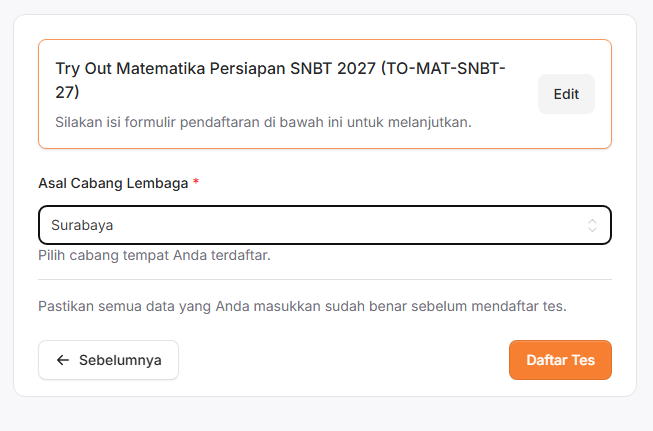
If the participant chooses Institution Branch = Surabaya, the payment method is not shown.Here’s what the participant sees:
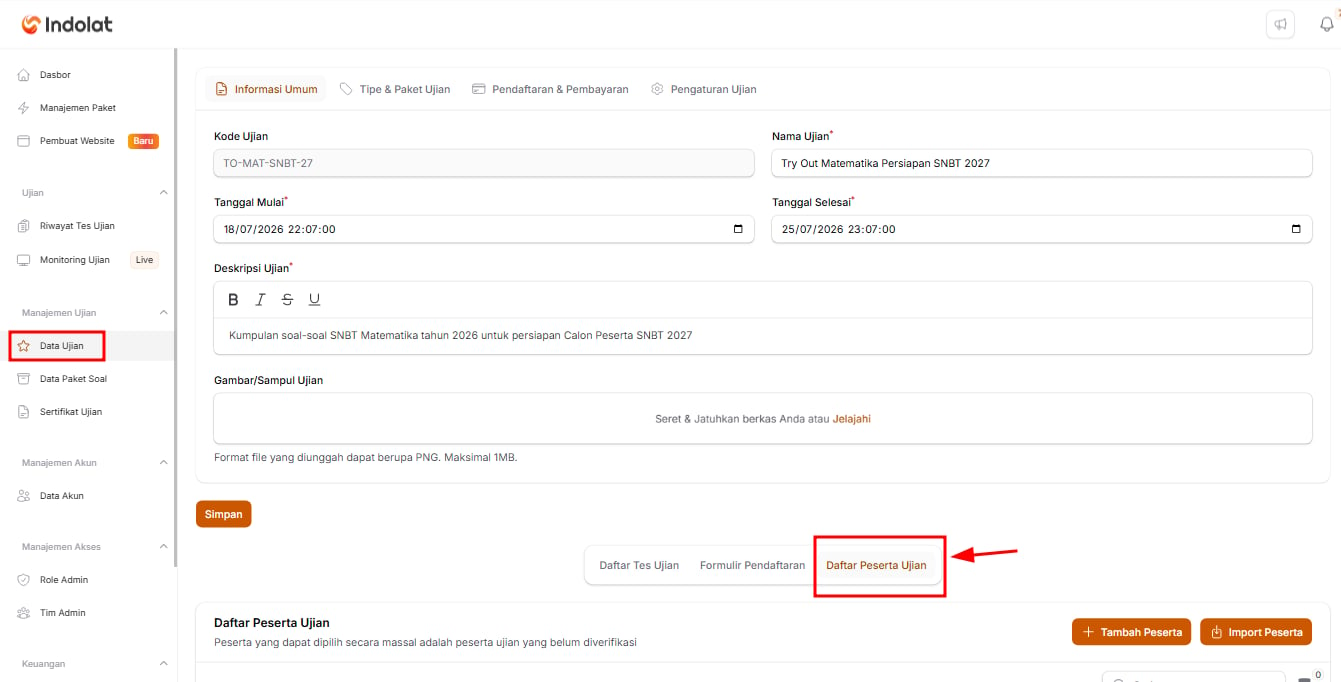
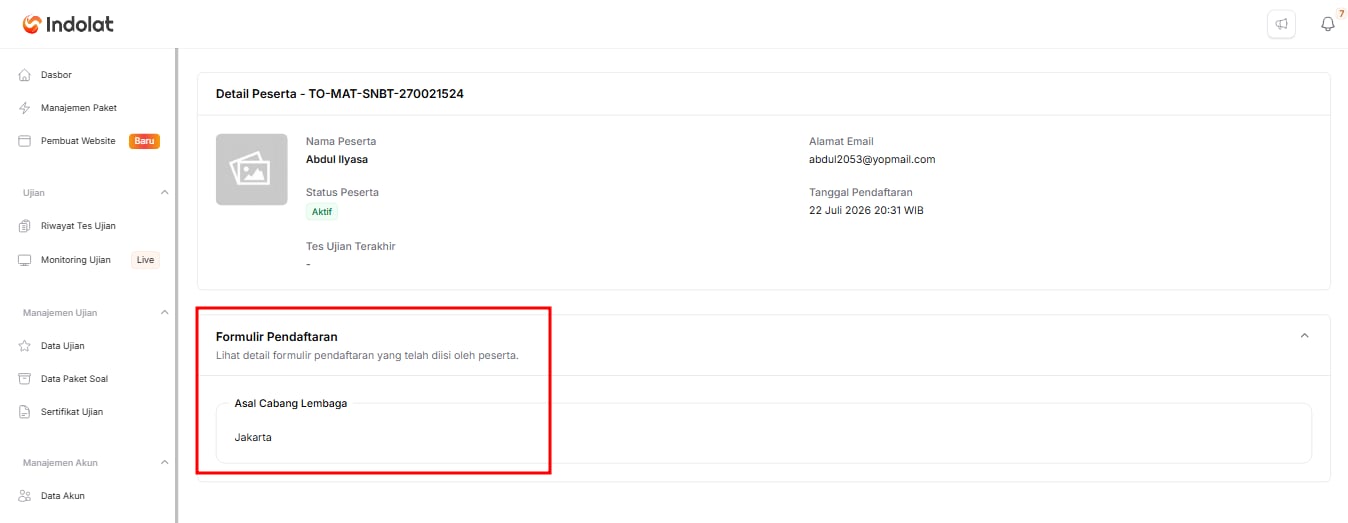
Monitor Participants' Registration Form Answers
Monitor Participants' Registration Form Answers
3. Participants Pay for the Registration Form
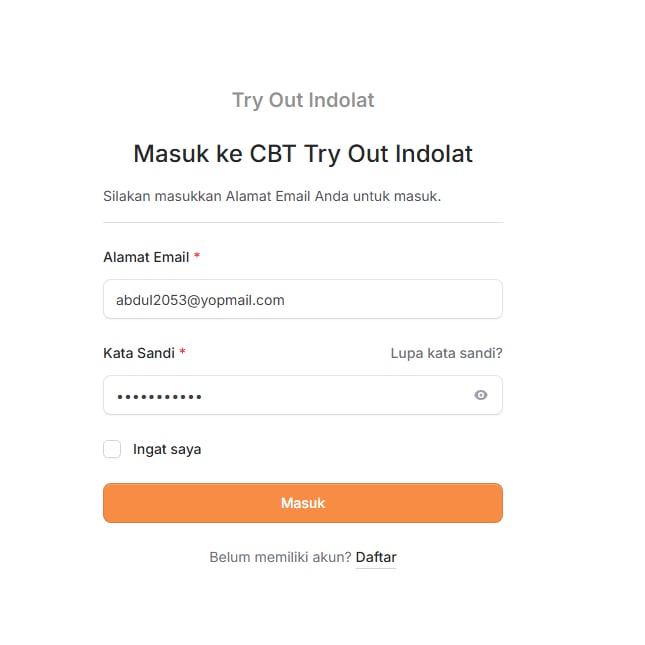
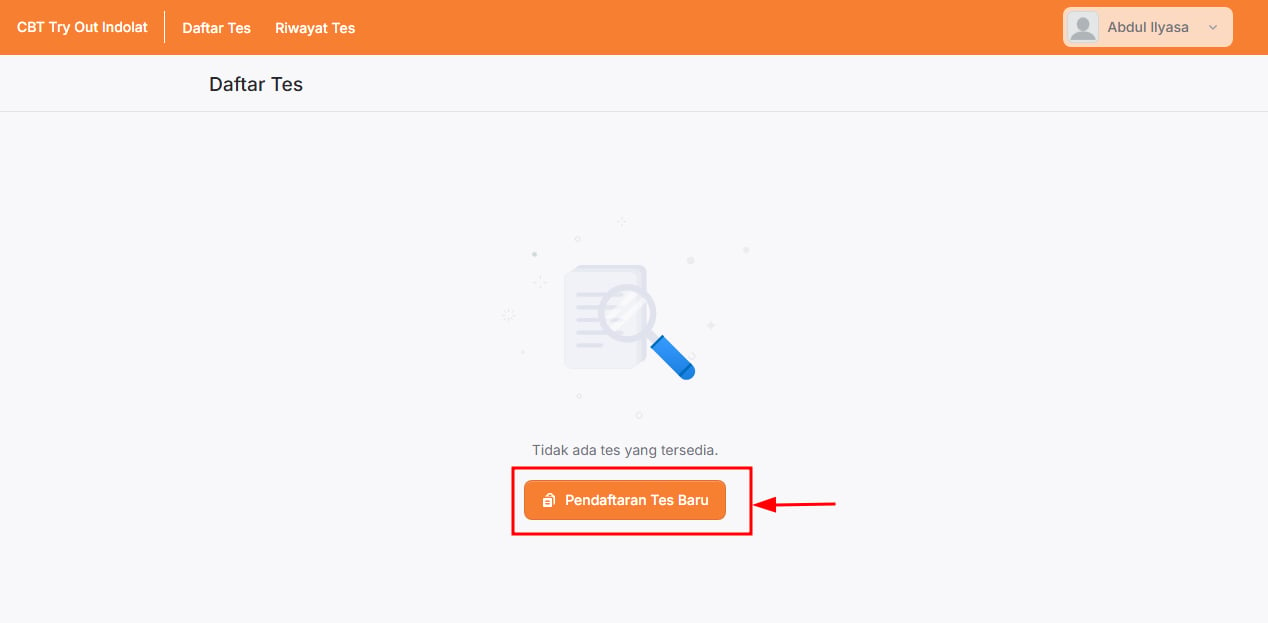
Once the registration form is ready, participants can start registering for the exam. 💡 For example, a participant wants to take the SNBT 2027 Mathematics Prep Tryout. Participants fill in the form first, then complete the payment before they can take the exam.Participant logs in to the CBT
Participant chooses New Exam Registration
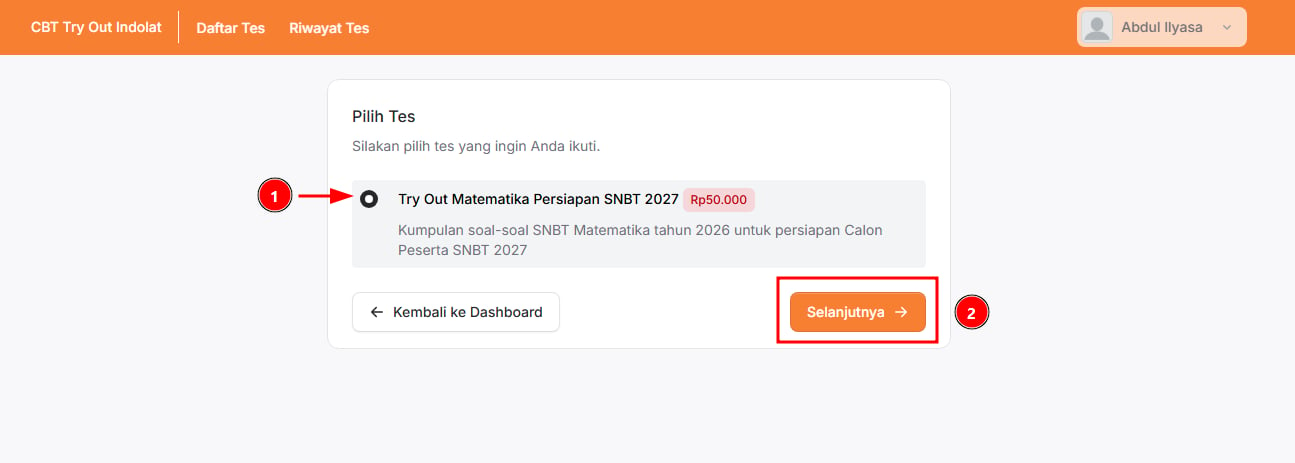
Participant chooses an exam and clicks Next
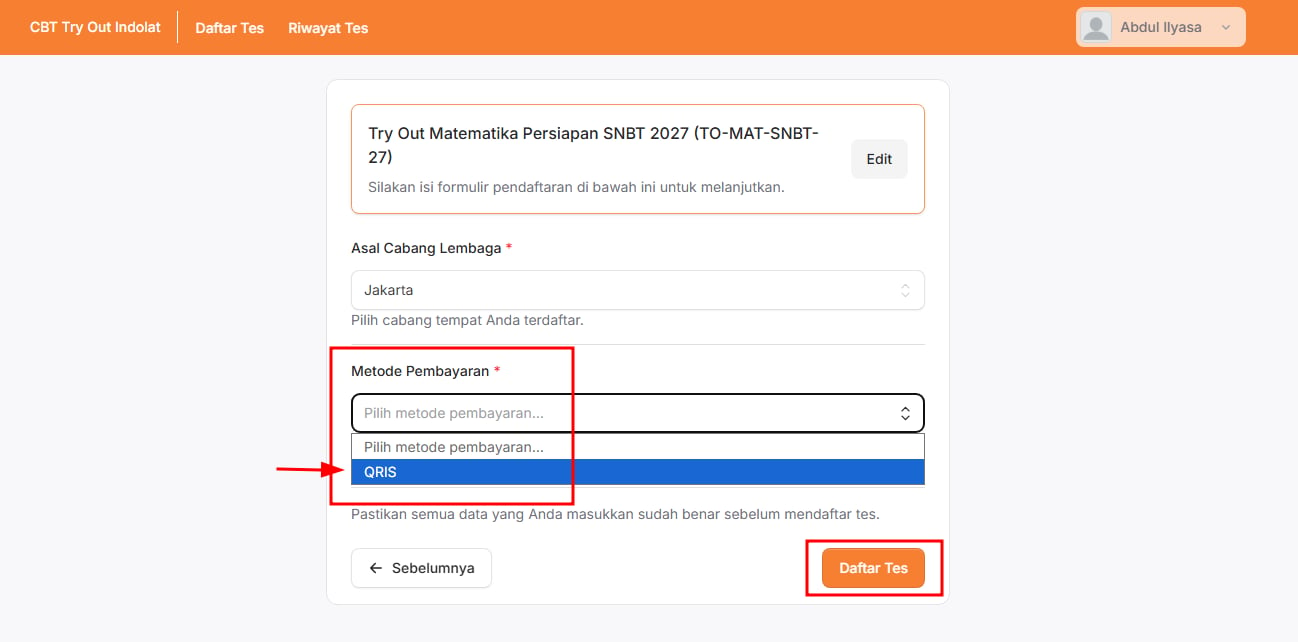
Participant fills in the registration form
-
On the participant’s side, the registration page shows the exam information and the questions the admin created. Example:
SNBT 2027 Mathematics Prep Tryout
The participant then fills in the requested details.
Please fill out the registration form below to continue. - Next, choose QRIS (Indonesia’s standard payment QR code) under Payment Method.
- Then click Register Exam.
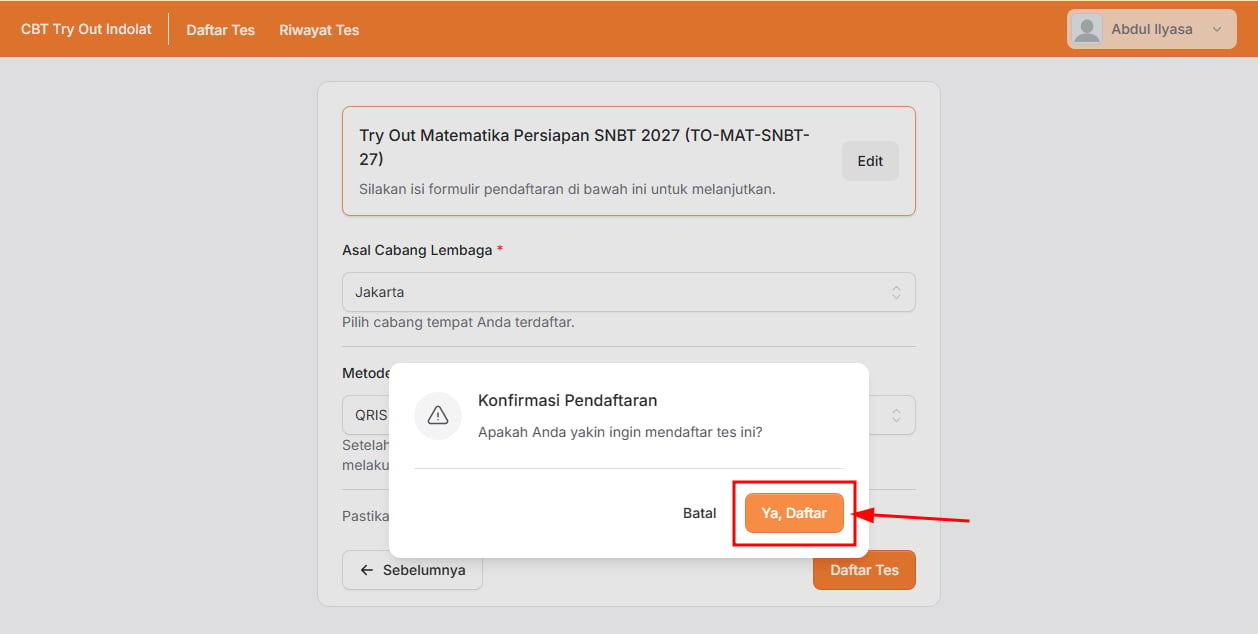
Participant confirms with Yes, Register
The system shows the QRIS code
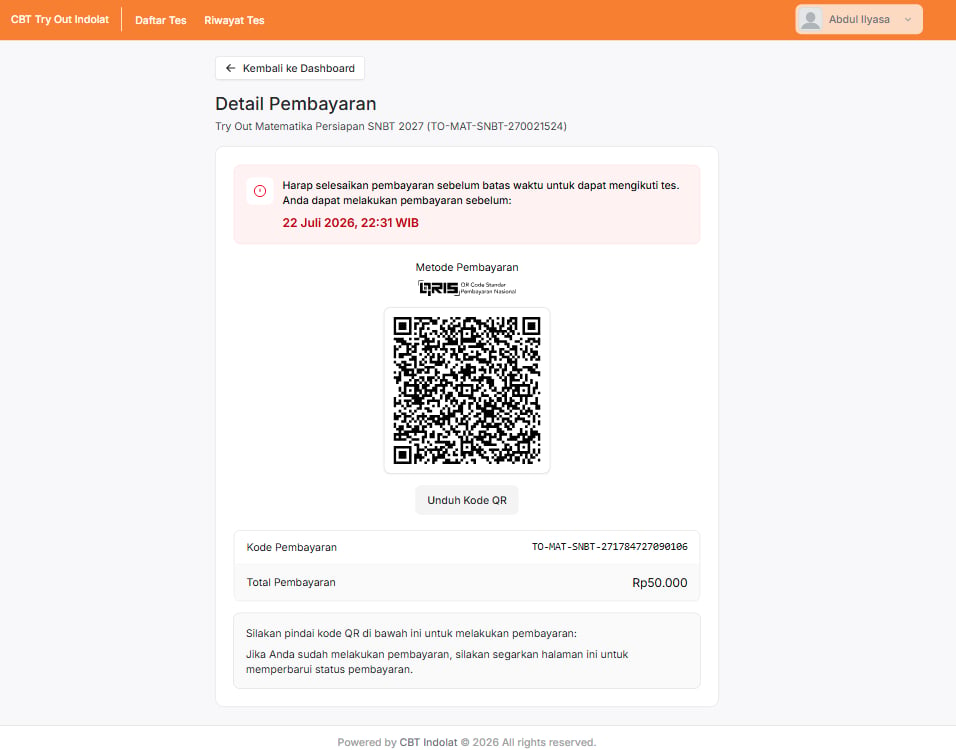
- Payment deadline
- Payment method
- Payment code
- Total payment
Payment Method: QRIS
Total Payment: Rp50,000
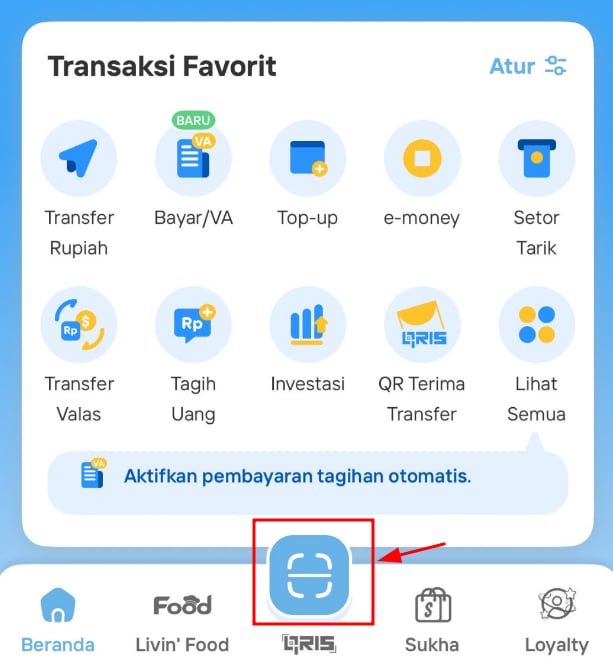
Participant makes the payment
- Open a payment app (mobile banking) that supports QRIS.
- Choose the QR payment menu.
- Scan the downloaded QR code.
- Pay the amount shown.
Payment successful
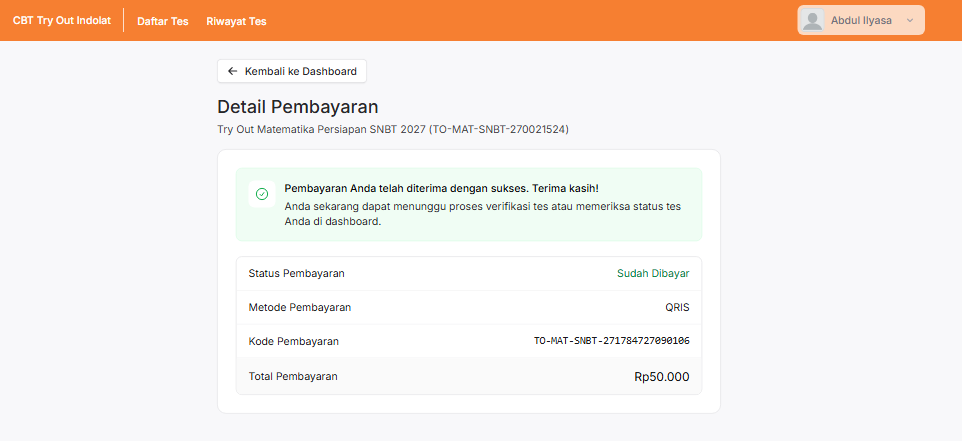
Your payment has been received successfully. Thank you!The participant can wait for verification or check the exam status straight away in the Exam List menu.
4. Add a Voucher Code
Voucher codes give special discounts to selected participants. 💡 Example: you run an SNBT tryout with a fee of Rp50,000. But you want to give a 10% discount to participants who received a promo code from your institution.
You can create a voucher code such as REFF-INDOLAT.
Participants who enter that code when they register get the discount set in the voucher.
Open the exam you created
- Open the Exam Data menu and choose the exam you want to add a voucher code to.
- Then click Details.
Make sure you have added a registration fee
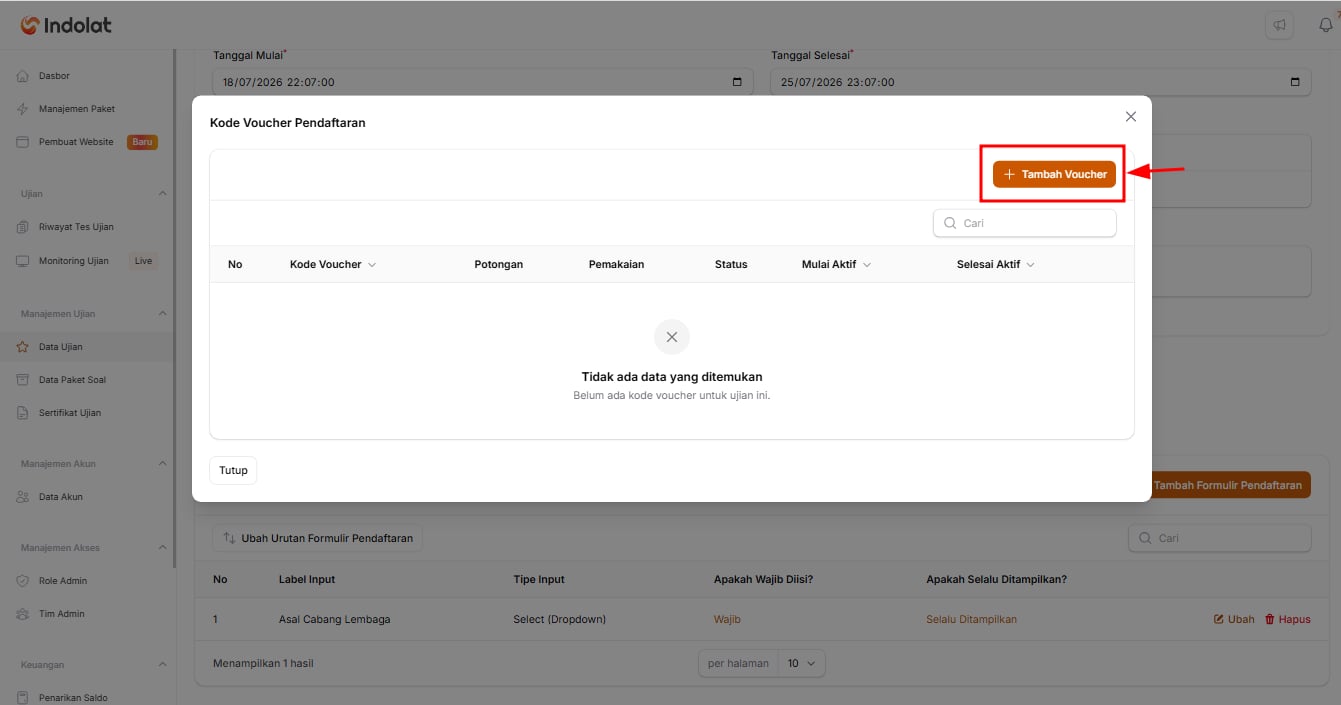
Open Registration Form and click Voucher Code
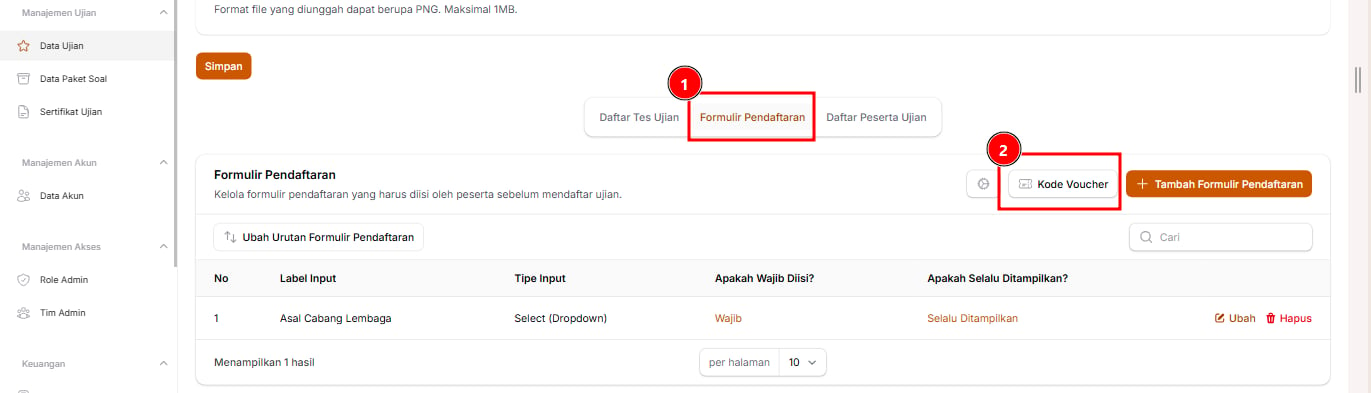
Click Add Voucher
Fill in the voucher details
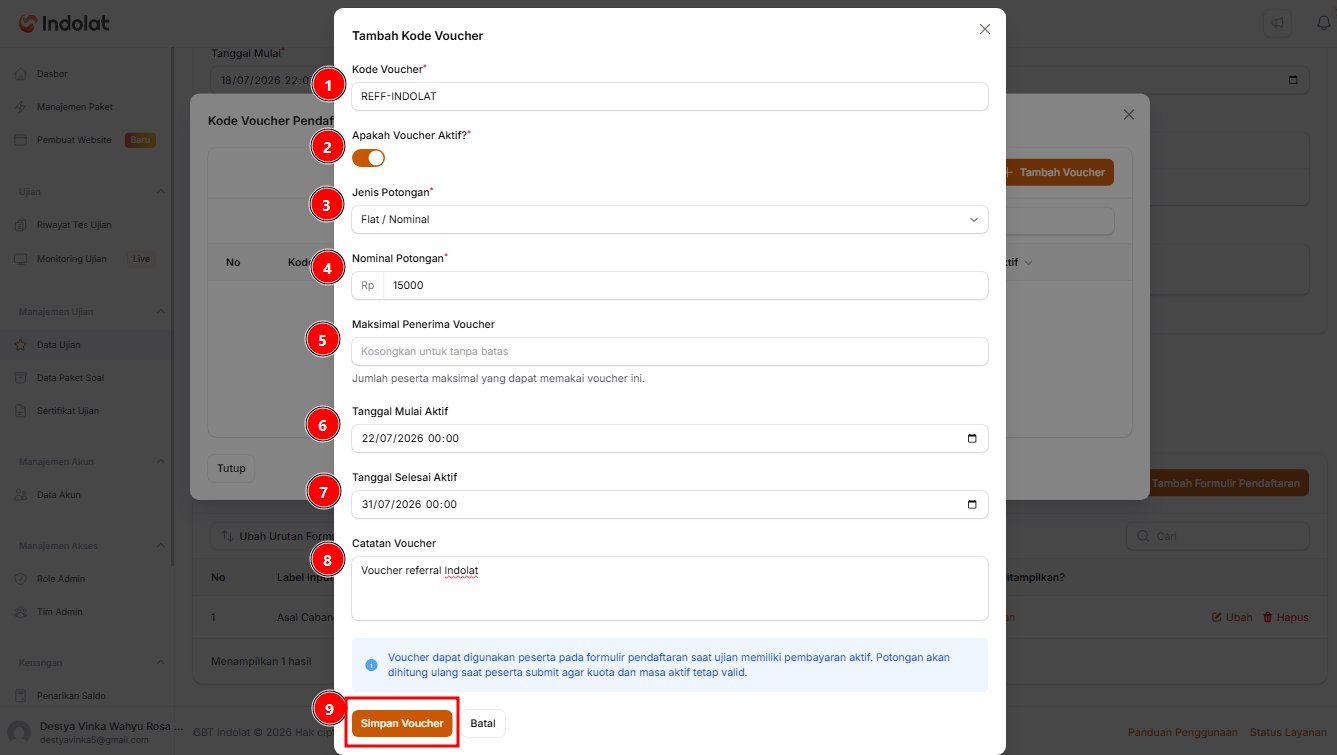
-
Voucher Code: Enter the code participants will use.
Example:
REFF-INDOLATYou give this code to the participants who are entitled to the discount. -
Is the Voucher Active?
- Switch it on if participants can use the voucher straight away.
- If it is switched off, the voucher can’t be used, even if participants know the code.
-
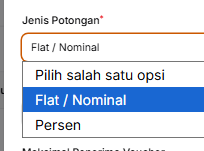
Deduction Type: Choose what kind of discount to give.
There are two Deduction Type options:
-
Flat / Fixed Amount: A fixed amount of money off. Example:
Exam fee Rp50,000
Voucher Rp5,000 The total payment becomes Rp45,000 -
Percent: A percentage off. Example:
Exam fee Rp50,000
10% discount voucher The participant gets Rp5,000 off
-
Flat / Fixed Amount: A fixed amount of money off. Example:
- Deduction Amount or Discount Percentage: Enter how much to take off. The Deduction Amount field (in Rp) appears when you choose Flat / Fixed Amount; the Discount Percentage field (1–100%) appears when you choose Percent.
- Maximum Voucher Recipients: Limits how many participants can use the voucher. Example: the voucher is only for the first 100 participants.
- Active From and Active Until: Set the period when the voucher can be used. Example: the voucher is valid from 22 July 2026 to 31 July 2026. Outside that period, the voucher can’t be used.
- Voucher Notes: Add a note to help admins recognise what the voucher is for. Example: Indolat referral voucher.
- When everything is filled in, click Save Voucher.
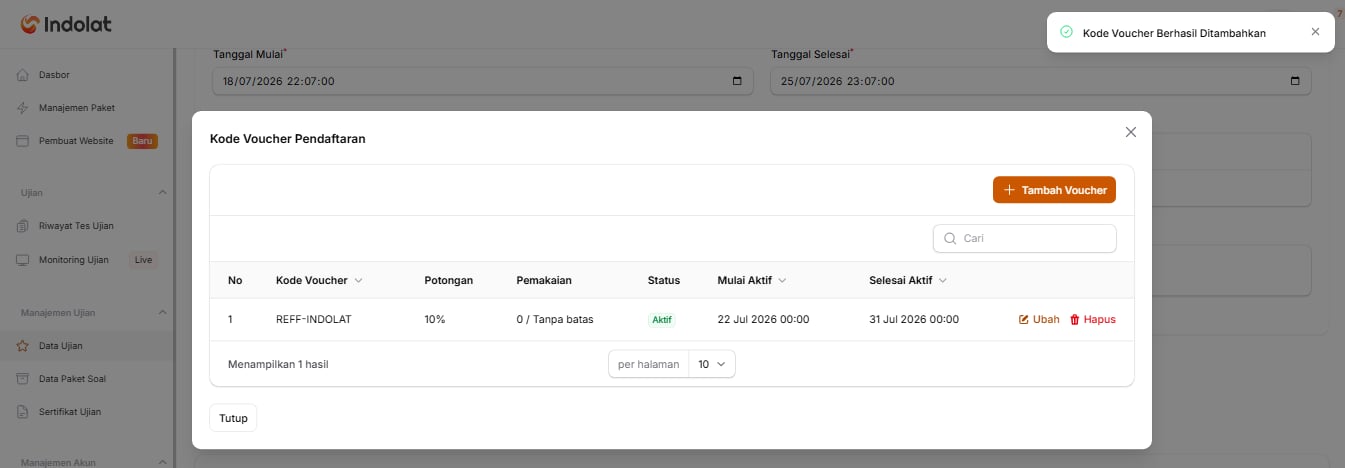
5. Participants Use a Voucher for Payment
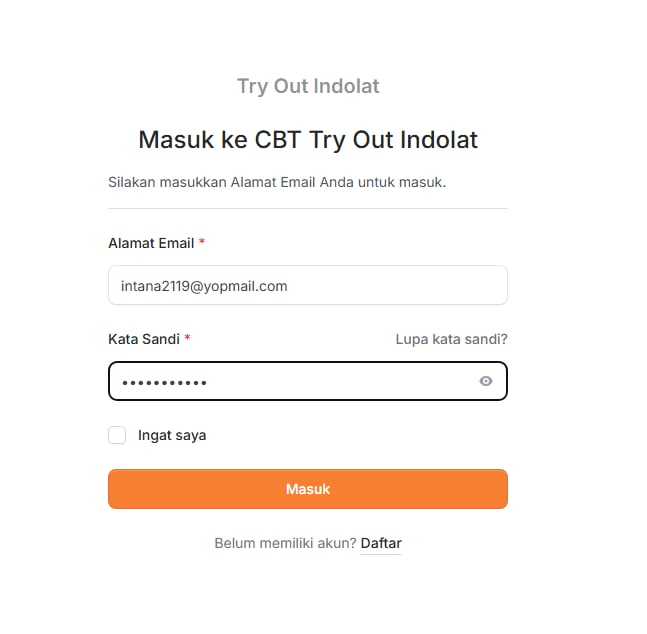
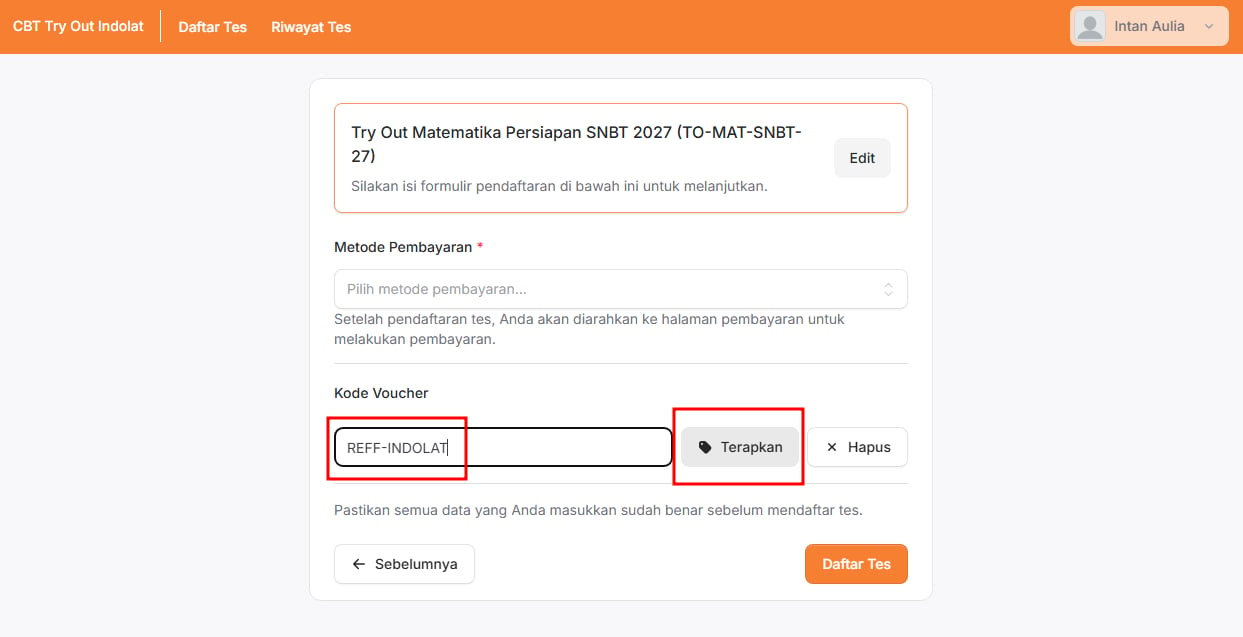
Once the voucher has been created, participants see a Coupon Code field on the registration page, as long as the Payment Method question is shown on the form.Participant logs in to the CBT
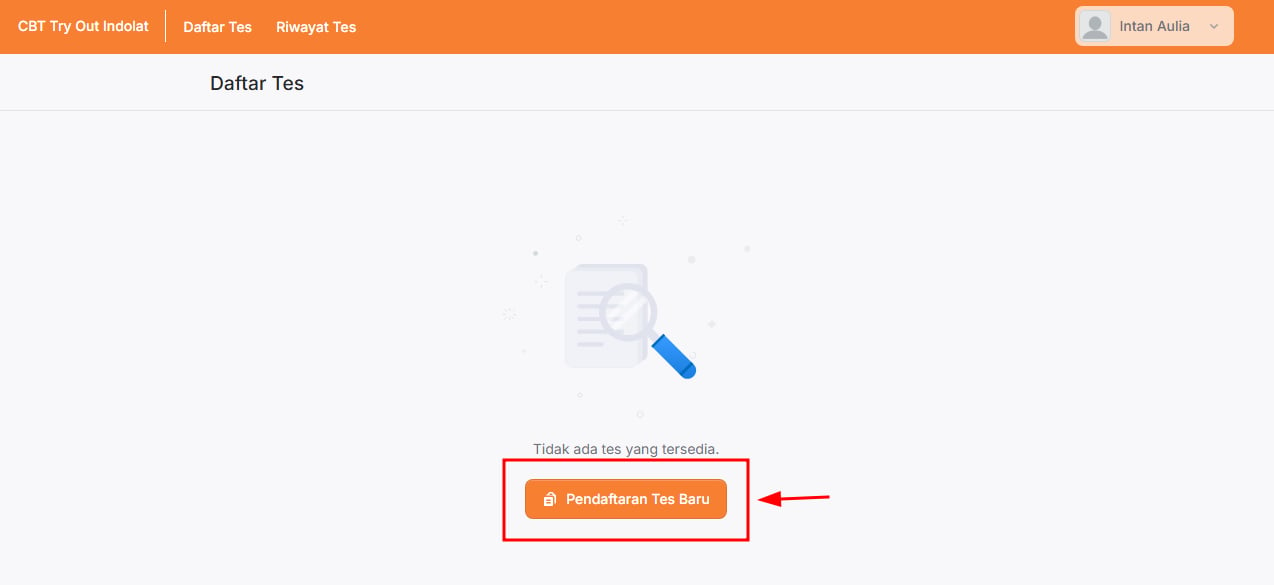
Participant chooses New Exam Registration
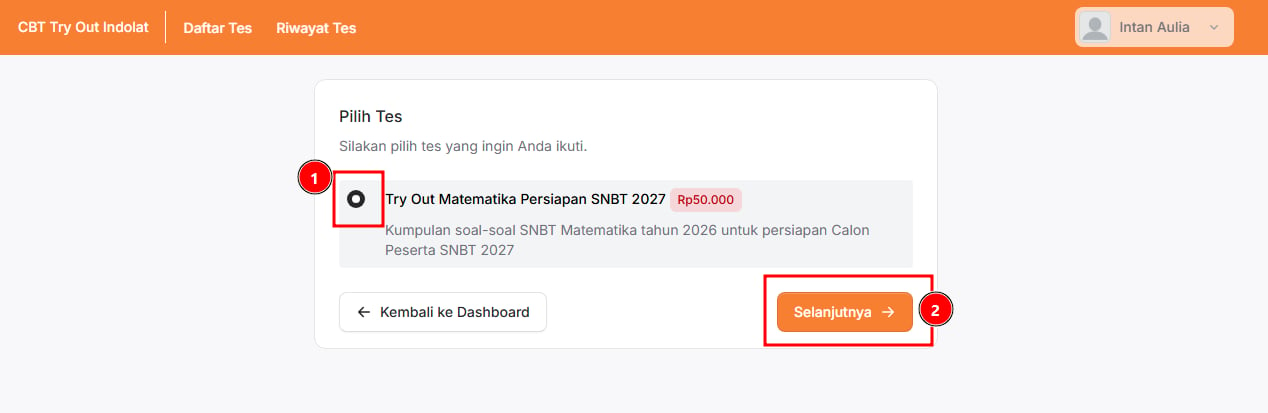
Participant chooses an exam and clicks Next
The system shows the Coupon Code field
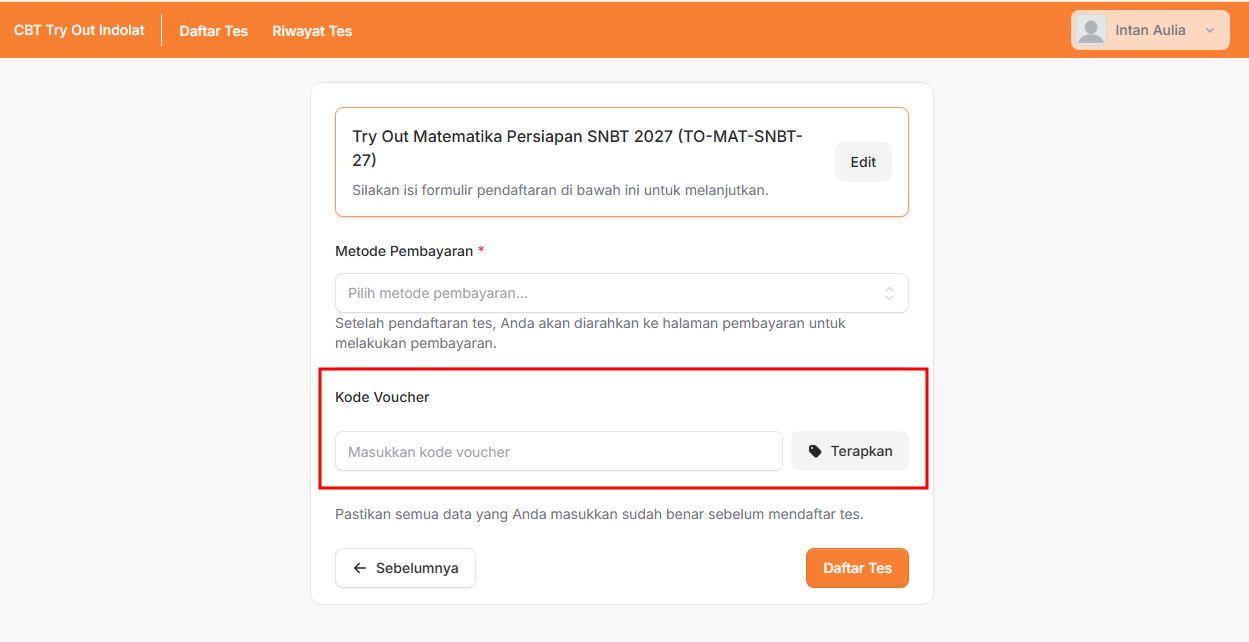
Participant enters the code and clicks Apply
The system recalculates the payment
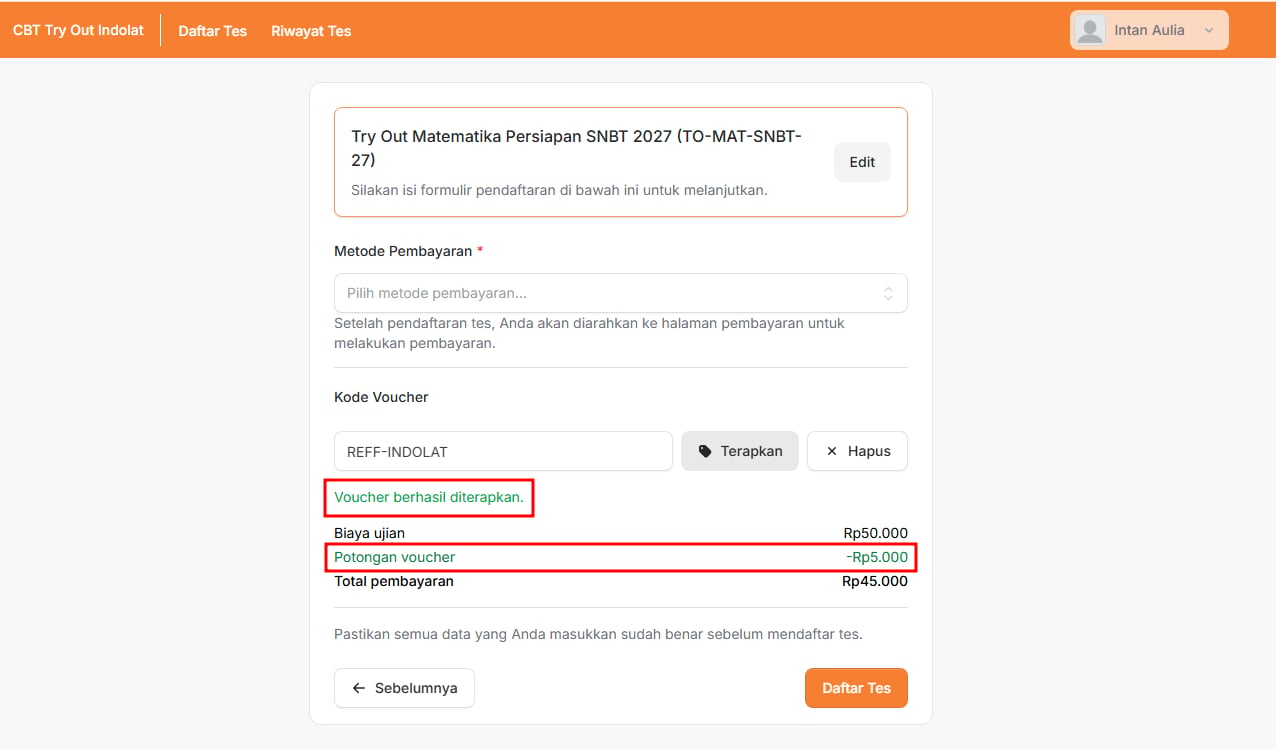
Exam fee: Rp50,000After using the voucher:
Coupon discount: Rp5,000If the code is wrong or no longer valid, the system doesn’t apply a discount.
Payment total: Rp45,000
6. Set Up Participant Registration Verification
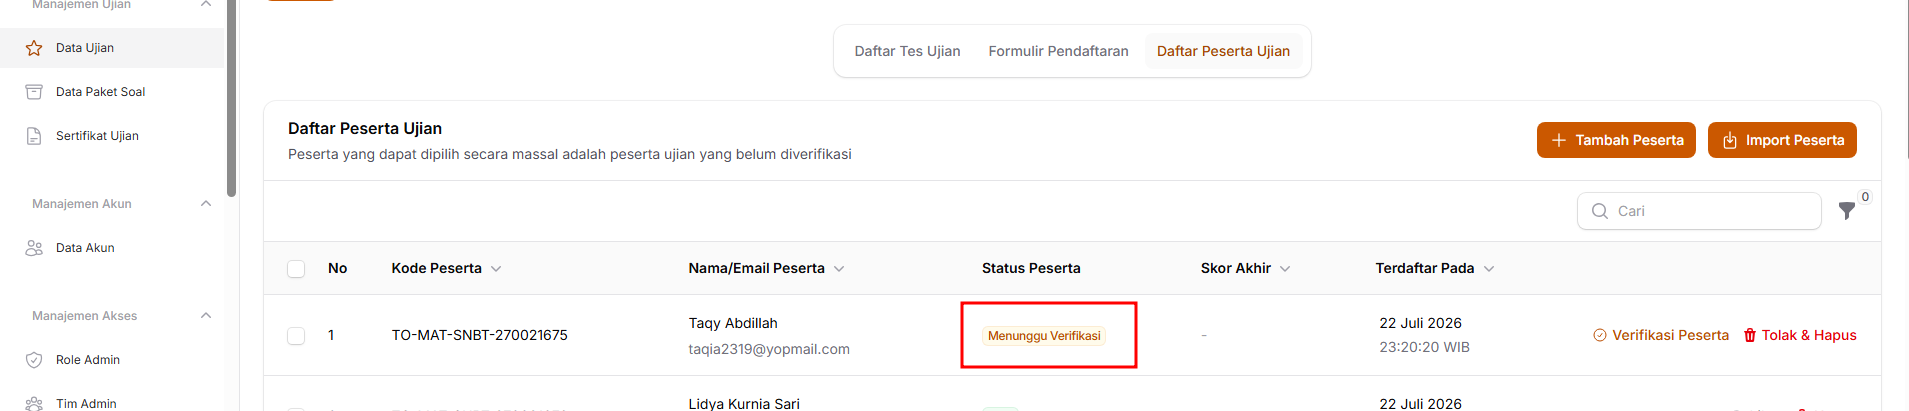
Once the registration form is ready, you can decide whether registrants need to be checked first or are accepted as exam participants straight away. This verification setting is optional. You can switch it on or off to suit how you run the exam. In short:- Turn verification on → if you still want to verify participants before they can take the exam
- Turn verification off → if participants can take the exam as soon as they register (and, for paid exams, once their payment succeeds)
Turn On Participant Verification
Turn On Participant Verification
Open the exam you created
- Open the Exam Data menu.
- Choose the exam that has a registration form.
- Then click Details.
Check the payment type and fee for a paid exam
Click the ⚙️ icon in the Registration Form section
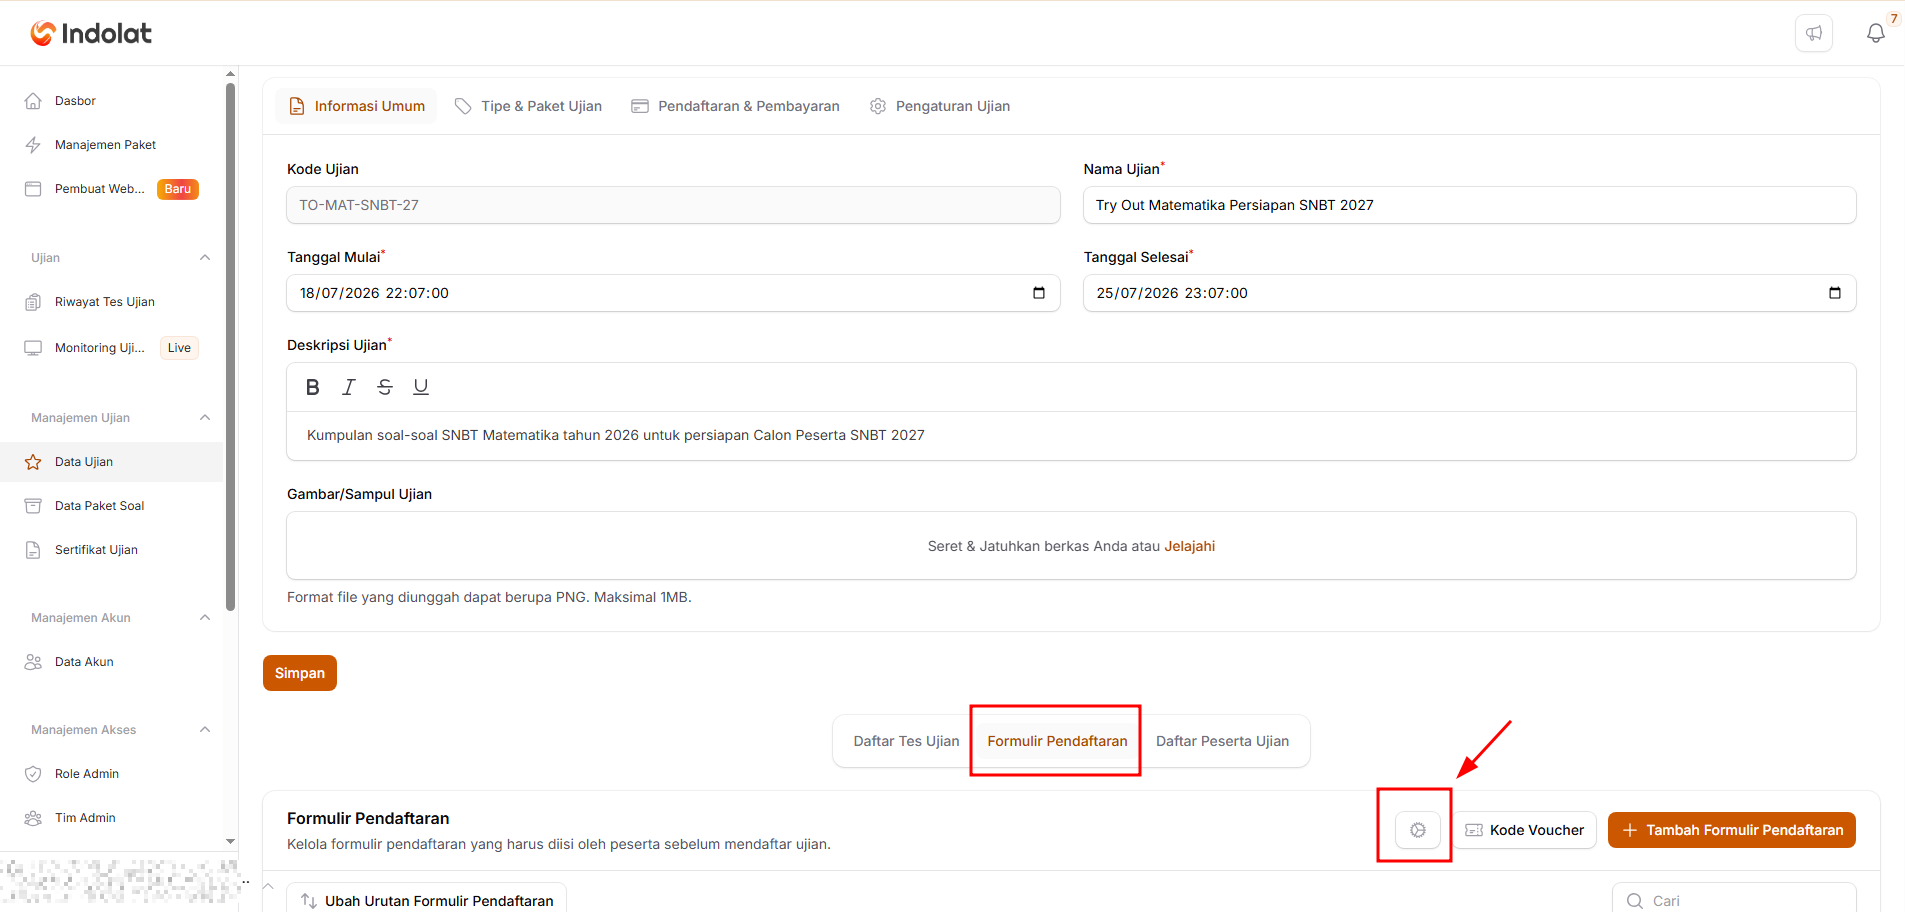
Turn verification on and click Update Settings
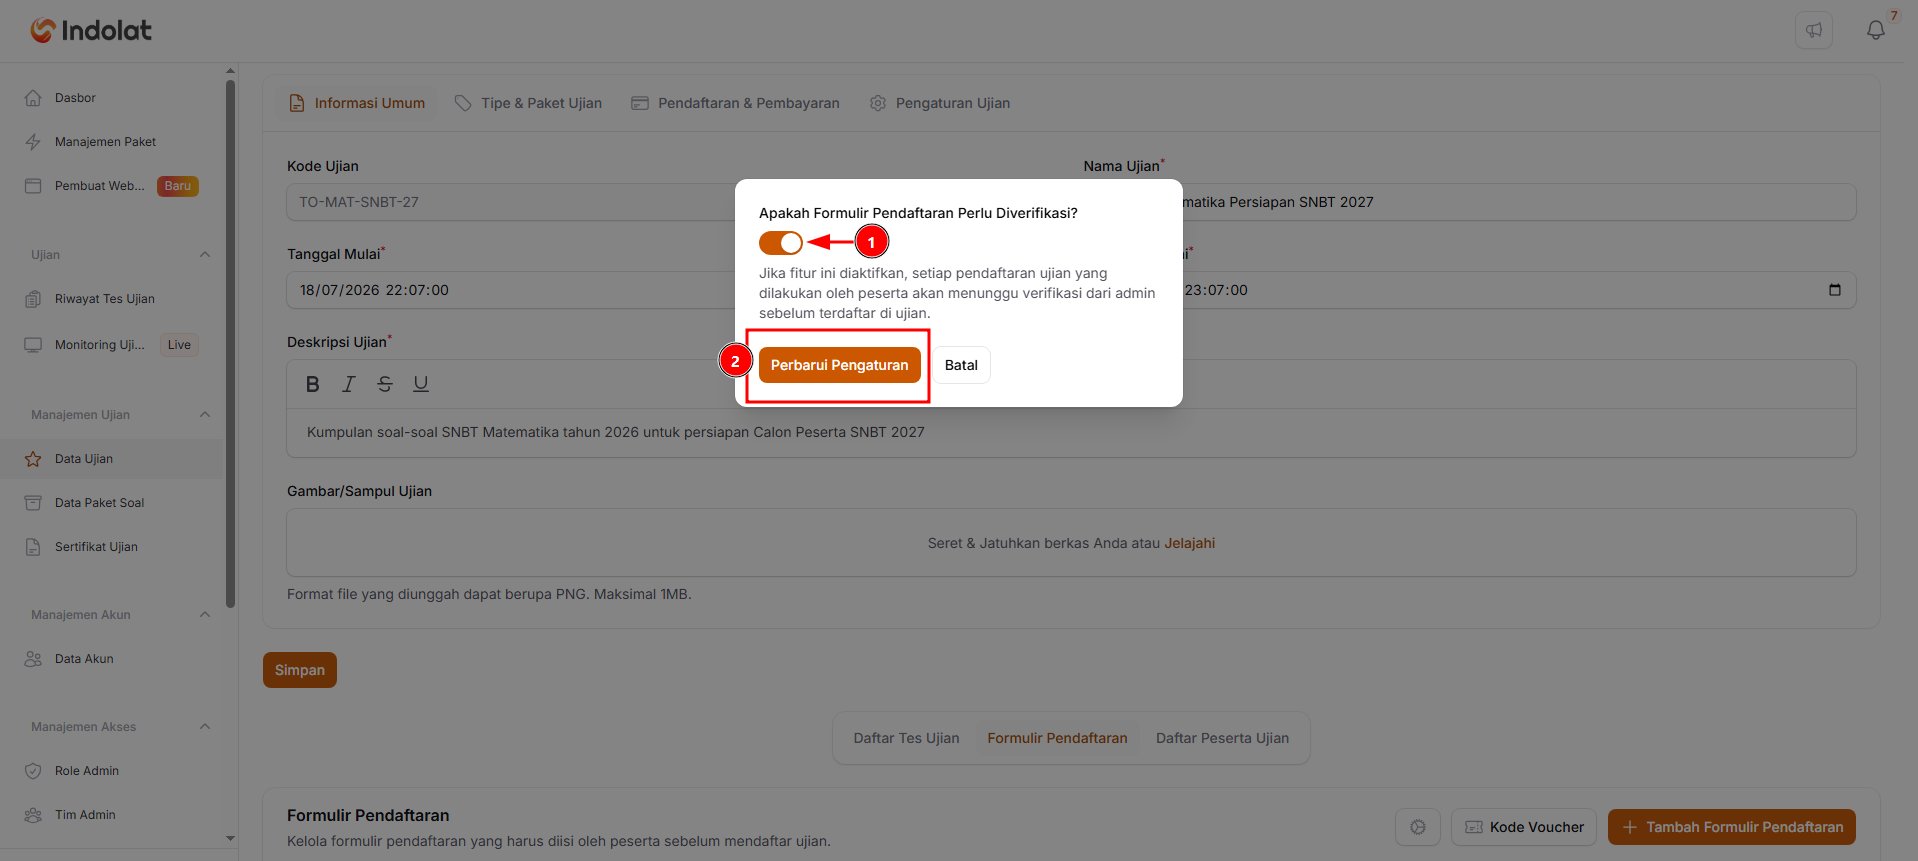
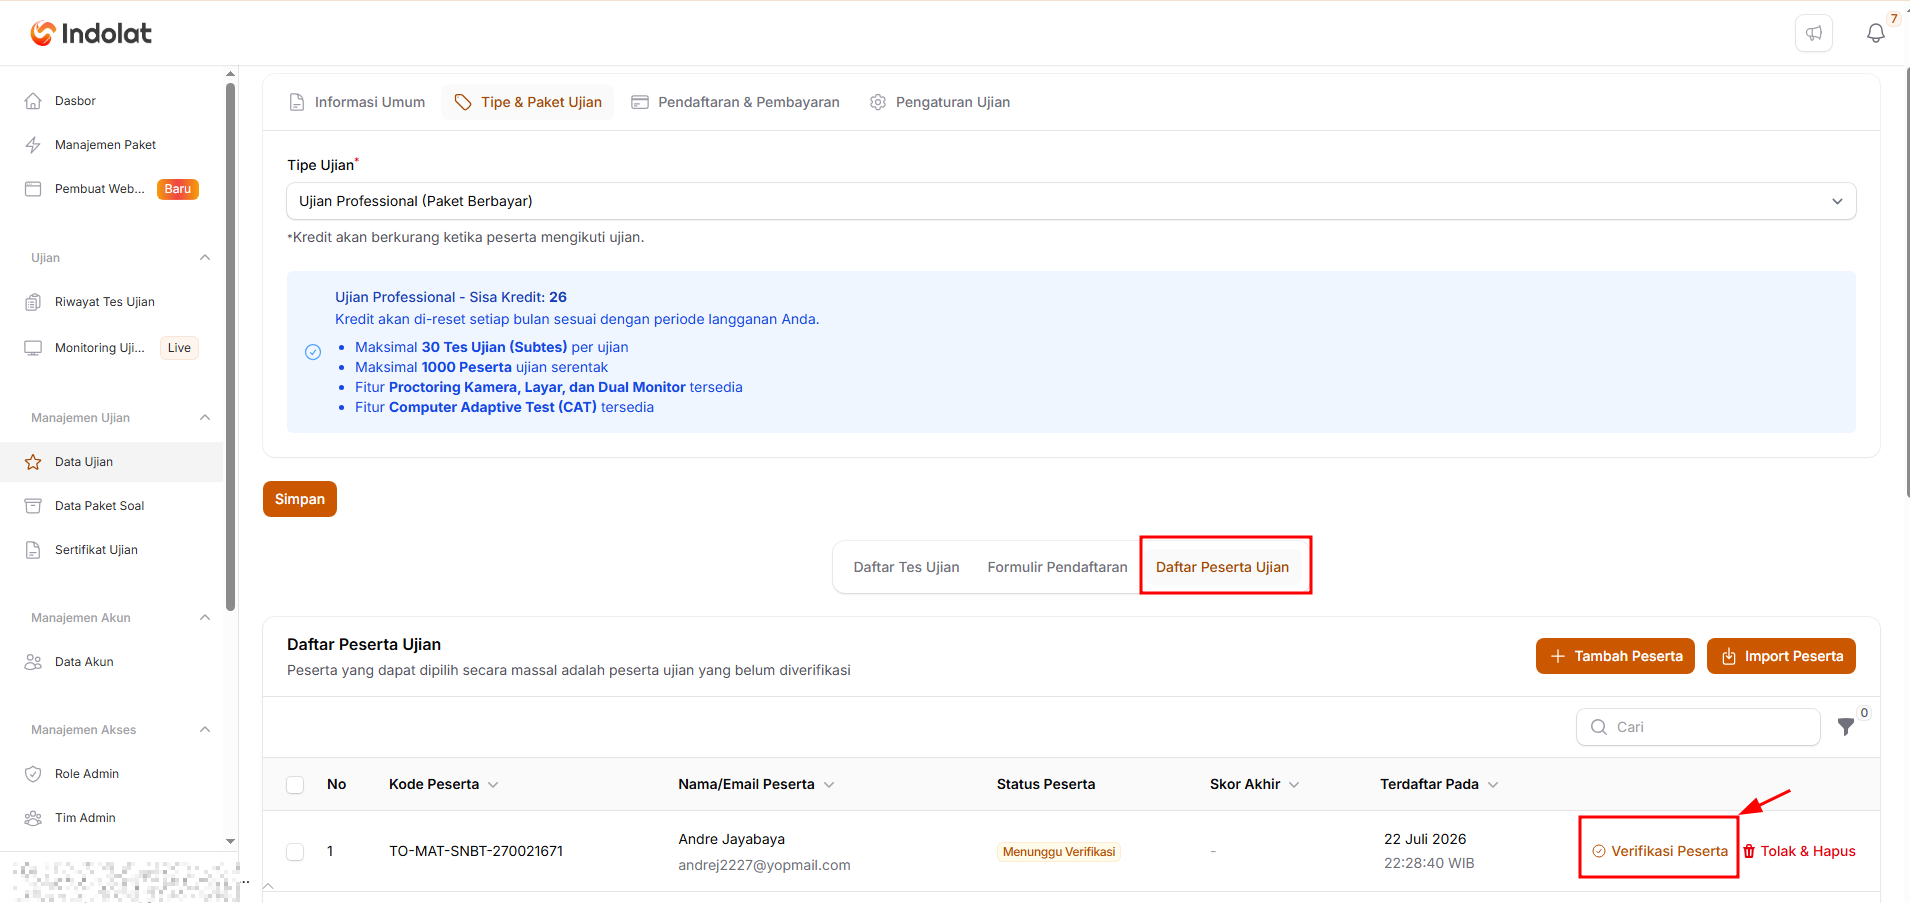
Verify participants
Turn Off Participant Verification
Turn Off Participant Verification
Open the exam you created
- Open the Exam Data menu.
- Choose the exam that has a registration form.
- Then click Details.
Click the ⚙️ icon in the Registration Form section
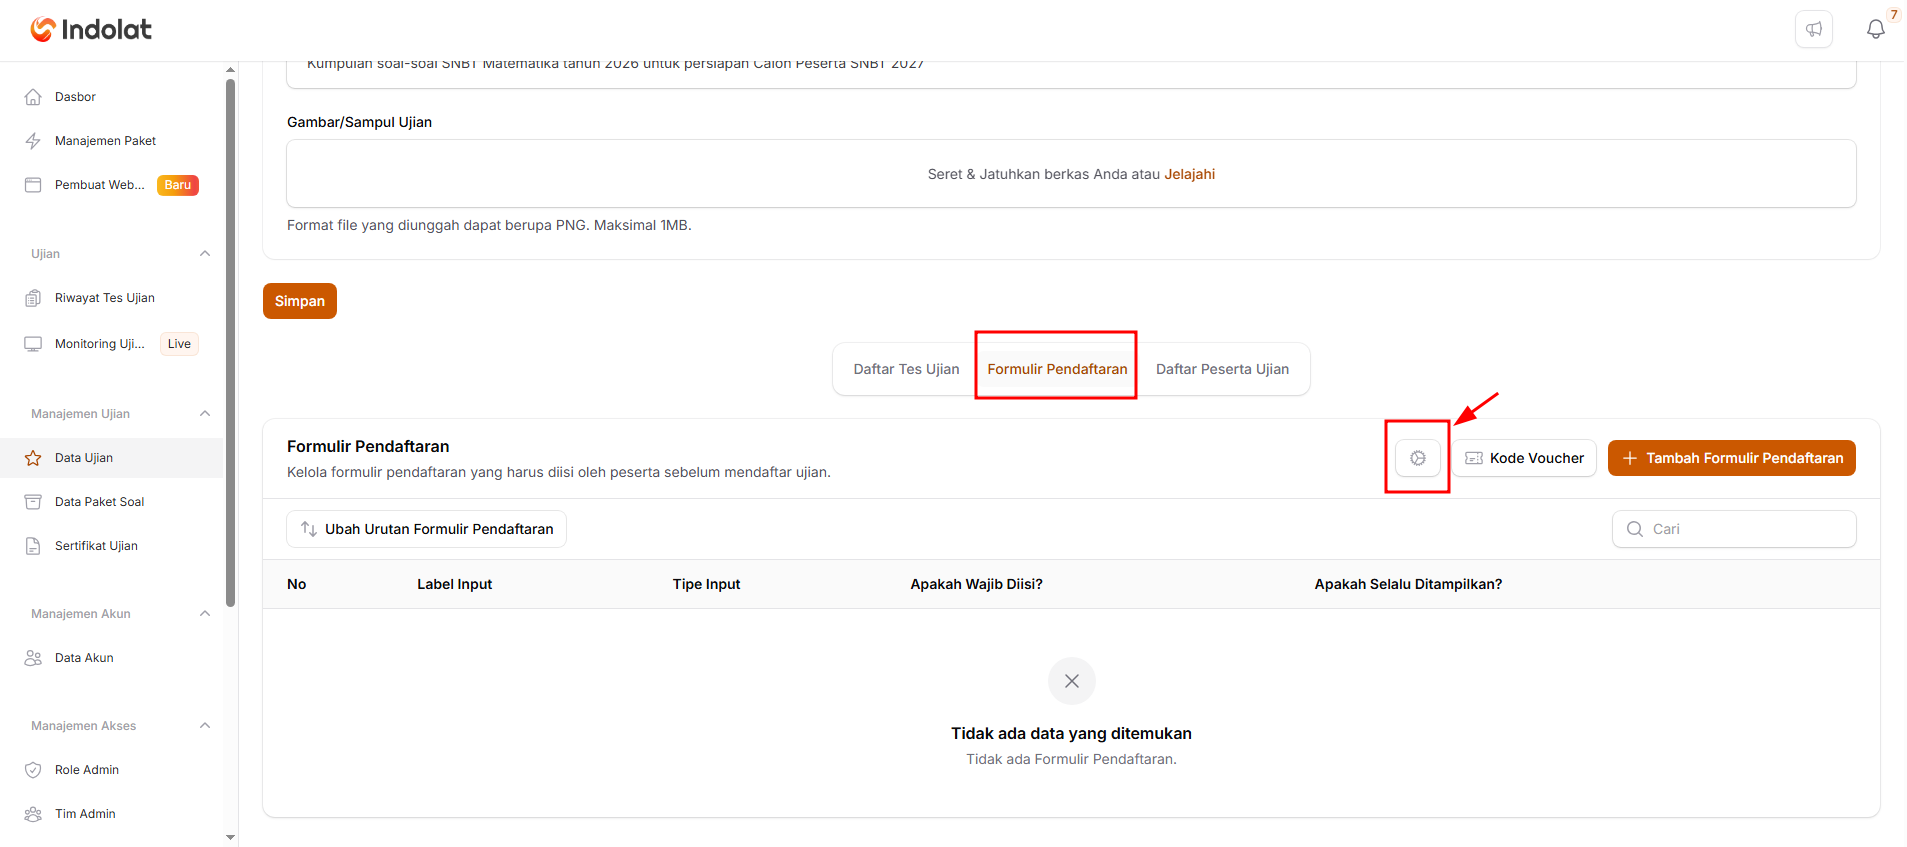
Turn verification off and click Update Settings
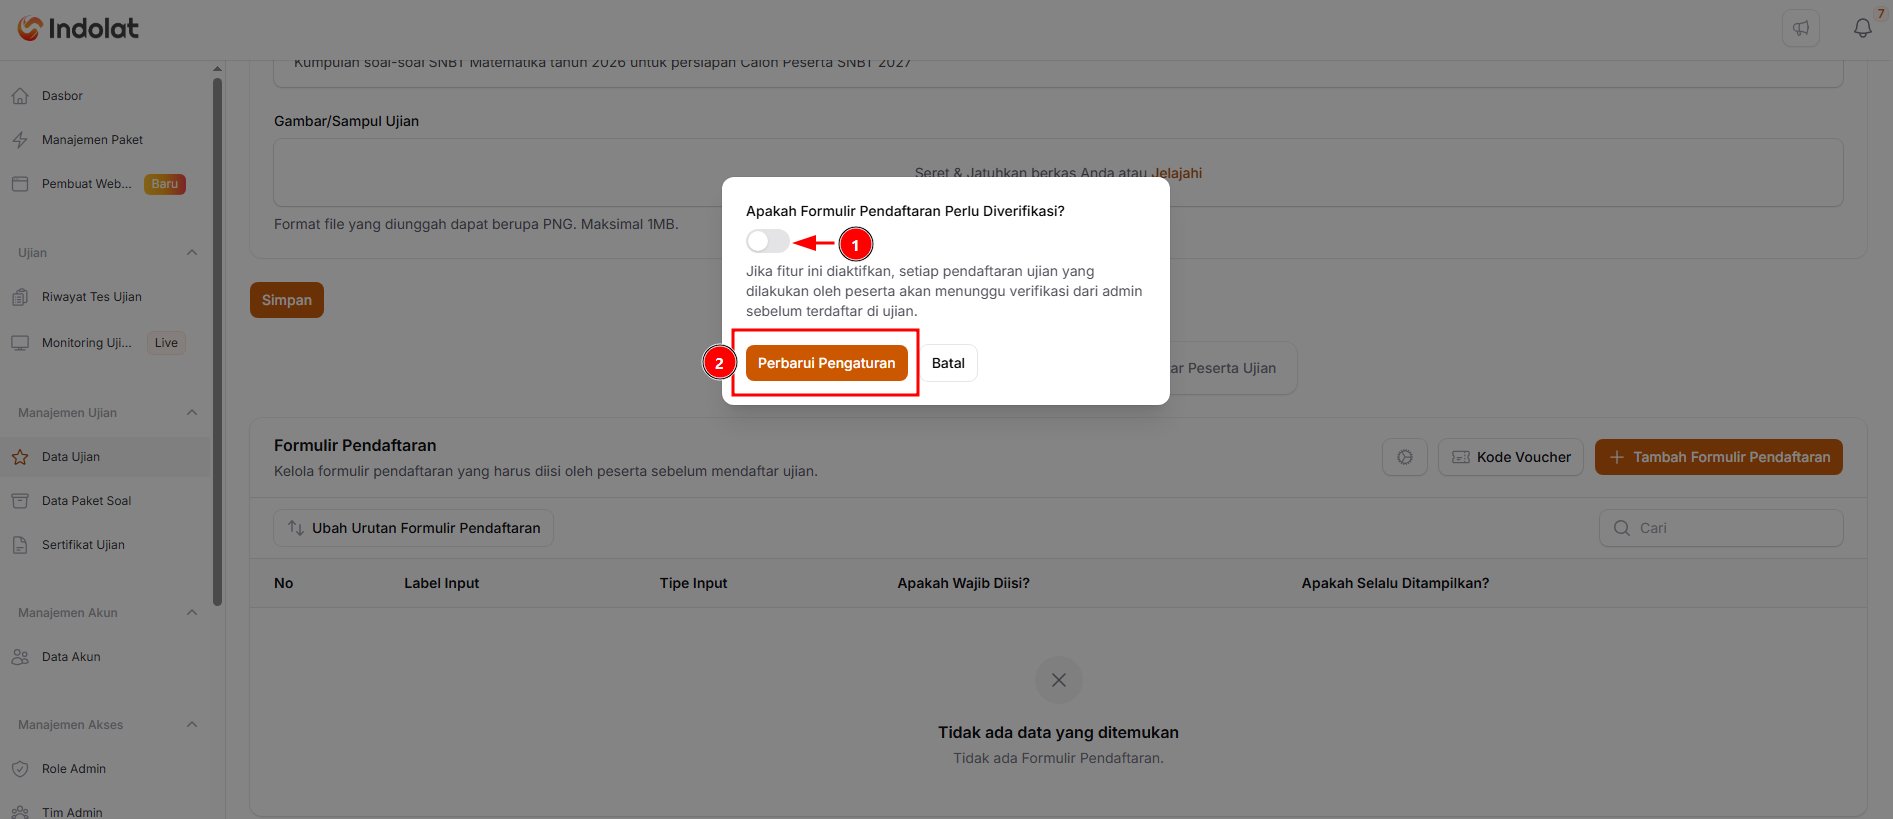
No need to verify participants
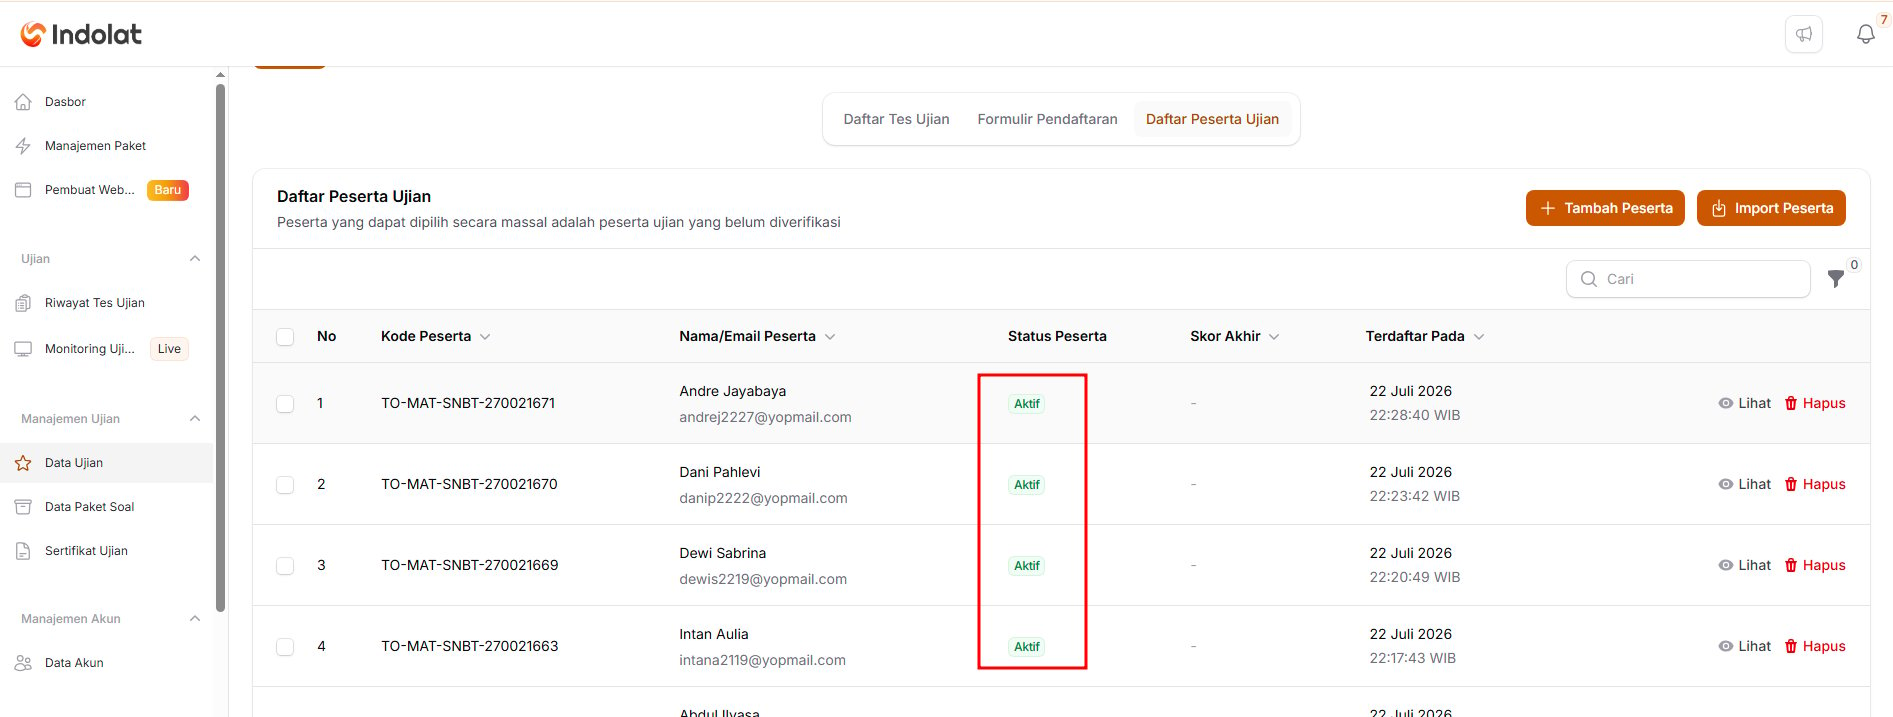
How to Verify a Participant
How to Verify a Participant
Open the exam you created
- Open the Exam Data menu.
- Choose the exam that has a registration form.
- Then click Details.
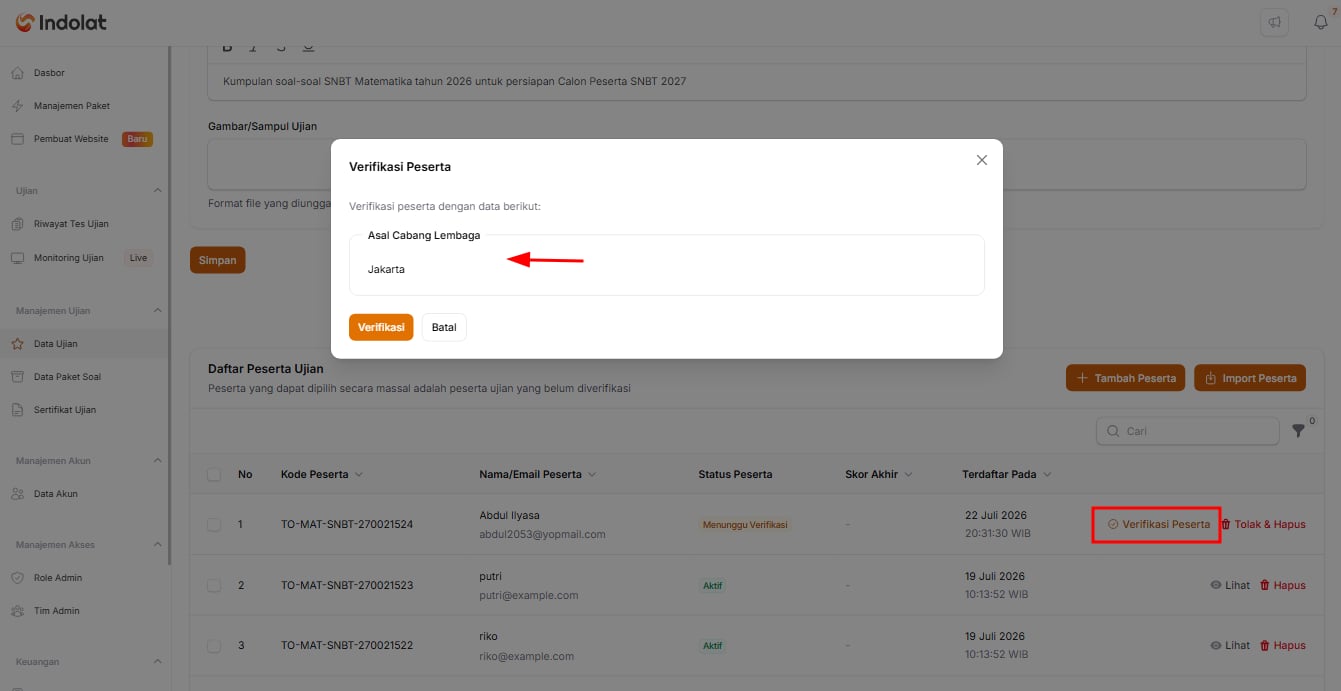
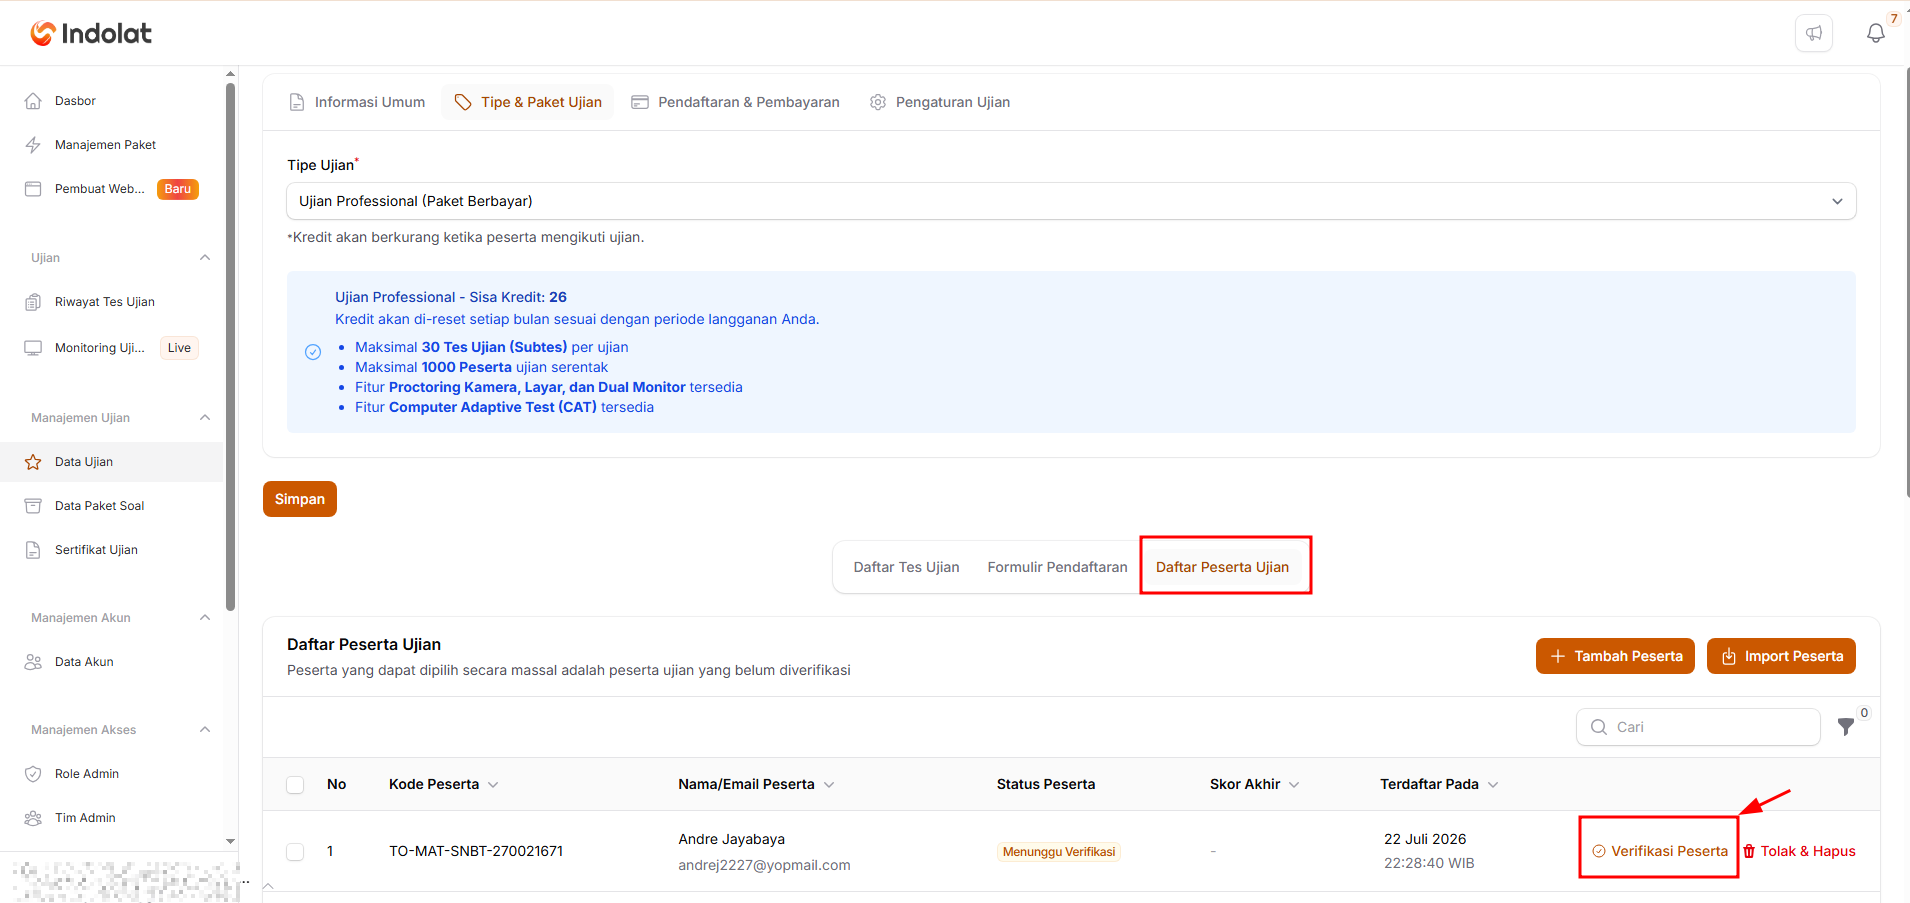
Open Exam Participant List and click Verify Participant
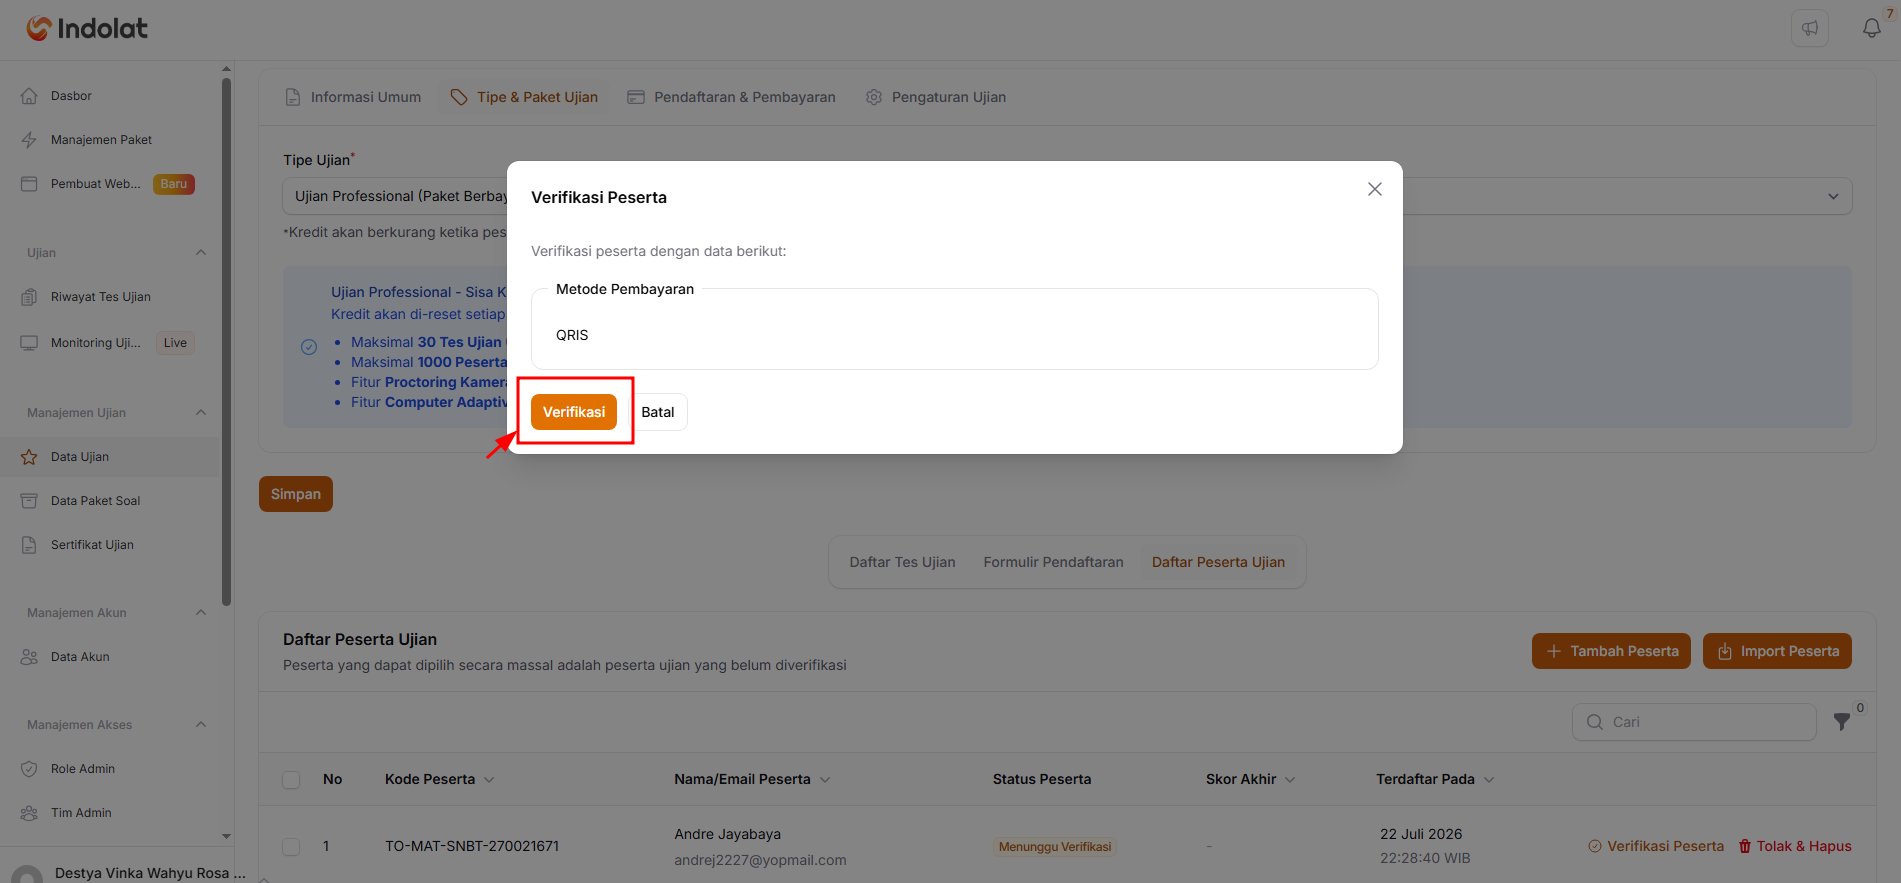
Click Verify
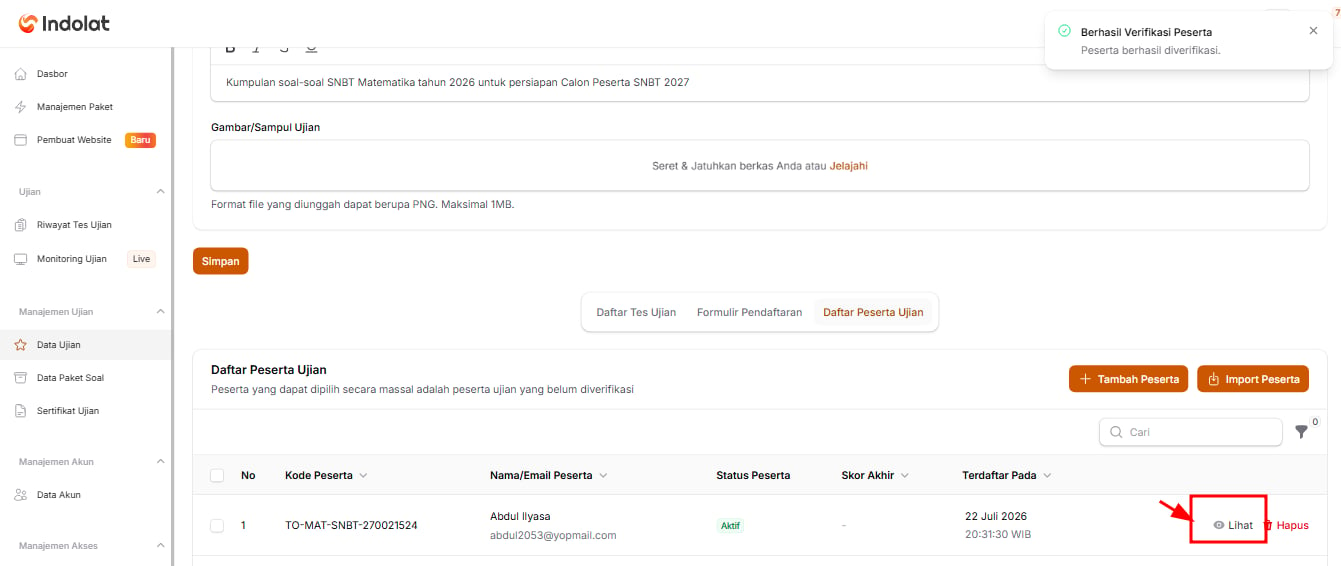
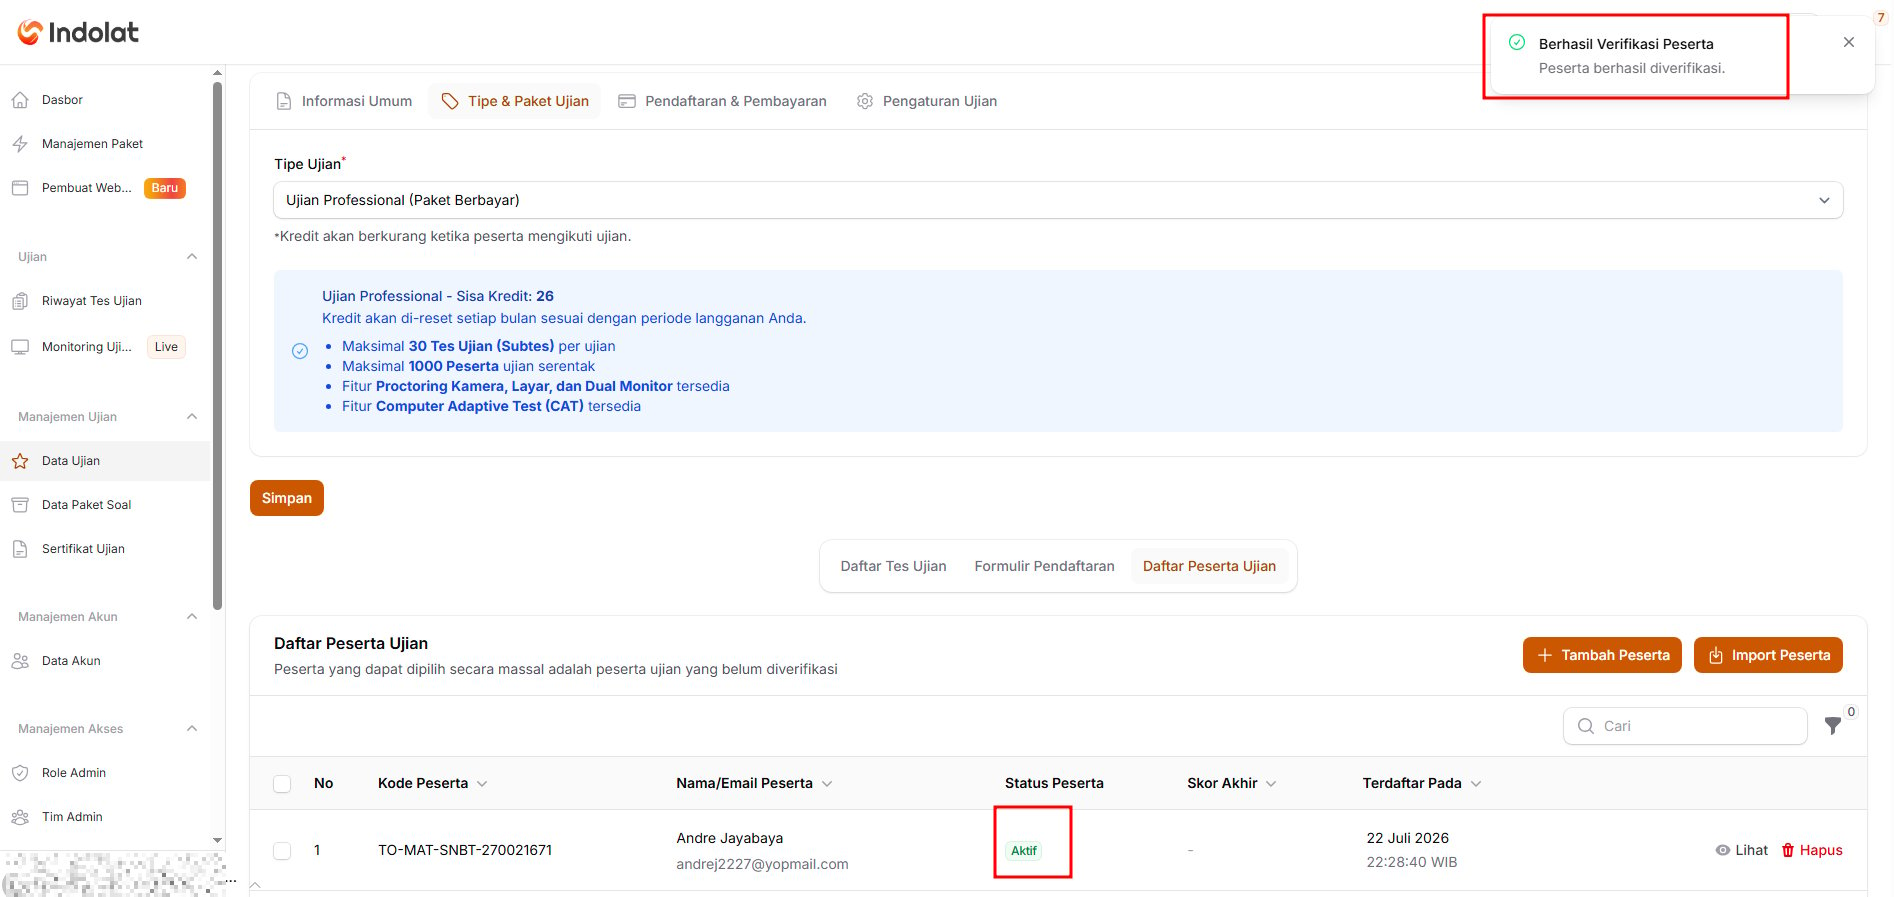
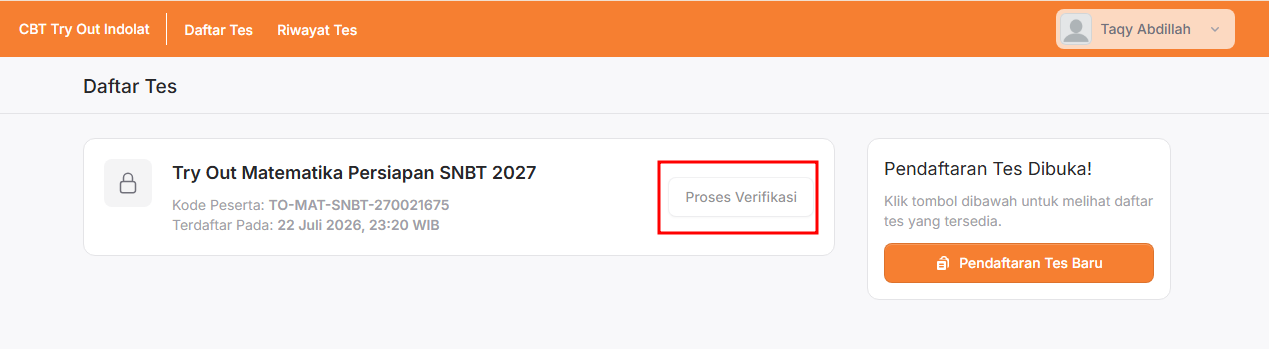
The participant is now active
7. Set the Participant Quota
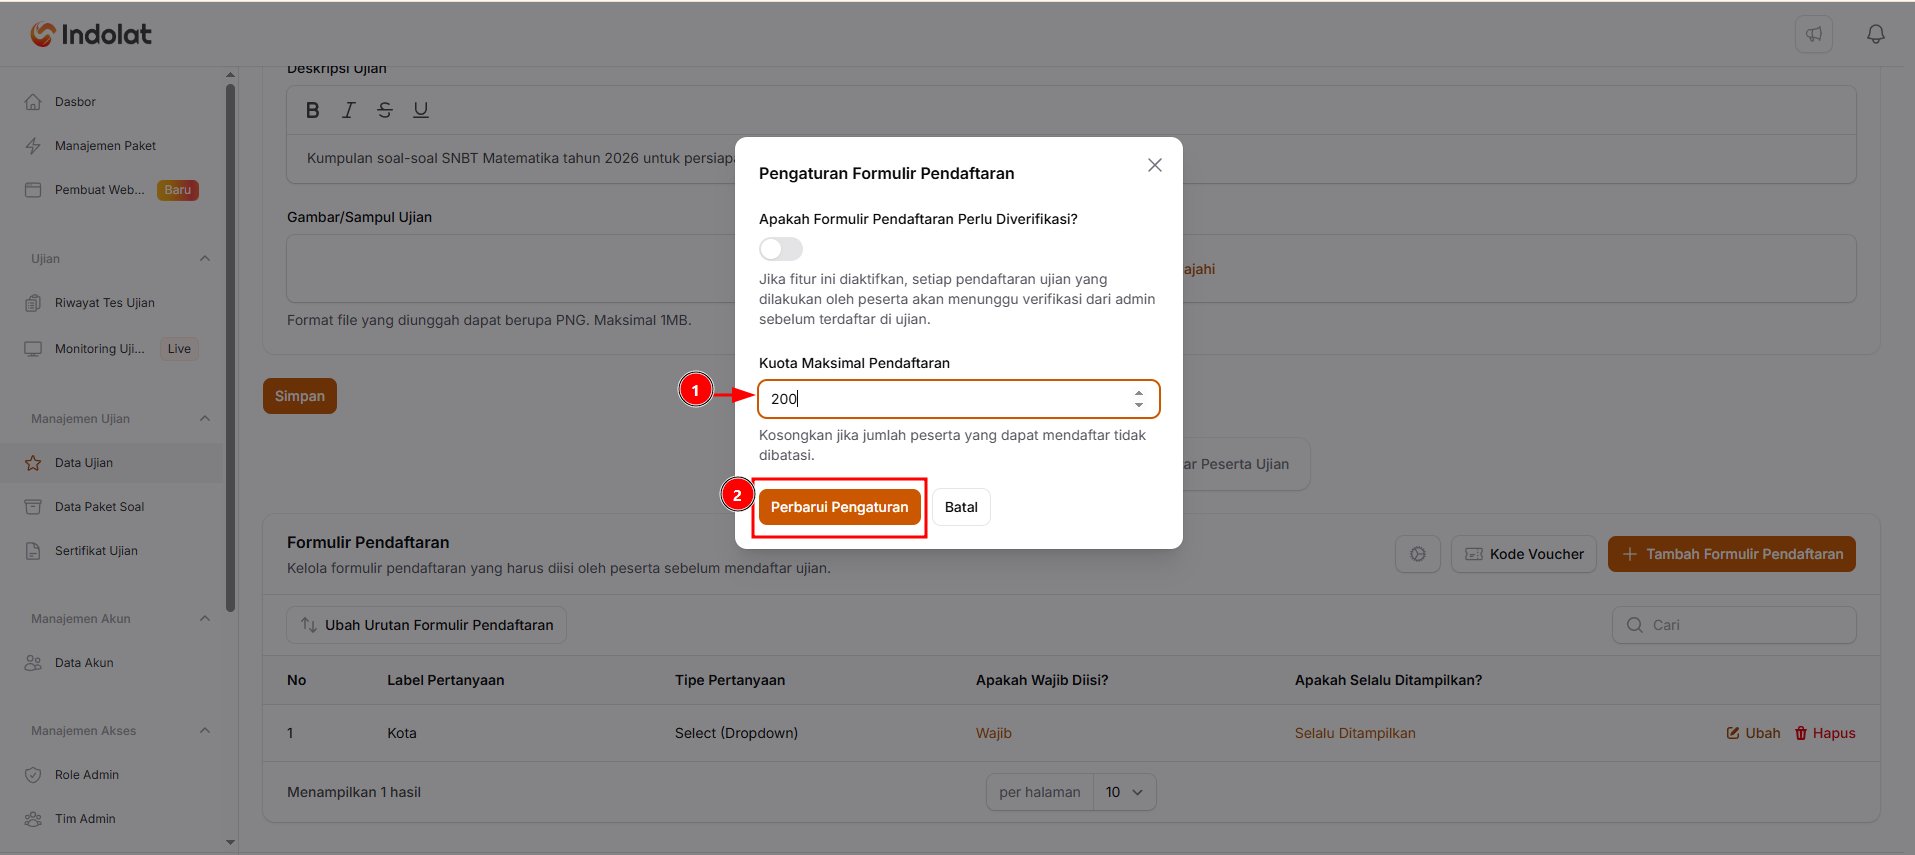
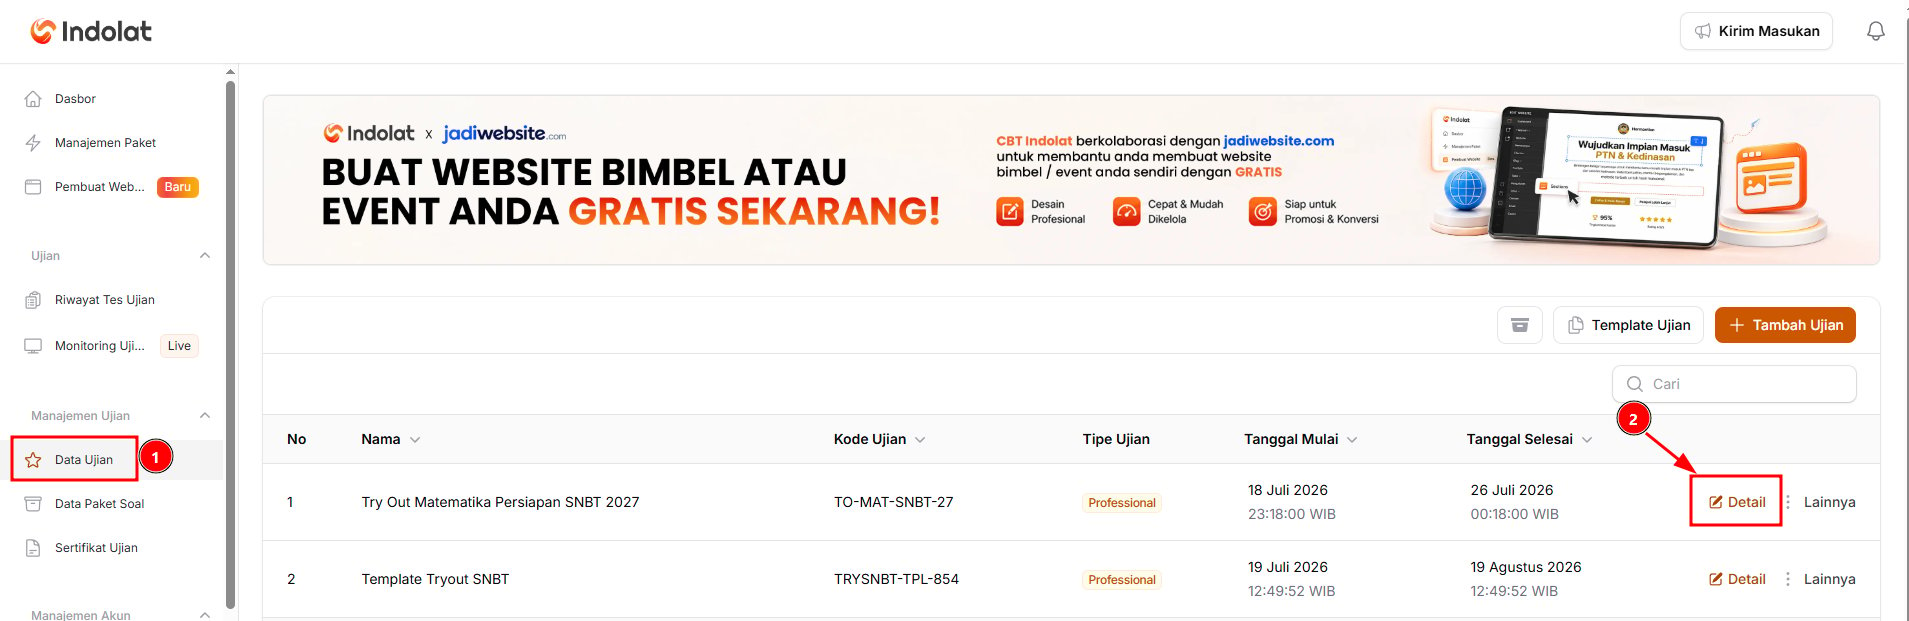
Enter how many participants may register for the exam. 💡 For example, you only have 200 places for the 2027 Mathematics Competition. Once 200 participants have registered, anyone after that can’t complete their registration.Open Exam Data and click Details
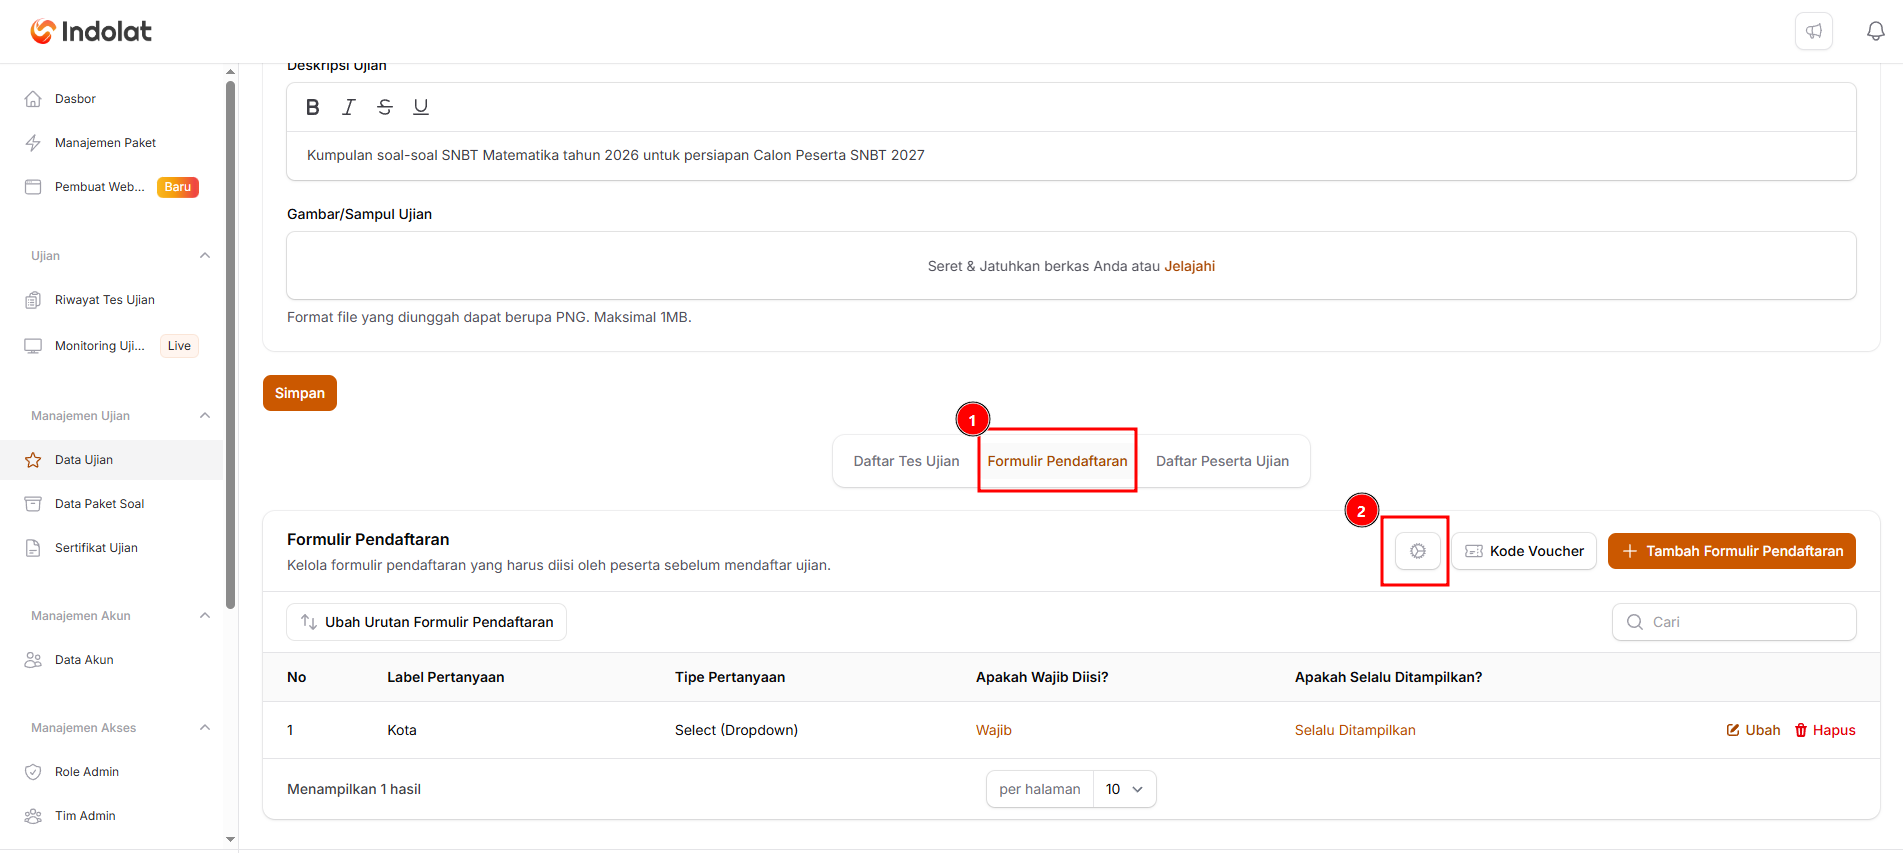
Click the ⚙️ icon in the Registration Form section
Fill in Maximum Registration Quota