

💡 Example: Participant Rosa Adinda pays Rp50,000 to take Try Out Matematika Persiapan SNBT 2027 (a maths tryout, or practice exam, for SNBT 2027, Indonesia’s national university entrance test). Once the payment succeeds, the transaction is recorded in the Transaction History menu.
In short, the flow is:The participant pays → the transaction is recorded in Transaction History → the balance goes into the institution’s account → the withdrawable balance can be requested to the institution’s bank account.
1. View Incoming Transactions
Open the Transaction History menu to see participant payments.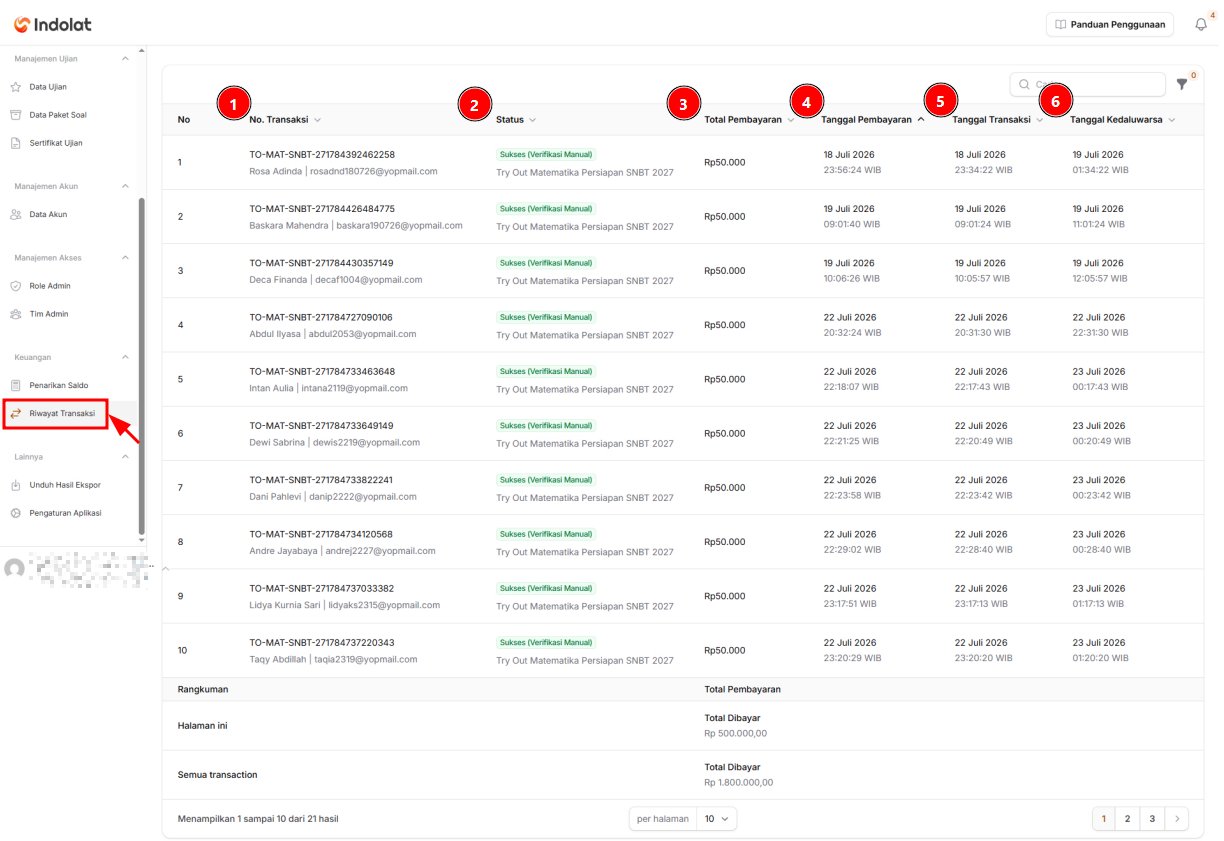
Transaction No.
Shows the transaction number that identifies each payment. Example:TO-MAT-SNBT-271784392462258
Status
Shows the participant’s payment status. Example on the page:Success (Manual Verification)
This means an admin marked the transaction as paid manually with the Mark as Paid button (available on transactions with the Pending status). The participant’s exam access is activated, but the institution’s balance doesn’t increase. Payments completed through the payment system show the Success status.
The name of the exam that was paid for is also shown under the status.
Example: Try Out Matematika Persiapan SNBT 2027
Payment Total
Shows the amount the participant paid. Example:Rp50,000
Payment Date
Shows the date and time the payment was received.Transaction Date
Shows the date and time the transaction was created.Expiry Date
- Shows the payment deadline.
- If the payment isn’t completed by then, the transaction can expire.

A Summary for the Payment Total column is shown at the bottom of the table. Its Total Paid value only adds up transactions that have been paid, that is, those with the Success or Success (Manual Verification) status. Transactions with the Pending, Failed or Expired status aren’t counted.
- This page shows the Total Paid for the transactions currently displayed on the page. This row only appears when the data spans more than one page.
- All transactions shows the Total Paid for every transaction that matches the active filters and search, including those on other pages.
Rp500,000All transactions, on the other hand, shows the total of every paid transaction, including those on other pages.
2. Add Your Bank Account Details for Withdrawals
Before you withdraw your balance for the first time, the project owner needs to complete the Bank Account Details in their account profile. The balance is always withdrawn to the project owner’s bank account; if you’re a member of the Admin Team, ask the project owner to fill them in.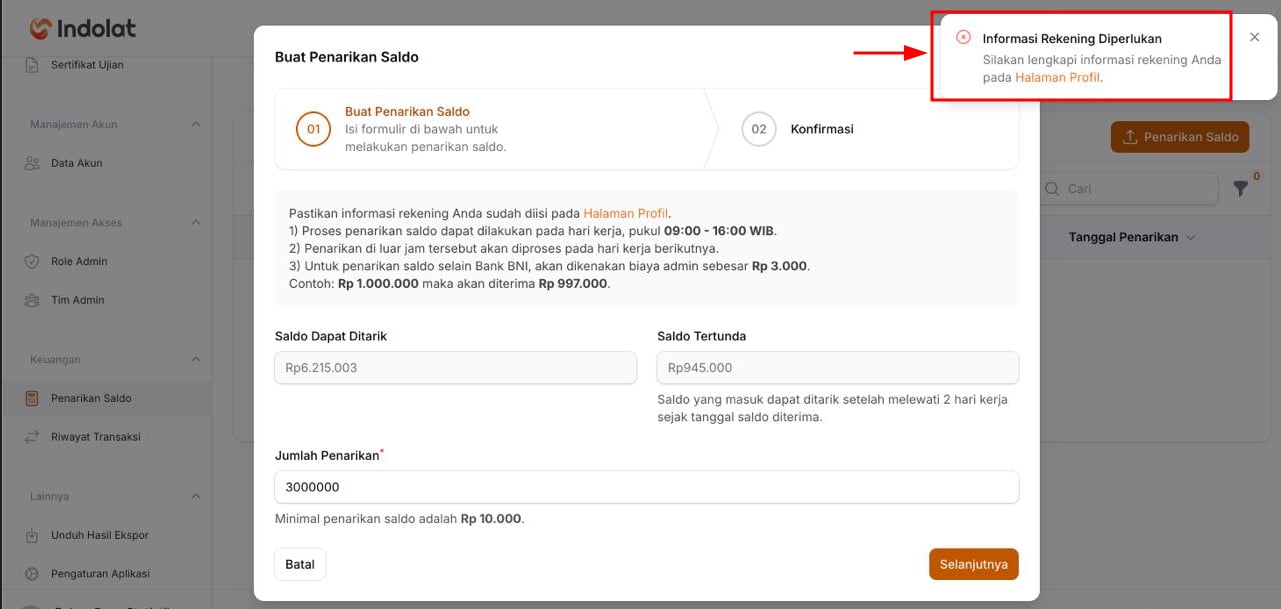
1
Click your account name in the bottom-left corner
Click your account name/profile in the bottom-left corner.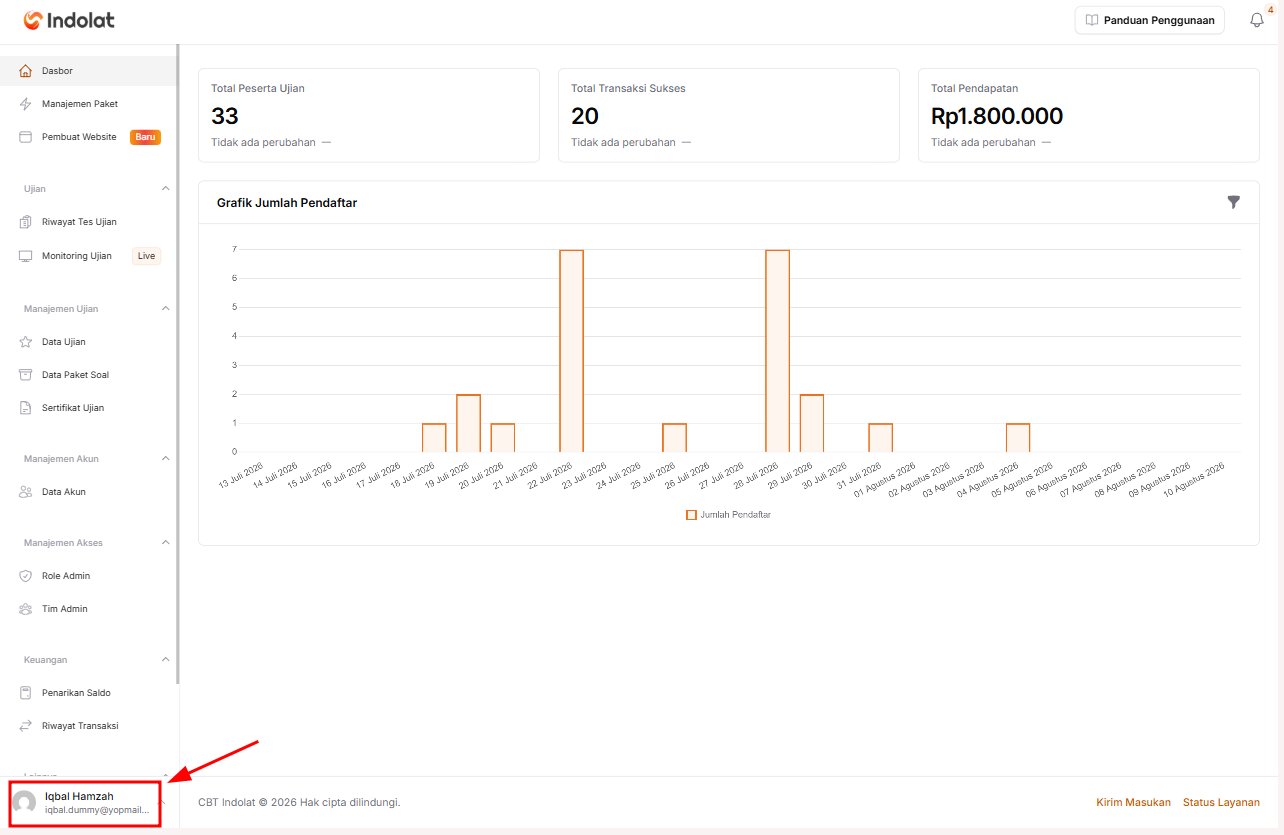
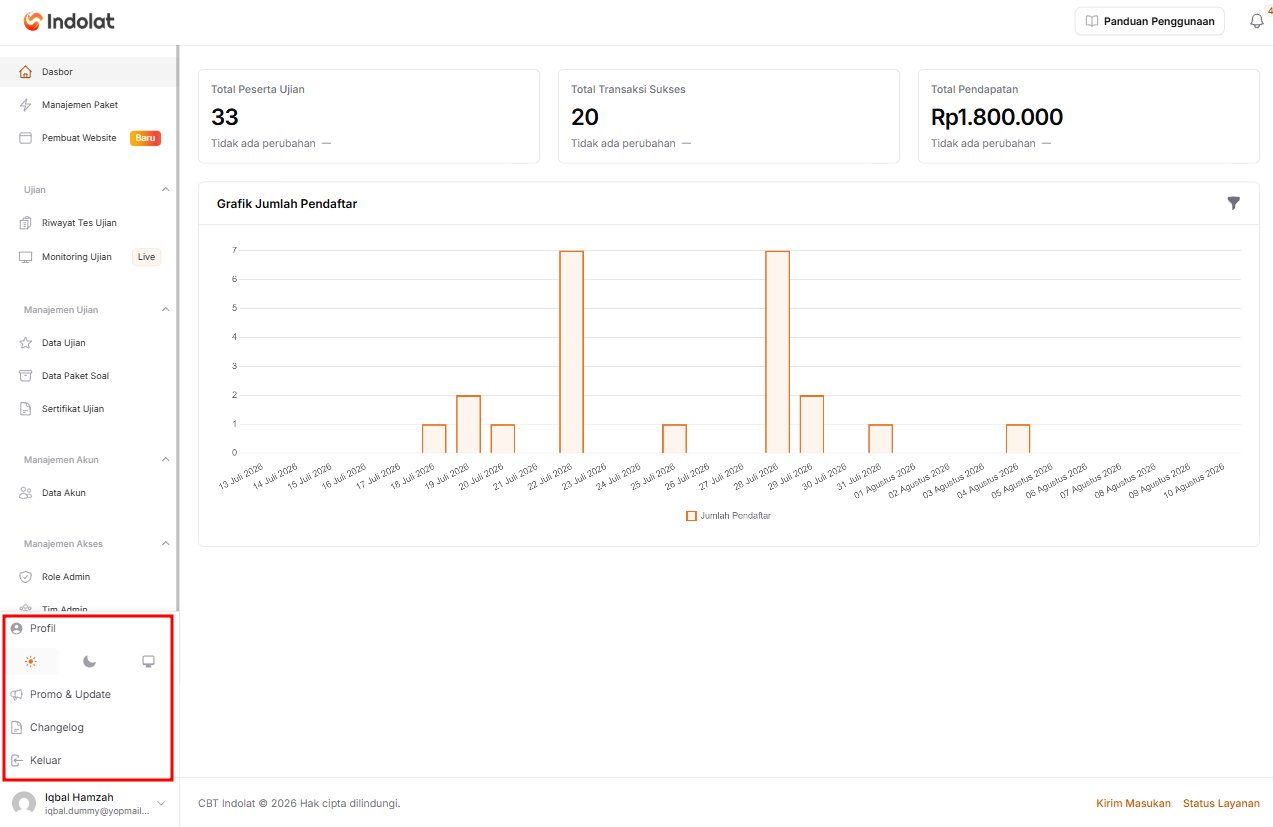
- Profile
- Changelog
- the language option (for example, English)
- Sign out
2
Select Profile
Select Profile to open your account settings page.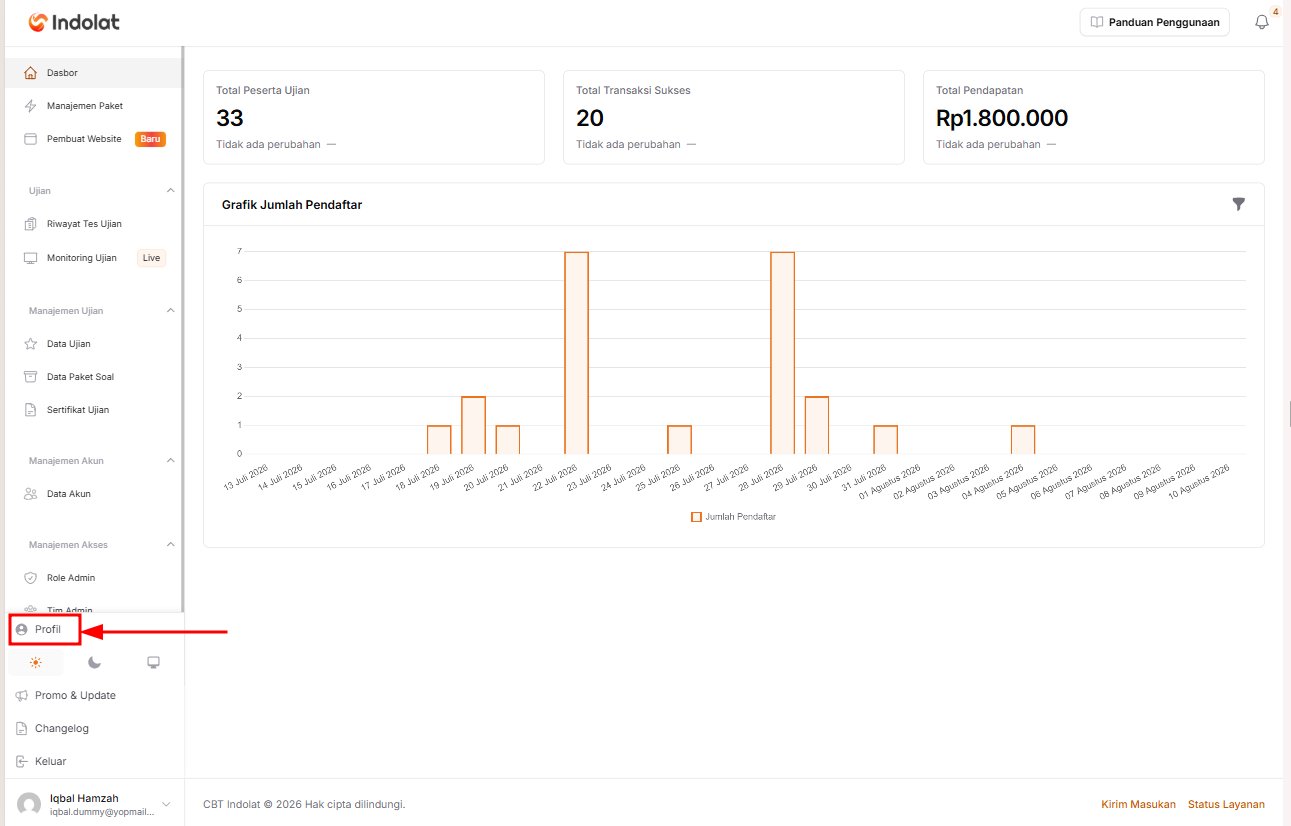
3
Fill in the Bank Account Details
Scroll down to the Bank Account Details section, then fill in your bank account details.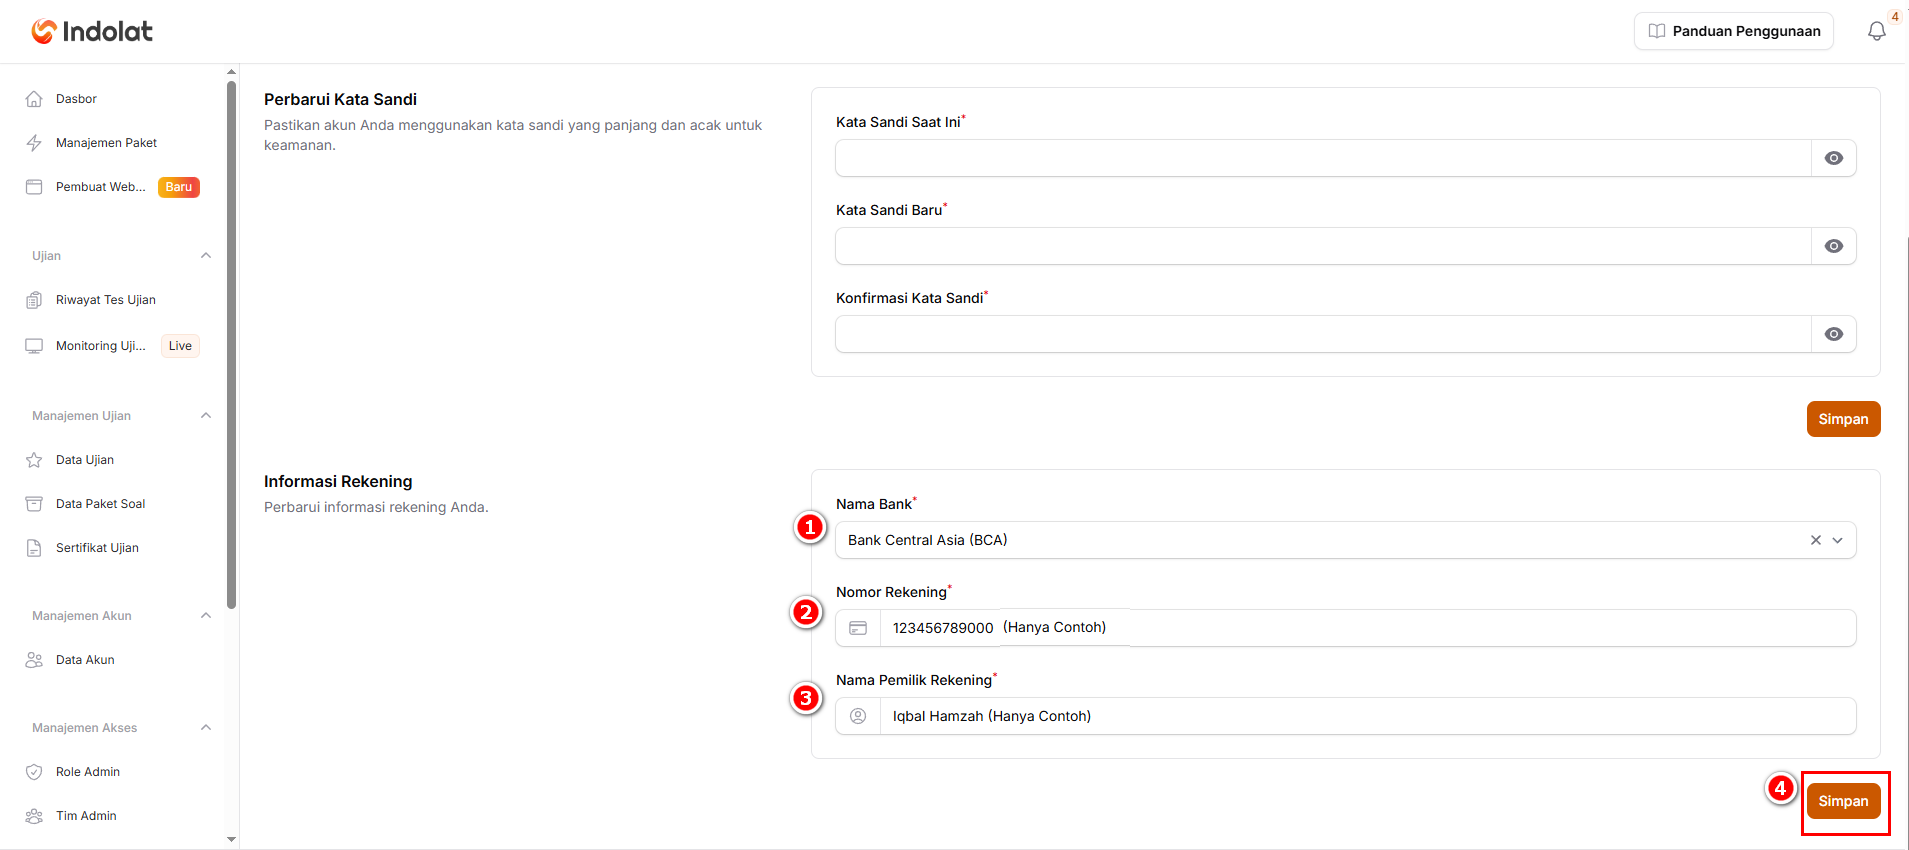
-
Bank Name
Select the bank where your account is held. Example:
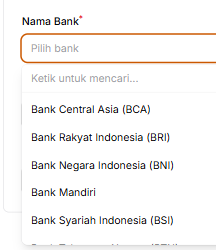
Bank Central Asia (BCA) -
Account Number
Enter the account number that will receive your withdrawals.
Example:
123456789000Make sure the account number is correct so the funds aren’t sent to the wrong account. -
Account Holder Name
Enter the account holder’s name as registered with the bank.
Example:
Iqbal HamzahUse exactly the same name as on the bank account to help avoid problems when the balance is paid out. - Click Save to save your bank account details.
3. Withdraw Your Balance
For example, Indolat Institute has a Withdrawable Balance of Rp6,215,003 and wants to cash out Rp3,000,000 to its BCA account. The admin has already filled in the bank account details in the profile. They open the Balance Withdrawal menu, enter Rp3,000,000 and double-check the destination account. After they select Create Withdrawal, the status starts as Pending. Once processing is complete, the status changes to Approved and the admin can view the payment proof.1
Open the Balance Withdrawal menu
Open the Balance Withdrawal menu, then click the Balance Withdrawal button.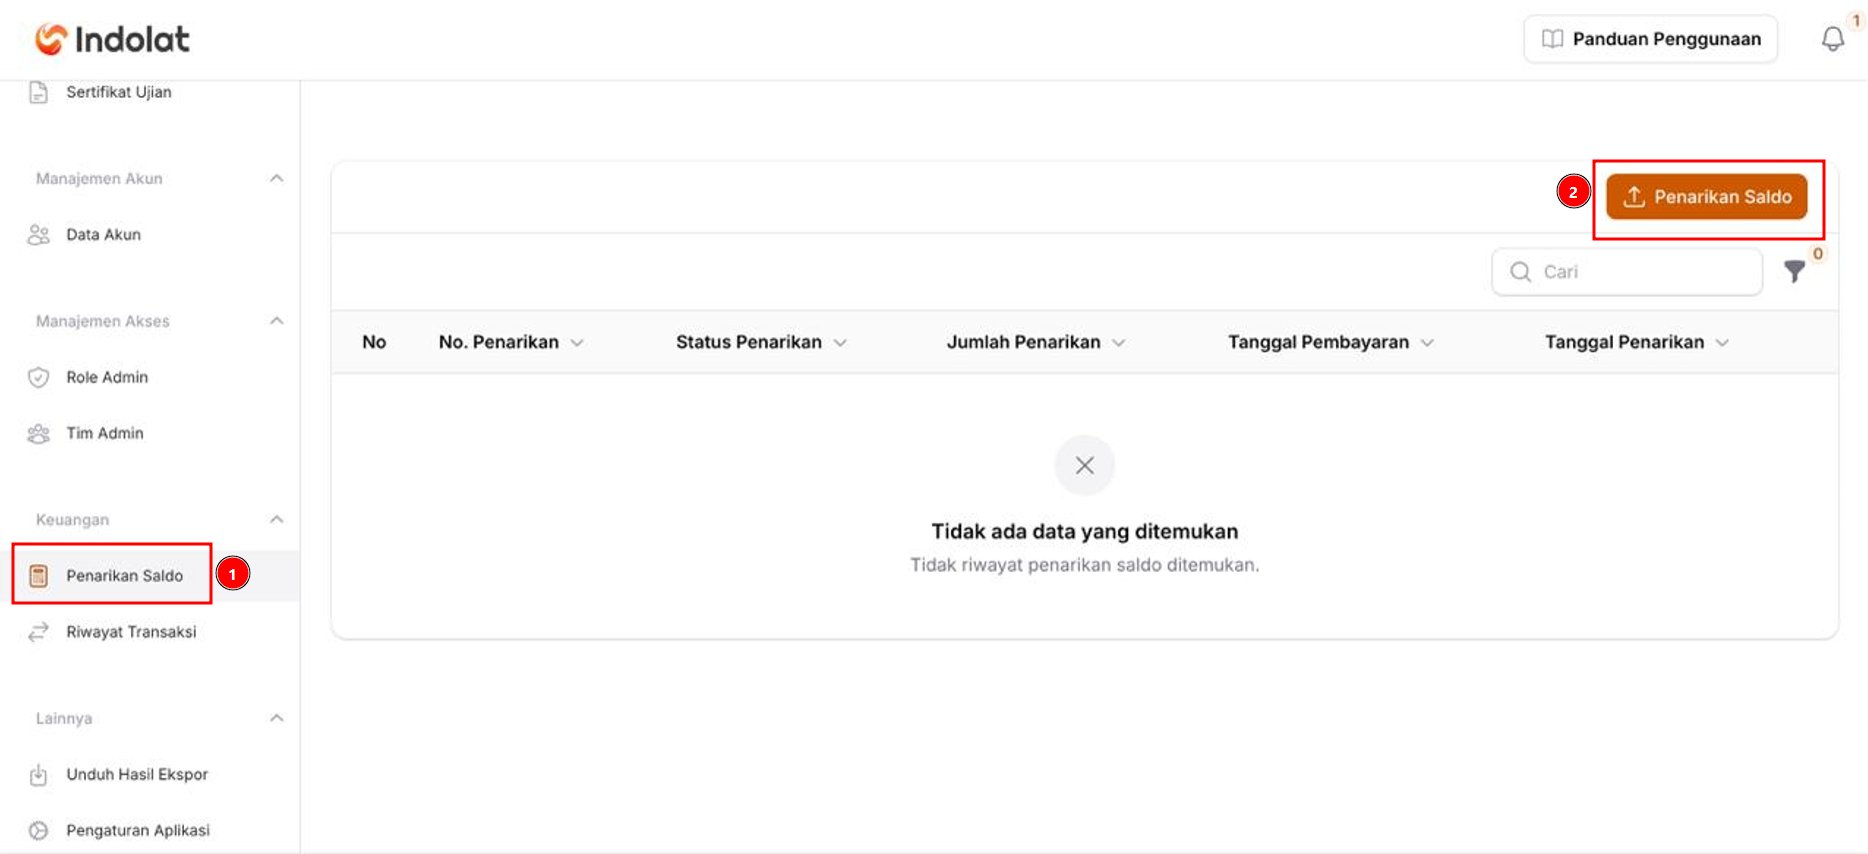
2
Enter the amount to withdraw
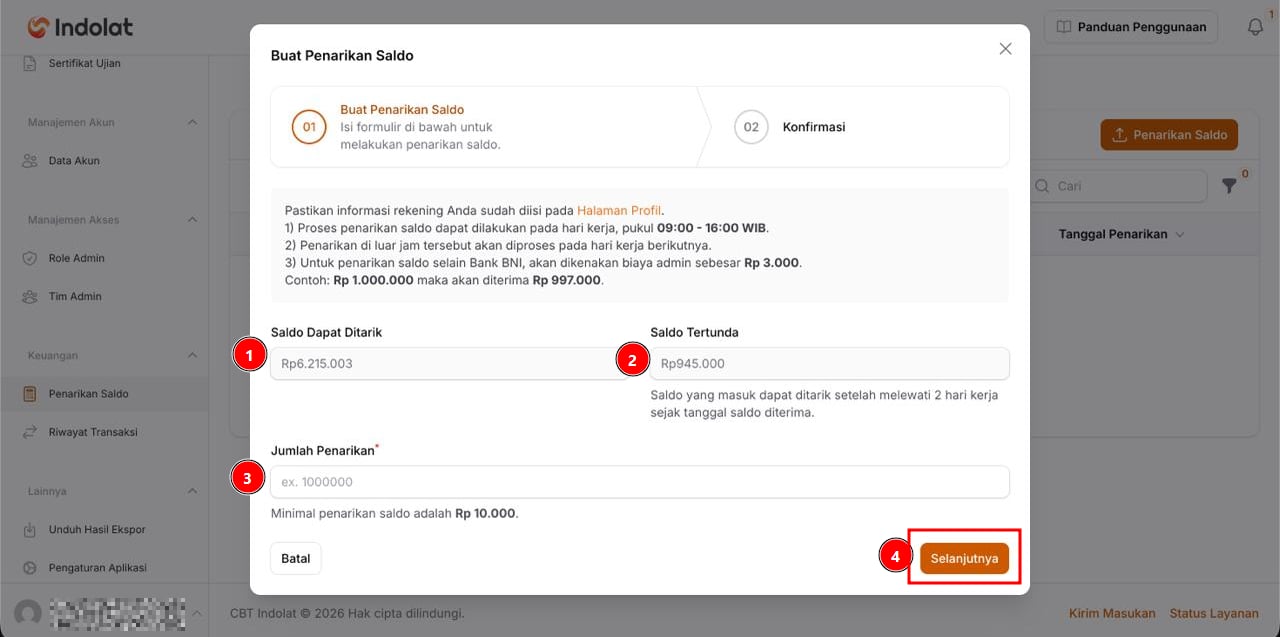
- Withdrawable Balance Shows the balance that can already be requested for transfer to the institution’s bank account.
-
Pending Balance
Shows the balance that can’t be withdrawn yet.
As stated in the system, newly received balance can be withdrawn once 2 working days have passed since it was received.
💡 Example: The institution’s balance:
- Withdrawable Balance: Rp6,215,003
- Pending Balance: Rp945,000
-
Withdrawal Amount
Enter the amount you want transferred to your account.
Example: Rp3,000,000
The minimum withdrawal shown in the system is Rp10,000.
- Click Next.
3
Review and confirm the withdrawal
After you click Next, the system shows again: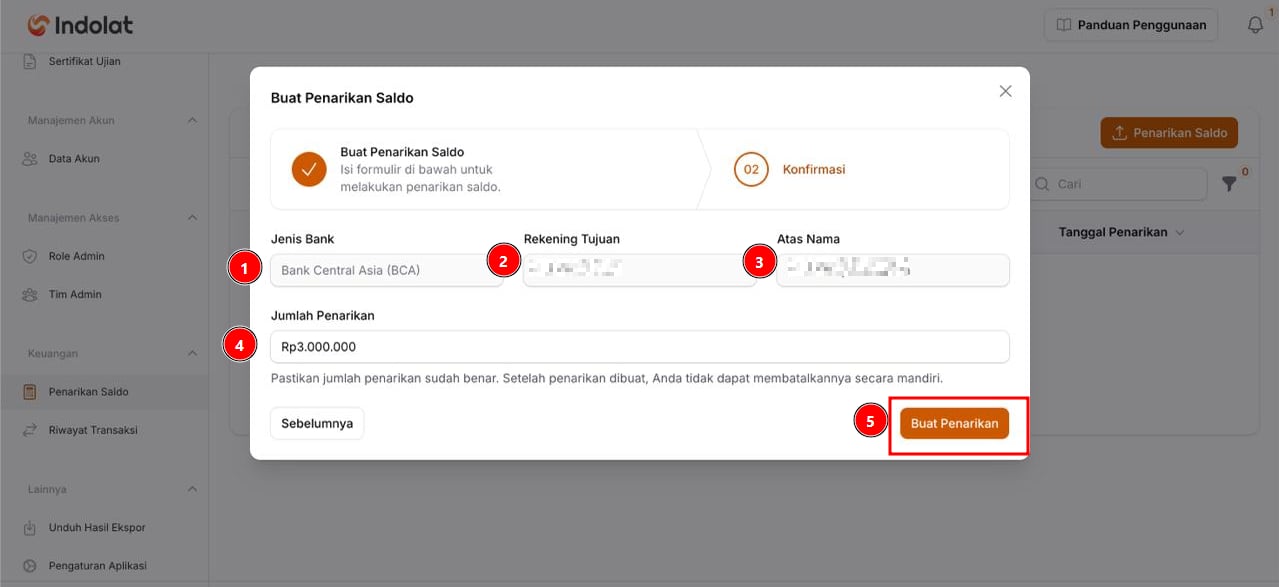
- Bank
- Destination Account
- Account Holder
- Withdrawal Amount
4
Check the withdrawal status
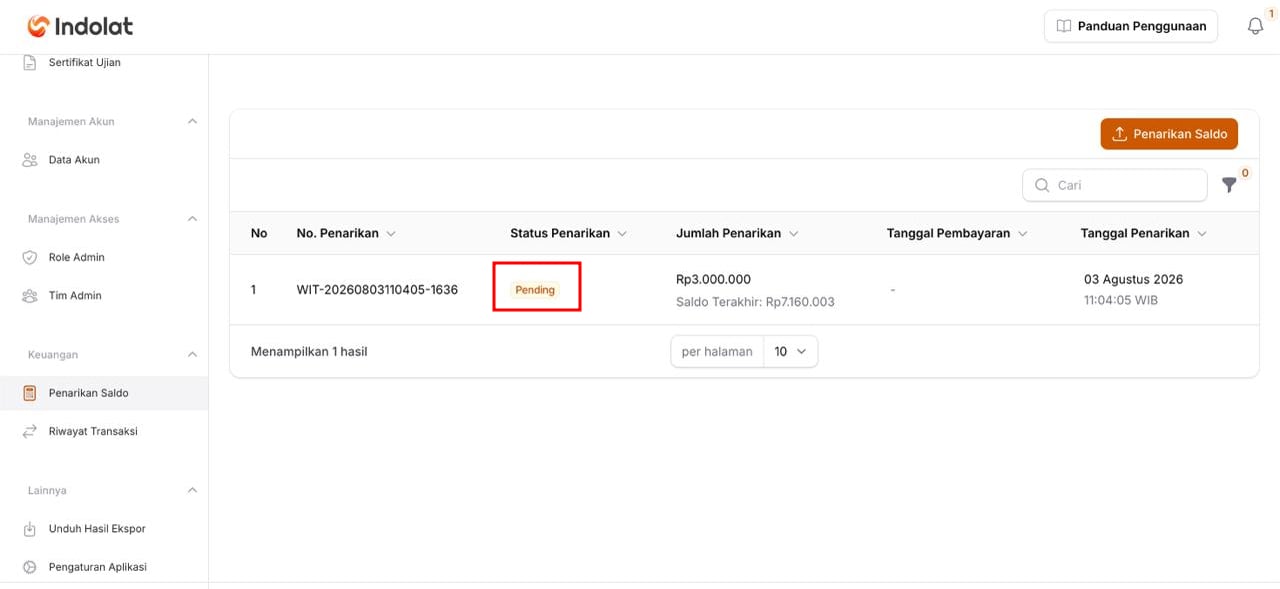
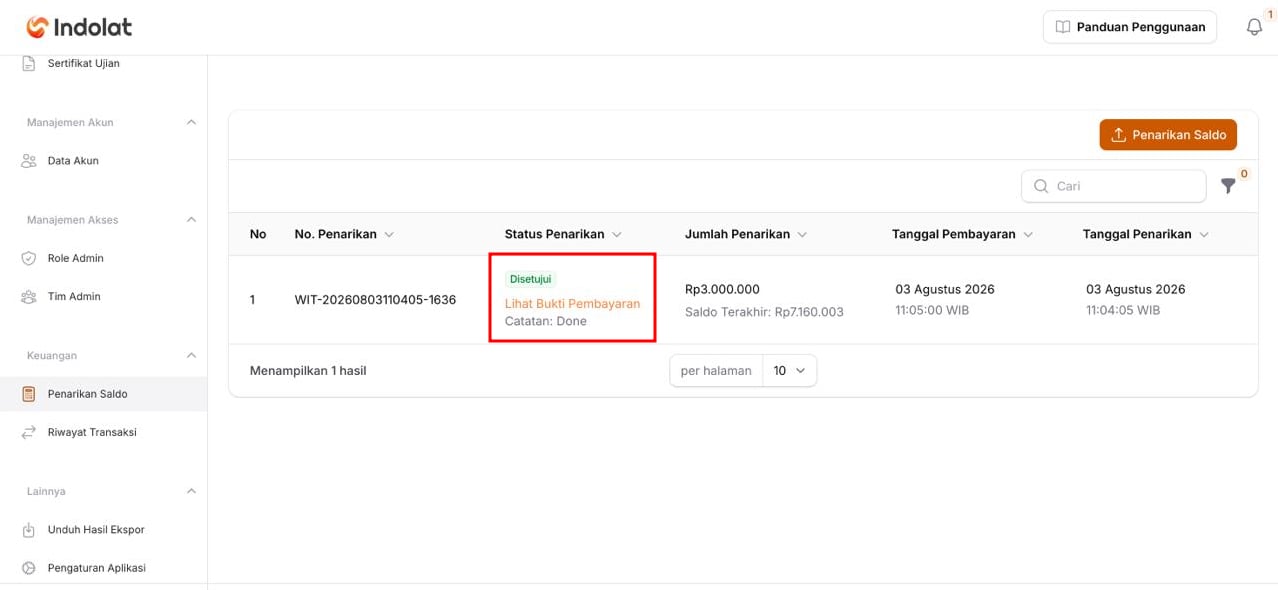
Once the request has been created, it appears on the Balance Withdrawal page. The status changes as the request is processed.
-
Pending: the withdrawal request has been created and is still being processed.
-
Approved: the withdrawal has been processed. Select View Payment Proof to see the transfer receipt.
Balance withdrawal termsBased on the information shown in the system:
- Withdrawals are processed on working days, 09:00–16:00 WIB (UTC+7).
- Withdrawals made outside these hours are processed on the next working day.
- Withdrawals to banks other than BNI incur an admin fee of Rp3,000.
- The minimum withdrawal is Rp10,000.
- You can’t create a new withdrawal while another one still has the Pending status.
Rp997,000