
1. Certificate Setup by the Admin
This section explains how to create a certificate from scratch, covering:- Opening the Exam Certificate menu
- Filling in the General section
- Setting up the Template & Design
- Adding signatories
- Adjusting the layout in the Designer
- Saving and activating the certificate
A. Open the Exam Certificate Menu
Open Exam Certificate, then click Add Certificate
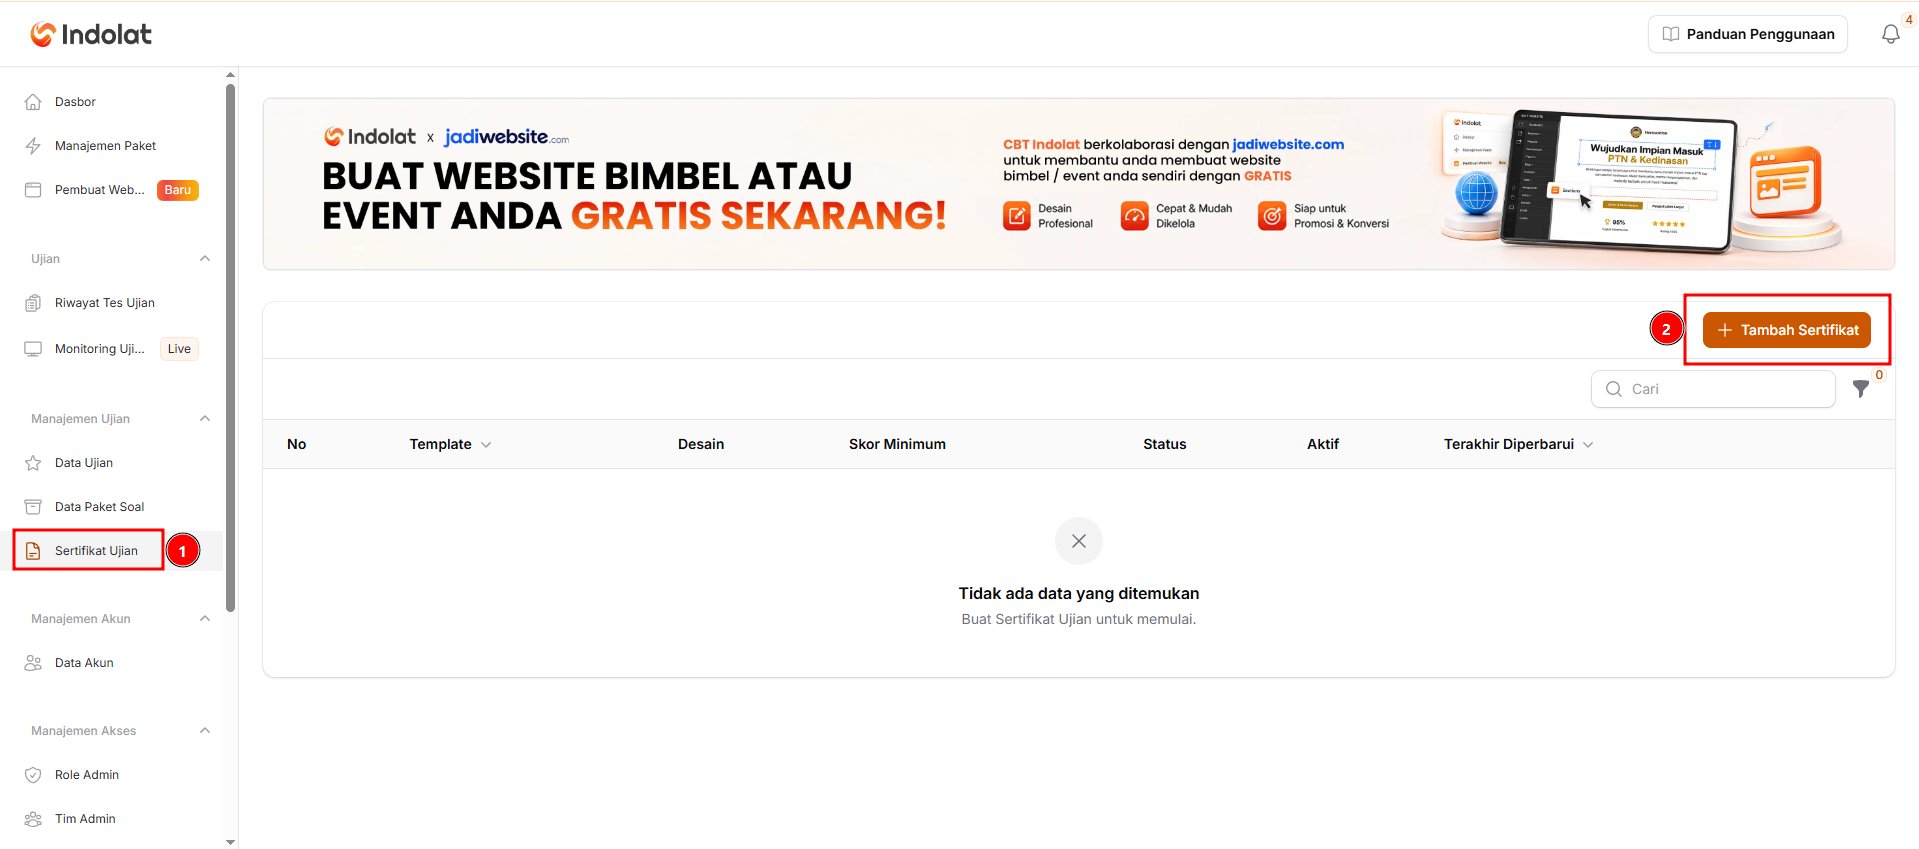
The system shows 4 sections
- General
- Template & Design
- Signatory
- Designer
B. Fill In the General Section
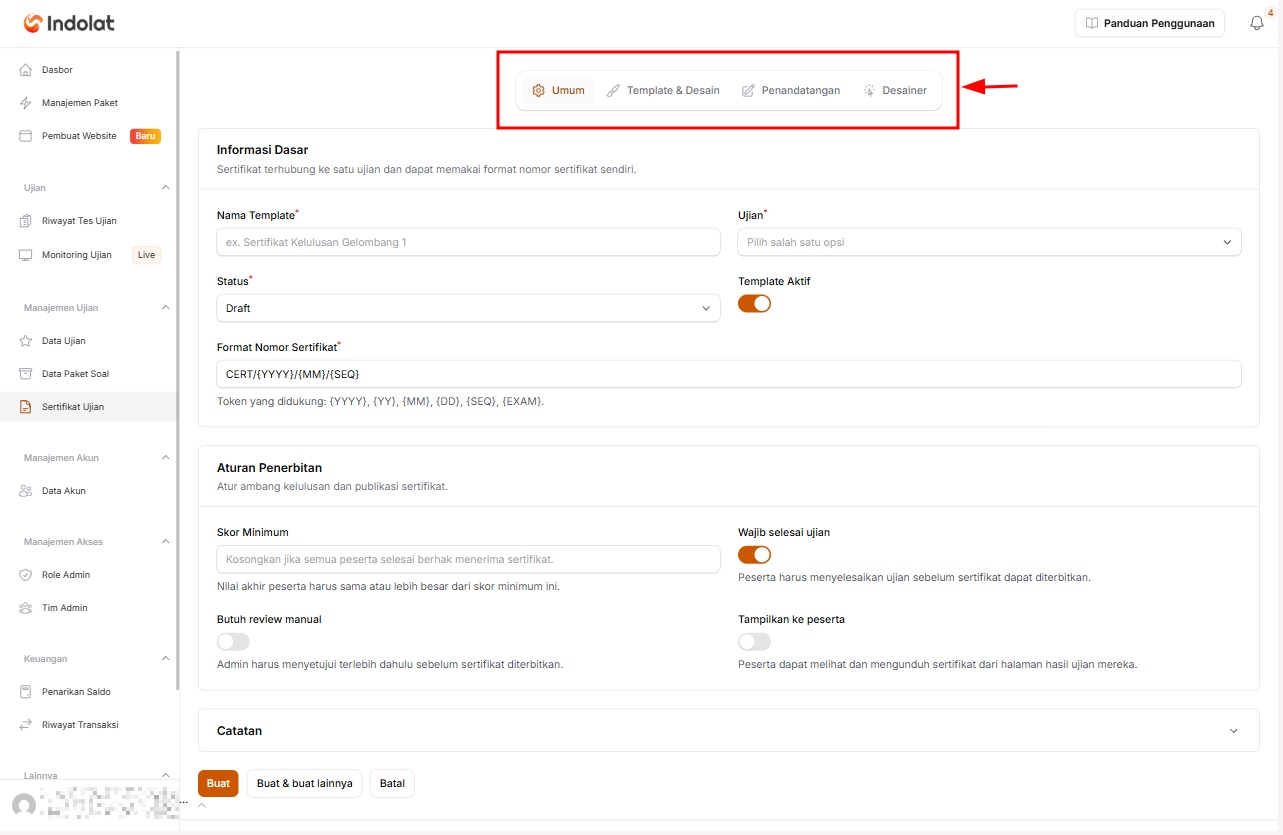
Fill In the General Information
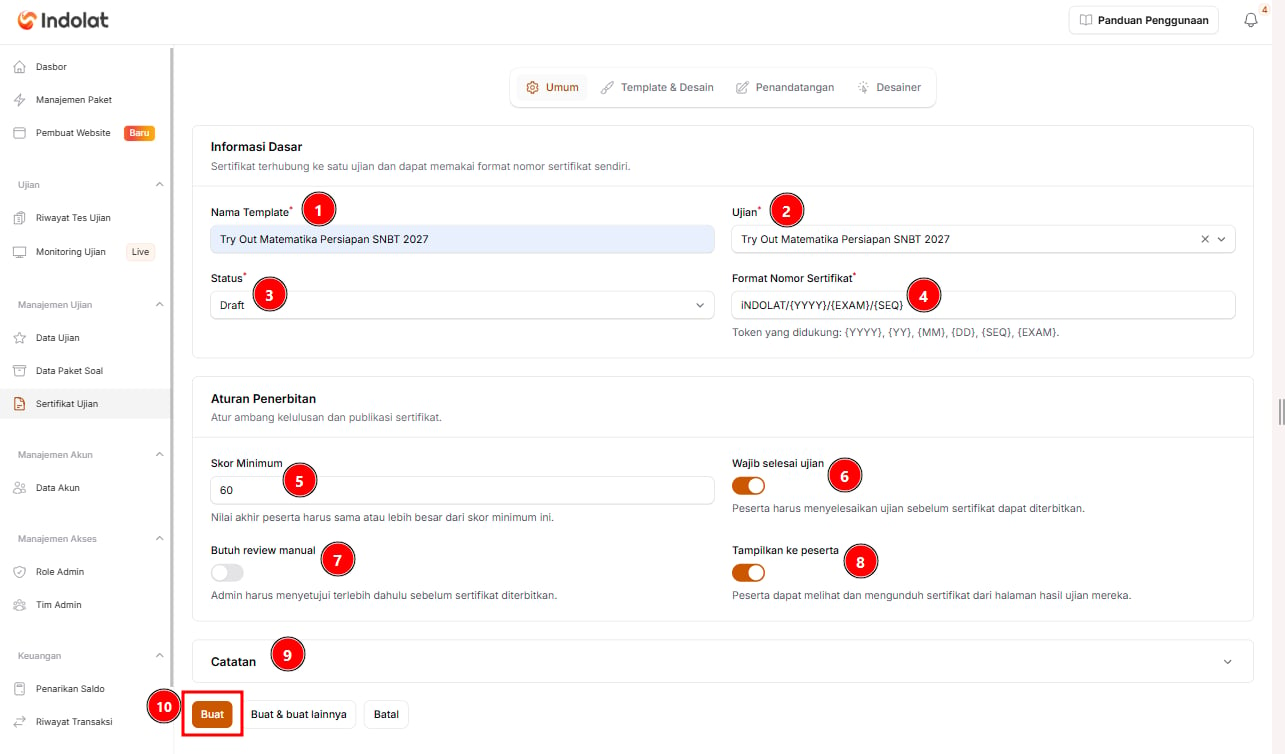
-
Template Name
Used to tell this certificate apart from other templates. Enter a name the admin can recognise easily.
Example: SNBT 2027 Tryout Completion Certificate -
Exam
Choose the exam that will use this certificate. One certificate template is linked to one exam.Example: Try Out Matematika Persiapan SNBT 2027 (an SNBT 2027 maths tryout)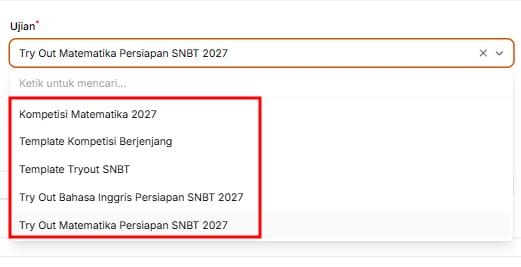
-
Status
Sets the state of the template.- Published: the certificate is ready to be used in the exam.
- Draft: the certificate still needs to be checked and adjusted by the admin, and isn’t shown to participants yet.
-
Certificate Number Format
Sets how the certificate numbers that the system generates automatically are put together.💡 Example format:Placeholder key:{YYYY}: year, e.g. 2027{YY}: two-digit year, e.g. 27{MM}: month{DD}: day{SEQ}: certificate sequence number (6 digits, e.g. 000001){EXAM}: exam code (letters and numbers only, up to 6 characters)
INDOLAT/{YYYY}/{EXAM}/{SEQ}for an exam with the codeTO-MAT-SNBT
Result:INDOLAT/2026/TOMATS/000001 -
Minimum Score
Enter the minimum score a participant needs to receive the certificate. For example, 70 means participants with a final score of 70 or higher can receive the certificate. -
The exam must be completed
Turn this on so the certificate can only be issued once the participant has finished the exam.
Example: a participant has a provisional score of 80 but hasn’t pressed the finish button yet. The certificate can’t be issued until the exam is actually finished. -
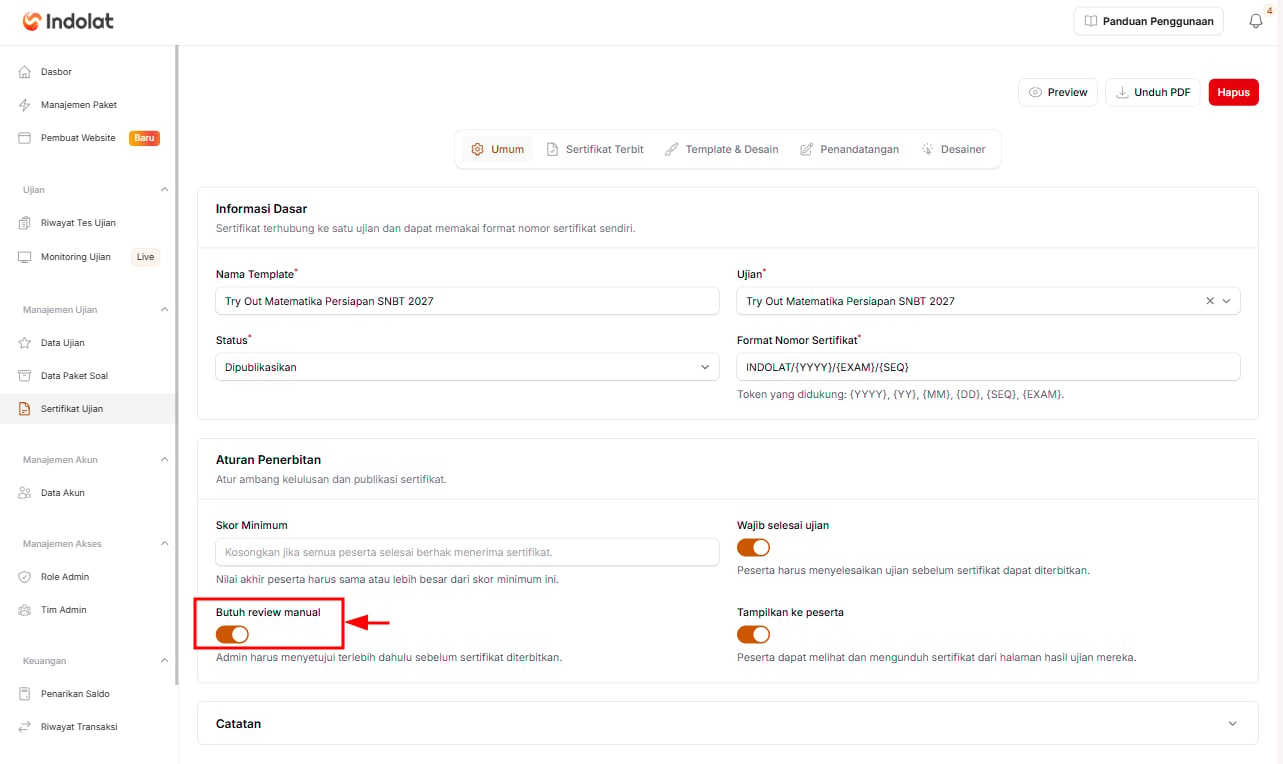
Needs manual review
Turn this on if the admin must approve the certificate first. This suits official exams or award certificates that need checking before they are issued. -
Show to participants
- Turn this on so participants can view and download the certificate from their exam results page.
- Turn it off if the certificate will only be managed or printed by the admin.
-
Notes
Expand this section and fill in Template Notes with extra information about the certificate. These notes are for admins only.
Example: The certificate is awarded to participants who have finished the exam with a score of at least 60.
C. Set Up the Template and Design
Adjust the Template and Design
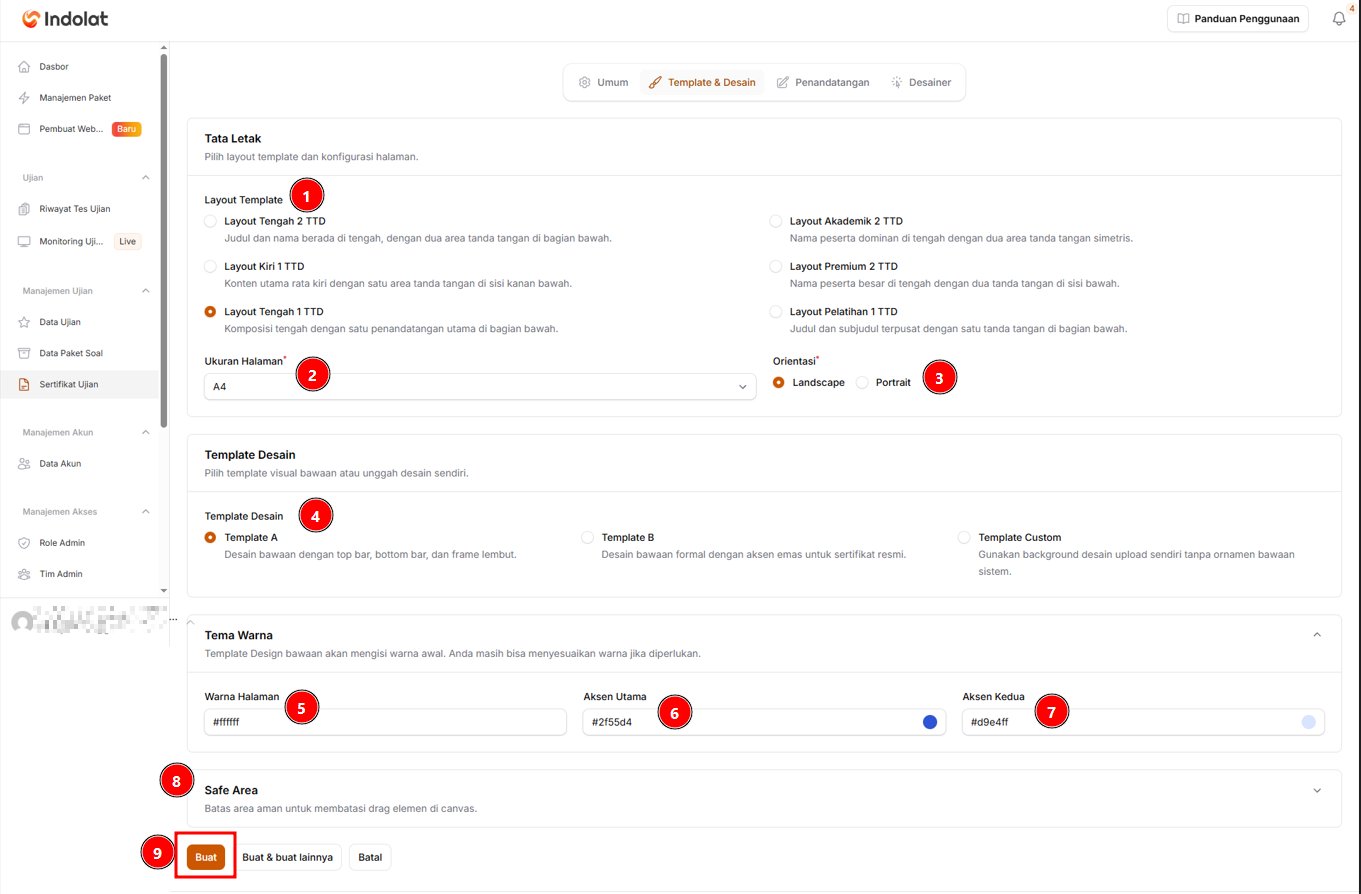
-
Template Layout
Choose the certificate layout you need.
Example: Centre Layout, 1 Signature -
Page Size
Choose the certificate size.Example: A4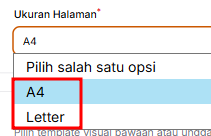
A4 suits certificates that will be printed or downloaded as a PDF. -
Orientation
Choose the page direction:- Landscape for a horizontal page
- Portrait for an upright page
-
Design Template
Choose the design to use:- Template A for a simple design
- Template B for a more formal design
- Custom Template if your institution has its own design. Upload that design in the Custom Template Background field that appears (PNG, JPG or WEBP, up to 2 MB).
-
Institution Logo (optional)
Upload your institution’s logo in the Logo File field (PNG, JPG or WEBP, up to 1 MB). The logo becomes available as the Institution Logo element in the Designer section, where you set its position and size. -
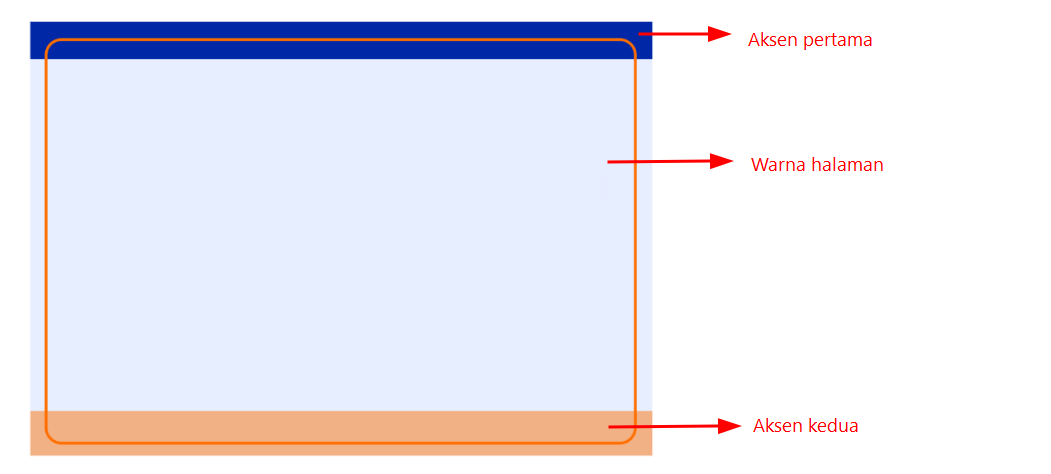
Colour Theme
Even after choosing a design template, you can still adjust the certificate’s Colour Theme. You can set:

- Page Colour
- Primary Accent
- Secondary Accent
-
Safe Area
The Safe Area is a margin that keeps text and signatures from sitting too close to the edge of the certificate.
D. Add Signatories
Open Signatory, then click Add Signatory
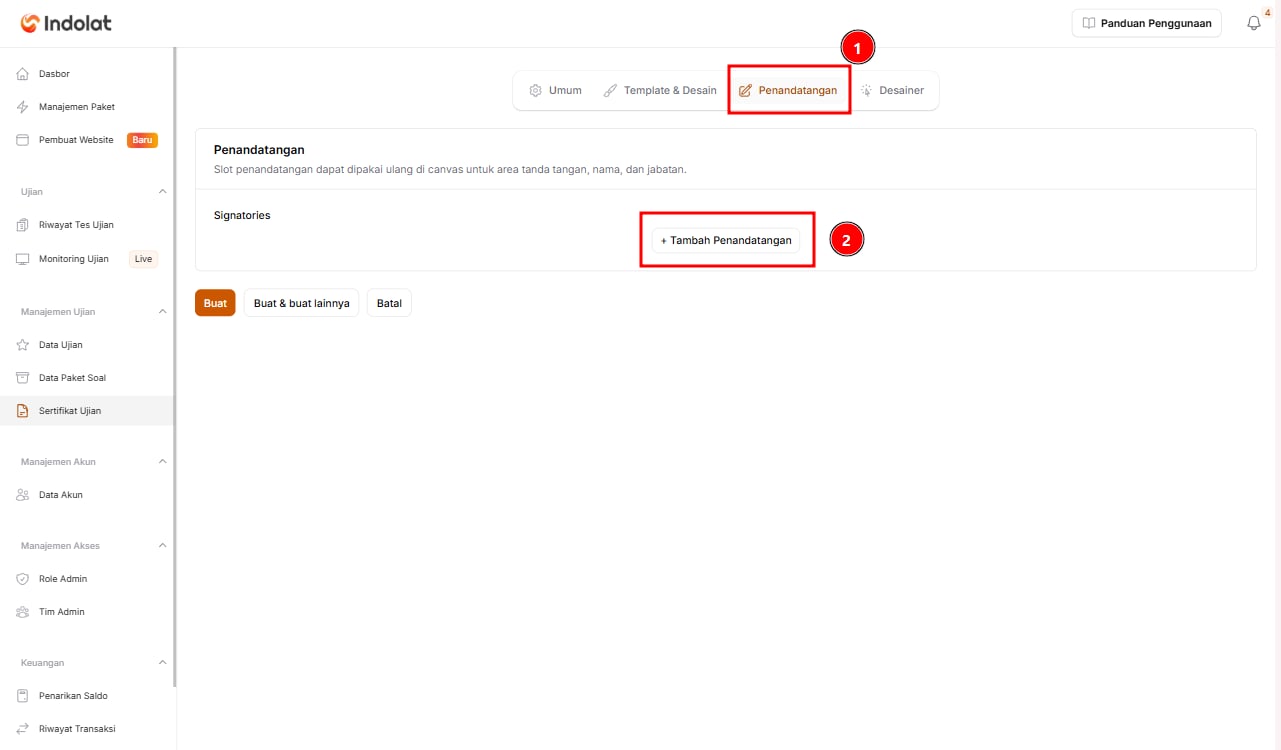
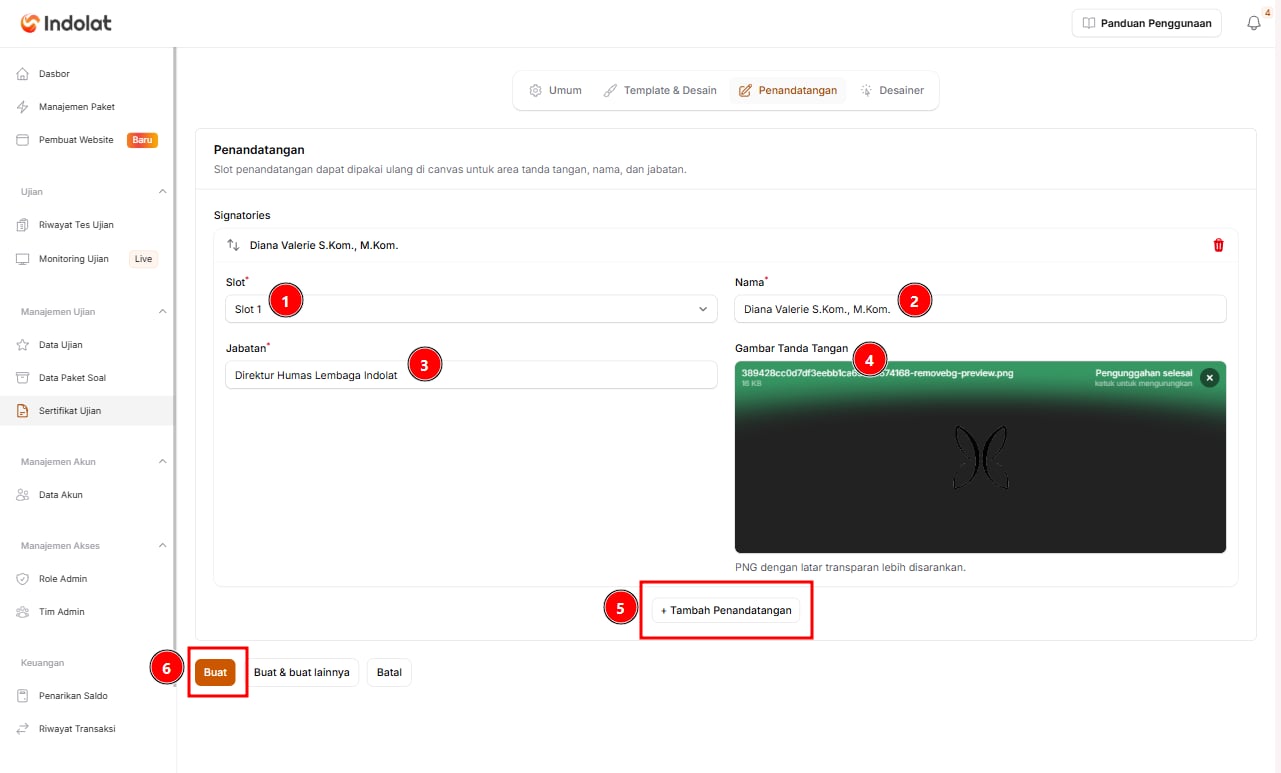
Add the people who will sign the certificate
-
Slot
Choose the signature position. For example:- Slot 1 for the first signatory
- Slot 2 for the second signatory
-
Name
Enter the signatory’s full name.
Example: Diana Valerie -
Position
Enter the signatory’s position.
Example: Committee Chair -
Signature Image
Upload the signature image. -
+ Add Signatory (optional)
If more than one authorised person signs the certificate, click + Add Signatory and fill in the second signatory’s details.
E. Adjust the Layout in the Designer
Open the Designer section to set the position and content of each part of the certificate.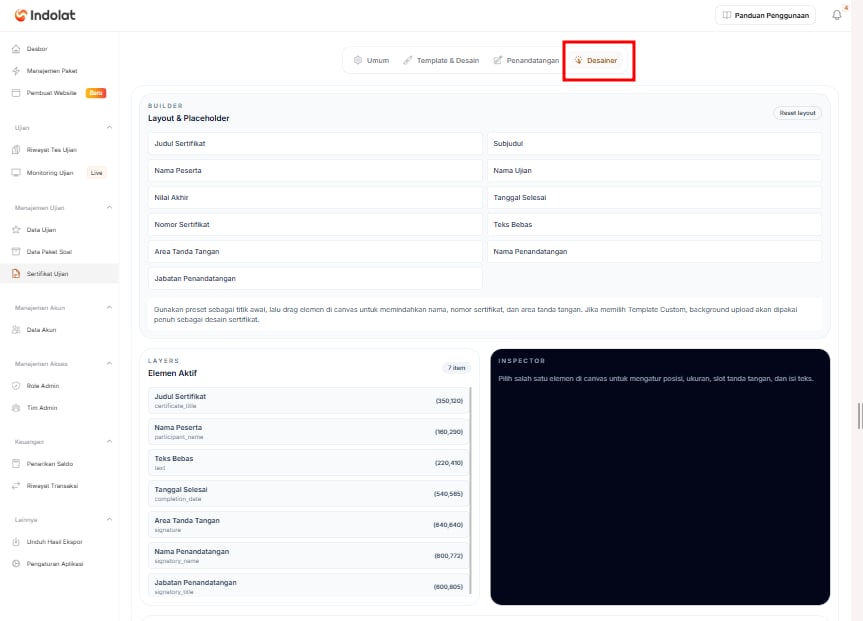
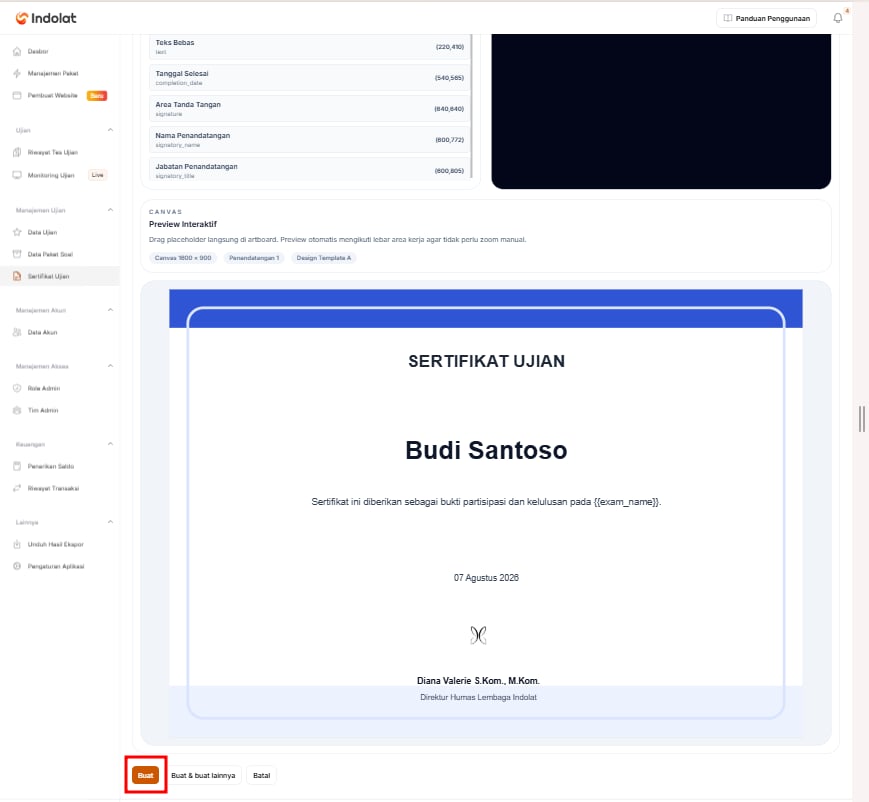
- Certificate Title
- Subtitle
- Participant Name
- Exam Name
- Final Score
- End Date
- Certificate Number
- Institution Logo
- Free Text
- Signature Area
- Signatory Name
- Signatory Position
- Select the part you want to change, for example Certificate Title.
- Change the text in the Content field if needed. Example: EXAM CERTIFICATE
- Position the text the way you want. You can move elements directly on the certificate by clicking and dragging them into place.
- Adjust the text or area size if it looks too small, too large or cut off.
- Repeat these steps for other parts, such as the participant name, certificate number and signature.
- Check the result in the Interactive Preview section.
💡 Example: The participant name looks too close to the certificate title. Select Participant Name, then drag it down a little until the spacing looks neater. If the certificate title looks too small, select Certificate Title, then increase its font size.The Interactive Preview section shows what the certificate will look like before participants use it. Check again:
- the title position;
- the participant name;
- the exam name;
- the score;
- the certificate number;
- and the signature position.
2. Participant Certificate Requests and Downloads
The certificate is available in the Final Score section of the Exam History page.A. Open Exam History
The participant logs in to the CBT page
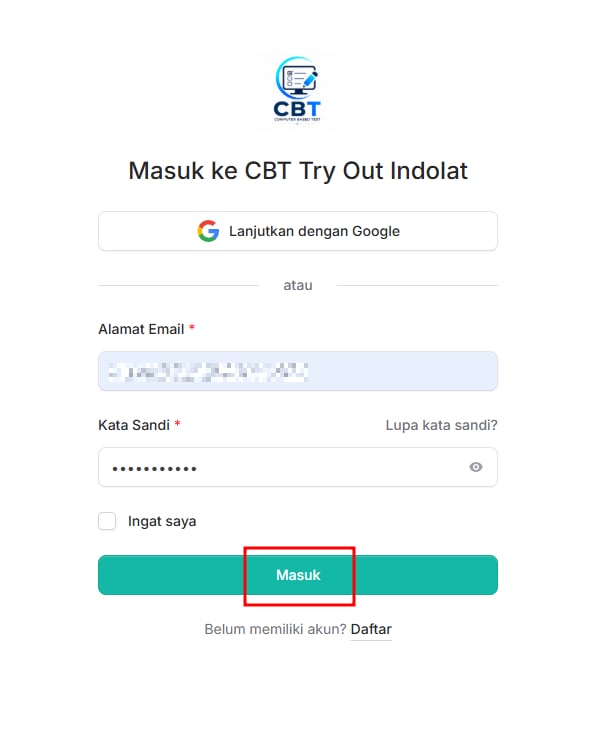
Open Exam History
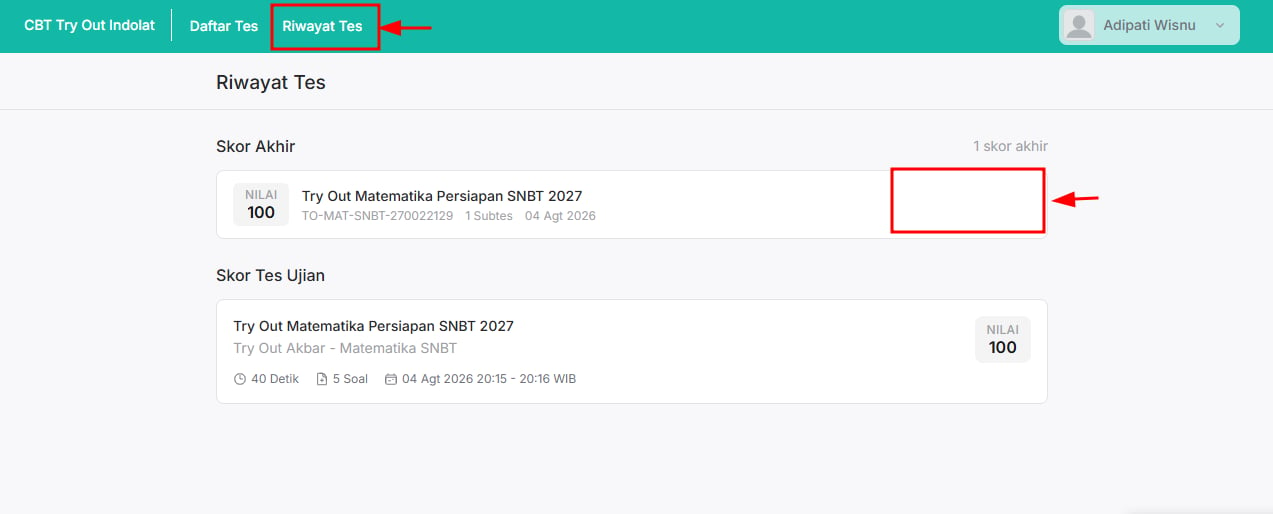
B. Without Admin Approval
If the certificate doesn’t need an admin check and all the requirements are met, the Download Certificate button appears.The admin turns off Needs manual review
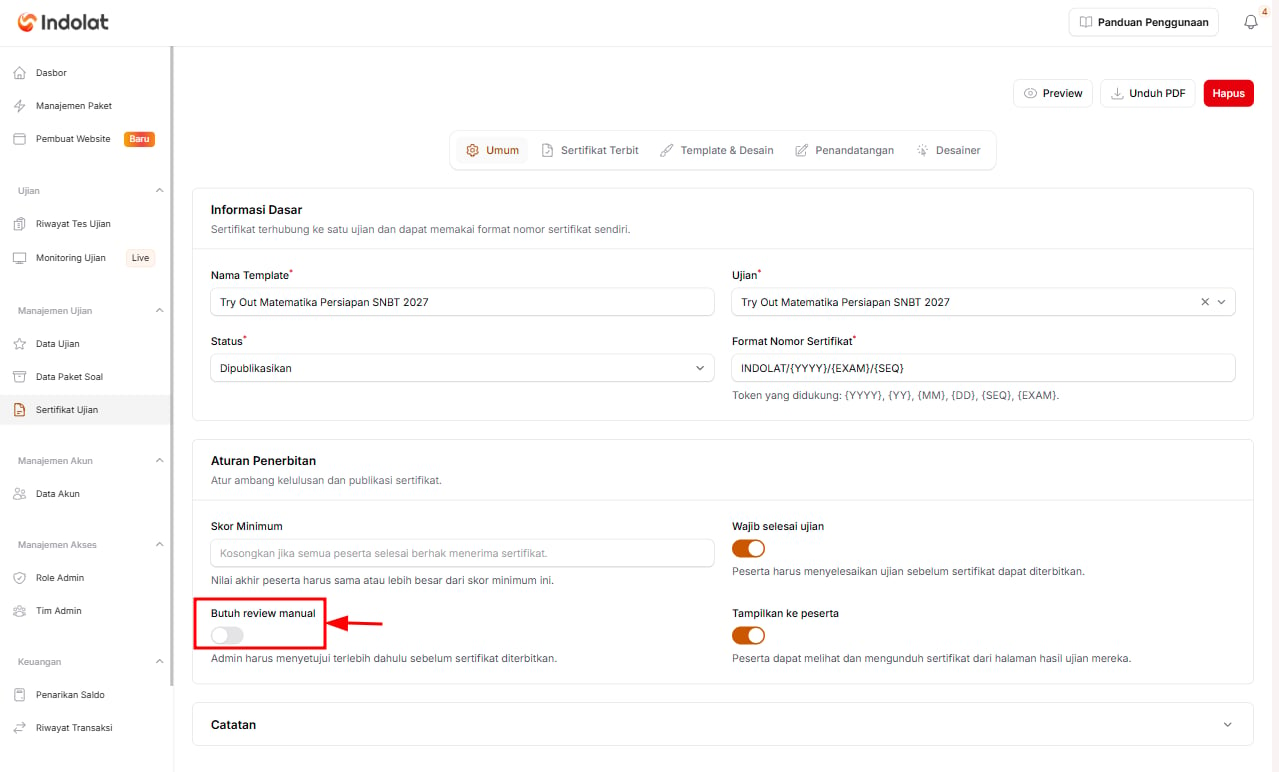
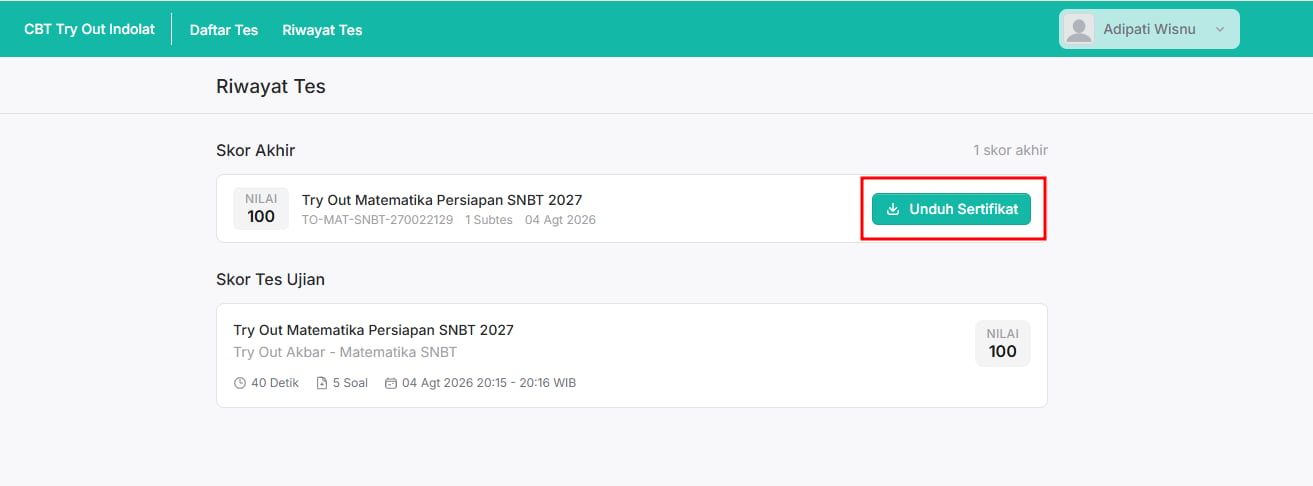
The Download Certificate button appears for the participant
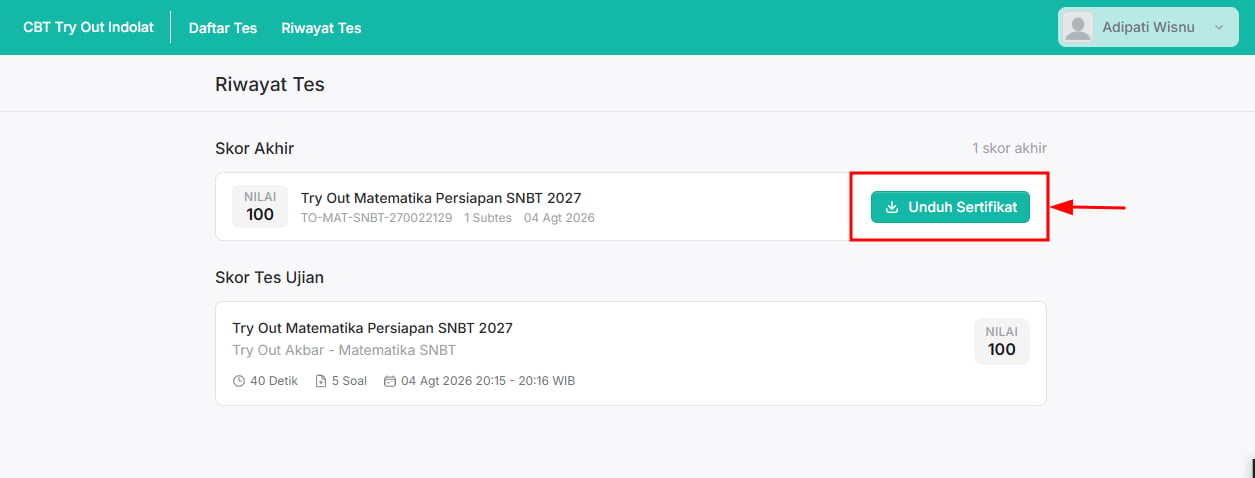
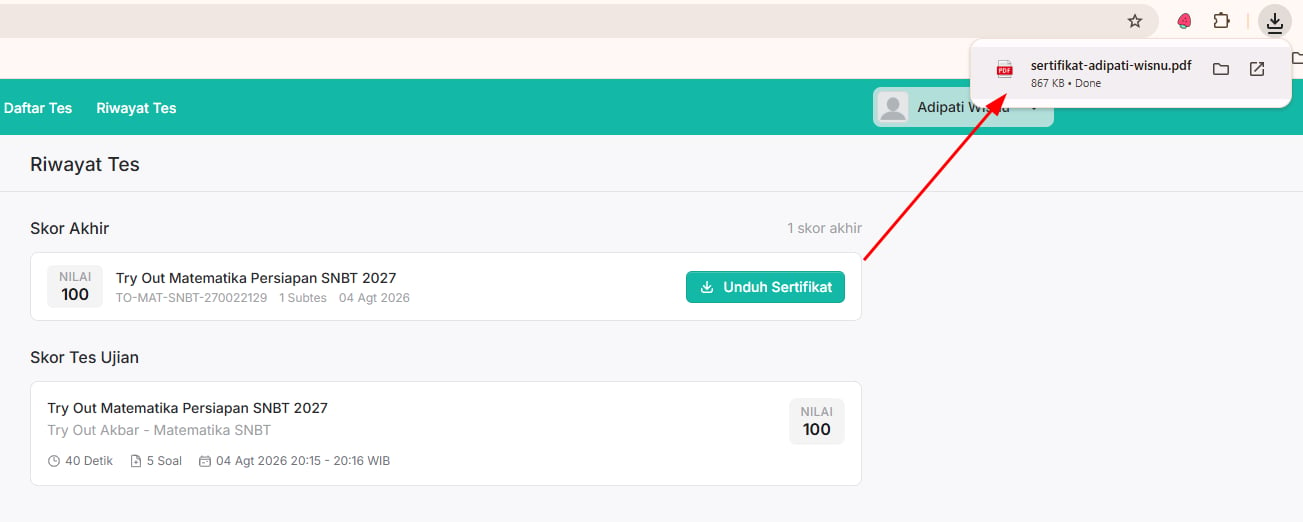
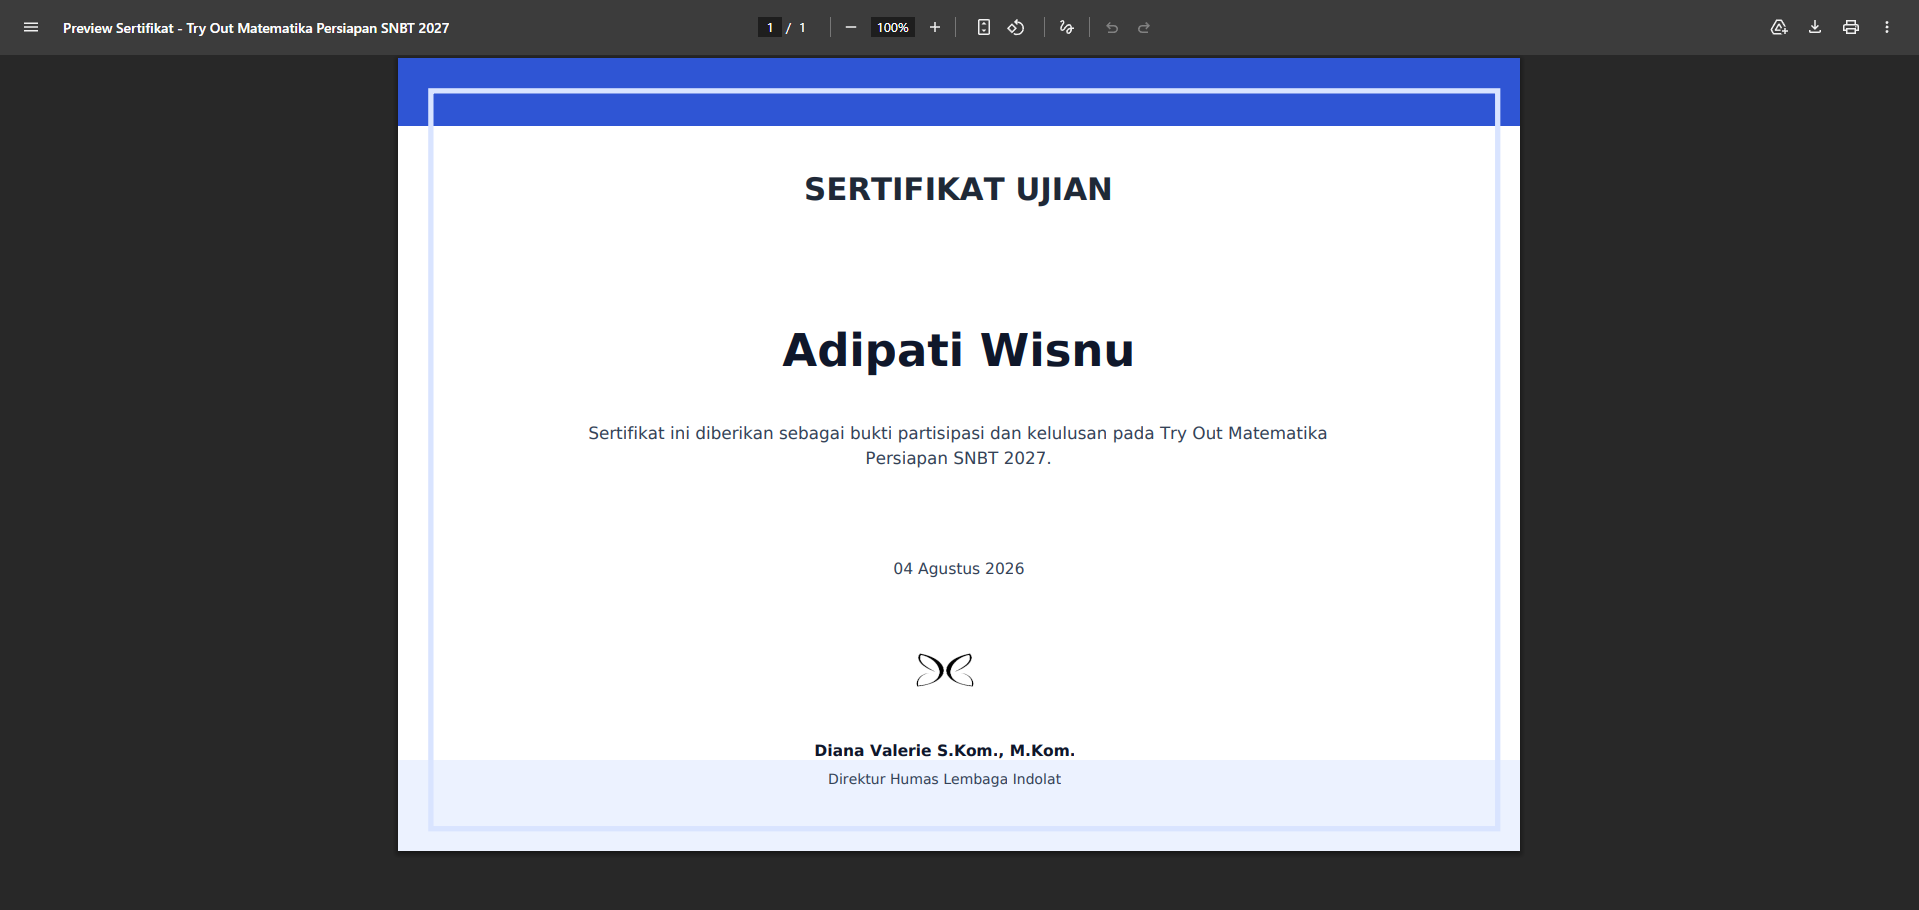
The participant clicks Download Certificate
C. Admin Approval Required
If the certificate needs an admin check, the process is as follows:The admin turns on Needs manual review
The Request Certificate button appears for the participant
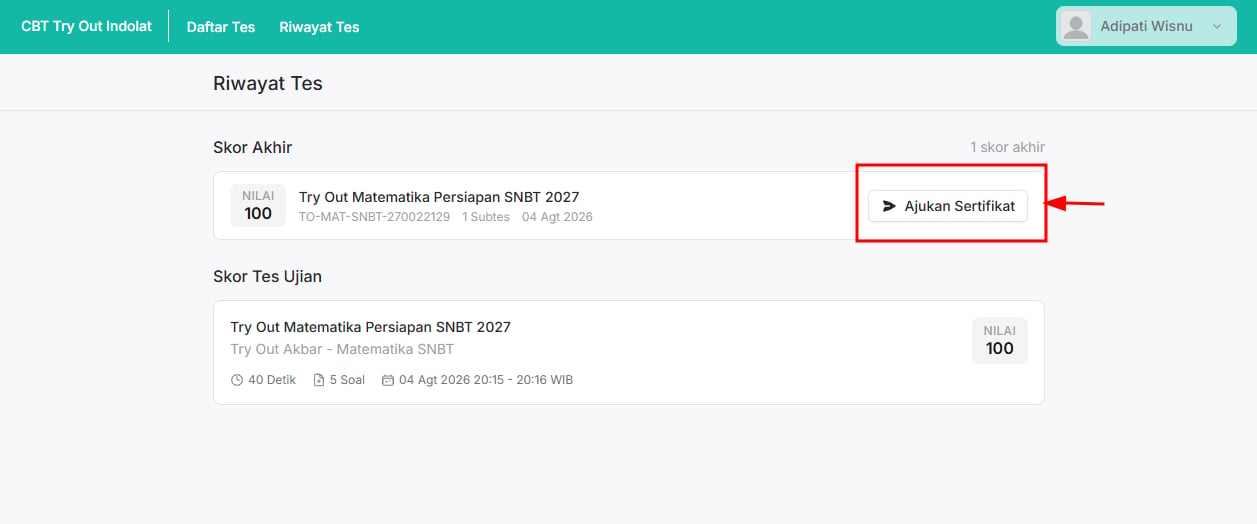
The participant clicks Request Certificate
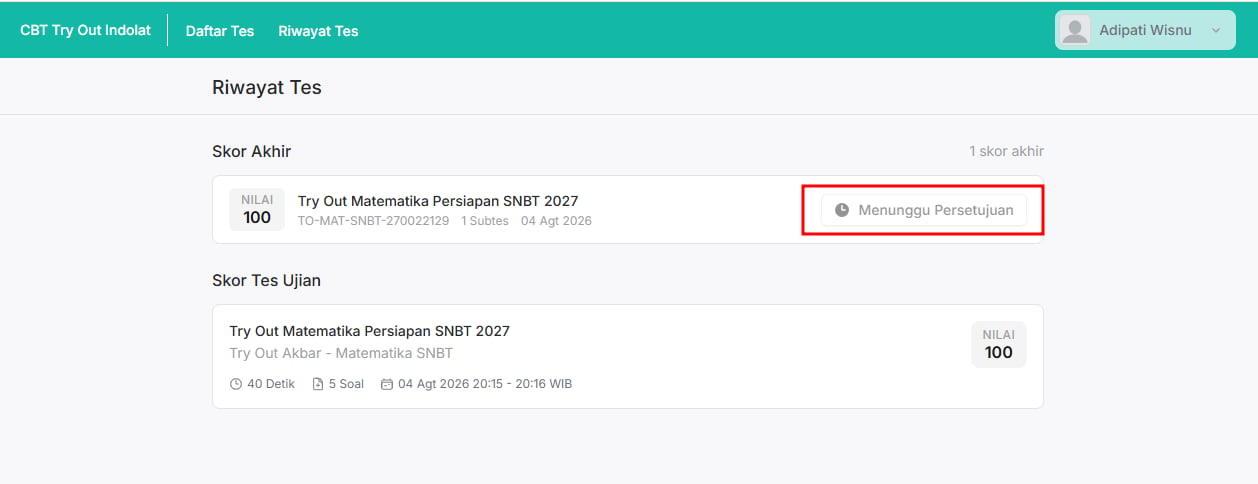
The admin approves the request
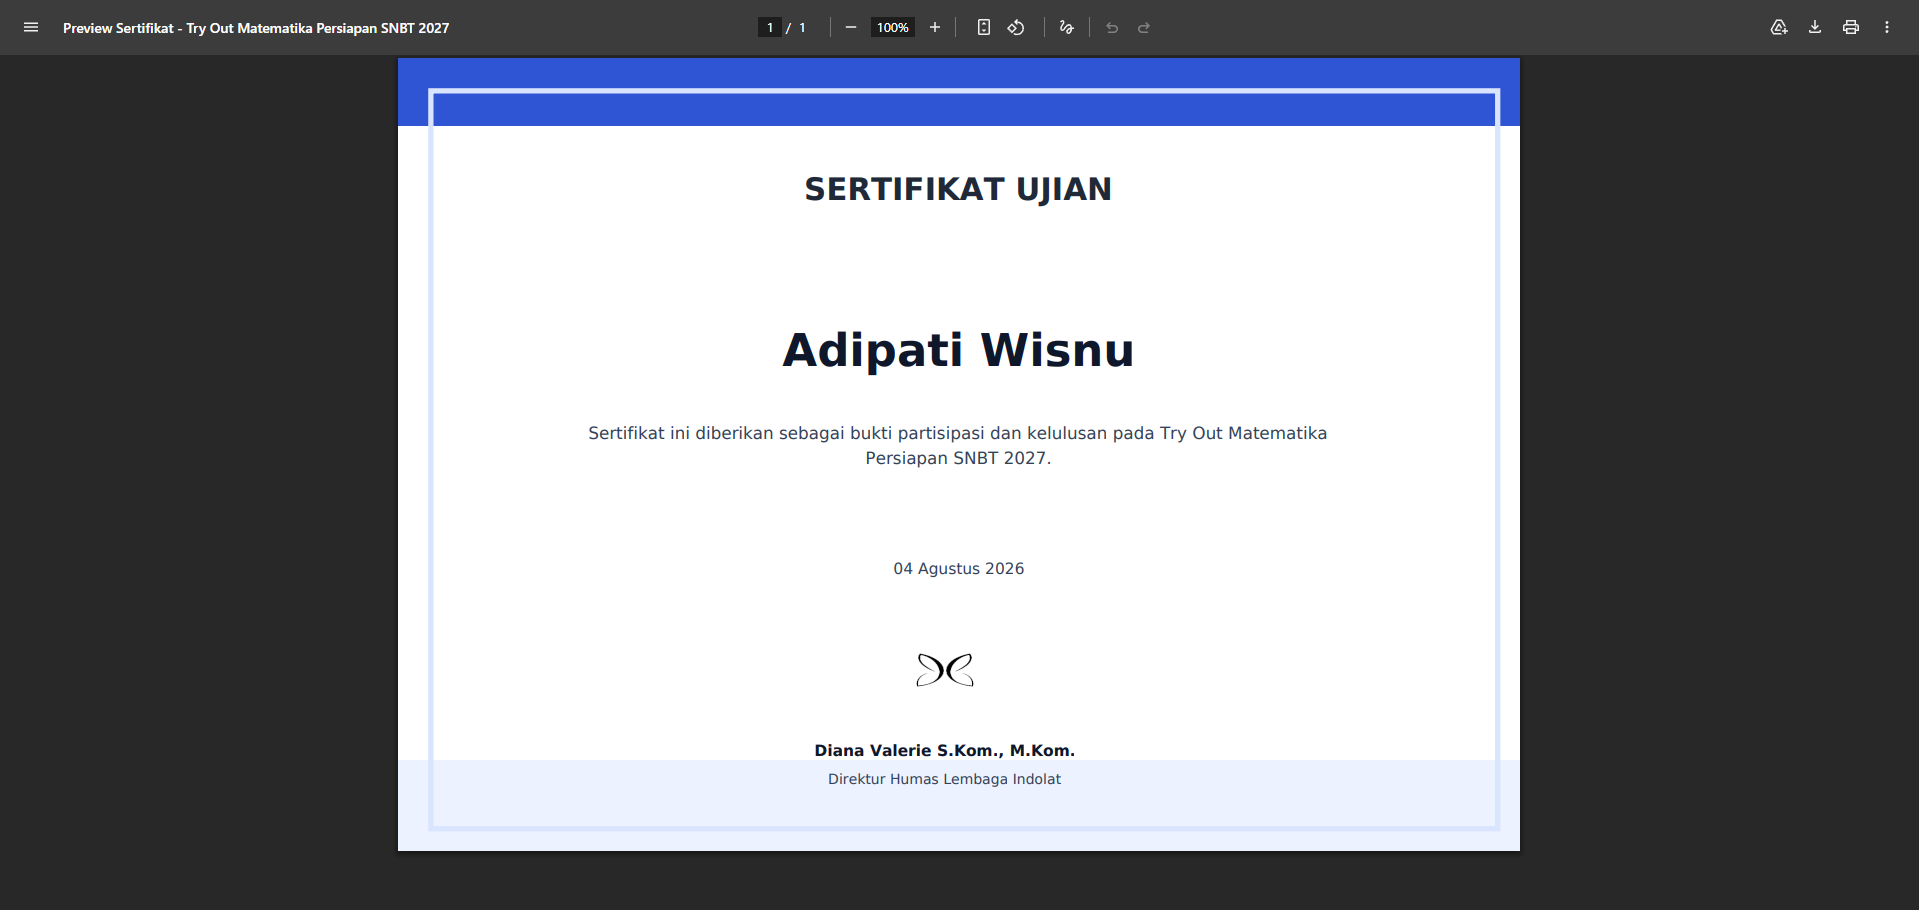
The Download Certificate button appears for the participant
The participant clicks Download Certificate
- Request Certificate: the participant hasn’t requested the certificate yet.
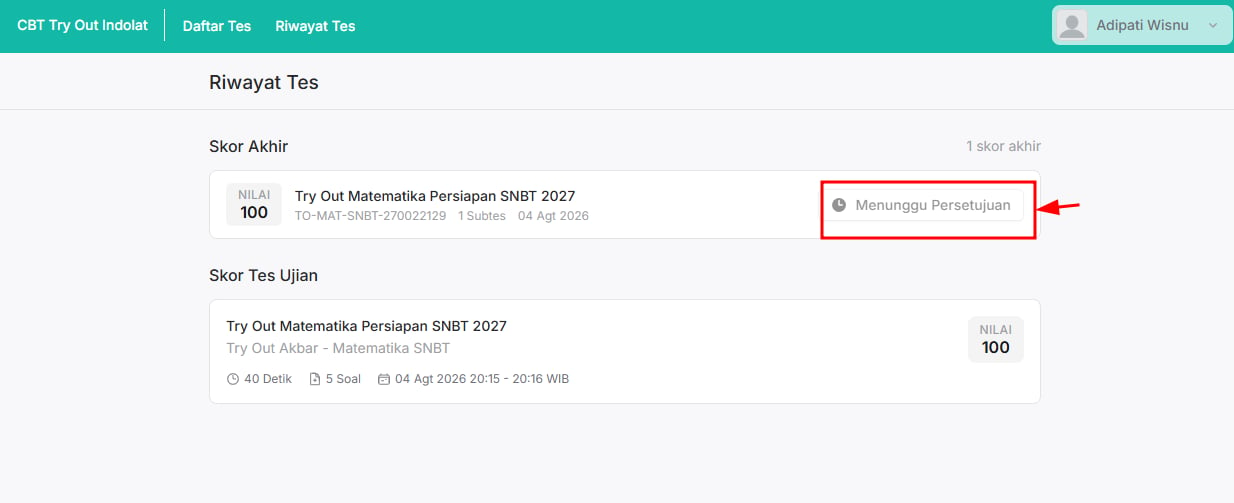
- Waiting for Approval: the admin is reviewing the request.
- Download Certificate: the request has been approved.
3. The Admin Approves Certificate Requests
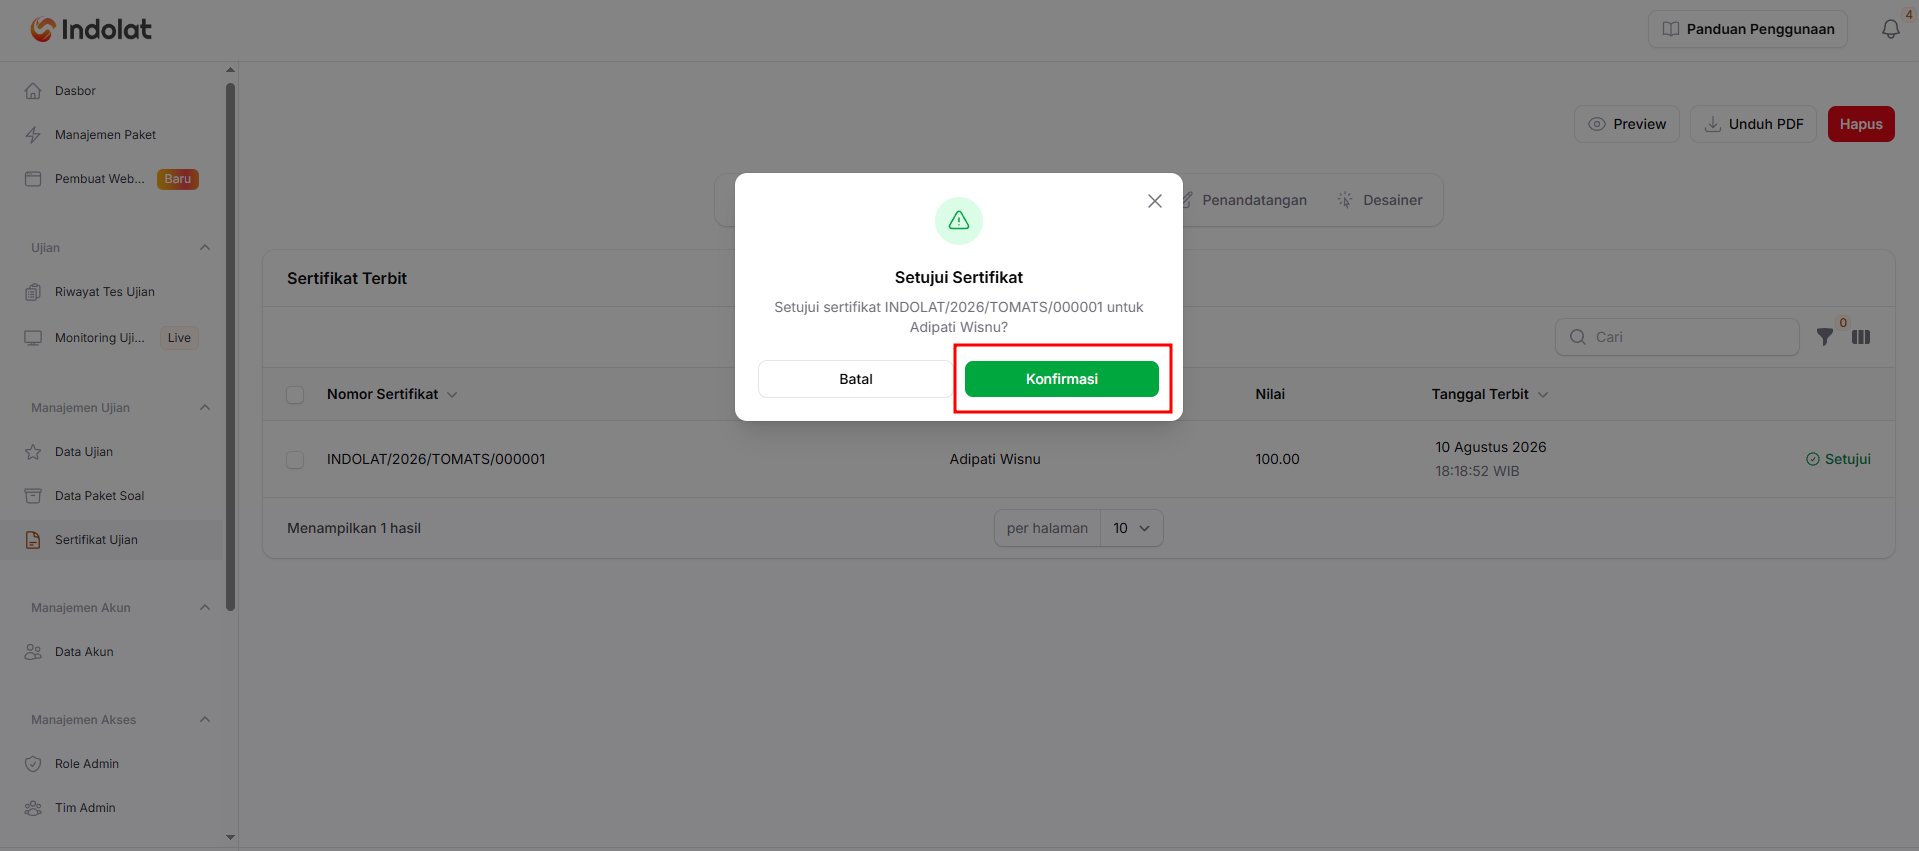
This section applies when Needs manual review is turned on in the certificate settings. This means participants who meet the requirements can’t download the certificate straight away. They need to request it first, and then the admin approves it.💡 Example: Adipati Wisnu has finished Try Out Matematika Persiapan SNBT 2027 with a score of 100. Because the certificate needs admin approval, Adipati first chooses Request Certificate. Once the request is sent, the participant page shows the status Waiting for Approval.
Open Exam Certificate, then click Edit
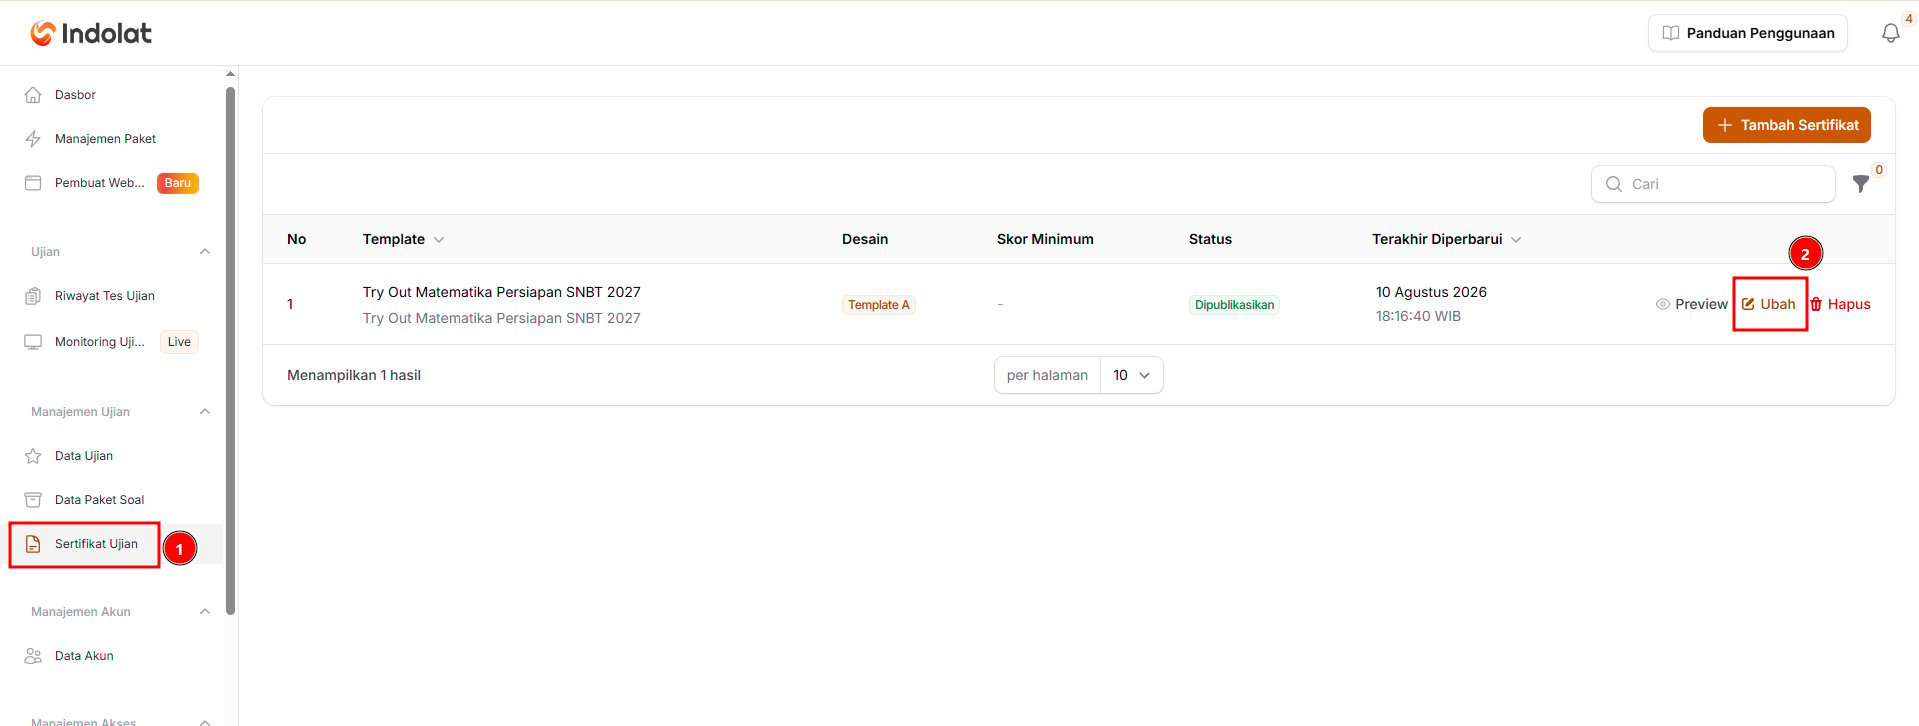
Open Certificate Issued, then click Approve
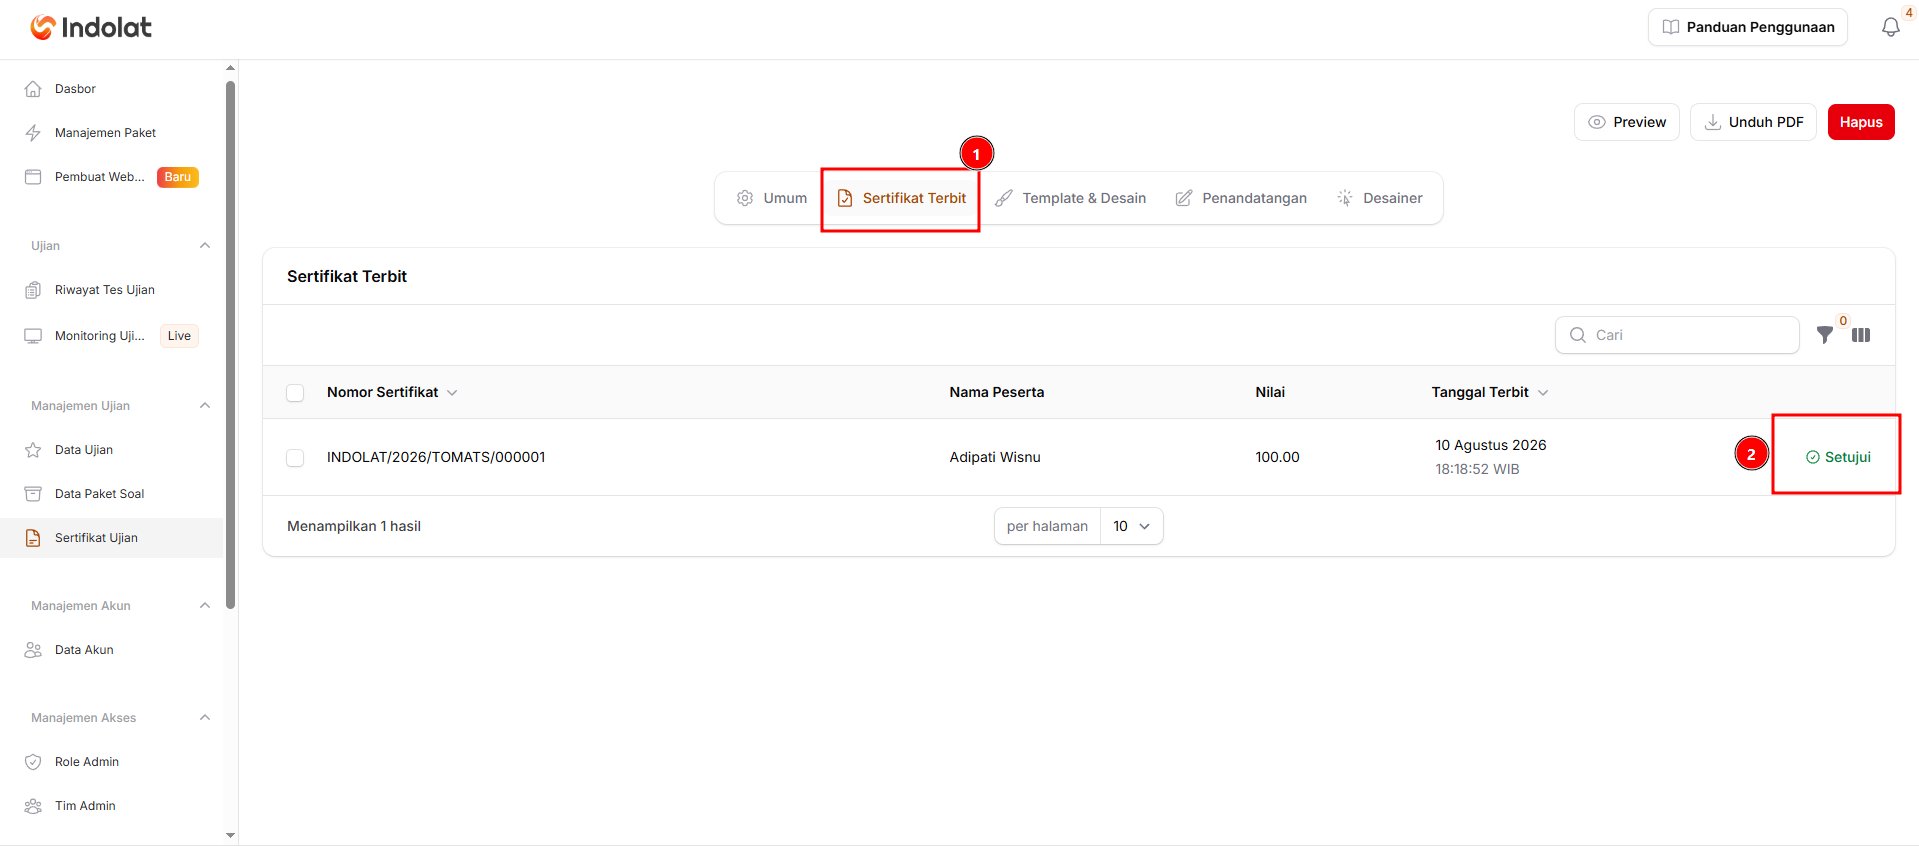
- Certificate Number
- Participant Name
- Score
- Issue Date
Confirm the certificate approval