
- Participants create their own account on the account registration page.
- The admin adds accounts one by one with the Add Account button.
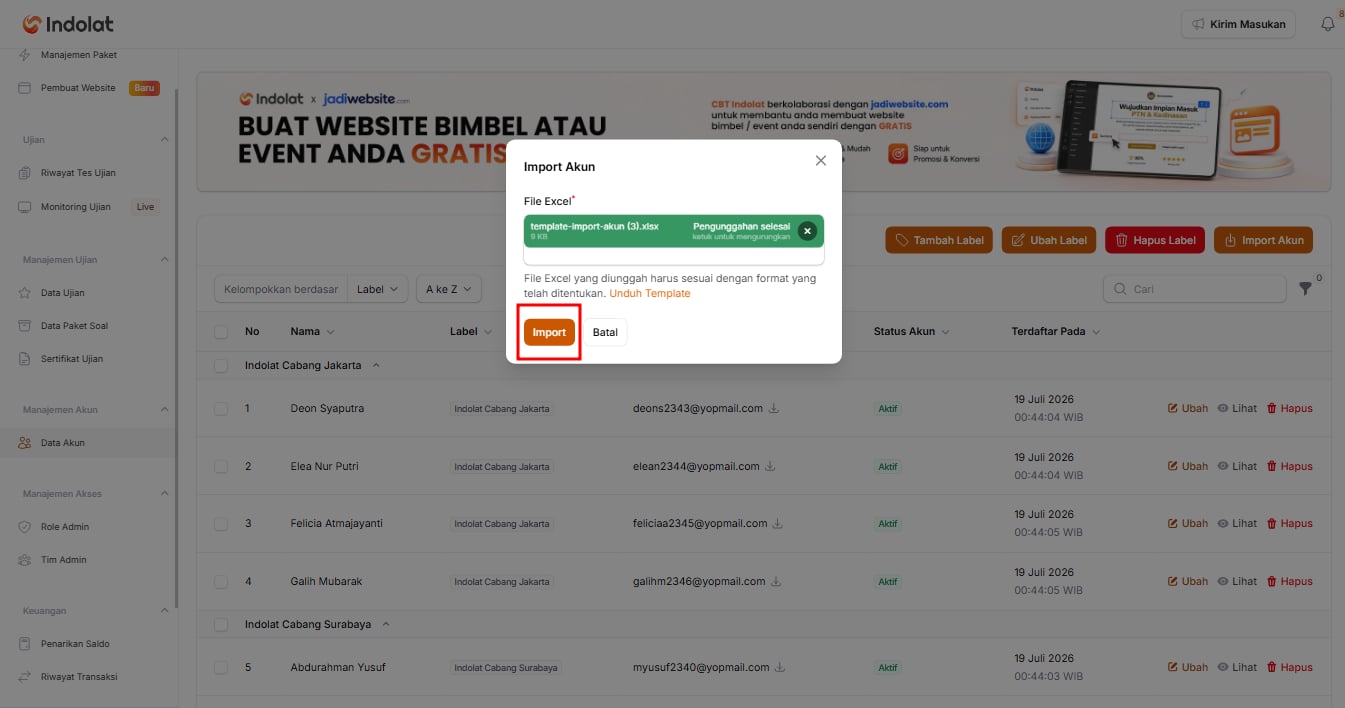
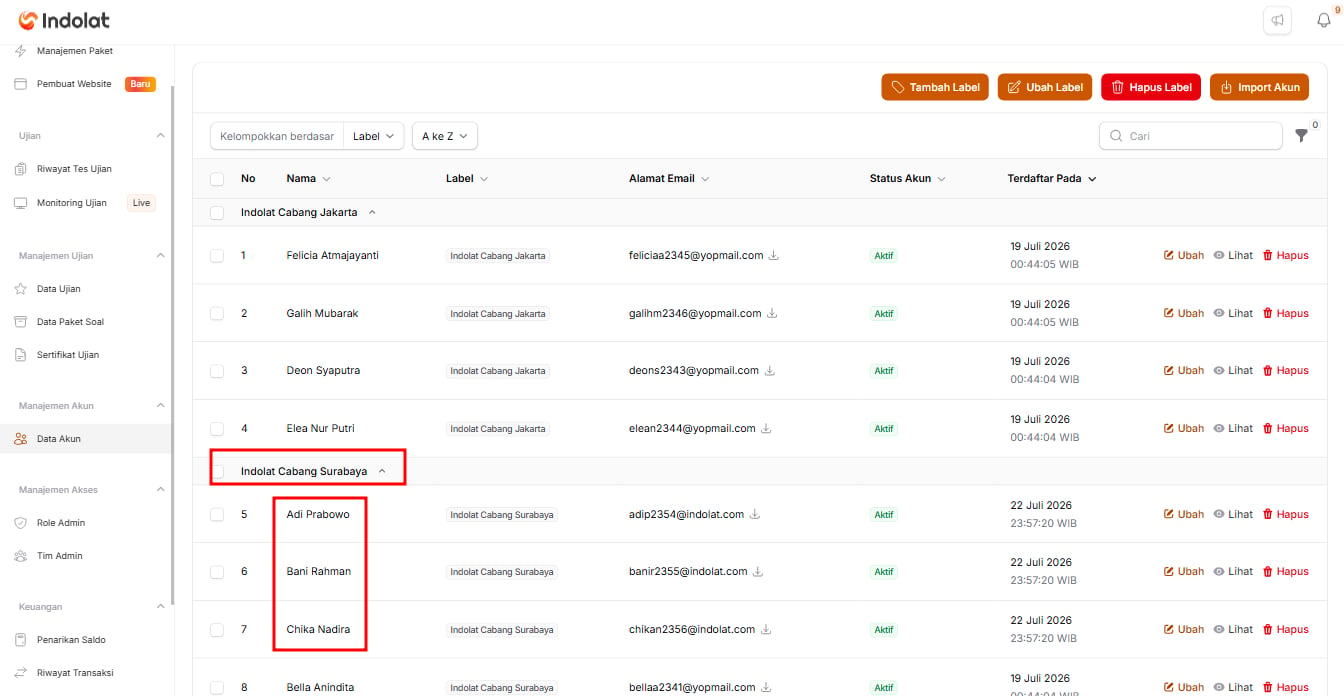
- The admin adds accounts with Import Accounts using an Excel file.
1. Get to Know the Account Data Page
The Account Data page is where you view and manage every participant account that can use the CBT Indolat system. 💡 For example, say you are the admin of Indolat Tutoring Centre, with participants from several branches, such as:- Indolat Surabaya Branch
- Indolat Jakarta Branch
- Indolat Promotion Programme Participants
- and General Participants
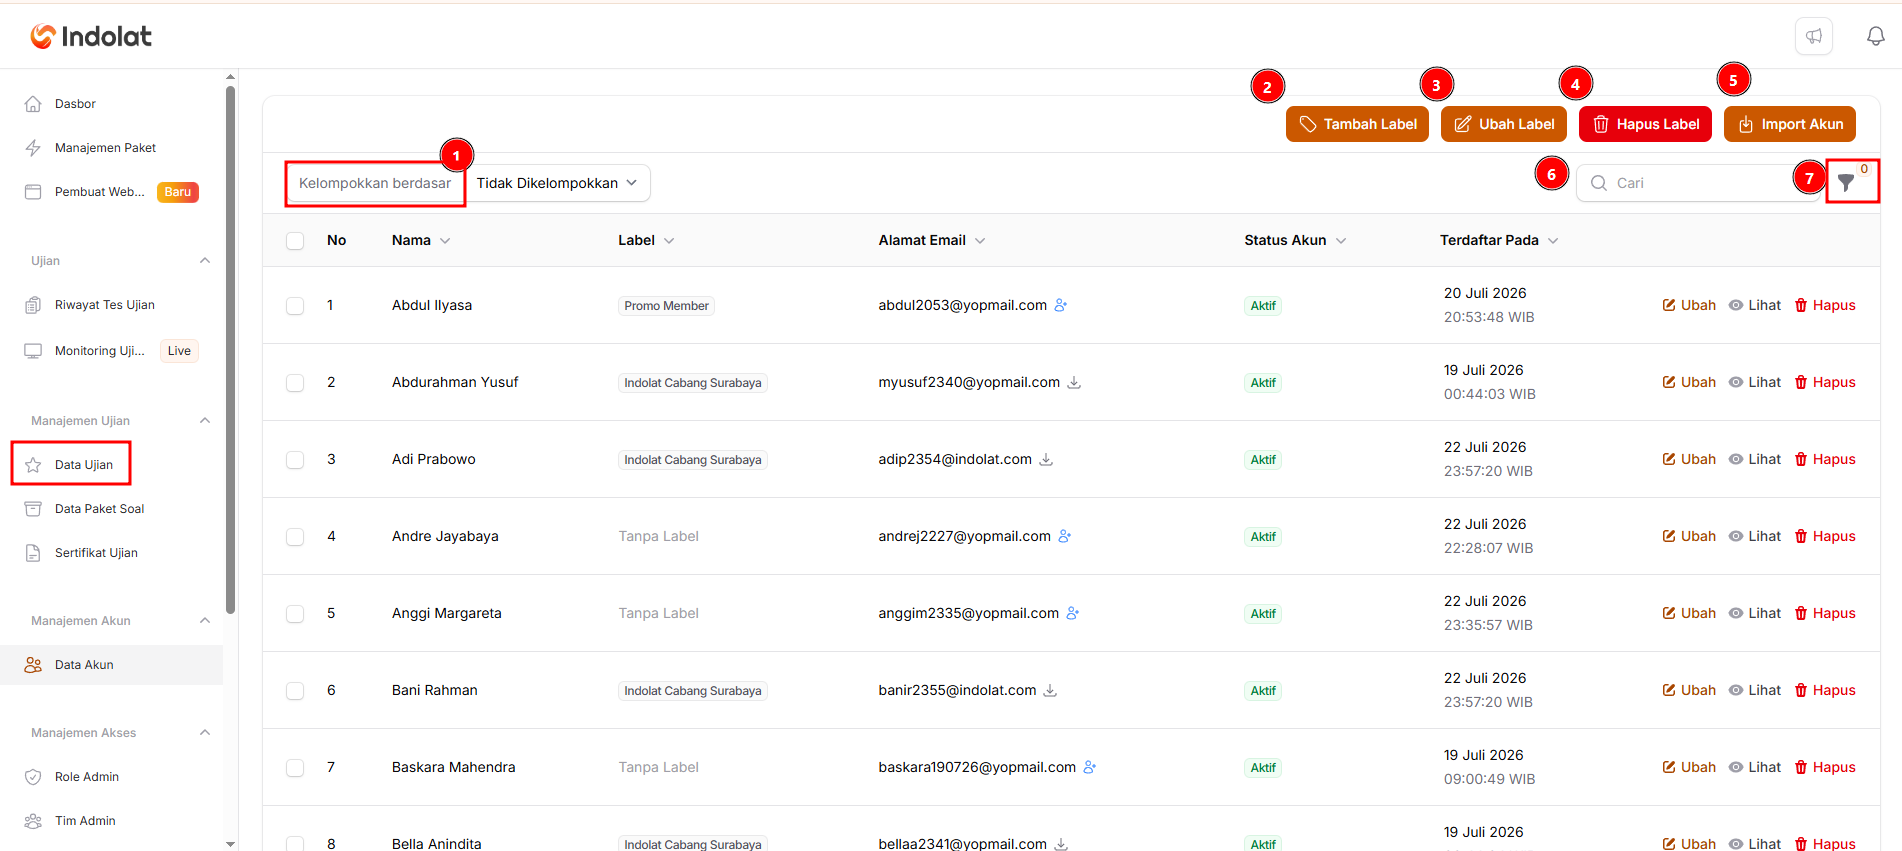
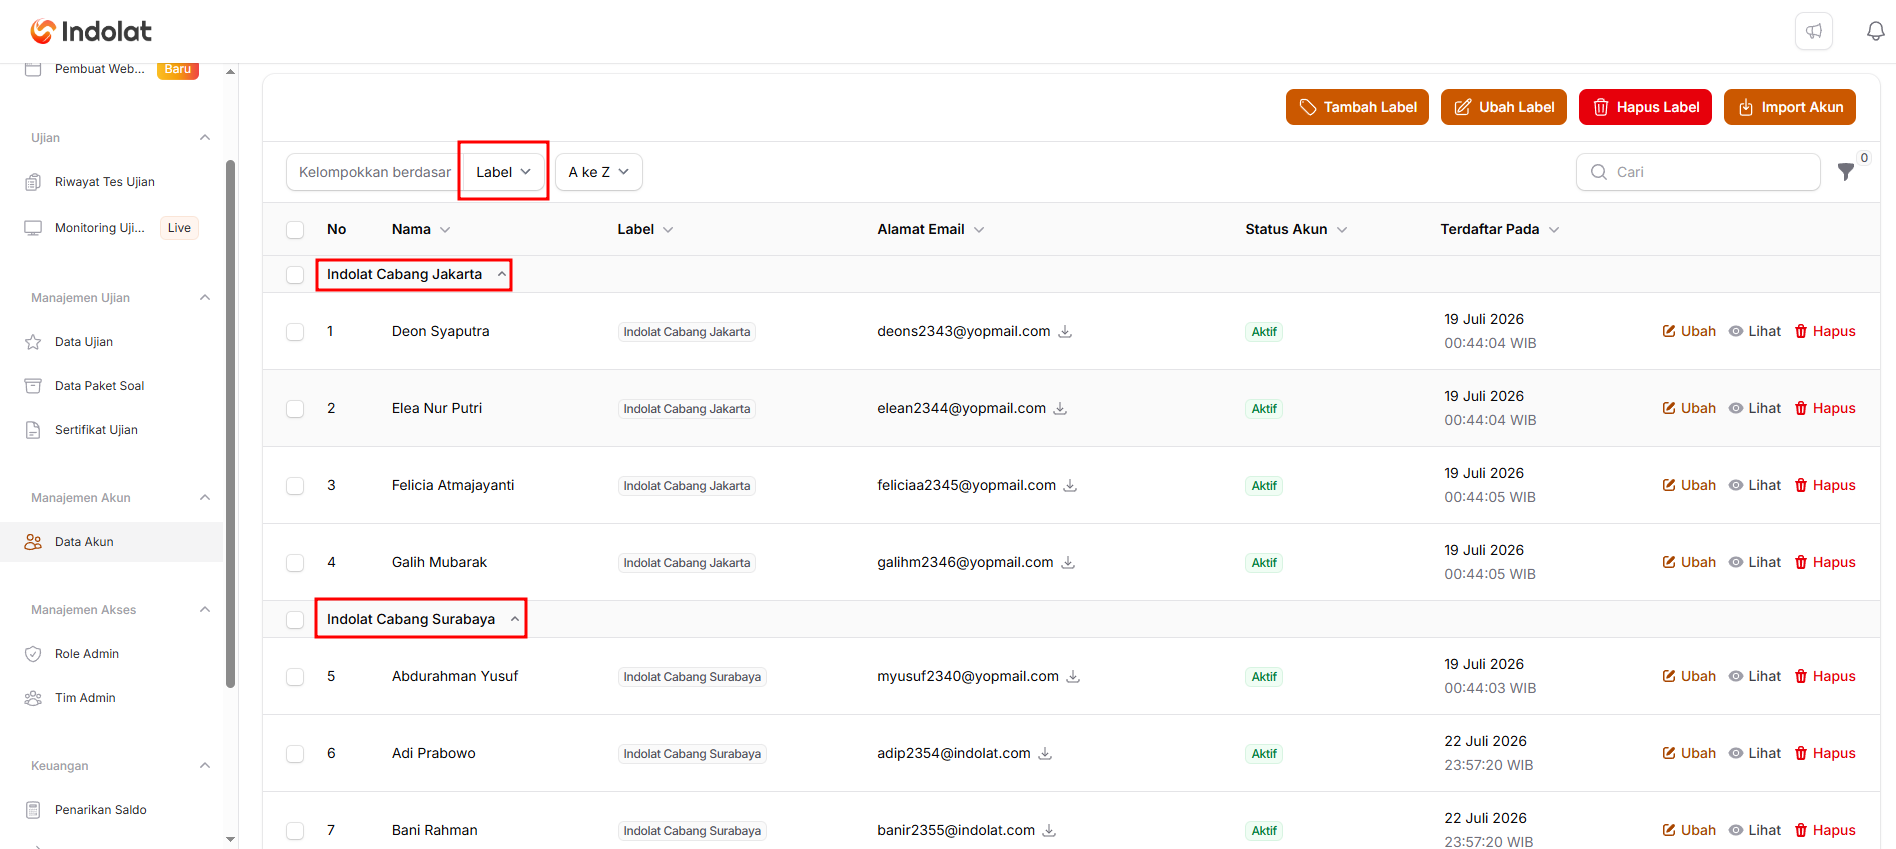
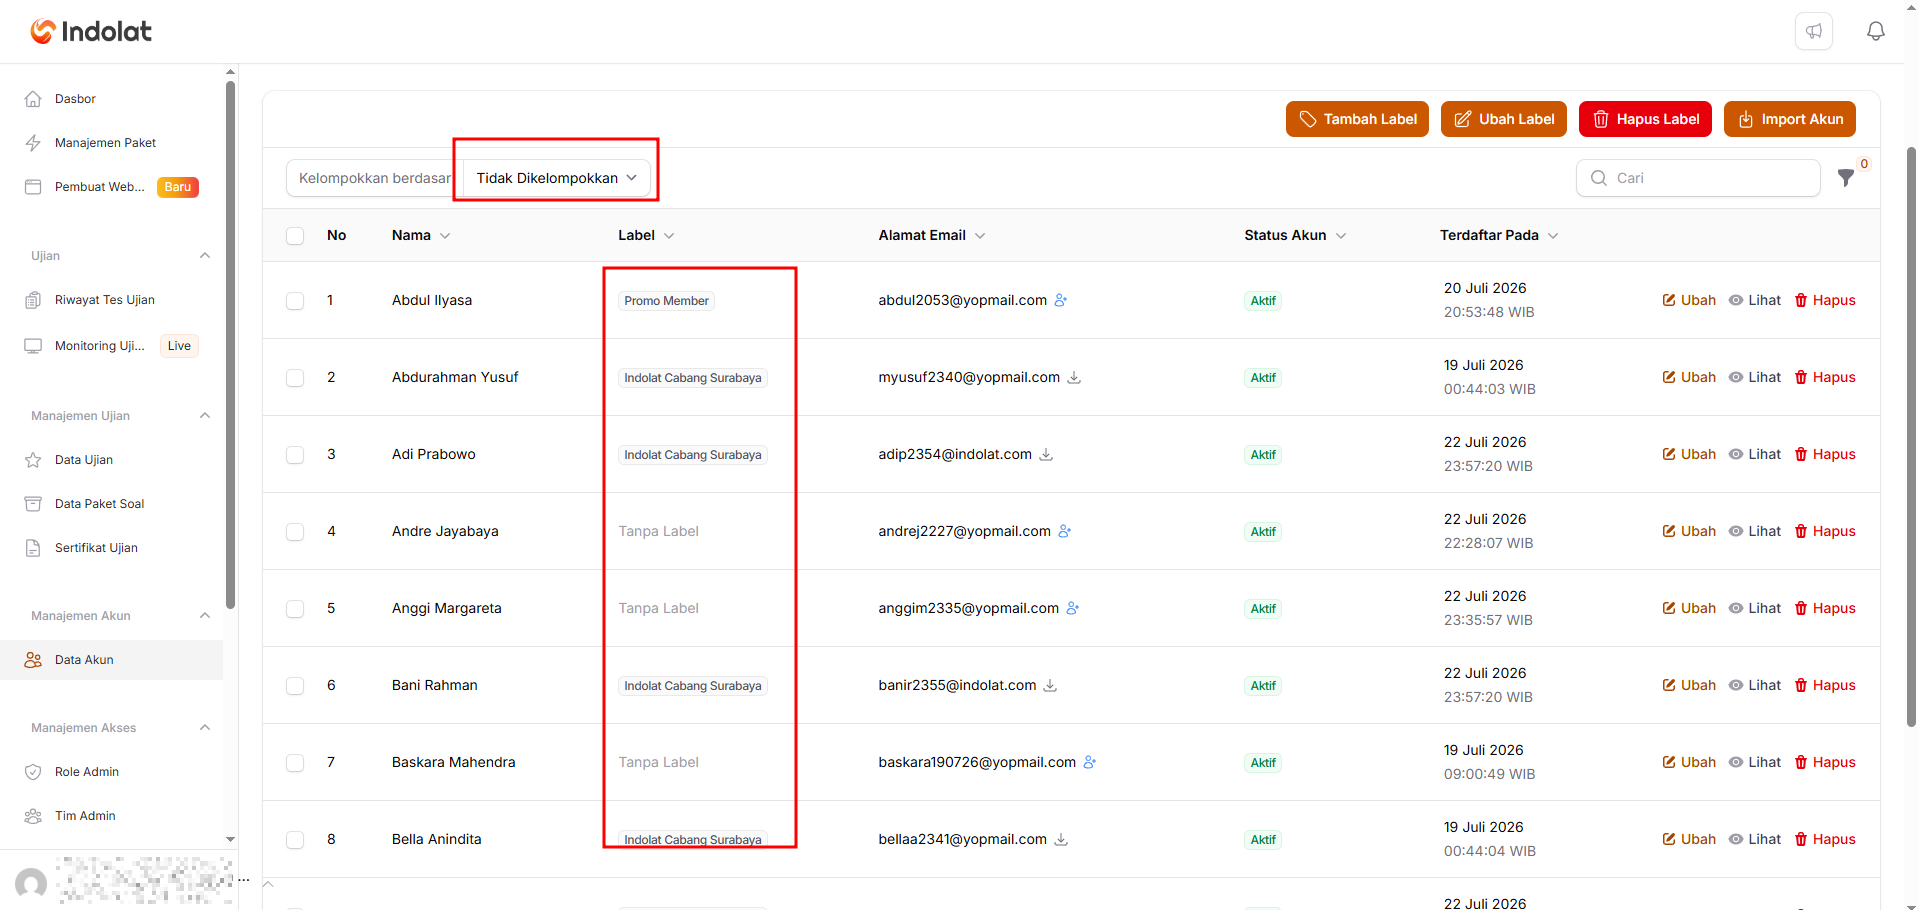
1. Group By
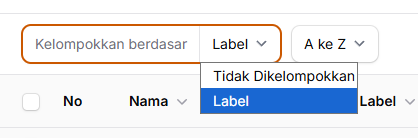
- Choose Label if you want participants in the same group to be shown together.
- Choose Ungrouped if you want all accounts shown in one plain list.
2. Add Label
Use it to create a new participant group. Open the Label tab, click Add Label, fill in Label Name, then click Save.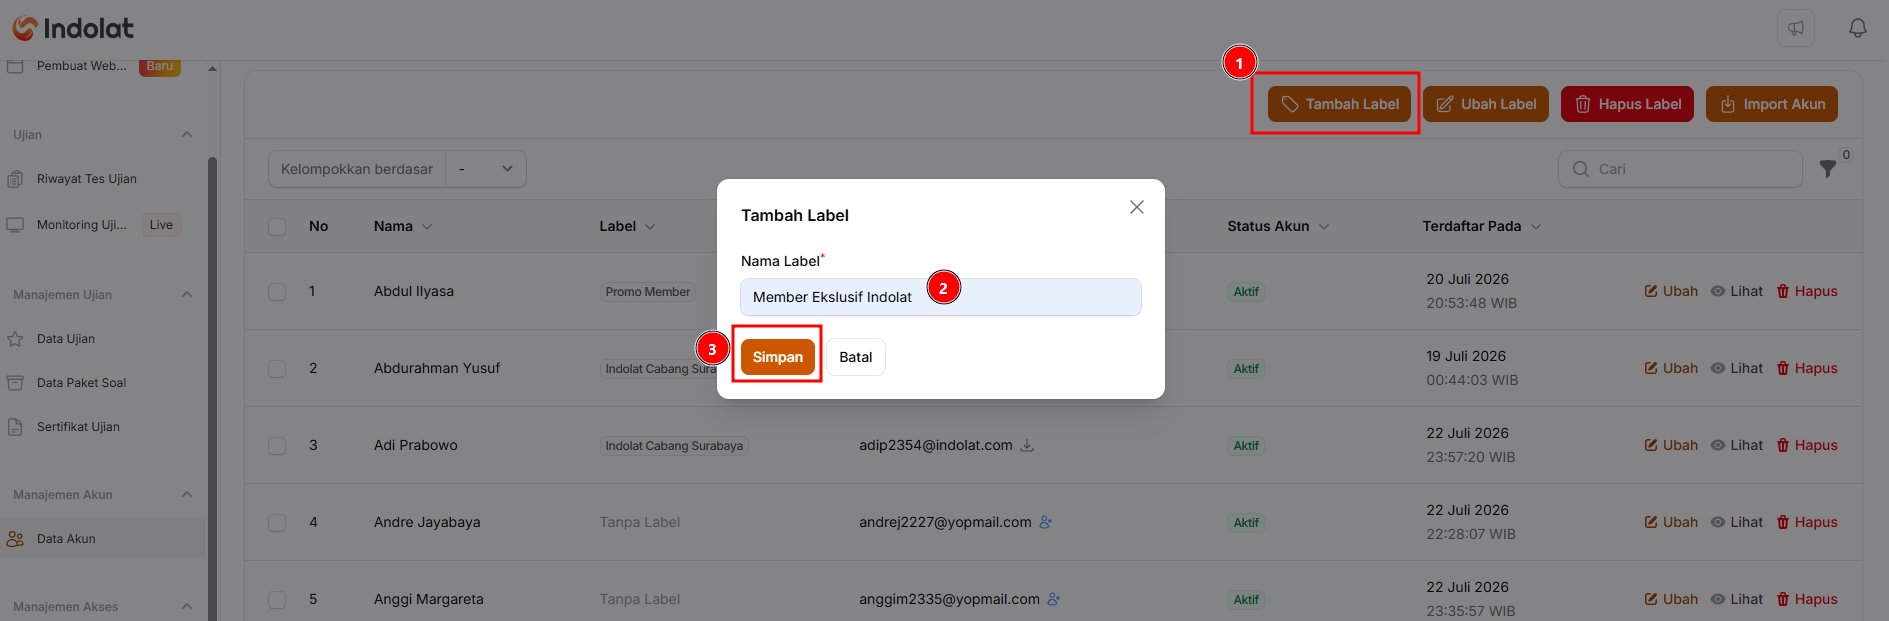
- Indolat Surabaya Branch
- Indolat Jakarta Branch
- 2026 Participants
- Promo Member
3. Edit Label
Use it to rename a label you have already created.
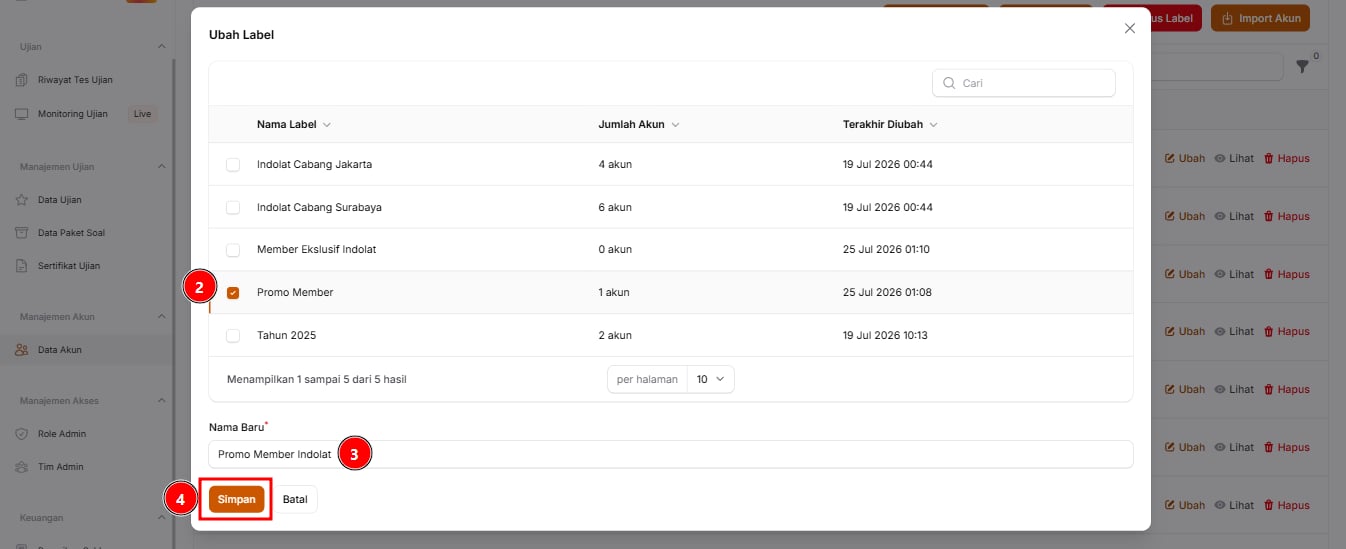
- Open the Label tab.
- Click Edit on the row of the label you want to rename.
- Enter the new name in the Label Name field.
- Click Save to save the new name.
4. Delete Label
Use it to delete labels you no longer need.
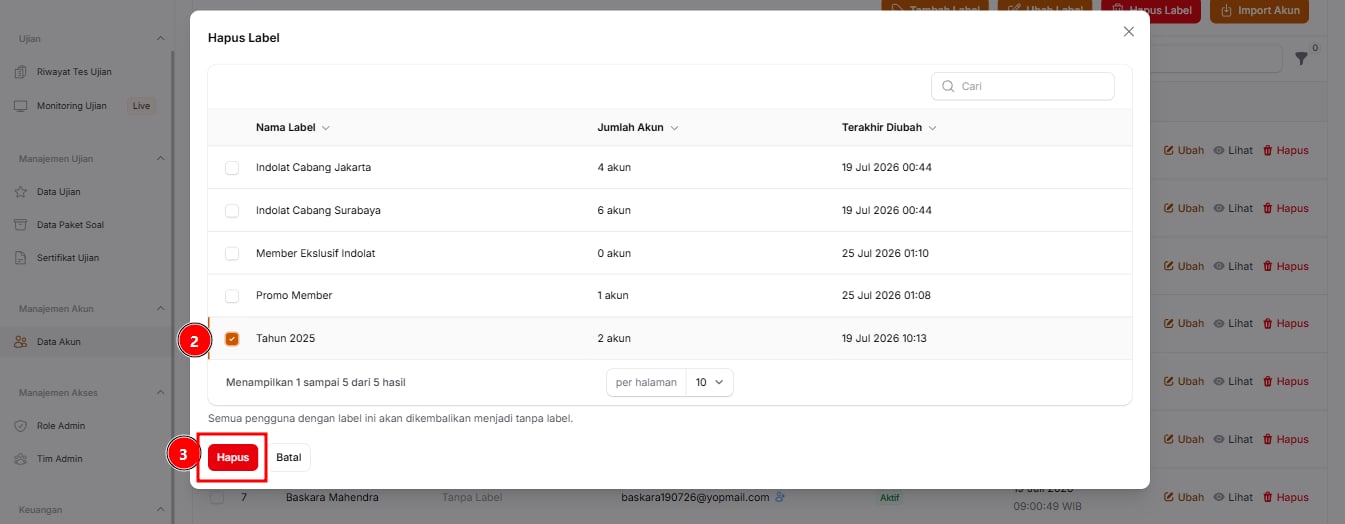
- Open the Label tab.
- Click Delete on the row of the label you want to delete.
- Click Delete in the confirmation window.
Deleting a label only removes the group.The participant accounts stay saved on the Account Data page and move to No Label.
5. Add Account
Use it to add participant accounts one at a time, without an Excel file.- On the Account tab, click Add Account.
- Fill in Name, Email Address and Password. You can leave the Label field empty.
- Leave Active Status switched on so the account can be used straight away.
- Click Create.
6. Import Accounts
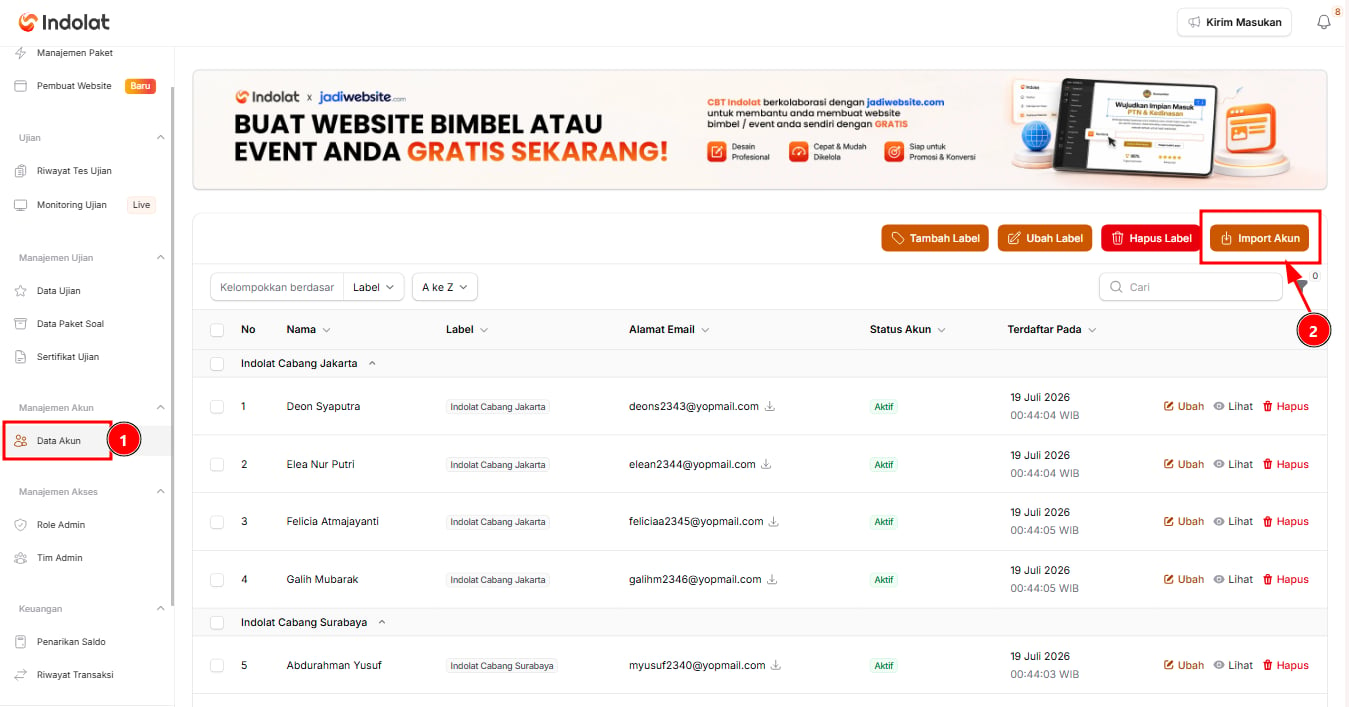
Use it to add many participant accounts at once from an Excel file.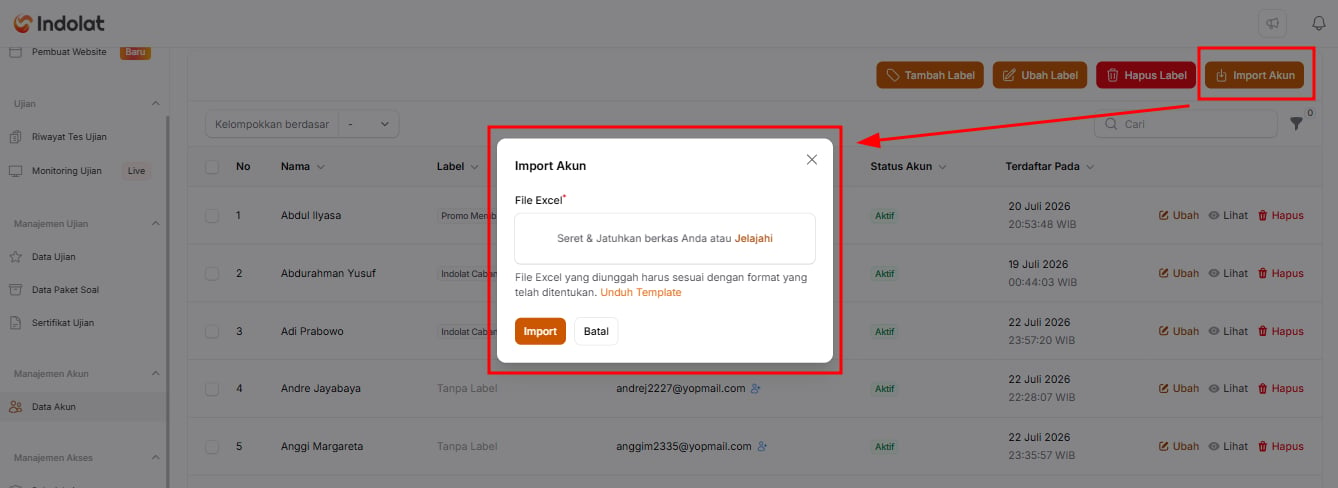
7. Search
Use the Search field to find a specific account without going through the list one by one. For example, type Rosa Adinda to show that participant’s account.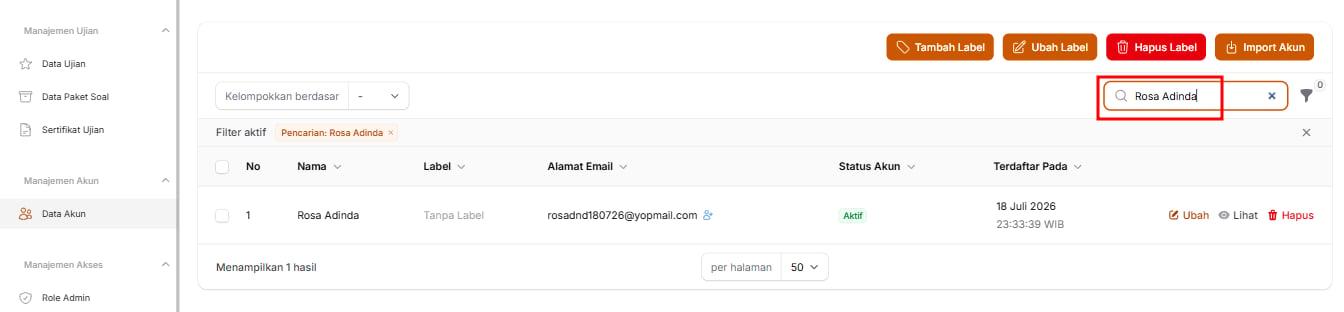
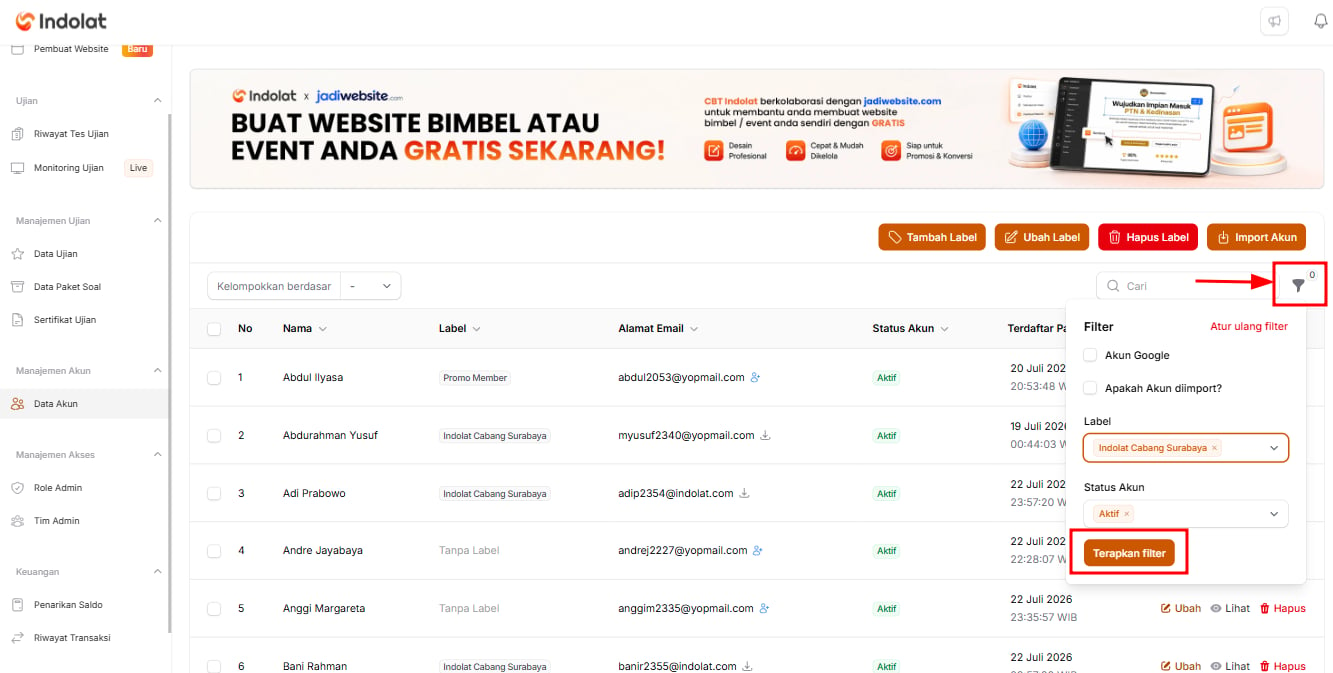
8. Filter
Click Filter if you want to narrow the account list down by certain criteria. For example, you only want to see:- accounts with the label Indolat Surabaya Branch; or
- accounts with the status Active.
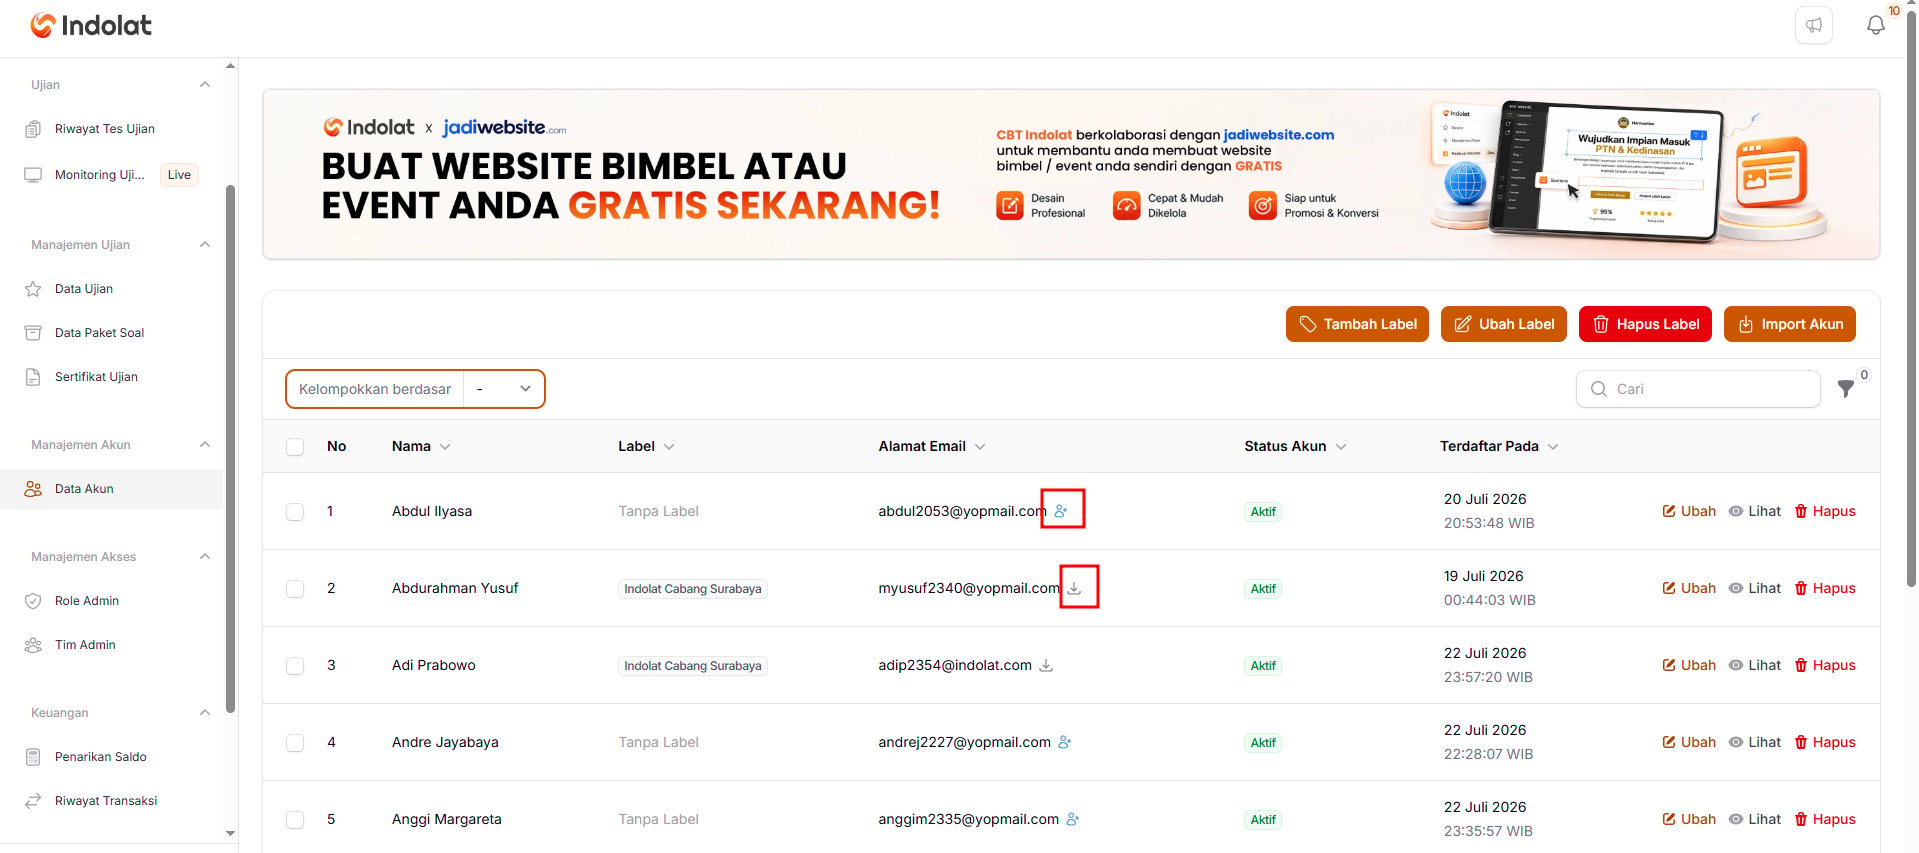
9. Marker Icons
In the Email Address column, an icon shows where each participant account came from:- Blue person icon
The account wasn’t imported: the participant created it on the account registration page, or an admin added it with Add Account. - Down arrow icon
The account was added by import, for example with Import Accounts on this page or Import Participants in an exam. - Google icon
The account was created by registering with a Google account. This icon appears next to one of the icons above.
2. Participants Create Their Own Accounts
Use this method if participants are allowed to create their own accounts.1
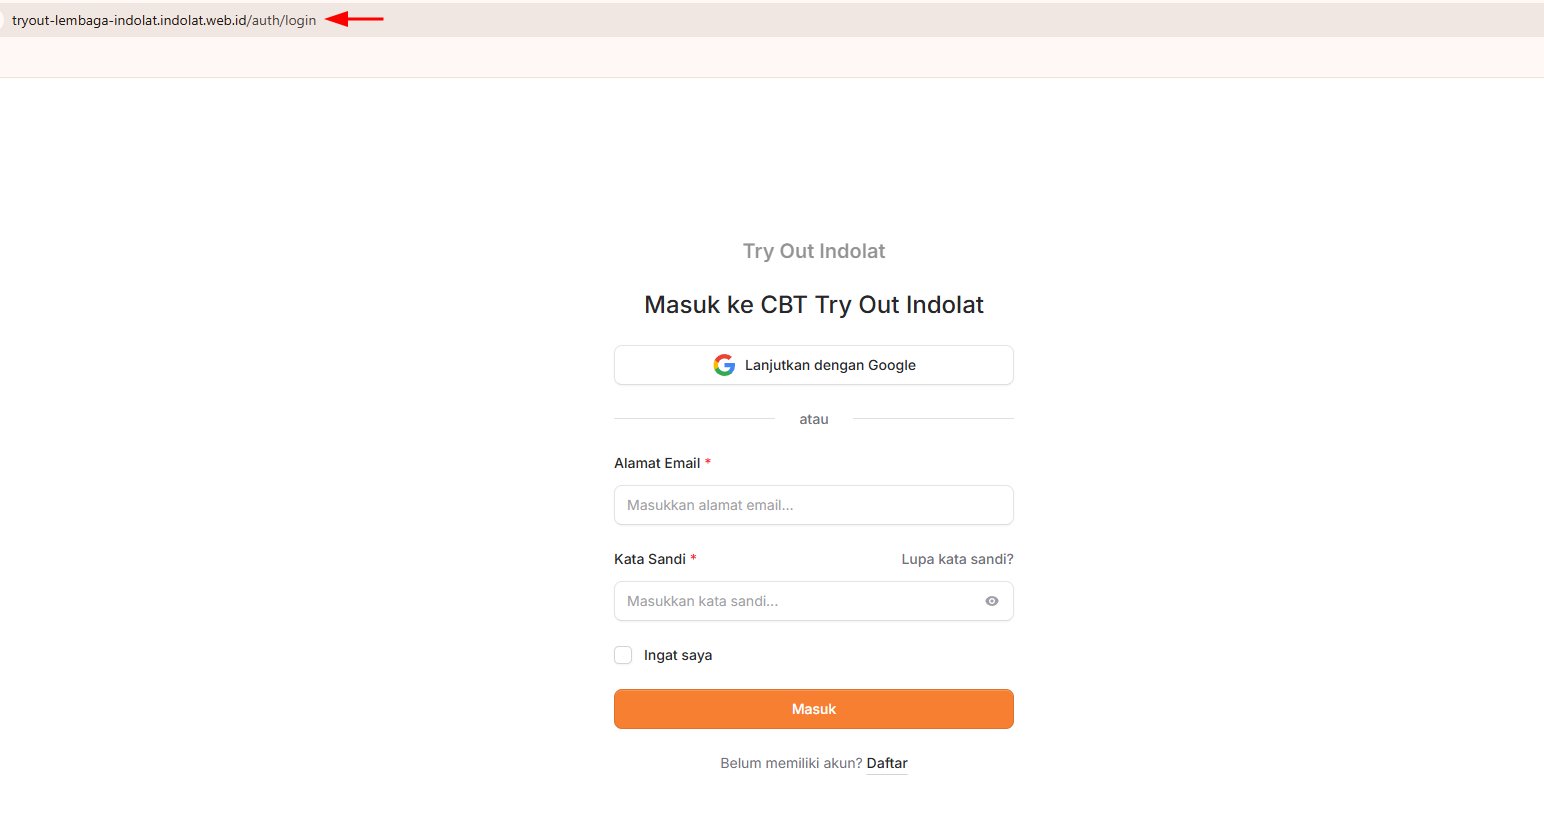
Participant opens the exam link
2
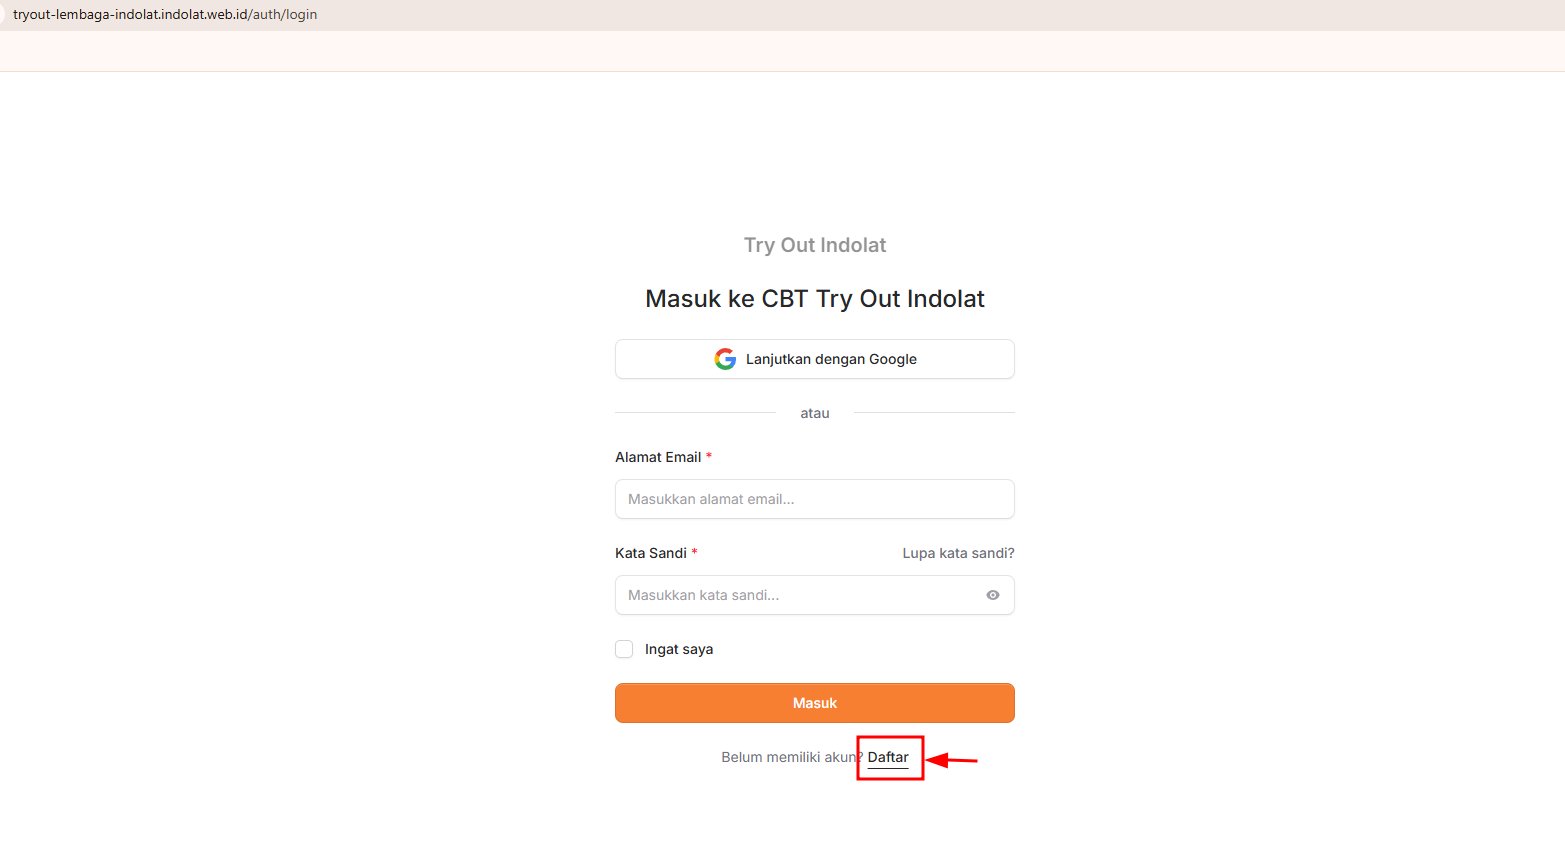
Click Register
3
Participant fills in their account details
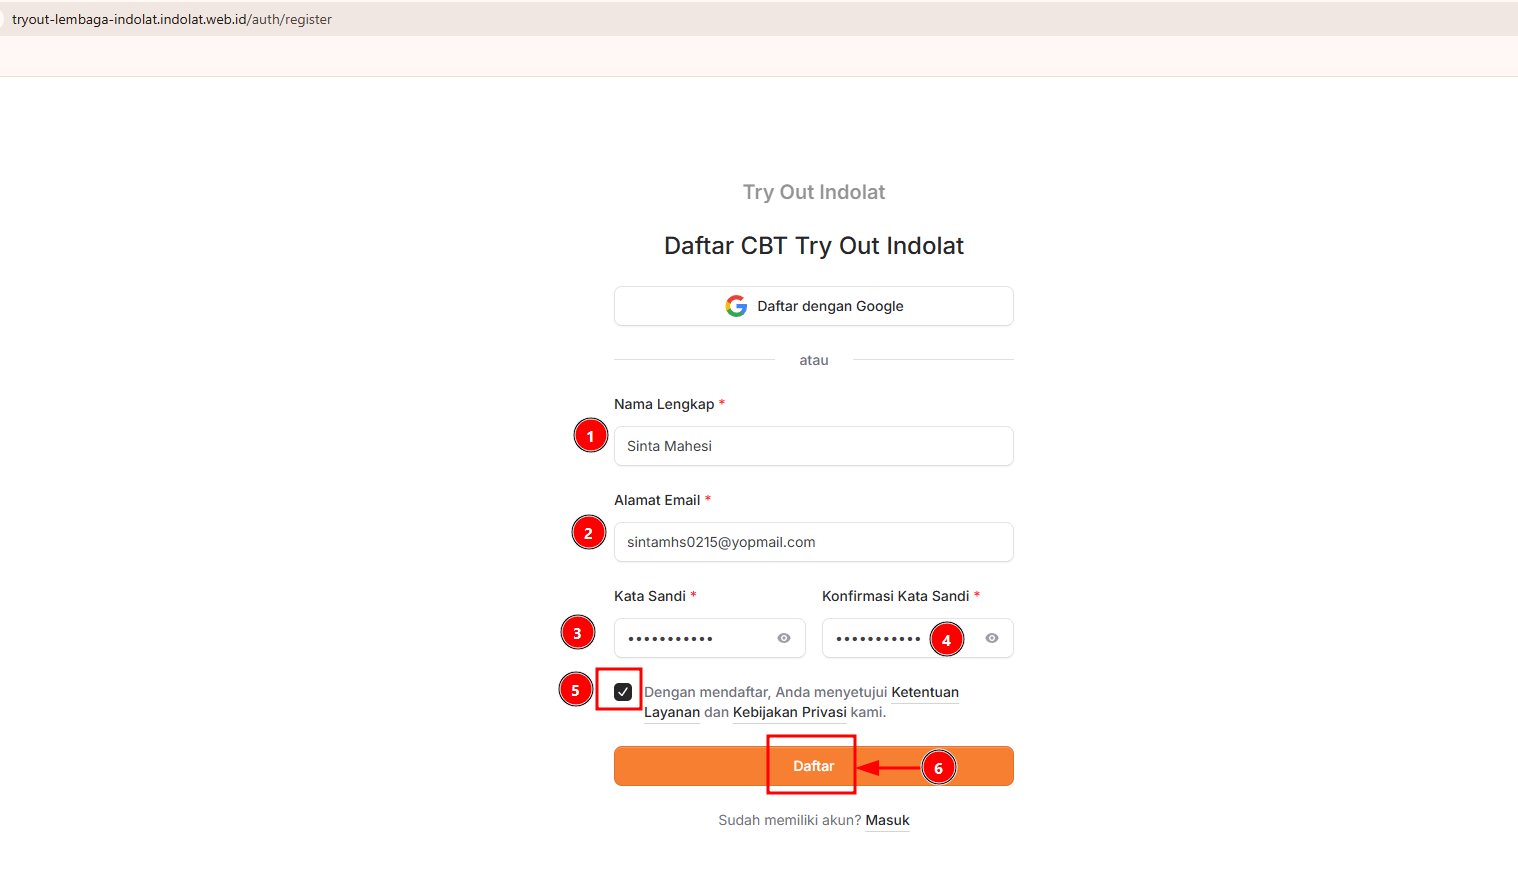
- Full Name
Enter the participant’s name as it will be used in the system. - Email Address
Enter an email address that is still active. The system sends the verification code to this email. - Password
Create a password that is easy to remember but hard for others to guess. - Confirm Password
Enter the same password again to make sure there are no typos. - Agreement to the Terms of Service and Privacy Policy
Tick this box to confirm the participant has read and agrees to the terms that apply. - Register
Once everything is filled in, click Register to create the account.
4
Participant verifies their email
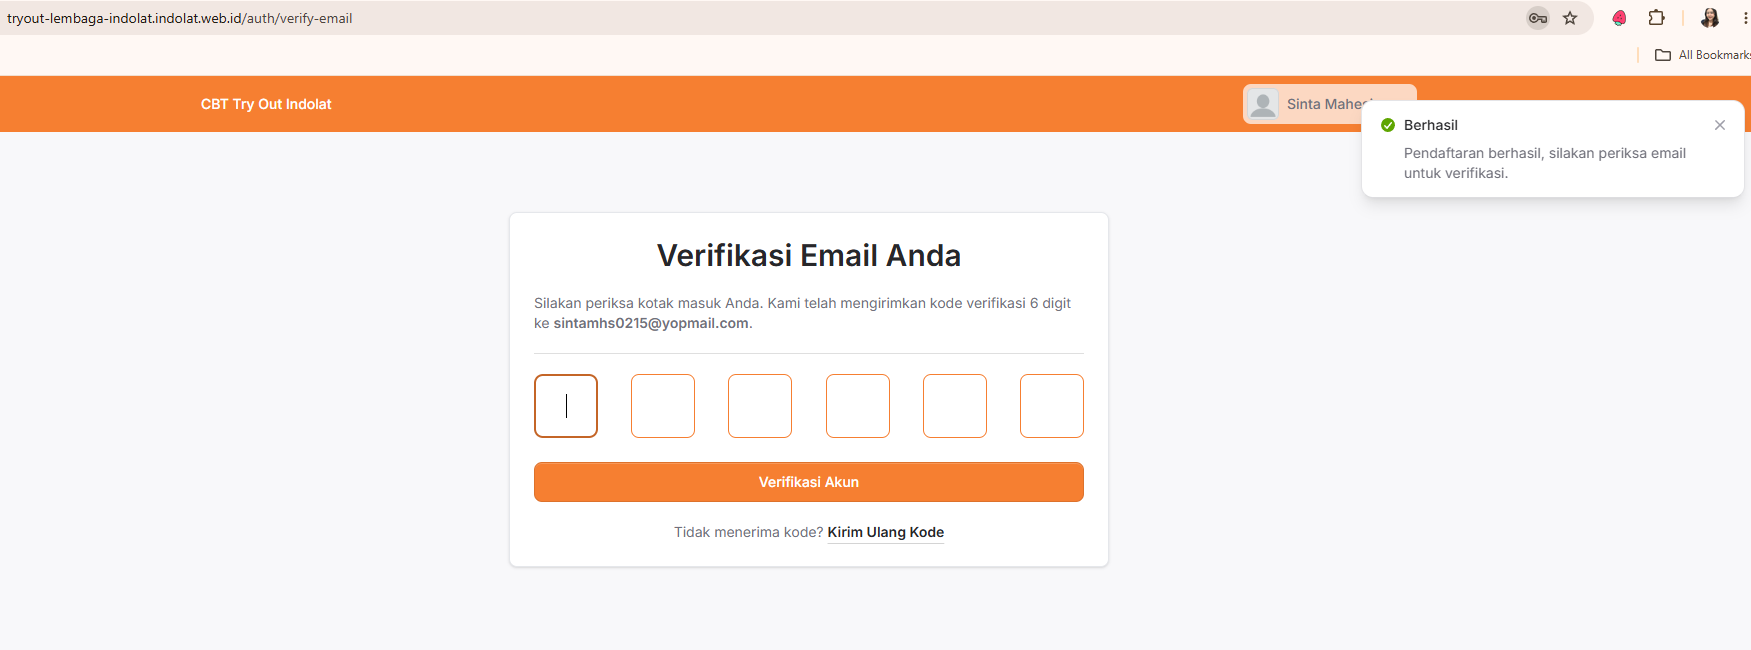
sintamhs0215@yopmail.com
What the participant needs to do:- Open the inbox of the registered email address.
- Look for the email from CBT Indolat.
- Copy the 6-digit verification code.
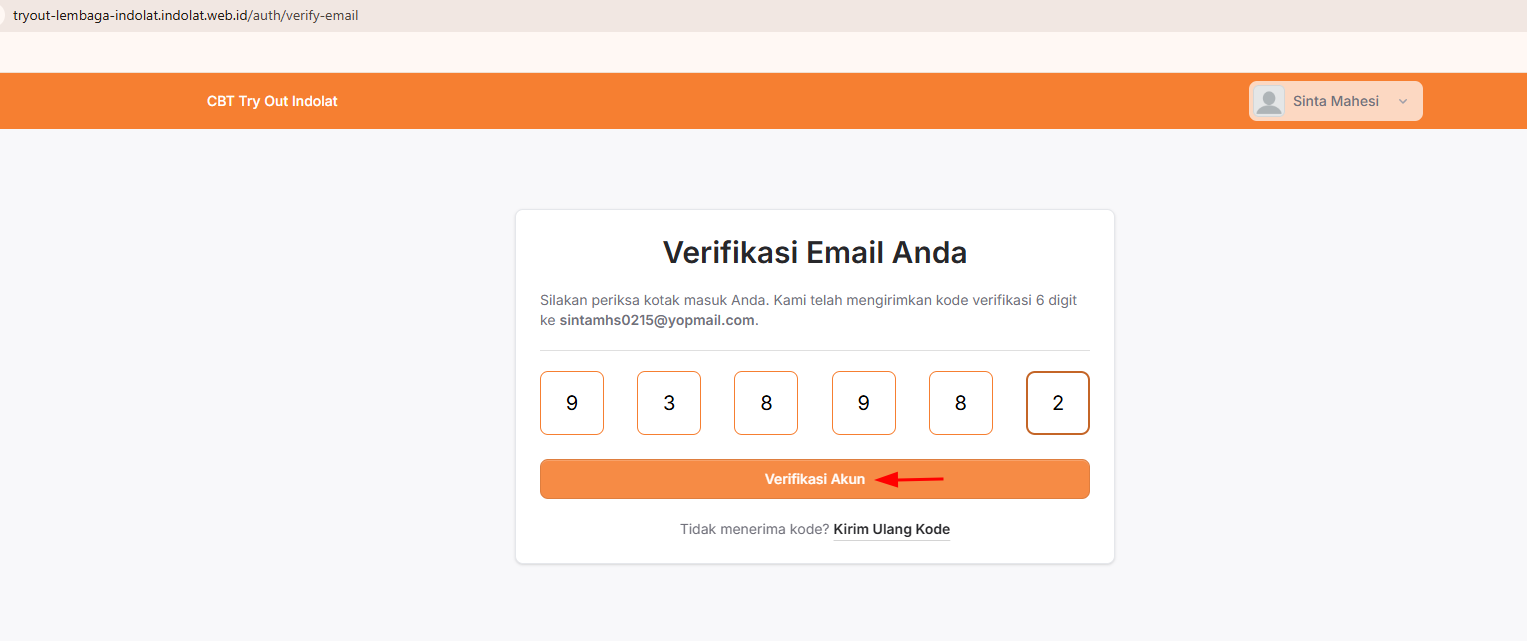
- Enter the code on the verification page.
- Click Verify Account.
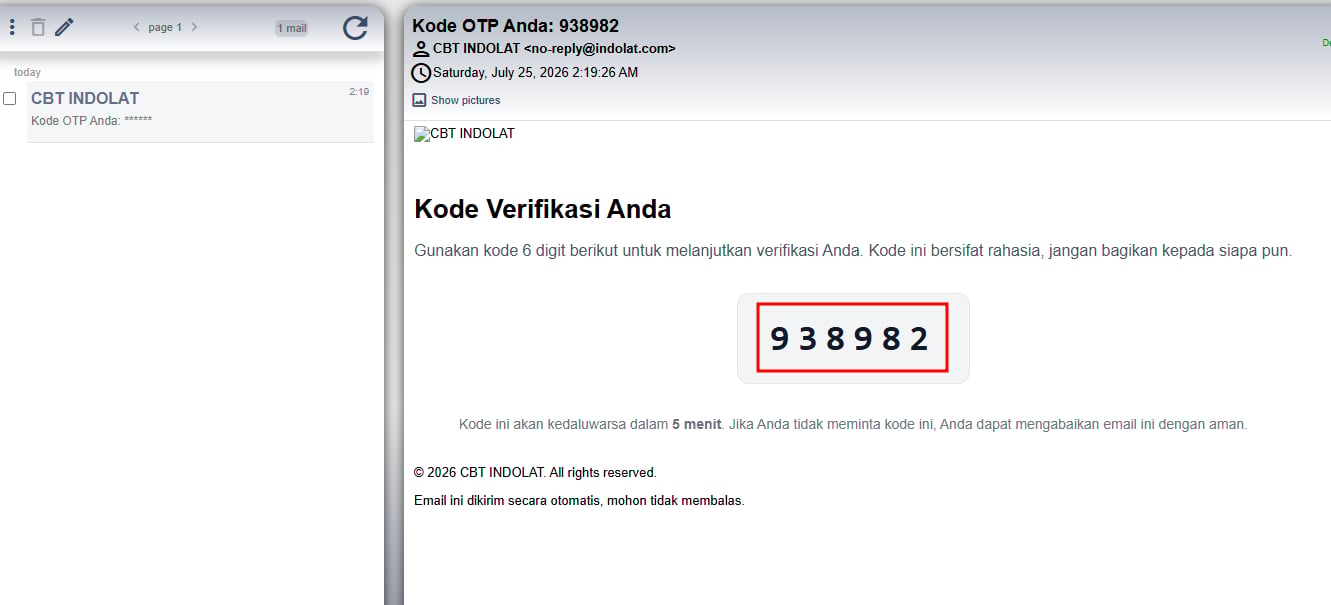
The verification code is only valid for 5 minutes. If the code hasn’t arrived or no longer works, click Resend Code to get a new one.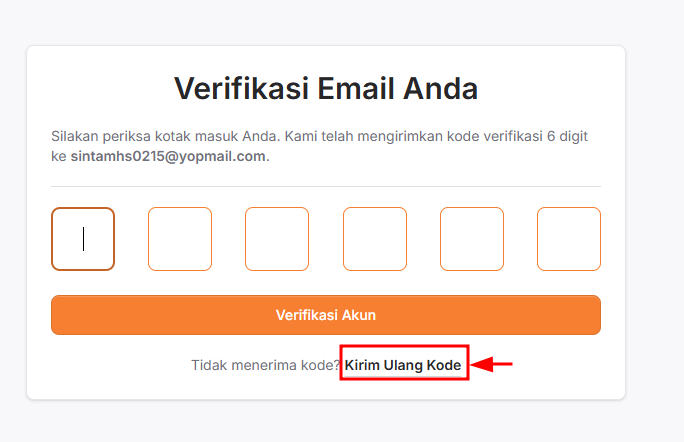
5
Participant reaches the CBT home page
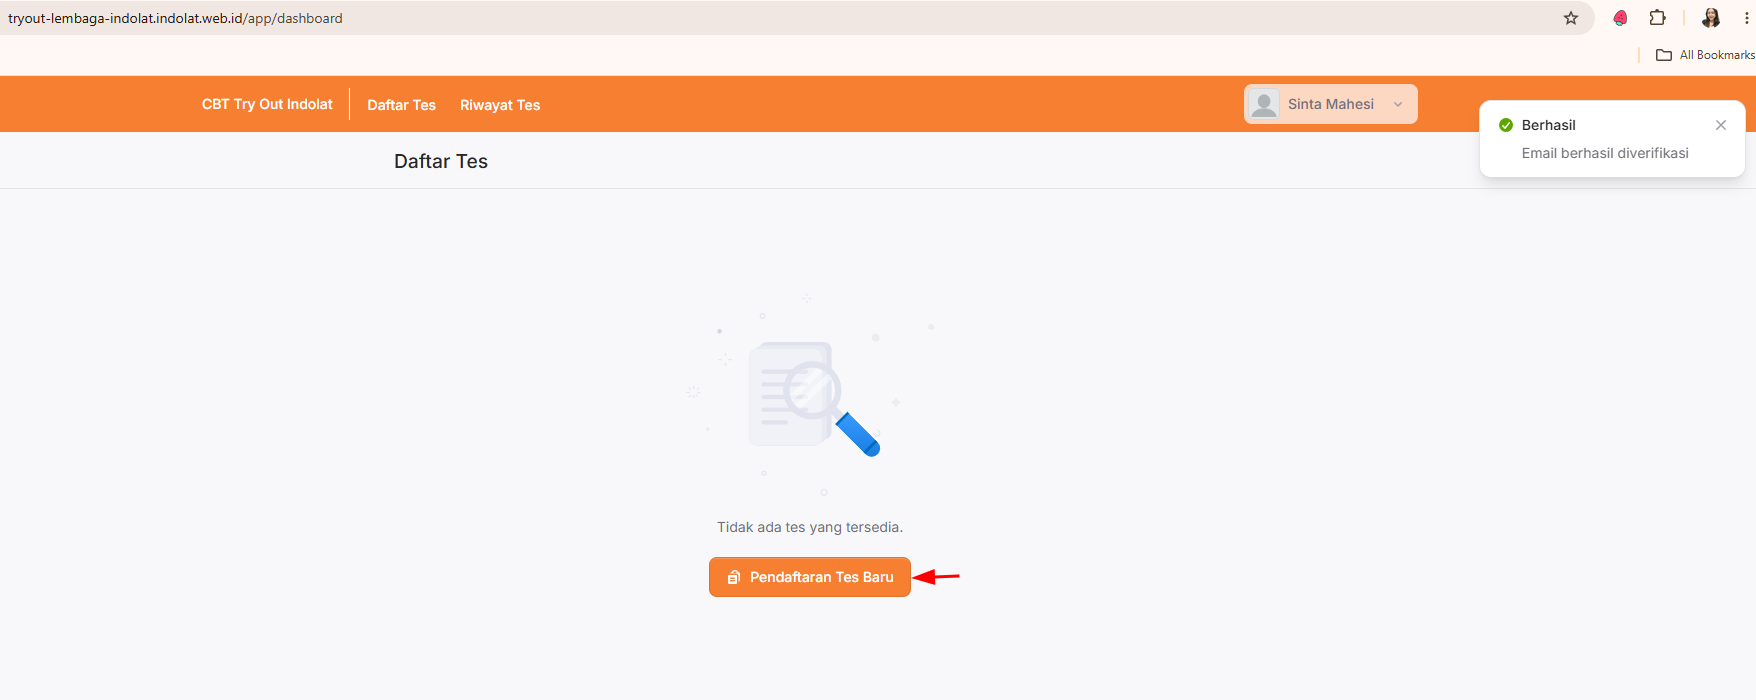
Email verification is only needed for participants who create their own accounts. Accounts added by an admin through Add Account or Import Accounts skip this step.
3. The Admin Adds Participant Accounts by Import
Use this method if you want to prepare participant data first, before deciding which exams they will take. 💡 For example, you have a list of participants from the Surabaya Branch. They will take several different exams later, so you add their data to the Account Data menu first.1
Open Account Data and click Import Accounts
2
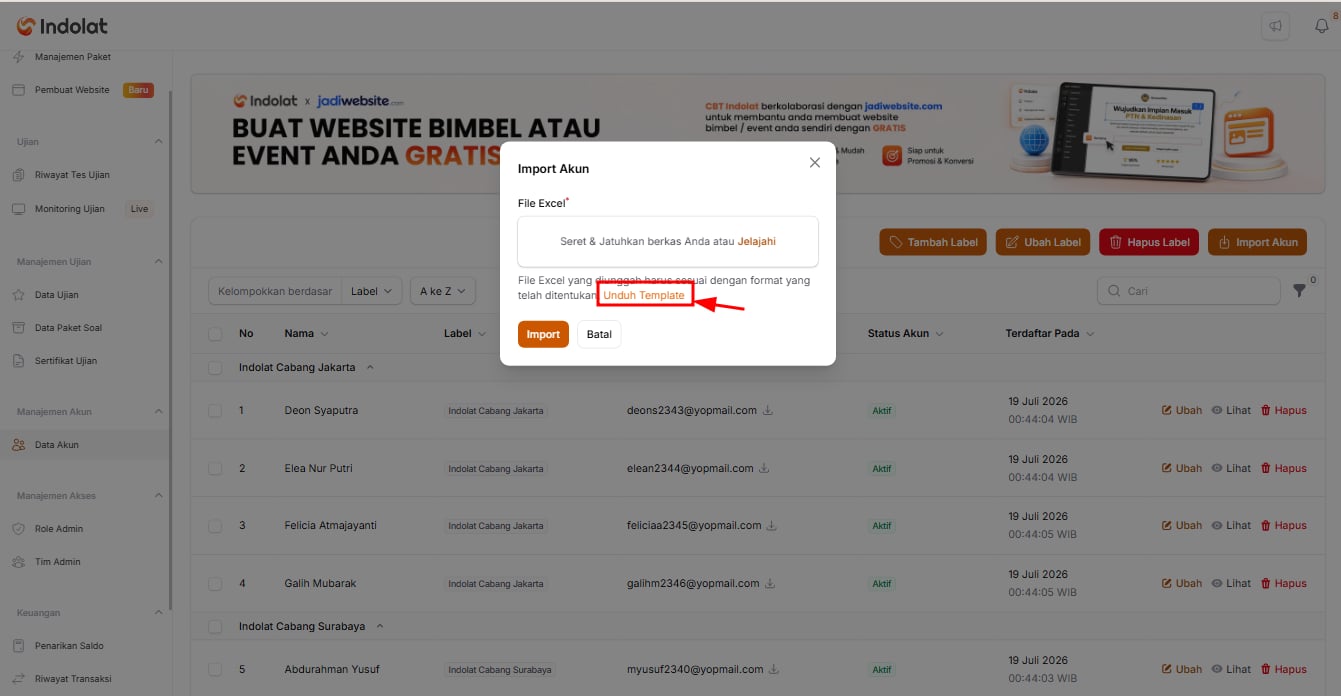
Click Download Template
3
Fill in the participant data in the Excel file
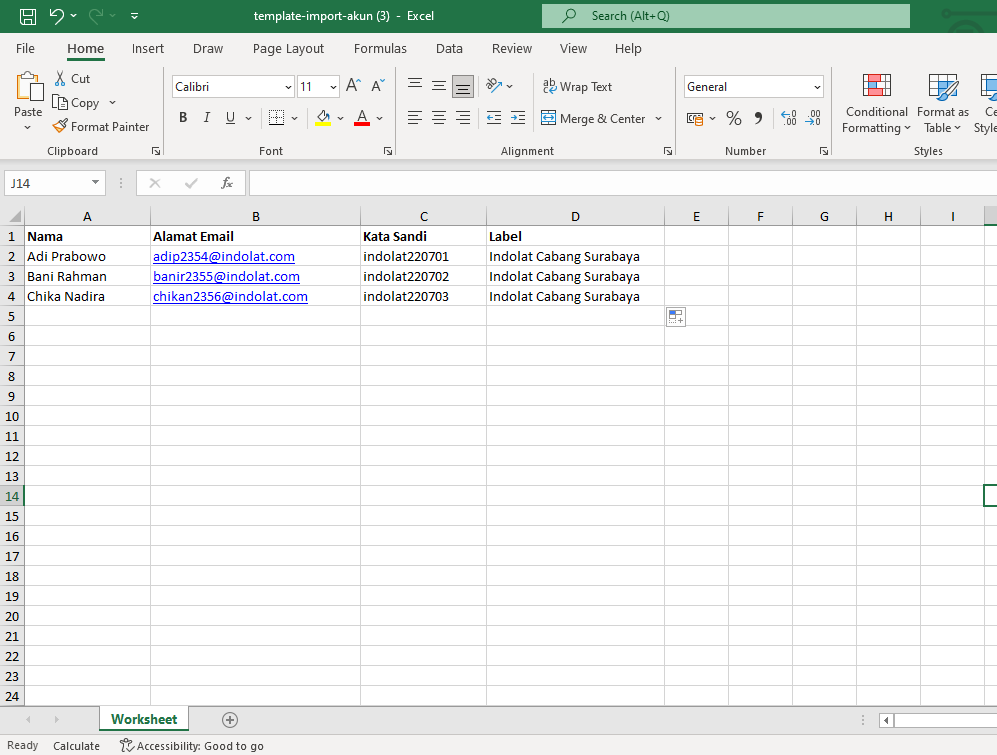
- Name: Enter the name of the participant who will take the exam.
- Email Address: Enter the email address the participant will use to log in.
-
Password: Enter a password for each participant.
About email addressesDuring the import, the system doesn’t check whether an email address is real and active; it only checks that it is written in a valid format. So admins can use email addresses created just for the exam, for example:
peserta001@indolat.compeserta002@indolat.com
-
Label: A marker for grouping participants. You can leave this column empty if you don’t need grouping.
What the Label column is forThe Label column groups participants so they are easier to find and select. Example labels:
- Year 2026
- Grade 12 IPA (science stream)
- Batch 1
- Surabaya Branch
4
Upload the Excel file and click Import